Dream Glasses Cases

Hello everyone!! Do you wear glasses or sunglasses? Well, you are going to love theseĀ  Dream Glasses Cases I created.

I have a million and one pair of glasses for different outfits and my different moods. I’m not sure why -wait, I do know why I love the way they look. Glasses have become such a fashion statement piece that you can’t help but have 2 or more! LOL!

The fabric I used is perfect for this project because it’s colorful and fun.

Let’s take a look at my Dream Glasses Cases:

Glasses Cases: Finish product

You can’t tell me these aren’t cute.

Glasses Cases: Finish product

Fabric Collection:

Dream is a color-packed fabric collection designed by Krisy Lea for Riley Blake Designs. This collection is filled with a full spectrum of colors and features soft, rounded dreamy shapes – rainbow, clouds, hearts, and raindrops!

It is fun and brights any room.

Dream

This collection has 24 colorful prints that you can use to make glasses cases, pillows, pajamas, bags, and more.

Here’s how to create the Dream Glasses Cases:

Materials:

Note: Some of the links below contain affiliate links.

Dream Fabric Collection
Free Glasses Case Pattern/Template
Quilting Ruler
Sewing Machine
Thread
Cutting Mat
Rotary Cutter
Snaps and Setter

Since I used a pattern/template that isn’t mine, I will show you via photo how I created these glasses cases!

Cut your fabric.

Dream Glasses Cases: Cut fabric

Add Interfacing and stitch the bottom.

Glasses Cases: Add Interfacing

Place the two pieces inside of each other.

Glasses Cases: Stitch and Put together

Stitch the top

Glasses Cases: Stitch and Put together

Turn inside out.

Glasses Cases: Turn inside out

Add snaps.

Glasses Cases: Add snaps

Nice and easy. You can make these in no time.

One snap glasses case!

Glasses Cases: Finish product

Flat glasses case!

Glasses Cases: Finish product

Two snap glasses case!

Glasses Cases: Finish product

Glasses Cases: Finish product

Glasses Cases: Finish product

Enjoyable glasses cases!


So what do you think? Fun glasses deserve to have fun glasses cases!!

Are you going to make your own? I would love to see them.

Supplies used:

Dream Bernina 570QE


Thanks for stopping by!

Hexi Pillow Cushion Tutorial

Hello everyone!! Today I have a cute Hexi Pillow Cushion tutorial to share with all of you. The fun part is the fabric! It has Santa Claus on it {smile}!

Yes, Christmas in June! It’s time to get ready for all things Christmas.

Let’s take a look at my Hexi Pillow Cushion:
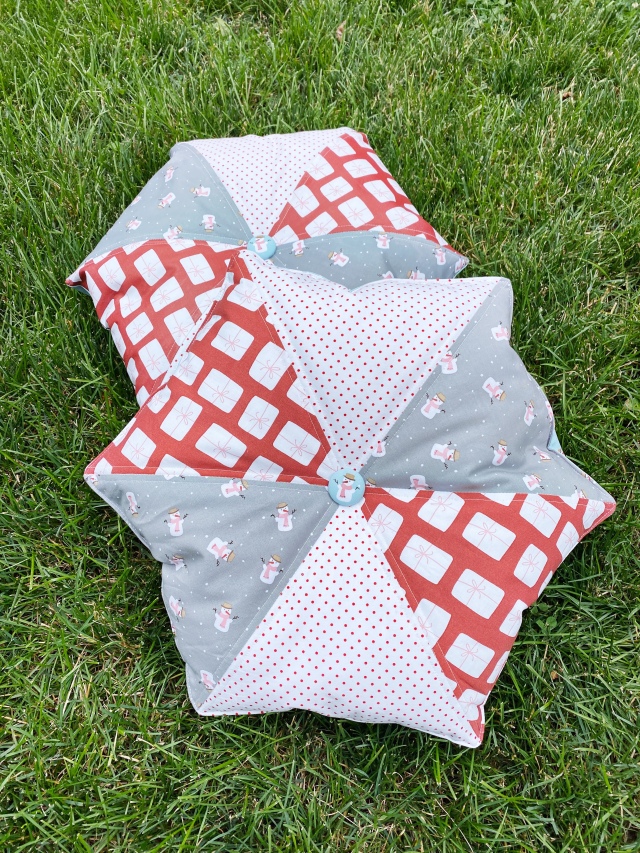
Hexi Pillow Cushion: Finish product

Are you tickled pink like me?Ā  Look at that button. It’s made of fabric too. I had fun making this pillow, but the button is my favorite.

Hexi Pillow Cushion: Finish product

Wait, I have another goody for you. One of these pillows is waterproof and stain-resistant. I created these pillows for my niece when she goes outside. She loves sitting on the front step, and my mother always tells her not to sit on the cold concrete, so I made her a pillow for that purpose.

Hexi Pillow Cushion: finished product

Before I share how I made the pillow waterproof and stain-resistant, let’s learn about this fabric collection.

Fabric Collection:

This fabric collection is called Warm Wishes by Simple Simon and Company for Riley Blake Designs. There are 21 prints full of snowmen, wrapped presents, candy canes, and more. It’s full of love and warmth that you get from family around the holiday.

Warm Wishes Fabric Collection

Here’s how to create the Hexi Pillow Cushion:

Materials

Note: Some of the links below contain affiliate links.

Warm Wishes Fabric
Creative Grid 60 Degree Triangle 8-1/2 in Quilt Ruler
Hobbs Poly-Down Batting
Sewing Machine
Thread
Cutting Mat
Rotary Cutter
HeatnBond Liquid Vinyl
Foam Brush
Dritz Cover Button Kit
Scissors
Poly-Fill Beads
HeatnBond Pressing Paper

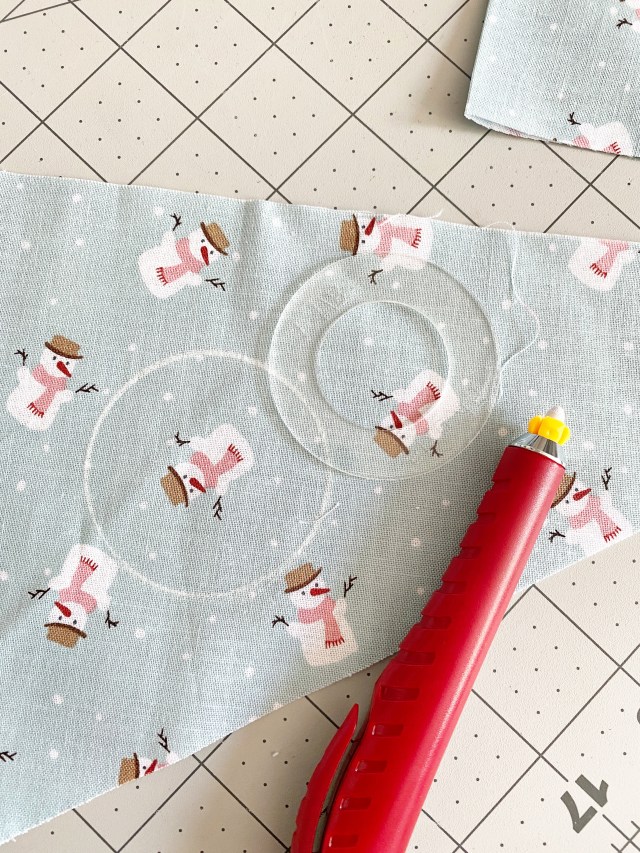
Step One: Cutting fabric

Cut 2 triangles from 3 different fabric prints.

Hexi Pillow Cushion: Cutting the triangles

Step Two: Sew the triangles

Sew the first three triangles together, pressing the seam allowance to the dark fabric.

Repeat with the next three triangles.

Sew the two pieces together.

Step Three: Cut the batting

Place the hexi piece on top of a piece of batting and cut 2inch past the hexi piece on all four sides.

Step Four: Stitching the two pieces together

Stitch in the ditch for every triangle.

Stitch 1/4 inch from the center stitch on both sides.

Hexi Pillow Cushion: stitching the two pieces together

Hexi Pillow Cushion: stitching the two pieces together

Step Five: Trim the excess batting

Trim the excess batting from the entire piece.

Hexi Pillow Cushion: trimming the excess batting

Serge or zig-zag the edge for easy turning.

Hexi Pillow Cushion: trimming the excess batting

Step Six: Cut the back piece

Cut the back piece by laying the front panel on top.

Step 7: Sew the front and back together

With right sides together, sew using a 1/4 inch seam allowance. Leave a 4-inch hole so you can add the poly-fill beads.

Hexi Pillow Cushion: Stitch the front and back together

Step 8: Turn and Fill with Poly-Fill Beads

Turn the fabric inside out and use a point turner to push out the corners.

Hexi Pillow Cushion: HeatNBond Liquid Vinyl

Fill the fabric with the poly-fill beads. Do not fill it up completely because you need to sew the edges and add the button.

Hexi Pillow Cushion: Turn and fill with Poly-Fill Beads

Use your judgment on how much to add.

Step 9: Close the pillow

Stitch the pillow closed by hand or machine depending on the amount of filling you have inside the pillow.

Step 10: Adding the button

Use Dritz Cover Button Kit to make a fabric button.

Hexi Pillow Cushion: Fabric Button Hexi Pillow Cushion: Fabric Button

Thread a long needle, push it in the center of the pillow from the back, and bring it out of the front.

Push the needle through the button notch and then back down the center of the pillow, pulling it from the back.

Hexi Pillow Cushion: Adding a button

Pull the thread tight, tie a knot, and cut the threads, leaving an inch of thread.

Yay, you did it!

Hexi Pillow Cushion: finished product

Do you want to make your pillow waterproof and stain-resistant?

Here are the extra steps:

After step 6, protect your workstation with pressing paper.

Use a foam brush and apply a thin coat of HeatnBond Liquid Vinyl on the front and back pieces.

Hexi Pillow Cushion: Waterproof and Stain Resistant

Let it dry for 30-45 minutes.

Once the pieces dry, cover them with pressing paper and press on medium heat and no steam.

Hexi Pillow Cushion: HeatNBond Liquid Vinyl

Apply a second coat and repeat the steps above.

Once the second coat dries, start back at step 7 till the end.

Now you can sit outside on the concrete or grass with your new pillow.

Supplies used:


Warm Wishes Fabric Collection Bernina 570QE HeatnBond VinylPressing Paper

Altenew Adventures Ahead Stamps/Dies/Stencils/More Collection Release Blog Hop + Giveaway

Hello, and welcome to Altenew Adventures Ahead Blog Hop!! Today we are showcasing a brand new stamp set. If you arrived here from the talented blog, Mindy Eggen,Ā then you are on the right track. If this is your first stop, then you will want to start at the beginning, the Altenew Card Blog.

Let’s take a look at my stamped napkins:

Say Yes Napkins

LOL stamped napkins, who would have thought. I surely did. I picked up these napkins the other day for my family’s upcoming backyard movie night.

I loved the colors; they reminded me of the Caribbean sky, but they are pretty plain, so I decided to jazz them up with this fun sentiment.

Say Yes Napkins

Now that the world is opening back slowly, we are saying yes to new adventures as a family.

Say Yes Napkins

What new adventures are you saying yes to? I would love to hear from you.

What is a blog hop without an amazing gift? Yayyy!!!

Prizes:

$300 in total prizes! To celebrate this release, Altenew is giving away a $50 gift certificate to 2 lucky winners and a $25 gift certificate to 8 winners! Please leave a comment on the Altenew Card Blog and/or each designerā€™s blog post on the blog hop list below by 06/09/2021 for a chance to win.

Altenew will draw 10 random winners from the comments left on each stop of this blog hop and announce the winners on the Altenew Winners Page on 06/11/2021.

Next Stop on this Blog Hop is:

Laura Bassen

You do not want to miss out on her amazing creations!!

Just in case you lose your place along the way, here is the complete list of participants so that you can find your way back:

Altenew Blog

Jennifer McGuire

Terri Koszler

Erum Tasneem

Jenny Colacicco

Norine Borys

Vicky Papaioannou

Jaycee Gaspar

Seeka

Amber Rain Davis

Erin Thompson

Tenia Nelson

Natasha Davies

Bridget Casey

Karen Brown

Laurie Willison

Kelly Griglione

Agnieszka Małyszek

LauraJane

Lilith Eeckels

Maryam Perez

Carol Hintermeier

Therese Calvird

Amanda Baldwin

Verity Biddlecombe

Emily Midgett

Raquel Bowman

Sande Woodson

Nicole Watt

Anna Mahtani

Virginia Lu

Sandhya Iyer

Michelle Short

Victoria Calvin

Nathalie DeSousa

Keren Baker

Reiko Tsuchida

Patricia Roebuck

Mindy Eggen

Kymona Tracey ā†here you go

Laura Bassen

Tania Ahmed

Zinia Redo

Vicki Finger

Joylita Dsouza

Preeti Chandran

Supplies used:

Thank you so much for stopping by. Compensated affiliate links are used at no cost to you. The Altenew products were given to me since I’m on the design team. The other products were personally purchased. This post was not paid or sponsored.

black ink

Thanks for stopping by!