{Clean and Simple} CASology 191 – Washi

Hello everyone!!  It’s CASology Tuesday!!  We are back with another Clean and Simple Cue Card just for you!!

This week’s cue card is:

Week 191 - Washi

Take a look at my card:

Washi (CAS)

I’m so tickled by my card.  I love how the numbers look like they come with the newsprint on them.  Its Washi Tape!! I used Tim Holtz’s Symphony Tissue Tape and Penny Black By The Number Die.

To create this card:

  1. Add 5 strips of washi tape to white cardstock.
  2. Use the die cut to cut the washi cover cardstock.
  3. Adhere the die cut to the cardbase using Tombow Mono Multi Liquid Glue.

Nice and simple!

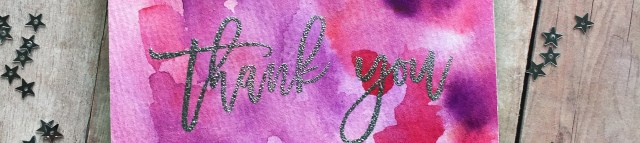
I was having so much fun, that I had to create another card.

Enjoy Washi (CAS)

This time I used some new watercolor washi tape that I picked up from Michaels. I love this tape.  So super pretty. I have to say that I’m super luck to have this set of washi tape.  I hear everyone saying they can’t find these.  I might have to search them out and pick up another for a giveaway, maybe!!

washi

To create this card:

  1. Add two strips of tape on the bottom of my card base.
  2. Use Simon Says Stamp Painted Enjoy Die to cut one word out.
  3. Adhere it right above the washi tape with Tombow Mono Multi Liquid Glue.

Nice and easy clean and simple card!!

What do you think?  I can’t wait to see what you come up with!

For more inspiration, check out my fellow Design Team members blog for more awesome work.

DT Badge

Supplies used: 

Tissue Tape by the numberRecollections Black HeavyweightRecollections White HeavyweightTombow Multi-Purpose Adhesivepainted enjoy

Thank you so much for stopping by!

~Kymona

Wedding Invitations

Hello everyone!!  I’m here to share with you some wedding invitations that I created for my cousins wedding in Jamaica, WI this July!!

I was commissioned to create 105 invitations with little directions.  The colors are blue, coral and white.  That was all I had to go on and i didn’t have a lot time to create them since they needed to go out so that people could make their travel plans.

Take a look at the invites:

Invitation complete

You have the invitation and envelope, reply card and envelope and a ribbon closure.

Check out my journey:

To create the invitation base, I used the envelope punch board to create an envelope but this is no ordinary envelope.

Invitation base

Once these card bases were cut and scored, the actually invite was created digitally and sent to print.

Once they printed, they were cut and adhered inside the blue base with Tombow Stamp Runner Adhesive.

Cut invites

Next up were the envelopes.  105 envelopes were cut using a Stampin’ Trimmer. They were adhered together with Tombow Extreme Adhesive.

envelope

Scoring the cardstock is up next.

envelope 2

The reply cards were created digitally as well.  Printed and sized perfectly.  The envelopes were created for those as well.

Once all of the paper was cut and put together.  The invitations were complete.

Invitation sets

I have to admit, I was given a month and a half to complete these and it was hard work.

105 cut invitation bases cut and scored
105 invitations cut
105 envelops cut and scored
105 reply cards cut
105 reply envelops cut and scored
105 ribbons

That is a lot of paper cut by hand!!

Here is some of the scraps left:

Scrap paper

This is just one table!!

I’m glad they turned out so pretty and that I was able to make my cousins happy!!

What do you think?  Should I go into the invitation business? Let me know below.

Supplies used:

Tombow Xtremeenvelope punch boardStampin' TrimmerRecollections White HeavyweightStamp Runner Dot Adhesive

Thanks for stopping by!

~Kymona

{Clean and Simple} CASology 190 – Weather

Third Post for today
If your looking for RAH post, please click here.
If your looking for the YNS Feature Day post, click here.

Hello everyone!!  It’s CASology Tuesday!!  We are back with another Clean and Simple Cue Card just for you!!

This week’s cue card is:

Week 190 - Weather

Take a look at my card:

Rain all the time (CAS)

I love this little guy in this stamp set.  He looks so sad which is perfect for this cue card, weather. We are now in Spring, so the rain is coming.  Perfect for our flowers but not for me.  I do not like getting wet.

Creating this card was easy:

  1. I die cut the card base using Mama Elephant Femme Frames.
  2. Then I stamped all of my images from Create a Smile Bad Day stamp set using the Mini Misti.
  3. I colored these images with Tombow Recycled Color Pencils.
  4. To create the highlights on the the little fellows belly and the top of the umbrella, I used Tombow Sand Eraser.

Nice and easy clean and simple card!!

What do you think?  I can’t wait to see what you come up with!

For more inspiration, check out my fellow Design Team members blog for more awesome work.

DT Badge

Our Guest Designer this week

Amelia

Our Sponsor this week is Avery Elle!

Supplies used:

FEMME_FRAMES-CC_large create a smile bad day Mini Misti Recycled Color Pencils Tombow Sand Eraser

Thanks for stopping by!

~Kymona

Thank you – RAH

Second Post for today
If your looking for the YNS Feature Day post, click here

Hello everyone!!  Can you believe we are almost at the end of March.  I can’t believe this.  Time is going by so fast!!

I’m here today on the Right At Home (RAH) blog with another super fun blog post as a design team member!!!  I have to say this months release is my favorite by far!!  The Script Greetings stamp set is my favorite of them all. That I hope you are too!

Here’s a sneak peek of my card:

Thank you (RAH)sp

To see the full card and get the full tutorial, please join me over on the Right At Home Blog today!

Thank you so much for stopping by!!

~Kymona

YNS March Feature Day

Hello everyone!!!  I’ here today with another YNS creation to inspire you and a chance to win a stamp set of your choice!!

On the 22nd of every month, YNS Design Team creates more samples featuring YNS products and shares them with all of you!!

The super duper awesome part of it all besides our awesome samples, you could win a stamp set of your choice!!  Now how super cool is that!!

Scroll to the bottom to find out how!!

This month we are focusing on “Think Spring”!!  The DT created projects with Spring on our minds.

Now take a look at the card I created to inspire you:

Creating this card was fun. Yayyy, I was able to create another shaker card this month.   What do you think?  Let me know below.

Now on to that prize!!

DTDare2candy-547x232

All you have to do is leave a comment on the YNS blog by March 24th for a chance to WIN a YNS stamp set of your choice!!  Super simple and easy!!  You will get to see my fellow DT’s projects as well.

So head on over, you don’t want to miss this one!!

Thanks for stopping by!!

Kymona

Canvas Art using a PenBlade

Hello everyone!!  Kymona here with a different sort of project for you today.  As a matter of fact, this whole week I will be show you how to use PenBlades to create different projects!!

Are you ready?

Today I will show you have to create canvas art using a penblade.

penblade 1

Here are the tools you will need:

Penblade 3

  1. A couple of canvases
  2. One PenBlade (sizes 10, 11, 15)
  3. One stencil that will fit inside the canvas.

Here is how I created the canvas art:

I turned the canvas upside down and taped the stencil on the inside of the canvas.

Penblade 5

Then I used the PenBlade to cut out all of the arrows in the pattern. The tip on this blade is the perfect size for this stencil. It fits right into the small spaces.

penblade 4

Once all of the arrows are cut out then I removed the stencil and turn the canvas over to inspected it.

Super easy to do.  The PenBlade glided through the canvas material with ease.

I could help but to make more then one.

Penblade 2

I like the one on the right better.  If you take a close look at the one on  the left, I cut to close to the wood backing.  Once I add a pop of color behind it you will not see the wood backing.

So what do you think?  Would you give this a try? I would love to hear from you.

Wait before I go, the women over at PenBlade, were gracious enough to give us a coupon code to use.  The code is KK20

I hope everyone will take advantage of this code.

Thank you so much for stopping by!

~Kymona

Ink Blending Tool vs. Clarity Brushes

Hello everyone!!  I here with a post that is quite different then my other card post.

On Instagram, I love giving my opinion on the different tools that I own and use.  So, that way my followers would be more informed about the products they see and want but aren’t sure if they should step out on that limb.

So this morning, I posted this picture:

ink blending 2

I was simply sharing an upcoming project that isn’t due to release until April 1st.

Then a good friend of mines asked me to do a comparison between these Ink Blending Tools and the new Clarity Brushes.

I agree to do it so here you go:

Comparison

Here are my finding:

Round Blending Tool:

  1. Blends the colors well with good pressure.
  2. To keep from having harsh lines, you have to tap off first or start adding color off of the paper.
  3. Snags on the stencils that are intricate.
  4. Easy and small enough to hold.
  5. You can use one tool with different sponge (extra cost).
  6. The cost of the blending tool is $8.17 and it comes with two handles and four sponges.
  7. The additional sponges are $8.36.
  8. When blending, the color didn’t transfer into the sponge.
  9. Due to the shape of the blending tool, you have to mask off areas you don’t want color to appear.

Clarity Brushes:

  1. Blends the colors well with little pressure.
  2. No need to tap off or start adding color off the paper, the brushes doesn’t create harsh lines.
  3. Does not snag on the stencils that are intricate.
  4. Easy to hold, but brushes are tall.
  5. They come in four different sizes.
  6. You can use one brush for each color family (no additional cost).
  7. The cost of the brushes are $25.00 for four.
  8. When blending, the color didn’t transfer onto the brush.
  9. The tip of the brush is small enough for you to add and blend colors where you want them without masking off.

Note: Take a look at the outer circles of both cards. The blending tool added color to the outer circle on the card to the left because I didn’t mask off. The clarity brush didn’t add color to the outer circles because I have control over where the color goes due to the tip!

I like them both, but the brushes are easier to use with less elbow grease. I have two sets one for each color family. No need to buy anything extra.

So what do you think? I hope this comparison was helpful to all of you.  If you wanted to see what some to my Instagram followers were saying you can check it here.

Supplies:

Clarity Brushes Blending tool

Thanks for stopping by!!

~Kymona

YNS Sketch and Color Challenge #35

I’m here today with Your Next Stamp (YNS) and the Sketch and Color Challenge #35!!

Each challenge has a sketch and a color combo to choose from.

Take a look at the color combo:

YNScolor-35

Take a look at the sketch:

YNSSketch35

Take a look at my card:

Congrats (YNS)

YNS Supplies: Whatnot Sentiments Set Five, Give Thanks for Sparkle Gumdrops

Other Supplies: Prima Watercolor Paper Pad, Prima Confection Tropical Watercolors, Recollection Heavyweight Cardstock, Hero Arts Ultra Fine White Embossing Powder

What do you think?  Did I follow the color photos? Let me know below.

So are you ready for the new challenge?

You have until March 31st, 2016 at midnight EST to play along and submit your project on the YNS Blog post.  One random participant will win a $15 gift certificate to the Your Next Stamp Store.  If YNS stamps or dies are the focal point then the winner receives and additional $5 gift certificate f0r a total of $20.  The winner will be announced on the YNS Blog the Sunday after the challenge closes.

I hope to see your projects!!

Supplies listed above!

Thank you so much for stopping by!

~Kymona

Kids Crafty Keepsake Box

Hello everyone!!  I was up on Walnut Hollow’s blog yesterday, showcasing this really cute one stop shop crafty box for my daughter and her traveling needs.

I was super excited to have been given this opportunity to represent their products.

Take a look at what I created:

Kids Crafty Keepsake Box

Cool, right!!  Stop on my Walnut Hollow’s blog for the full photo tutorial!!!  I didn’t leave a step out.

My daughter loves her box!! I hope you will too!!

Thanks for stopping by!

~Kymona