{Clean and Simple} CASology – Crunch

Hello everyone!!!  It’s CASology Tuesday!!  We are back with another Clean and Simple Cue Card just for you!!

This week’s cue card:

week-238-crunch

Take a look at my card:

opps-im-late

I love how this clock looks.  He makes me laugh.  This stamp set is Create A Smile Time Flies.  I had this stamp set for quite some time now and haven’t used it until today.  Super cute!

To create this card, I stamped the different pieces of the stamp set first- that was 4 different stamps using Clearsnap Archival Black Ink onto Strathmore Bristol Smooth cardstock.  Then I used Tombow Recycled Color Pencils to color in the image.  After that I stamped the sentiment from the same stamp set using Clearsnap Archival Black Ink. After that I added small black ink splatters using Distress Ink Black Soot, for character.

Nice and Easy.

What do you think?

Are you inspired to play along?  Please let me know below!

For more inspiration, check out my fellow Design Team members blog for more awesome work.

Deidre Payne

Hannelie Bester

Hazel Hodgkins

Jacquie Southas

Janet Ribet

Jen Wills

Joyce Mehrberg

Judy Marino

Kymona Tracey

Melissa Chipperfield

Rachel Bergfeld

Sherrie Mannion

Guest Designer

Amy

Our sponsor this week is Lawn Fawn!

Supplies used:

time-flies     Recycled Color Pencils

(Affiliate links used at no additional cost to you.  Thanks!)

Thank you so much for stopping by!

name-tag

How to Create an Elvis Retro Posh Bracelet

Hello everyone!!  I’m up on the Craft Fantastic Blog today sharing how I created an Elvis Retro Posh Bracelet for a coworker!!

craft-fantastic-logo

Take a look at the Elvis Retro Posh Bracelet:

elvis-bracelet-cf

For the full tutorial on how I created this Elvis Retro Posh Bracelet, please head on over to the Craft Fantastic blog!!  I would love to hear from you!!

Thanks for stopping by!

name-tag

Did You Hear the News Shaker Card

Hello everyone!!  Did you hear the news?  I’m guest designing for Gerda Steiner Design this month!!  I’m super excited!!

I’m up on their blog showing you how I used the What’s New stamp set to make this cute shaker card:

did-you-hear

Stop on by Gerda Steiner Design blog to see the full card and tutorial.

Please let me know what you think.  I would love to hear from you.

Thanks for stopping by!

name-tag

Clean and Simple Ways To Use Rinea Foil Paper!

Hello everyone!! I’m super excited to be here!  I’m guest designing for Rinea today. I’m going to show you three clean and simple ways to use Rinea foil paper!

Lets get started!

Take a look at card number one:

Using Rinea Foil Paper as the Focal Point!

hello-foil

Using Rinea foil paper as the focal point creates a clean and simple card!

To create this card:

  1. Cut the card base to 6.25 by 7.50 scored at 3.75.
  2. Using die cutting machine, run the Rinea foil paper with The Ton Stamps Brushed Hello Coordinating Die, through the machine. Once with the Rinea silver foil paper and once with the Rinea blue foil paper.
  3. Adhere the silver sentiment first using Tombow Mono Liquid Glue. Then adhere the Rinea blue foil sentiment die cut on top of the silver, in an offset manner.  Offsetting the sentiment, creates dimension.
  4. Using a corner rounder, round all of the corners.

Nice and easy!  What do you think?  Pretty simple right!!

Take a look at card number two:

Using Rinea Foil Paper to Balance Out the Card Design!

many-thanks

Using Rinea foil paper with paints keeps the card design balanced!

To create this card:

  1. Cut you card base to 4.25 by 11 scored at 5.50.
  2. Then prepare your card stock for paint.  Add tape at the score line to prevent paint from touching the backside of the card. adding-paint
  3. Use an old gift card and pull the paint down the card stock.  After each swipe, wipe the gift card off. Then repeat the process until all of the paint dots are smeared.
  4. Using a die cutting machine, die cut My Favorite Things Many Thanks Die using the Rinea silver foil. 
  5. Adhere the Rinea foiled die cuts to the card front using Tombow Mono Liquid Glue.

Pretty easy! An easy introduction to mixed media! Another fun way to use Rinea foil paper! What do you think?

Take a look at project number three:

Using Rinea Foil Paper for the entire Project!

foiled-easter-baskets

Using Rinea foil paper as the project, takes foil paper to the next level!

To create these baskets:

  1. Using a die cutting machine, cut the Rinea blue and silver foil using Mama Elephant Cute Basket die cut and cut out all of the pieces with the Rinea foil paper.
  2. Assemble the basket according to the instruction that comes with the die.
  3. Change up the basket colors by mix and matching the different color Rinea oils.close-up-of-basket
  4. Once the baskets are together, add the cripple paper and eggs!

Lets look at those baskets again:

foiled-basket-2

I love how the Rinea foil looks.  So pretty and different then regular cardstock.  Rinea foil paper folds and rips just like paper but it is much prettier.  Its a bit lighter then cardstock but heavy enough to create these baskets and hold these eggs without fear of ripping.

Easy and requires a bit more assembling but it’s worth it.

So what do think?  Will you give Rinea foil paper a try?  I think you should.  The possibilities are endless. Please let me know what you think.  I would love to hear from you.

Supplies used:

rinea-embossed-foil hello-co-diemft970_thanks_webpreview_1_grandetombow-mono-liquid-glue-big Sizzix - Big Shot Machine - White and Grayali_acrylic_paint_bundle__2_original

(Affiliate links used at no additional cost to you.  Thanks!)

Thank you so much for stopping by!

name-tag

{Clean and Simple} CASology – Score

Hello everyone!!!  It’s CASology Tuesday!!  We are back with another Clean and Simple Cue Card just for you!!

This week’s cue card:

week-237-score

Take a look at my card:

so-lucky-to-have-you-cas

For this week’s cue card I used Neat and Tangled So Lucky stamp set.  I figured I would get a jump start on St. Patrick’s Day, LOL!!

When I thought about the cue card, I thought about score lines.  I remember having some already scored card stock that I prepped for a different project.  Why not use one of those for this challenge.  I used Papertrey Ink Sunshine Impressions Plate to score the card front.

Then I thought which stamp set would look good over the scored lines and the big bold sentiment from Neat and Tangled came to mind. In order to use this stamp set, I knew I needed to add some color before I stamped the sentiment.

I used Gansail Tambi 36 Color Set to add the pretty watercolor green to card front. I heat set the watercolor.

Then, I used the Mini Misti to stamp the sentiment.  It made it so much easier to stamp the sentiment a couple of times using Stazon Jet Black Ink.

I love how the score lines show through the sentiment.  You have score lines on the actual card front and score lines in the sentiment that were not originally there.

Super doper easy!!

What do you think?

Are you inspired to play along?  Please let me know below!

For more inspiration, check out my fellow Design Team members blog for more awesome work.

Deidre Payne

Hannelie Bester

Hazel Hodgkins

Jacquie Southas

Janet Ribet

Jen Wills

Joyce Mehrberg

Judy Marino

Kymona Tracey

Melissa Chipperfield

Rachel Bergfeld

Sherrie Mannion

Our sponsor this week is STAMPlorations!

Supplies used:

neat-and-tangled-so-lucky pti Sunshine impressions dieMini MISTI - Most Incredible Stamp Tool Invented

(Affiliate links used at no additional cost to you.  Thanks!)

Thank you so much for stopping by!

name-tag


Kreative Kymona Approved Plus Podcast Feature

Second Post for today
If your looking for Happy Surprise Birthday Suzanne Blog Hop, click here

Hello everyone!!  I’m so excited to be here today!!  I am launching my new Kreative Kymona Approved Program today!!

logox2

You can find all of the information on the new Kreative Kymona Approved page right here or at the top of this page.

I’m so excited about this new venture in my crafty journey! I love helping all of you figure out what products are a must have and why!! Stop on by and see what this program is all about.

Also, I’m being featured on So Suzy Podcast today!!  Yes, she interviewed me while we were at Creativation this year.  I am tickled pink with delight.  You can hear my interview here on this page or here on Suzy’s page.

mihm-kymona-tracey

You will hear my journey from card making hobbiest, to Design Team Member, DT Coordinator to my new dream of becoming an industry influencer!!

Totally amazing!! You will also hear what some of my Creativation favorites!!

I can’t wait to hear what you think about all of the new things I’m involved in!!  Please let me know below.

Thank you so much for stopping by!

name-tag

Happy Surprise Birthday Suzanne Blog Hop

sosuzybh

Hello everyone!!  I’m tickled pink to be here today!!  Do you want to know why?  Today is Suzanne’s Birthday!!! Who is Suzanne?  What???  She is Suzy from So Suzy Stamps!!!

For the past three years, Suzy has been an amazing friend to me!! I truly appreciate her and all of the lessons she has taught me.

A couple of her crafting friends have gotten together to throw her a birthday blog hop!! Along with the super cute birthday cards you will see, we also have a giveaway for you!

If you are arriving from Justine’s blog you are on the right track.  If you arrived by yourself, please head on over to Justine’s blog, which is the beginning of the hop, so that you don’t miss a thing!!

Now let look at the card I created:

guess-what-suzy-blog-hop

Check out the inside:

inside-suzy-card-suzy

I created a super clean and simple card for Suzy!!  The cardstock is cut to 4.5 x 7.5, scored at 4.5.  I stamped the Butterfly Music stamp using Clearsnap Colorbox Wicked Black Archival Ink.  Then I stamped the Guess What sentiment (retired) using the same ink.  On the inside of the card I stamped the sentiment bomdiggityshizzit and Happy Birthday (retired).  To finish the card off, I added a small pop of color to the butterfly using Tombow Irojiten Vivid Color Pencils.

Super cute!!  I hope Suzy loves this card that I created for her.

So what do you think? Will she like the card?

What is a blog hop without a giveaway!!

Here’s the giveaway info:

Prizes are:

1. $20 So Suzy Gift Certificate from justinehovey.com
2. Bunkie Bag from Simply Charming Everyday
3. Original MISIT from My Sweet Petunia

A lucky winner who leaves a comment on each of the blogs for a chance to win by February 21, 2017 by 11:59pm.  The winners will be chosen at random and announced on February 22nd, 2017.

Now on to the wonderful and talented Josefine Fouarge to see what she created for Suzy!

Here’s the complete list of party participants:

Justine Hovey

Kymona Tracey ← you are here

Josefine Fouarge

Jennifer Loftfield

Martha Lucia Gomez

Effie Cho

Iliana Myska

Steph Ackerman

Giada Rigamonti

Cornelia Wenokor

Henriette van Mierlo

Terri Burson

Olesya Kharkova

Monica Taylor

Janis Ford

Ceal Pritchett

Lydia Fiedler

Supplies used:

butterfly-music bomdiggityTombow Irojiten Vivid Coloring Set

Thank you so much for stopping by!!

name-tag

Tombow is having a President’s Day Sale

Hello everyone!!  I’m popping in here to let all of you know, if you don’t know already, Tombow is having a President’s Day Sale!!  Yes, they are offering 25% off everything in their store!!

tombow-saleThat is amazing right, let me tell you why!!

Recycled Color Pencils

Fudenosuke soft Fudenosuke Hard

Tombow Permanent Adhesive Plus


  • The glue that I love is on sale!

Tombow Multi-Purpose Adhesive

Stop on by and check them out!!  You can stock up on all of these personal goodies or other goodies that you love!

Thanks for stopping by and happy shopping!!

name-tag

(Affiliate links used at no additional cost to you.  Thanks!)

Did You Know Series – ETC Papers

Hello everyone!!  I’m so excited to be here today!!  I have some great news for all of you.

I have this series on Instagram called the “Did You Know Series”!  Its a series where I introduce my followers to new products that they may or may not know about.  I give them all of the information about the product, show them what they can do with the product and let them know where to find it.

I decided that I wanted to bring the series to my blog for those of you who aren’t on Instagram!!  Yayyyy!!

This is my first Did You Know Series for 2017 and I’m introducing ETC Papers!

ETC Papers is your source for speciality papers and other good stuff.  The speciality paper is actual Wood Paper! Yes, real wood!

Large sheets are carefully extracted from nature’s canvas, pressed into thin sheets and backed with an adhesive backing.  Then they are cut and packaged into fine products that you can use to create amazing products with!!

Take a look:

wood-papers

This wood paper is so pretty!!  Here are the names of the different wood papers above:

  1. White Birch Wood with Adhesive Backing
  2. Cherry Wood with Adhesive Backing
  3. White Rustic Birch Wood with Adhesive Backing
  4. Rustic Cherry Wood with Adhesive Backing

What can you do with this paper?

  • You can emboss this paper!! 

wood-embossed

Check out all of that detail! The texture is amazing too!  When you rub your hand over each  butterflies, it makes you smile!

  • You can stamp on it!

wood-card-cas

It takes the ink so well! Nice and crisp!

  • You can die cut and punch holes! 

wood-tag-with-white-backing

Die cutting this wood paper is as easy as die cutting regular card stock.
The hole was nice and clean after the punch.  The eyelet and washer didn’t ripe the backing.

  • You can color on it!

wood-tag-with-black-backing

The color pencils went on so easy!  I was able to blend on the wood with no problem.

  • The wood takes the color of the backing!

both-tags-cas

kt-wood-paper-backing

The tag on the left has a black card stock backing and the tag on the right only has the adhesive back paper.  You can see the difference in the darkness and lightness of the tags.

  • You can letterpress the wood also!!

letterpressing

The wood paper didn’t break or separate when it when through the big shot with this letterpress plate.  It took on the ink with no problem and the ink did not bleed through.

  • It has an adhesive backing!

showing-the-backing

The adhesive backing is the highlight of this paper.  It makes it so easy to add the wood panel to the front of a card stock base.  It comes off with no tugging.

removing-the-backing

I folded the backing so that I could add the wood panel to the card stock without worrying if the panel is on straight. I lined the edges up and simple pulled the backing off to create a perfect wood card front.

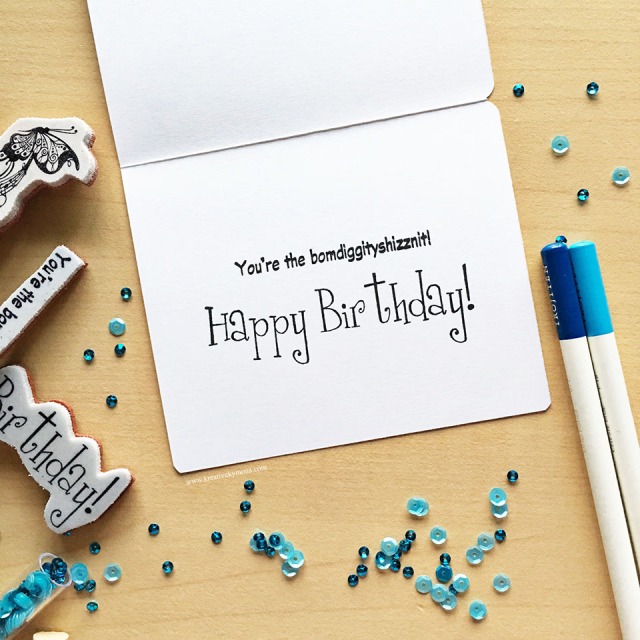
  • Here’s the finished card!

adding-ink-to-wood

Here are some other things you need to know when working with this wood paper:

  • You can cut it with your trimmer or scissors.
  • They come in different sizes; 8.5 x 11, 6 x 12, 12 x 12, 12 x 24
  • They have wood envelopes and wood tape.
  • The price per sheet is reasonable.

I had fun working with this paper and I recommend that you give it a try.  It’s a nice addition to your cardstock stash.  The recipient would be surprised to get a gift made with wood paper!!

Where can you buy this paper?

On the ETC Papers website!! You might also see them at Jo-Anns as the previous brand, ARC Papers.

So what do you think?  Let me know below!!

Thank you so much for stopping by!

name-tag


Did You Hear The News?

Second Post for the day
If your looking for the Rubber Dance Stamps post, click here

Hello everyone!!  Did you hear the news?  I’m guest designing for Gerda Steiner Design this month!!  I’m super excited!!

I’m up on their blog showing you how I used the What’s New stamp set.

Here’s a sneak peek:

whats-new-2

Stop on by Gerda Steiner Design blog to see the full card and tutorial.

Please let me know what you think.  I would love to hear from you.

Thanks for stopping by!

~Kymona