Design Team Challenge Blog Hop

Hello everyone!!  Happy Leap Year!!  Are you excited about the extra day of the year.

Do you know what a leap year is?

A leap year, where an extra day is added to the end of February every four years, is down to the solar system’s disparity with the Gregorian calendar.  

I just learned that watching a TV show.  All I knew was we had an extra day every four years in February.  LOL!!

SSS DT

Well to your luck, the So Suzy Stamps Design Team is taking advantage of this day and having a fun Blog Hop. If you arrived from So Suzy Stamps blog, your on the right track.  If you arrived here on your own, you will want to go back to the beginning as to not miss a thing!!

I’ve added a full list down below just in case you get lost!

The projects made for this hop are a big secret between the design team.  Now of us know what stamps we are working with.  Super fun.  So the big reveal is for everyone.

I was sent two sentiment stamps!  I think these stamps were chosen for me because in April I turn the BIG 40!!!

Take a look at my first card:

IMG_8936


I’m excited about turning 40!  Its a big year for me and I plan on doing big things.  When I think of 40 I definitely think of Sexy!  Not just in body shape but in my mind as well.  I’ve grown so much and I’ve learned so much in the last 39 years that I am ready to hit the ground running.

Take a look at my second card:

IMG_8955


Did you know that watercoloring can be sexy too!  LOL!!  When you add the silver foil corset on top, boy o’ boy!!

watercoloring

Here’s a closer look:

IMG_8956

Foiling has become one of my favorite crafting thing to do. I love how it turns out each and every time.

The company that made this corset die went out of business a last year so this die isn’t available any more.

So what do you think?  Are you ready to be sexy at what ever age your going to be this year?

I would love to hear from you on what you think?

Now what is a blog hop without a prize!!

Here are the details:

This Blog Hop goes from today, February 29th through March 3rd.  The winner will be announced on March 6th.

Here is what the winner will win:

One of our (the design team) cards from everyone, that’s 10 fabulous cards.  How awesome is that!!

All you have to do is hop along leaving a comment on everyone’s blog as you go along.  Yup, that’s it. Make sure you finish commenting by the 3rd of March.

Now your off to Terri’s blog!!  Its sure to please.

So are you ready?  Have fun!!

Here is the list of all the participants:

So Suzy Stamps
Kymona ←your here
Terri
Jennifer
Christine
Justine
Shannon
Monica
Janis
Martha
Chris

Supplies used:

Recollections White HeavyweightTop Dog Die Corset DieTop Dog Dies Corset Background Diesilver foiltoner sheets adhesivePrima Watercolor paper 6x6.jpg Happy Birthday 40 the new sexy Prima Watercolor Confection

Thanks for stopping by!!

~Kymona

 

CASology 186 – Distress

Third Post for today
If your looking for the So Suzy Stamp post, click here
If your looking for the Right At Home post, click here

Hello everyone!!  It’s CASology Tuesday!!  We are back with another Cue Card just for you!!

This week’s cue card is:

Week 186 - Distress

I was wondering what do I do with this cue card.  When I think of distress, I think of ink and blending.  How can I make a CAS card with different inks blending together? Nothing was coming to me that would be simple and WOW at the same time.

Then I remember I received a Tombow Mono Correction Tape and saw a super fun technique using this non-crafty tool.

Check out my card:

Distress banner (CAS)

Do you see my distress banner?  LOL!!  I created that with correction tape!!

Here’s how:

Stamping images (CAS)

I used the Mini Misti to stamp the flower image from Lawn Fawn Happy Easter Stamp Set.

adding correction tape (CAS)

Then I used the Tombow Mono Correction Tape Retro to create a distress box that my sentiment will go.

Once the correction tape was down, I used my finger to pick up some of the tape on the edges, so that it looks distress.

I used the Mini Misti and My Favorite Things Hybrid Ink to stamp the sentiment on the correction tape.

After that I, I used a Copic Mulitliner to draw a line around the distressed box.

Finished (CAS)

To finish the card off, I used Tombow Irojiten Colored Pencils Dictionary, Rainforest Pale Tones to color my tulips.

Very non-conventional, but I love it!! I hope you give this method a try!!

What do you think?  I can’t wait to see what you come up with!

For more inspiration, check out my fellow Design Team members blog for more awesome work.

DT Badge

Our Guest Designer this week:

Annie

Our Sponsor this week is Lawn Fawn.

Supplies used:

Happy Easter Mini Misti tombow correction tapetombow irojten color pencils MFT Hybrid Black Ink Tombow Xtreme

Thanks for stopping by!!

~Kymona

So Suzy Stamp Happy Mail Gift Box

Second Post for today
If your looking for the Right At Home post, click here

Hello everyone!!  I’m up on So Suzy’s blog today sharing a gift box with you.

Here is a sneak peek of that card:

Happy Mail (SSS)

For the full reveal of this box and tutorial, please stop on by So Suzy Stamps Blog, to see how I created this box!

Thank you so much for stopping by.

~Kymona

Bloom – RAH

Hello everyone!! I’m here today on the Right At Home (RAH) blog sharing another project from the February release.   I love the

Here’s a sneak peek of my card:

Bloom 1(RAH)

To see the completed card and the process in which this card was create, please stop on by Nicole’s blog Right At Home!

I hope to see you there!

Thank you for stopping by!

~Kymona

YNS February Feature Day

Hello everyone!!!  I’ here today with another YNS creation to inspire you and a chance to win a stamp set of your choice!!

On the 22nd of every month, YNS Design Team creates more samples featuring YNS products and shares them with all of you!!

The super duper awesome part of it all besides our awesome samples, you could win a stamp set of your choice!!  Now how super cool is that!!

Scroll to the bottom to find out how!!

This month we are focusing on “Coffee – Tea You and Me”!!  The DT created projects with a coffee, tea or friendship theme.

Now take a look at the card I created to inspire you:

IMG_8748

YNS Supplies: Coffee…Right Meow!, Circles Die Set, Stitching Marks Die Set, Crystal Clear Gumdrops

Other Supplies: My Favorite Things Hybrid Ink, Recollection Heavyweight Cardstock, Neenah Desert Storm Cardstock, V’s Sweet Idea Chocolate Sequin, 3M Foam Tape, We R Memory Keepers Fuse Tool

Creating this card was fun. I haven’t made a shaker card in awhile.  What do you think?  Let me know below.

Now on to that prize!!

DTDare2candy-547x232

All you have to do is leave a comment on the YNS blog by February 24th for a chance to WIN a YNS stamp set of your choice!!  Super simple and easy!!  You will get to see my fellow DT’s projects as well.

So head on over, you don’t want to miss this one!!

Thanks for stopping by!!

Kymona

Adding Foil To A Watercolor Panel

Hello everyone!!  I’m here today because I’ve received a couple of questions regarding the cards I made early today with my foiled handwriting.

So I recreated a watercolor panel and used a stencil to show how I use the pen.

Check out this process:

Foiling 8

I’m using Prima Watercolor Confections Tropicals, Archers Watercolor Paper, some water, paintbrushes and clean water.

Foiling 1

I added some clean water to the watercolor panel then I added the colors to the water. I watched the colors move on the paper.

Foiling 2

Then I heat set the paint.  I would let it dry by itself but for the sake of this tutorial I sped the drying process.

Foiling 3

After that I added more color since the colors muted some during the drying process. I heat set it again.

Foiling 4

Once the panel was dry, I took a Simon Stamp Stencil Raindrops Stencil to show how you add the foil using the Thermoweb Deco Foil Adhesive Pen.  I applied the adhesive to each of the tear drops.

Foiling 5

Once I added all of the adheasive, I cut a piece of Thermoweb Deco Foil Champagne to the watercolor panel.  Then I placed it on my new Sizzix Big Shot Plus and rolled it through.

The pressure of the rollers seals the foil onto the adheasive.

Foiling 6

Look at that pretty foil tear drops on that watercolor panel.  It’s so pretty in person. Now I have to figure what I’m going to do with this panel!!  Future card front.

I hope this tutorial has helped you understand how to use the new Deco Foil Pen.

One more thing, the pen does pick up some of the watercolor when you rub it on the card panel.

Foiling 7

I just rubbed it off on a piece of scrap paper and its fine.

What do you think?

Supplies used:

Prima Watercolor Confection Archers WC Deco Foil ChampangeDeco Foil PenBig Shot Plus Simon Says Stamp Raindrop

Thank you so much for stopping by!

~Kymona

Happy Birthday So Suzy Blog Hop

SSSBlogHop

Hello everyone!!!  I’m here today because its Suzy’s Birthday!!

The Design Team loves to surprise Suzy for her birthday!!  If your stopping in from Monica’s blog your on the right path.  If you arrived on your own, please head back to So Suzy Stamps as to not miss any links along the way.

HAPPY BIRTHDAY TO YOU!!  HAPPY BIRTHDAY TO YOU!!  HAPPY BIRTHDAY DEAR SUZY!!  HAPPY BIRTHDAY TO YOU!!

How as Suzy impacted my life and why I love her so:

Suzy is an amazing mentor to me.  She has help me see all of the things I can do besides just making cards.  Suzy has seen other talents in me that I was afraid to say out loud.  Thank you Suzy for guiding in an amazing direction.
Take a look at the cards I created for your birthday:
Suzy's Birthday
Don’t laugh at my handwriting.  I’m working on it!!
IMG_8678
I was going to do some brush lettering but was a bit nervous and didn’t want to miss up my watercolor panel.
Here’s my process:
prep
I’m hooked on improving my handwriting and to do that I have to write more!!  So, these cards a personalized just for you.  Mix that with foil and BAM, you have a great card, LOL!!

I hope you like your cards Suzy!! Your next stop is Martha blog!!

Now whats a blog hop without a giveaway!!

Leave a comment on all of the participates blogs for a chance to win a $10 Gift Card to So Suzy Stamps Store.  The giveaway closes February 22nd, 2016 at 11:59pm EST. 

Just in case you get lost along the way, here is a list of all of the participants:

So Suzy Stamps

Monica 

Kymona ←your here

Martha

Jennifer

Justine

Supplies used:

Ranger Watercolor PaperPrima Watercolor Confection Deco Foil Champange

Thank you so much for stopping by!!

~Kymona

Something New, Just For You!!

Hello everyone!!  I’m jumping in this evening to say oops, I’m sorry.  Let me explain.

-images-opps2

I’m not sure if you know that I love Instagram.  Its my favorite social media outlet to work with. Its fun to use and since it a phone base application, it super easy to post and respond to people. It has become almost effortless to share what I’m doing.  Which, now has stopped me from sharing more here and I want to change that.

So here is what I will do, since I post everyday on Instagram all sorts of things. I will share the weeks worth of post here on the weekend so that all of you aren’t missing out on important information that you would miss if you aren’t on Instagram.

So why not start today!!

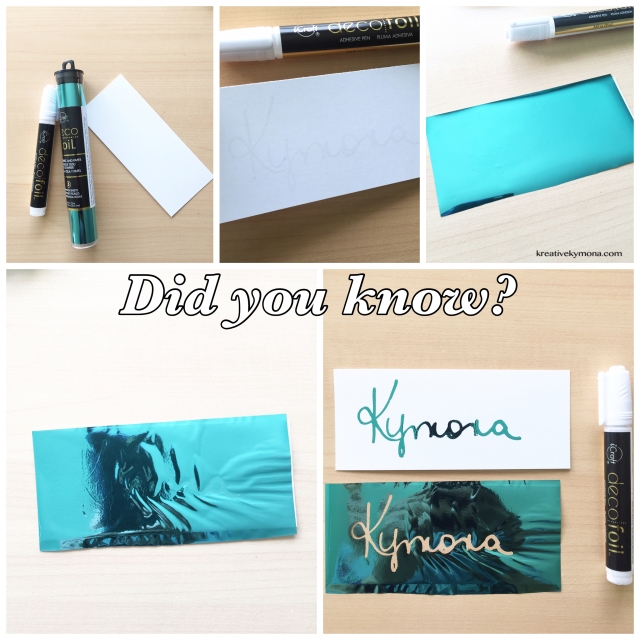
Did You Know Series

Here’s what I shared on Instagram this week {2/14/2016 to 2/19/2016}: I started a new series called Did You Know?  I love sharing information about the different supplies that I use and thought all you would like to get some quick tips and info on that particular product.

Take a look at what I shared:

Did You Know 1:

did you know 1

Did you know Tombow carries Fastener Tabs? Yes, they do!! What are Fastener Tabs you ask? They are ultra thin hooks & loop pre-paired fasteners that leave no bumps or lumps on your finished projects!

They are super easy to use and can be cut to any size. They are ideal for re-sealing gift bags, cards, envelopes, folders and/or any simple papercraft project with a closure!

I used them to seal up my mini gift bags! No ribbon needed!

Any questions?

Did You Know 2:

Did you know 2

Hey, did you know that this little handheld @xyroninc Sticker Maker could turn pretty much anything into a sticker! Yes, it sure can!! This isn’t a new tool, I’ve had it for a long time. My original one is orange, this pretty purple one belongs to my daughter!

Here are some of its features:

 √ It’s handheld and refillable.
 √ The tape measures 1.5 inches wide.
 √ The tape comes either permanent or repositionable.
 √ It applies adhesive edge to edge for great coverage.
 √ No messy clean up.

My daughter, nieces and I love using this tool for its easy access. I don’t have to worry about them making a mess with glue or wasting the tape runners. Such a great way to get them involved in crafting!

Any question?

Did you know 3:

Did you know 3

Today, I’m going to talk about the NEW Thermoweb Deco Foil Adhesive Pen! I had the privilege of sitting in on the Thermoweb class at CHA and was introduced to this amazing pen and fell in love!! I couldn’t wait to get my hands on it to play some more!!

Here’s what I like:
☀️ It’s a permanent adhesive in the foam of a pen, that allows you to add foil to any project.
☀️ It’s easy to use and the flow of liquid is even.
☀️ You can use it with a stencil or draw and write with it freehand.

☀️ The big WOW is: you don’t need a laminator or Minc to transfer the foil!! You can use your die cutting machine!!!! Just place it in between your plates and the pressure from the machine does the work for you!!! That’s what sold me!!

So, for those of you who don’t have a Laminator, Minc or Laser Printer you can still achieve foiling on your projects!!

Any questions??

Brush Lettering

Next up is my new love for Brush Lettering!!  Since the beginning of the year, I decided that I wanted to really practice my brush lettering and I have!!

Brushlettering Notebook

I created a travel notebook that I could carry everyone and practice my brush lettering skills.

Brushlettering2

Brushlettering3

Brushlettering1

Did you know there are all sorts of different strokes that form the letters?  There is.  You can see a good number of them here in these photos.  I love this and love seeing my growth.

#HappyMail

I love coming home to mail, especial crafty mail.  Take a look:

Happymail 3

I ordered this bag for my daughter.  A fellow Instagram Jess made this bag for her.

happymail 5

I ordered this for my One Little Word 2016 album.  They are from Get To Workbook.

happymail 6

I ordered these pens and adhesive from Tombow.  I love these brush pens.  I’m thinking of getting some more as I type this post, LOL!

happymail2

Here is the fantastic Deco Foil pen!!  I was super happy to receive this bundle of joy!

Happymail5

I saw these Prima Watercolors at CHA and can’t wait to play with them.  I will post my review.

Sizzix

My coworker dropped this awesome box off at my office.  He won it while on a talk show and had no clue what to do with it.  He knew I would so I got it!! Totally Swoon!!

Right At Home Sending Love Swap

We were instructed to send 4 things to our partners

♦ Something you made – a set of cards
♦ Something that’s cute – a ball of yarn
♦ Something you love – a mug
♦ Something that’s sweet – chocolate & peppermint

Take a look at what I put together for my swap partner:

Swap

Super cute and I can’t wait for Paula to get this awesome package in the mail.

Ok, I think I’ve recap everything but my cards since you see those here.

I hope you liked this recap and want to see more.

Thanks for stopping by!

~Kymona

YNS Sketch and Color Challenge #33

I’m here today with Your Next Stamp (YNS) and the Sketch and Color Challenge #33!!

Each challenge has a sketch and a color combo to choose from.

Take a look at the color combo:

YNScolor-33

Take a look at the sketch:

YNSSketch33

Take a look at my card:

Love you to pieces (YNS)

YNS Supplies: Scrapworks-Mini Sunburst Die Set, Whatnot Sentiments Set Four

Other Supplies: Random pattern paper, Versafine Ink, 3M Foam Tape, Wink Of Stella, Lil’inker   Design On the Diagonal Die, Misti

I went with both the sketch and the color photo.  I like both and couldn’t decide so I took some of the colors and added it to the sketch.

I love how it turned out.

What you can’t see in this photo is the amount of Wink of Stella that is on that heart.

Take a look:

WOS Heart


What do you think?  Did I follow the sketch and the color photos? Let me know below.

So are you ready for the new challenge?

You have until March 3rd, 2016 at midnight EST to play along and submit your project on the YNS Blog post.  One random participant will win a $15 gift certificate to the Your Next Stamp Store.  If YNS stamps or dies are the focal point then the winner receives and additional $5 gift certificate f0r a total of $20.  The winner will be announced on the YNS Blog the Sunday after the challenge closes.

I hope to see your projects!!

Supplies listed above!

Thank you so much for stopping by!

~Kymona

Casology 185 – Egg

Second Post for today
It your looking for the Right At Home post, click here

Hello everyone!!  It’s CASology Tuesday!!  We are back with another Cue Card just for you!!

This week’s cue card is:

Week 185 - Egg (1)

When I saw this cue card, I thought of the Living Magazine I saw standing in line at the supermarket.  I had to snap a picture of it.

FullSizeRender (38)

Look at how pretty those easter eggs look! This was the inspiration for my watercolor easter egg.

Take a look at my card:

Sending Easter blessing

Creating this card was very easy.

I created a watercolor panel using my new Tombow Yo-i Crayons. These crayons are water soluble so its easy to play with.

Yo-i coloring

All I did was add color to the white cutting board. Then use the wet paintbrush to pick up the color and add them to the wet Arches watercolor paper.

Super easy and fun.  You add color according to what you want.  I love the softness of my palette since its an egg for Easter.

Then I used Your Next Stamp Stitched Ovals Die Set to create cut out an large oval shape that looks like an egg.

I used Right At Home Hoppy Easter Stamp Set to stamp my sentiment right in the middle of the egg.

I adhered the egg to the Recollection Heavyweight Black card base with 3M Foam Tape.

To finish my card off, I rounded the corners with the We R Memory Keepers Corner Chomper.

All done!!

What do you think?  I can’t wait to see what you come up with!

For more inspiration, check out my fellow Design Team members blog for more awesome work.

DT Badge

Our Guest Designer this week:

Gerrina

Our Sponsor this week is STAMPlorations.

Supplies used:

Yo-i Crayons Stitched Oval Dies easter-stampArches Watercolor Pad Cold Press Recollections Black Heavyweight3M Double Coated Foam Tape We R Memory Keepers Corner Chomper

Thanks for stopping by!

~Kymona