How to Create a Denim Pillow Sham with English Paper Piecing Hexagons

Hello everyone! I’m here today to show you how to create a denim pillow sham with English Paper Piecing Hexagons. Yes, I’m trying new things. The weather calls for it, LOL.

Springtime has arrived, and I couldn’t be happier. I love the smell of flowers, the birds chirping, and the warmer weather. Better weather calls for new skills and fun stuff.  Don’t you agree? So when Auriful asked their Artisans to create a project using English Paper Piecing (EPP), I was eager to learn.

So, let’s jump into English Paper Piecing.

English Paper Piecing is a hand quilting method that allows quilters to sew intricate and complex shapes with acrylic and paper templates. EPP involves using these templates to stabilize fabric before sewn together to form blocks, sewn together to make quilts, or whatever your heart desires.

It is most effective for shapes that do not have long straight sides and will require numerous set-in corners, such as hexagons.

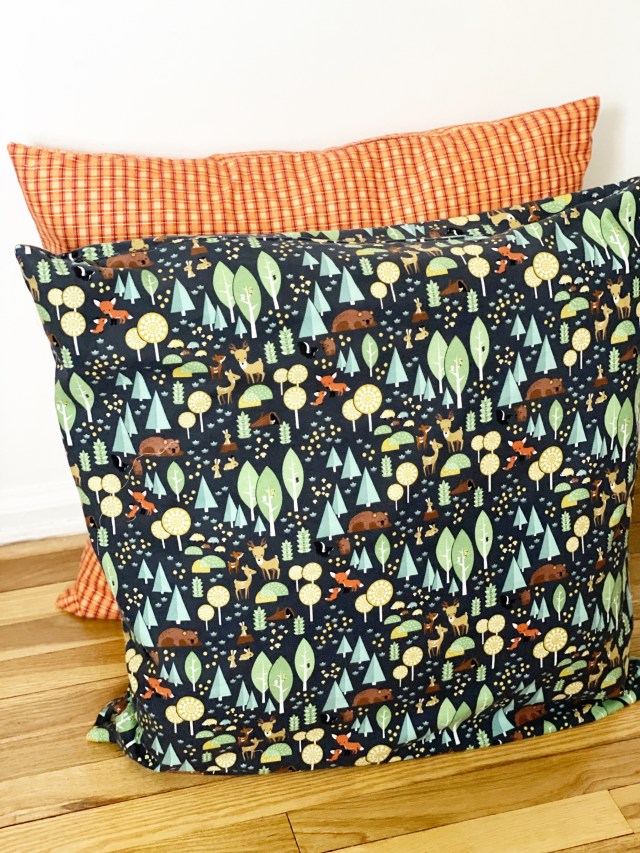
Let’s take a look at my Denim Pillow Sham with English Paper Piecing Hexagons:

English Paper Piecing Hexagons: Finish Product


I love this!! It was therapeutic to create. Sewing by hand relaxed me so much. It went by fast too.

Creating those hexagons would be hard if the English Paper Piecing method was not used. The edges of these hexagons are nice and clean because they are neatly folded underneath.

Interesting right? Want to learn more? Great, I’m going to show you.

Here’s how you create this Denim Pillow sham with English Paper Piecing Hexagons:

Materials:

Aurifil Monofilament Thread
1-1/4 inch Hexagons Acrylic Template
1-1/4 inch Hexagons Small Pack Paper Pieces
Sewline Glue Pen & Refill
Fabric -Tilda Chambray
Clover Gold Eye Applique Needles, No. 9
Best Press Spray Starch
Iron
Denim fabric
Quilting Ruler 3 Inches
Small Cutting Mat
Rotary Cutter
16 inch Pillow Form

English Paper Piecing Hexagons: Materials

Let’s get to work:

Step One: Cutting the Hexagons

Cut 3-inch squares out of the different fabrics you choose. I cut 15.

English Paper Piecing Hexagons: Cutting out the Hexagons

I do this to make it easier to stack my fabric in smaller pieces than dealing with the entire fat quarter or yardage.

Then I stack the squares on top of each other and cut the hexagons out using the acrylic ruler.


English Paper Piecing Hexagons: Cutting out the Hexagons


Step two: Glueing the hexagon paper template

English Paper Piecing Hexagons: Glueing the hexagon paper templates

Now, place the paper hexagon template on the wrong side of the fabric and glue the sides down.

English Paper Piecing Hexagons: Glueing the hexagon paper templates

Do not let the glue touch the edge of the paper. You do not want glue on your needle.

English Paper Piecing Hexagons: Glueing the hexagon paper templates

Turn the edges over so that they stick on the glue.

English Paper Piecing Hexagons: Glueing the hexagon paper templates

Step three: Stitch them together

The fun begins now! Decide on the pattern you want to create.

English Paper Piecing Hexagons: Stitch them together

Start with two pieces and whipstitch two sides together using a small needle and Aurifil Monofilament thread. That way, you don’t see my stitches.

English Paper Piecing Hexagons: Stitch them together

Continue doing that until you have all of your pieces stitch together.

Once you’re done, take the paper out of each hexagon. They will come out with ease and stay in shape.

If you want, you can starch and iron them.

English Paper Piecing Hexagons: Stitch them together

This took me about 30 minutes to do with stopping to rethread my needle. Easy and very therapeutic to do.

Now it’s time to attach this piece to the denim fabric.

Step Four: Cut the denim fabric

The pillow form is 16 inches so cut the pillow front to 16 inches by 16 inches.

Cut two back panels to 16 inches by 10 inches. This will create the opening in the back.

English Paper Piecing Hexagons: Cut the denim fabric

Step Five: Attach hexagon to the denim fabric

You can sew this panel on the fabric, but I decided to use my sewing machine to complete the task.

Place the hexagon panel on the front of the denim front piece and pin.

English Paper Piecing Hexagons:Attach hexagon to the denim fabric

Add the Monofilament thread as the top thread in your sewing machine.

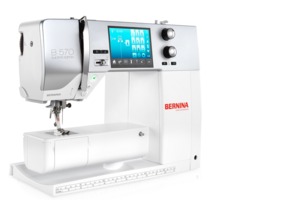
If your machine comes with an applique foot, use that. I’m using the #20C foot that comes with my BERNINA 570 QE sewing machine.

English Paper Piecing Hexagons: Attach hexagon to the denim fabric

Blanket stitch the entire piece.

Step Six: Sew the pillow sham

With the panel in place, it’s time to sew the pieces together.

For the back pieces, turn the 10-inch side over 1/2 and sew in place. Repeat for the second piece.

Place the front panel right-side up first.

Then place one of the back panels right sides down, matching the raw edges.

Now place the second-panel right-side down, matching the raw edges.

Both sewn edges should be in the middle and on top of each other.

Sew the entire pillow sham closed using a 1/2 inch seam allowance.

If your hexagons hangover, trim them off. Trim the corners to reduce bulk.

You can zig-zag the edges if you want but not needed since no one will see it.

Turn the pillow sham inside out and push out the corners.

English Paper Piecing Hexagons: Sew the pillow sham

Insert your pillow form, and you’re done!

English Paper Piecing Hexagons: Sew the pillow sham

Beautiful right!

English Paper Piecing Hexagons: Finish Product

Now it’s time to make the matching pillow. The best thing about this pillow sham is it’s WASHABLE!!!

It’s your turn now to give this project a try. Will you? I would love to hear all about it.

Supplies used:


Thank you so much for stopping by!

How to Make An in-the-Hoop BERNINA Pincushion

Hello everyone! I’m here today to show you how to make an in-the-hoop BERNINA pincushion. It is National Quilting Month, and quilters use many pins; I figured this would be a fantastic project to try out.

Pincushions are small, stuffed cushions, typically 3-5 cm across, used in sewing to store pins or needles with their heads protruding to take hold of easily, collect them, and keep them organized. They come in all forms. Today we are making small pillow pincushions.

Let’s take a look:

In the Hoop BERNINA Pincushion: Finished Product

Are you excited as much as I am? I love these pincushions. They are perfect since my favorite sewing machine is the BERNINA 570 QE!!!!

In the Hoop BERNINA Pincushion: Finished Product

Here’s how to make them:

Material:

Bernina Love Pincushion Embroidery File
OESD PolyMesh Stabilizer
Isocard Black Thread – 0020
Isocard Red Thread – 1902
Expert Point & Press Tool 
Embroidery Tape
Basting Adhesive
Polyfill

In the Hoop BERNINA Pincushion: Materials

Instructions

You will find the complete step-by-step instructions when you download the file.

Step 1: Cut fabric

Cut 2 pieces of fabric for the front and back of the pincushion.

Cut 2 pieces of fabric for the pincushion pillow form.

Cut a piece of PolyMesh stabilizer bigger than the hop.

Step 2: Prepare hoop and select the design

Hoop a piece of PolyMesh stabilizer by itself.

Select the design you want to use and load it into your machine.

Step 3: Stitch out the design

Stitch the placement line.

In the Hoop BERNINA Pincushion: Stitching out the design

Either spray basting adhesive or tape down the front fabric centered of the placement line.

Stitch out the design. Changing colors when directed.

In the Hoop BERNINA Pincushion: Stitching out the design

In the Hoop BERNINA Pincushion: Stitching out the design

In the Hoop BERNINA Pincushion: Stitching out the design

In the Hoop BERNINA Pincushion: Stitching out the design

In the Hoop BERNINA Pincushion: Stitching out the design

Step 4: Adding the pincushion backing

There are two pieces to the back of the pillow.

In the Hoop BERNINA Pincushion: Adding the pincushion backing

In the Hoop BERNINA Pincushion: Adding the pincushion backing

Fold both according to the instruction and place them down on the stitch placement lines.

Stitch the back of the pillow on.

Step 5: Finish the pincushion

Remove the project from the hoop.

In the Hoop BERNINA Pincushion: Finish the pincushion

Trim the project 1/4 inch from the seam line.

In the Hoop BERNINA Pincushion: Finish the pincushion

Turn the pincushion inside out.

Use a point turner to push the corners out.

Step 6: Sew a pillow form

Take the extra two pieces of fabric cut for the pillow form and sew them together using a 1/4 inch seam allowance.

Leave a 2-inch opening.

Turn inside out, push out the corners, and stuff with polyfill.

Stitch the opening closed and place the pillow form inside of the pincushion cover.

In the Hoop BERNINA Pincushion: Finished Product

In the Hoop BERNINA Pincushion: Finished Product

Finished!!

How amazing are these!

In the Hoop BERNINA Pincushion: Finished Product

In the Hoop BERNINA Pincushion: Finished Product

These would look so cute right up on your sewing machine. You can also make tons of these to give away to people you love.

So what do you think? Will you create your own BERNINA pincushions? I would love to know and please share your finished products.

Supplies used:

There are some compensated affiliate links used at no cost to you. 

BERNINA Pincushion

Thank you so much for stopping by!!

How to Create Flannel Floor Pillows with an Invisible Zipper

Hello everyone!! I’m here today to show you how to create flannel floor pillows with an invisible zipper.  Floor pillows, you say? Yes, I recently refinished my hardwood floor and wanted to provide my nieces and daughter with a place to sit comfortably when hanging out.

Floor pillows are easy to sew, and with a zipper, you can even wash it when it gets dirty. Now, that is a great reason to make some.

Let’s take a look at my floor pillows:

What do you think? Aren’t they cute? My nieces and daughter will enjoy these.

Let’s take a look at this fabric collection:

This cozy and soft flannel collection was created by Ben Byrd for Riley Blake Design. It comes in a palette of earth tones – green, orange, brown, navy, and parchment. Some prints have forest animals and trees.

It’s full of fun and playfulness.

Here’s how to create these pillows:

Materials:

Note: Some of the links below contain affiliate links.

Woodland Flannel Fabric
Aurifil White Thread
Pins
Cutting Mat
Ruler
Rotary Cutter 
Quilting Ruler
Matching Invisible Zipper
Pillow Form

Instructions

1/2 inch seam allowance unless otherwise noted.

Step 1: Measure Pillow Form

Measure the pillow form to determine how big you want to make your pillow cover. If you’re going to make your own pillow form, determine what size you want the pillow.

Step 2: Cut the fabric

Cut 2 pieces of the woodland fabric to the size of your pillow form.

For the orange pillow, I made the pillow form 30 inches by 30 inches. The blue pillow, the pillow form is 27 inches by 27 inches. I cut the fabric according to these measurements. 

Step 3: Mark the fabric for zipper placement

Place your zipper teeth up (remember this is an invisible zipper) at the raw edge of the fabric in the center.

With a pen, mark the fabric where the zipper teeth begin and behind the zipper stopper.

Remove the zipper.

Step 4: Prepare the zipper casing

With right sides together, sew a straight stitch to the first marked line and backstitch. Without cutting the thread, increase your stitch length to 5.0, stitch a basting stitch to the second line, and backstitch again. Without cutting the thread again, decrease your stitch length back to the original length and continue stitching to the end.

Finger press the seams open.

Find the line you drew and place the zipper back in place with the zipper teeth up. Make sure the zipper teeth are in the center.

Step 5: Sew the zipper in place

If your machine comes with an invisible zipper foot, attach that to your machine. If you only have a zipper foot, use that.

Start sewing at the beginning of the zipper tape. You want to stitch as close to the zipper teeth as possible.

Repeat on the other side of the zipper.

Note for the invisible zipper foot: when you sew the other half of the zipper, open the basting stitch so that the foot does not butt up against the zipper foot.

Once your zipper is sewn in place, open and close the zipper to ensure the fabric does not get in the way.

Step 6: Sew the pillow cover closed

Open the zipper halfway, and with right sides together, sew the three remaining sides.

Step 7: Turn and insert the pillow form

Trim the edges of the fabric if it shifted and round the corners to reduce bulk.

Turn inside out and insert the pillow form.

Enjoy your floor pillow!

How many pillows will you make? I would love to see your pillows.

 Supplies used:

There are some compensated affiliate links used at no cost to you.

 Bernina 570QE       

Thank you so much for stopping by!

Altenew Storybook Fantasy Stamps/Dies/Stencils/Embossing Folders Collection Release Blog Hop + Giveaway

Hello, and welcome to Altenew StoryBook Fantasy Blog Hop!! Today we are showcasing brand new stamps, dies, stencils, and embossing folders. If you arrived here from the talented blog, Seeka, then you are on the right track. If this is your first stop, then you will want to start at the beginning, the Altenew Card Blog.

Let’s take a look at my small pouch:

Stamping on fabric is fun, and I love to do it. You can create your own fabric pattern that no one else will have.

This is the perfect pouch for pretty pens and fabulous pencils. I love taking notes in the books that I read. Do you?

The stamp set that I used is called Tall Tale and it’s perfect for all book lovers like myself. This stamp set is one of the many great sets from today’s release.

What is a blog hop without an amazing gift? Yayyy!!!

Prizes:

$300 in total prizes! To celebrate this release, Altenew is giving away a $50 gift certificate to 2 lucky winners and a $20 gift certificate to 10 winners! Please leave a comment on the Altenew Card Blog and/or each designer’s blog post on the blog hop list below by 03/15/2021 for a chance to win. Altenew will draw 12 random winners from the comments left on each stop of this blog hop and announce the winners on the Altenew Winners Page on 03/17/2021.

Next Stop on this Blog Hop is:

Teresa Litchfield

You do not want to miss out on her amazing creations!!

Just in case you lose your place along the way, here is the complete list of participants so that you can find your way back:

Altenew Card Blog

Laura Bassen

Jaycee Gaspar

Amanda Baldwin

Emily Midgett

LauraJane

Nicole Watt

Vicky Papaioannou

Norine Borys

Nichol Spohr

Erum Tasneem

Jennifer McGuire

Therese Calvird

Yoonsun Hur

Svitlana Shayevich

Barb Engler

Virginia Lu

Michelle Short

Lilith Eeckels

Terri Koszler

Tania Ahmed

Jenny Colacicco

Laurie Willison

Seeka

Kymona Tracey

Teresa Litchfield

Reiko Tsuchida

Karen Brown

Amber Rain Davis

Rachael Shedeed

Maryam Perez

Tenia Nelson

Katrina Howe

Agnieszka Małyszek

Keren Baker

So what do you think? Would you create your own stamp fabric then turn it into something beautiful? I would love to see it.

Supplies used:

(Thank you so much for stopping by. Compensated affiliate links are used at no cost to you. The Altenew products were given to me since I’m on the design team. The other products were personally purchased. This post was not paid or sponsored.)

Thank you so much for stopping by,

How to Create a Quilted Candy Pouch Tutorial

Hello everyone!! I’m here today to show you how to create a cool quilted candy pouch that seems to be all the craze on my Instagram feed.

These pouches are easy to make and involves some quilting which is always fun. My daughter and nieces love when I make these for them. People think they have candy in them, but they don’t. They keep their money, phone, and whatever young ladies carry in their bookbags.

Take a look at these cute candy pouch:

Candy Pouch: Finished Product


Cute right?  We think so over here.

Here’s how you make it:

Materials:

Your Favorite Candy Bag
Thermoweb HeatnBond Vinyl
Aurifil Thread 2024
Quilting Ruler
Cutting Mat
Rotary Cutter
Lining Fabric
Batting
Plastic Zipper
Sew Machine

Candy Pouch: Materials

Step one: Cut the candy bag

The bag’s size is determined by how much you cut off the sides, top, and bottom.

I cut very little to preserve most of the bag.

This candy bag has a sealed side that is about half an inch wide. I cut right up against that on both sides. I’m starting with the right side.

Candy Pouch 5: Cut the candy bag

Candy Pouch 5: Cut the candy bag

I cut the left side, but I didn’t cut far enough.

Candy Pouch 5: Cut the candy bag

So I cut again, this time only a slither.

Candy Pouch 5: Cut the candy bag

Now it’s open.

Candy Pouch 5: Cut the candy bag

The top of this bag has the ziplock seal, so do the same and cut right below that.

Candy Pouch 5: Cut the candy bag

The bottom is a bit tricky because it has a square bottom so that it could stand up. So we have to be careful how we cut this. Remember we want to save most of the bag.

Start by cutting a slither at the bottom. It will separate the front and bag of the bag.

Candy Pouch 5: Cut the candy bag

Next, open the bottom to make sure the cut opened the bottom of the bag.

Candy Pouch 5: Cut the candy bag

Once you see the cut, take your time and use a scissor and cut the bottom off at the corners where they met.

Like this, repeat on the three remaining sides.

Candy Pouch 5: Cut the candy bag

Congrats, you have a front and bag panel to make your bag.

Candy Pouch 5: Cut the candy bag

Step Two: Apply vinyl

Lay the top of the candy bag on top of the vinyl and cut the vinyl bigger than the candy bag.

I do this just to make sure the entire candy bag is covered.

Candy Pouch: Apply Vinyl

Peel the paper off of the vinyl and adhere the vinyl to the front of the candy bag.

Candy Pouch: Apply Vinyl

Cut the excess around the edges off. Make sure you do this before you move onto the next step. You will make a mess of your ironing board if you don’t.

Candy Pouch: Apply Vinyl

This is where the magic happens!

Place the paper backing you peeled off back on top of the vinyl cover candy bag, and heat set it.

Follow the manufactures instructions.

Candy Pouch: Apply Vinyl

You now have a sewable candy bag front and back!!

It’s Sewing Time!!!

Step Three: Create a Quilt Sandwich

Place the candy bag front on top of the lining fabric and cut a piece bigger than the candy bag.

Candy Pouch: Create a quilt sandwich

Cut a piece of batting that will sandwich between the front and the lining. You want to see all three layers.

When you quilt this, the layers might shift, you want to make sure you catch all of the layers that is why we cut each layer bigger than the first. Repeat for the back of the bag.

Candy Pouch: Create a quilt sandwich

Step Four: Quilt both pieces

Place the quilt sandwich under the presser foot lining up the right edge of the candy bag with the presser foot’s edge.

I used my patchwork foot because it’s easier for me, and that is what was attached to my machine at the time.

Candy Pouch: Quilt both pieces

Once the first quilted line is down, I attached the ruler guide to equally space out the lines.

If you don’t have a ruler guide, you can use the presser foot as the guide. Just line the right edge up with the previous line to ensure accuracy.

Quilt the entire front and repeat for the back.

Excellent, now you have two quilted pieces.

We are in the home stretch now.

Step 5: Sew the bag

Trim all four edges. Repeat for the second piece.

Make sure both pieces are the same size.

Candy Pouch: Sew the bag

Now you can measure the top of the bag to determine what size zipper you should use.

My bag measured 7 7/8 inches by 8 1/8 inches.

I used a 12-inch zipper. I didn’t have anything smaller.

Candy Pouch: Sew the bag

I prepare my zippers by folding back the zipper tabs in the front and sewing them in place.

Candy Pouch: Sew the bag


Candy Pouch: Sew the bag

I unzip the zipper so that I don’t have to worry about the zipper pull.

I place the zipper face down on the top of the candy bag, lining the zipper’s edge to the edge of the bag.

Candy Pouch: Sew the bag

After you sew the zipper in place, close the zipper. Fold the closed zipper back so that the top of the bag folds back like the picture below.

Candy Pouch: Sew the bag

Use your hand to press the front of the backdown. You would normally iron this, but you can’t because of the vinyl.

Topstitching will keep the bag folded at the top.

Place the edge of the presser foot up against the fold and stitch straight down. You can change your stitch length but remember to change it back before you sew the other side of the bag.

Candy Pouch: Sew the bag

Place the front of the bag, right sides together with the back of the bag.

Line the zipper edge with the edge of the back panel of the bag. Make sure the right side edge of the bag is lined up as well.

Candy Pouch: Sew the bag

Stitch the zipper in place.

Candy Pouch: Sew the bag

As you get closer to the zipper pull, lift the presser foot with the needle down and pull the zipper pull out of the way. Continue stitching to the end.

Candy Pouch: Sew the bag

Fold the zipper back to create the fold on the top of the back of the bag.

Candy Pouch: Sew the bag

Topstitch this side of the bag.

Candy Pouch: Sew the bag

This is what your bag should look like now.

Candy Pouch: Sew the bag

Open the zipper half-way at this point. Make sure you do not skip this step. If you do, you will sew the bag shut. 

Now, fold the bag right sides together and sew from one side, around the bottom, and back up to the top—backstitch at the beginning and the end.

Candy Pouch: Sew the bag

Step Six: Clean up and turn inside out

At this point, if your zipper extends out, cut it off.

Candy Pouch: Sew the bag

Candy Pouch: Sew the bag

Cut corners and trim the edges if they don’t match up.

Candy Pouch: Sew the bag

Now turn the bag inside out.

Candy Pouch: Sew the bag

You will have to play with the corner a bit because of the vinyl touching each other. Just take your time and ease it out.

Candy Pouch: Sew the bag

Done!!! Now it’s your turn to make one!

Here are other bags I’ve made:

Candy Pouch: Finished Product

Candy Pouch: Finished Product

Candy Pouch: Finished Product

What do you think? Will you make a couple for yourself, family, and friends. Let me know.

Supplies use:

Bernina 570QE

Thanks for stopping by,