{Clean and Simple} – Fly

Second Post for Today
If your looking for Altenew’s Scrapbooking post, click here

Hello everyone!!!  It’s CASology Tuesday!!  We are back with another Clean and Simple Cue Card just for you!!

This week’s cue card:

fly


Take a look at my card:

rubber dance stamps

Creating this card was a no brainer!! I saw the small bird from the A Little Birdie stamp set and knew that I had to stamp them at the top of the card, to show them in flight.

After stamping the sentiment, I used Jane Davenport Mermaid Markers to color in that sentiment.

What do you think?

Are you inspired to play along?  Please let me know below!

Wait before you go, I have a surprise for you:

If you like this stamp set or any other stamp set from Rubber Dance Stamp, use coupon code: KTFreeShip for free shipping!!  YES, Free Shipping.

For more inspiration, check out my fellow Design Team members blog for more awesome work.

Deidre Payne

Hannelie Bester

Hazel Hodgkins

Jacquie Southas

Janet Ribet

Jen Wills

Joyce Mehrberg

Judy Marino

Kymona Tracey

Melissa Chipperfield

Rachel Bergfeld

Sherrie Mannion

Guest Designer

Angie

Our sponsor this week is Rubber Dance Stamps!

Supplies used:

(Thank you so much for stopping by. Compensated affiliate links used at no cost to you.  All products were personally purchased.  This post was not paid or sponsored. )

a little birdie stamp set

Thank you so much for stopping by!!

Altenew Pattern Play

Hello everyone!!  I’m up on Altenew’s Scrapbook Blog today sharing my big and bold layout!!

Here’s a sneak peek:

sewing labels

To see the complete layout and full tutorial, head on over to Altenew’s Scrapbook Blog.  I can’t wait to see what you think!

Supplies used:

(Thank you so much for stopping by. Compensated affiliate links used at no cost to you.  All products were personally purchased.  This post was not paid or sponsored. )

        sewing labels stamp set

Thank you so much for stopping by!

We Are Memory Keepers Planner Punch Review

Hello everyone!!  I’m here today with the long awaited We Are Memory Keepers Planner Punch Review!!
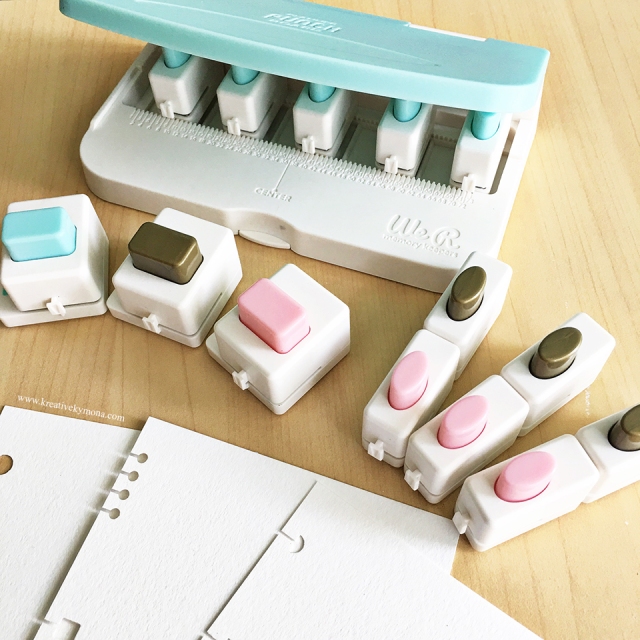
Planner Punch Board review

I learned about the Planner Punch before Creativation this year.  I don’t remember where but when I saw it I knew that I had to stop at the We R Memory Keepers booth to test this one out. That I did and I’ve been waiting for this product to hit the stores so that I could get one for myself.

Let’s get started:

The Planner Punch Board comes with Adjustable Punches

we r memory keepers planner punch
The Planner Punch Board comes with 5 circle inserts. Use these inserts for ring binder planners.

we r memory keepers planner punch board

The Planner Punch Board has a Punch Position Number chart. You use these numbers to align the punches up correctly.

we r memory keepers planner punch

The Planner Punch comes with hole catcher that opens so that you can empty it out.

we r memory keepers planner punch board

You can store your inserts flat within the base.

we r memory keepers planner punch board

The directions are printed directly on the back of the punch board. (After reading the direction, I found the sticker for the happy planner

we r memory keepers planner punch board

Lets see how this tool works:

Mind you, I did not read the directions before playing with it.  I wanted to see if I could figure this tool out just by playing with it. 

The paper I used was Canson Watercolor paper weighting 140lbs.

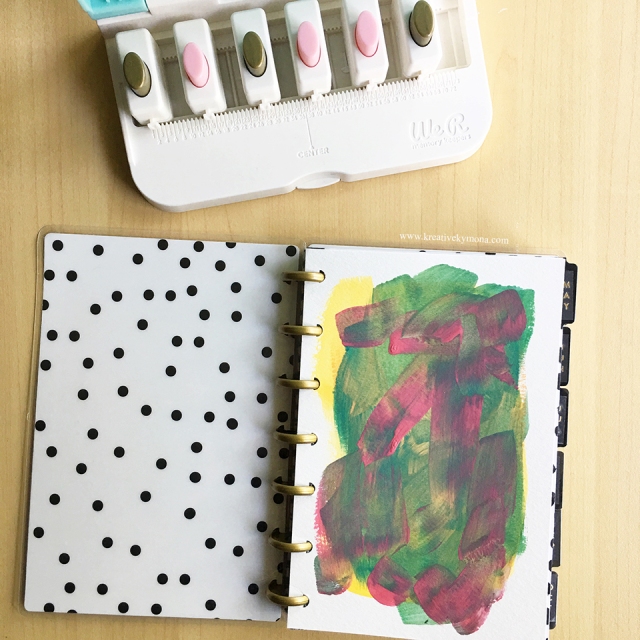
I started with the circle binder inserts that came with the punch board. I have a two ring binder that I wanted to add a watercolor insert.

  1. I measured one of the pages inside the binder to cut the watercolor paper to the correct size.we r memory keepers planner punch board
  2. Then I used the middle line in the page protector to center my paper.  Once that was done, I placed the inserts in the corresponding punch position number.  Which is 10 and 63.
  3. I punch the holes. we r memory keepers planner punch board
  4. The holes were punch cleanly.we r memory keepers planner punch board
  5. The page fits perfectly in the binder. we r memory keepers planner punch board

For the next test I used the circle inserts to create a watercolor panel for a 6 ring binder.

  1. Follow steps 1 and 2 from above.
  2. For the 6 ring binder, you only need three of the inserts.
  3. Line the paper up using the grove on the left side of the punch and punch the first three holes 11, 21, 30.we r memory keepers planner punch board
  4. Turn the paper around and move the punches down to 14, 24, 33 and punch.we r memory planner punch board
  5. Fits perfect in my 6 ring binder. we r memory keepers planner punch board

The planner punch board is only for ring binders.  They have inserts to fit the other planners on the market.

Check out the other inserts:
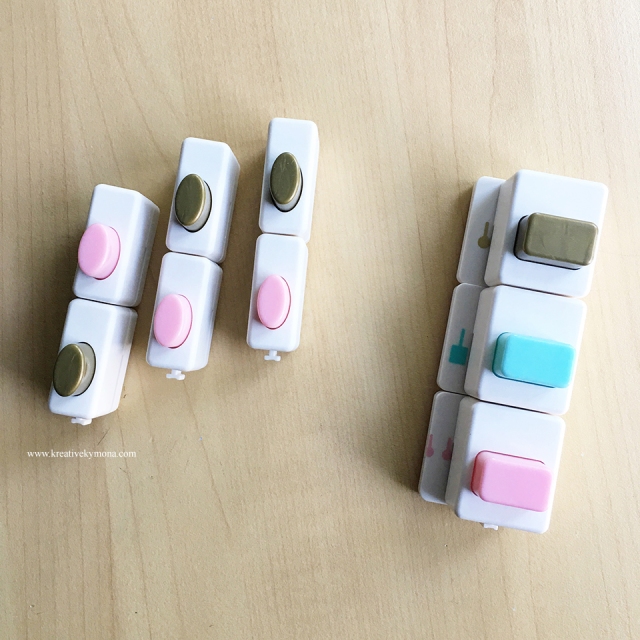
we r memory keepers planner punch board inserts

The inserts on the left are called the Disc Punch Inserts and the ones on the right are called the Spiral Punch Inserts.

The disc punch inserts work in the same fashion as the circle inserts.  The spiral punch inserts work a bit differently.

Lets start with disc punch inserts:

  1. For the disc inserts, I used one of the pages from my mini planner to line up the disc inserts.
  2. There are 7 rings but the package comes with 6 inserts.  So you have to turn the paper over to punch the last hole.we r memory keepers disc inserts
  3. The planner position numbers are 2, 15, 28, 53, 65 and 2 again for the last one.we r memory keepers disc punch
  4. It fits perfectly in my planner.we r memory keepers disc punch inserts

The spiral inserts are a bit different. You only get one punch for the different punches.

The pink insert punches 4 holes per inch.

The gold insert punches 3 holes per inch.

The teal insert punches 2 holes per inch.

Lets take a look:

According to the directions, you place the punch at line 37 and use the center line to start. I didn’t do that.  So you will see my photos different then what the company may show.

  1. Place the insert inside the punch board.
  2. I used the line guide to line my paper up so that I can punch.
  3. Then I used the guide on the side of the punch to punch even space holes in my paper.
  4. Punch the entire side of the paper.we r memory keepers spiral inserts

we are memory keepers spiral punch

we are memory keepers spiral punch

I went against the directions and started where I wanted to.  
we are memory keepers spiral punch

we are memory keepers spiral punch

Take a look at all three of them together.

we are memory keepers spiral punch

All punch and the inserts are super easy to use. The possibilities are endless with this tool. You can make a varsity of handmade pages.

Here is a tip for your inserts:

They clip together so that you don’t lose a piece.
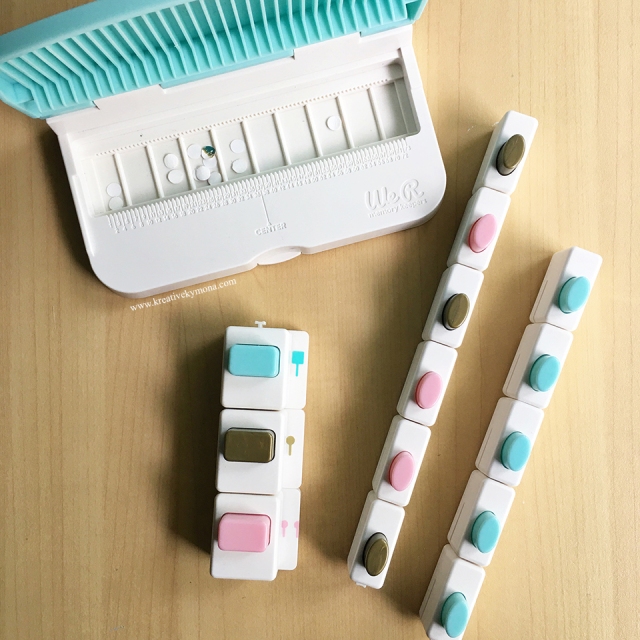
we r memory keepers planner punch board

So here you have it!!  The Planner Pouch Board!

What do I think?

I love it!! I recommend it for those of you who are planner lovers.

  1. This tool is easy to carry vs. the bigger punches for each planner system.
  2. It fits right in your bag.
  3. With this tool, you can create pages for any planner, not just the one you have.
  4. It’s inexpensive.
  5. You can create custom pages for your planner.
  6. You can also create your own book with it.
  7. It cuts though thick paper with ease.

I put in an order with Simply Charming Bags for a custom bag for my punch and the additional inserts. I will share it when it arrives.

So what do you think? Would you add this to your planner supply collection? I would love to hear from you. Leave a comment below.

Supplies used:

(Thank you so much for stopping by. Compensated affiliate links used at no cost to you. All products were personally purchased. This post was not a paid or sponsored post.)
We R Memory Keepers - Planner Punch Board        We R Memory Keepers - Planner Punch Board - Disc Punch Inserts       We R Memory Keepers - Planner Punch Board - Spiral Punch Inserts

Thank you so much for stopping by!

Planning for the Week

Second post for the day
If your looking for CASology post, click here

Hello everyone!!  I’m up on Gossamer Blue’s blog today sharing how I plan for the week! Planning for the week is super easy and fun when I use Gossamer Blue’s Planner June Kit!!

Take a look:

I just loving looking at these pages.  To see the entire layout, please head on over to Gossamer Blue’s blog to see the full spread and the tutorial on how I created this.

You don’t want to miss this!!  Let me know what you think!

Thanks for stopping by!

{Clean and Simple} – House

Hello everyone!!!  It’s CASology Tuesday!!  We are back with another Clean and Simple Cue Card just for you!!

This week’s cue card:

Take a look at my card:

rubber dance stamp

This week’s cue was super fun to work with.  I recently received a stamp set from Rubber Dance Stamp called Textured House and I knew these houses were perfect for this week.

Creating this card was easy.  I used Derwent Inktense Pencils to color the images in. Then I used a wet paint brush to move the color within the image.

The sentiment stamp is from Taylored Expressions Mama & Me stamp set.

I posted a super quick video on Instagram a couple of days ago showing how I color the images in.  If you would like to take a look, click here.

What do you think?

Are you inspired to play along?  Please let me know below!

Wait before you go, I have a surprise for you:

If you like this stamp set or any other stamp set from Rubber Dance Stamp, use coupon code: KTFreeShip for free shipping!!  YES, Free Shipping.

For more inspiration, check out my fellow Design Team members blog for more awesome work.

Deidre Payne

Hannelie Bester

Hazel Hodgkins

Jacquie Southas

Janet Ribet

Jen Wills

Joyce Mehrberg

Judy Marino

Kymona Tracey

Melissa Chipperfield

Rachel Bergfeld

Sherrie Mannion

Guest Designer

Sue

Our sponsor this week is Rubber Dance Stamps!

Supplies used:

rubber dance stamps  taylored expressions stamp

Thank you so much for stopping by!

Altenew Sales

Hello everyone!!  I’m  jumping in here to share two new sales that Altenew is running right now.

Lets check out Altenew’s Sales:


Save 20% off on the New Day Card Kit & Artist Marker Set A Bundle now through 6/21 at 11:59 pm EDT. No discount code needed to enjoy this deal! 


Altenew Bambook Rose Bundle

Save 25% off on the Bamboo Rose Stamp & Die Bundle now through 6/21 at 11:59 pm EDT. No discount code needed to enjoy this deal! 

I hope you stop by and check these sales out.

Personalize Your Craft Supplies With Craft Fantastic

Hello everyone!!  I’m up on Craft Fantastic blog today showing how to use Craft Fantastic glass trays on cards.

Take a look:

craft fantastic trays

To see more photos and to get the tutorial and supply list, please stop on by the Craft Fantastic blog!  I would love to hear from you about what you think!

Thank you so much for stopping by!
Rubber Dance Stamp June 2017 Theme Challenge

Hello everyone!!  I’m here today with Rubber Dance Stamp June 2017 Theme Challenge!!

Take a look at the theme for this challenge:

rubber dance stamp theme challenge

Check out what I created to inspire you:

rubber dance stamp butterflies

Summer reading is so much fun!! I love sitting under a tree, escaping to another word.  So I created this bookmark for those summer books.

I brayed bright summer colors to create the fabulous back ground colors. Then I stamped Rubber Dance Stamp Butterfly Trio stamp set on top the dry background.

For the ribbon, I added paint to the ribbon using my finger.  Then I rounded the corners to finish the bookmark off.

What do you think?  Please let me know below.  I would love to hear from you.

Guess what!!!  If you like this stamp set or any other stamp set from Rubber Dance Stamp, use coupon code: KTFreeShip for free shipping!!  YES, Free Shipping.

Now onto the challenge prizes!

The winner will win five fabulous stamps fromRubber Dance Stamp!! Wait, if the winner used stamps from Rubber Dance Stamp, they will winner another five stamps! That’s a total of 10 stamps!! Wow!!!

You have until June 3, 2017, midnight Central European Time.  Which is 6:00 PM, June 30, 2017!! Please pay attention to this time. Here in NY, we are 6 hours behind Norway! 

Supplies used:

(Thank you so much for stopping by. Compensated affiliate links used at no cost to you.  All products were personally purchased.  This post was not paid or sponsored. ) 

Paper Artsy Fresco Finish CHERRY RED Chalk Acrylic Paint 1.69oz FF86
Thank you so much for stopping by!

Altenew Stencil Release Blog Hop + Giveaway

Hello everyone!!  I’m so excited to be here today.  This is my first Altenew Blog Hop as a design team member!!  Today we are showcasing all of the new stencils that are being released.  If you’ve arrived here from fabulous Lydia Evans, then you are on the right track. If you arrived here on your own, then you will want to start at the beginning, the Altenew Card Blog so that you don’t miss a thing!

Take a look at my layout:

altenew layered kaleidoscope stencil b

For my layout I used Altenew Layered Kaleidoscope B Stencil  paired with some of the supplies from the Reflection Scrapbook Collection Kit and some Ink Sprays to add interest to my page.

Altenew scrapbook layout

I used the Layered Kaleidoscope B stencil to add texture behind my photo using embossing paste. I took my time to only get the embossing past in the center design of the stencil only.

Note: for those of you who are new to this technique, I would suggest you mask of the areas that you do not want the past to go as to not make a mistake.

applying embossing paste

I did this twice so that the design would peak out from behind the photo.

Note: you could color the embossing paste using Altenew’s inks and/or sprays to really enhance the texture.  Like this:

coloring embossing paste with Altenew ink spray

I choose not to use it the color paste because it was to much yellow on the page but know that this is an option as well.

Let’s take a closer look:

layered scrapbook page using Altenew Reflection Scrapbook kit

For this page, I matted the photo on top of a piece of pattern paper from the Reflection Scrapbook Kit. Then I used the stickers and other embellishments from the kit to add the title and cute saying to the layout.  To finish the layout off, I used Altenew Ink Spray and a paintbrush to add ink splatters throughout the page.

So what do you think?  Will you use stencils on your layouts now?  I would love to hear what you think below!

What is a blog hop without an amazing gift? Yayyy!!

Prizes

To celebrate this release, Altenew is giving away a $50 gift certificate to FIVE lucky winners! Please leave a comment on the Altenew Card Blog or/and Scrapbook Blog by Tuesday, June 20th at 11:59pm EDT for a chance to win. The winners will be announced on the Altenew Card/Scrapbook blogs on Thursday, June 22nd.

Next Stop on this Blog Hop is the talented:

Debby Hughes

You do not want to miss out on her beautiful creations!!  It is sure to please, trust me!!

Just in case you lose your place along the way, here is the complete list of participants so that you can find your way back:

Altenew Card Blog

Jennifer McGuire

Altenew Scrapbook Blog

Sveta Fotinia

Sandra Dietrich

Yoonsun Hur

Erum Tasneem

Laura Bassen

Enza Gudor

Agnieszka Malyszek

Lydia Evans

Kymona Tracey ← You are here!

Debby Hughes

May Sukyong Park

Terhi Koskinen

Svitlana Shayevich

Virginia Lu

Therese Calvird

Lilith Eeckles


Supplies used:


Thank you so much for stopping by and enjoy hopping along!!