How to Make a Quilted Travel Roll

Hello everyone!! I’m here today with a super cute quilted travel roll tutorial as a part of the Aurifil Artisan November Challenge – Hand Quilting!

Traveling is one of my favorite things to do. I usually travel at least 3 times a year. I love seeing different places and meeting new people. One of my goals is to visit every country at least once.

COVID-19 has put a halt to my travel plans. I was supposed to take a class in Portland during March, spend my birthday in Aruba in April, and have fun with my sister and our children in Belize and Mexico in August. None of that happened, and I can’t wait till we get to jet-set again.

While we wait for the green light to travel again safely, I am getting ready by making some new cute travel quilted rolls, and I’m going to show you how.

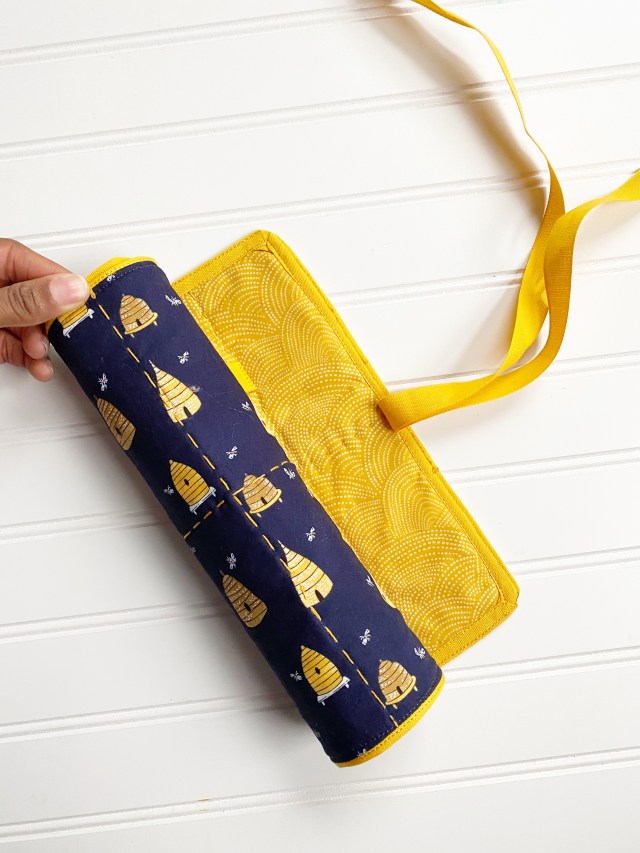
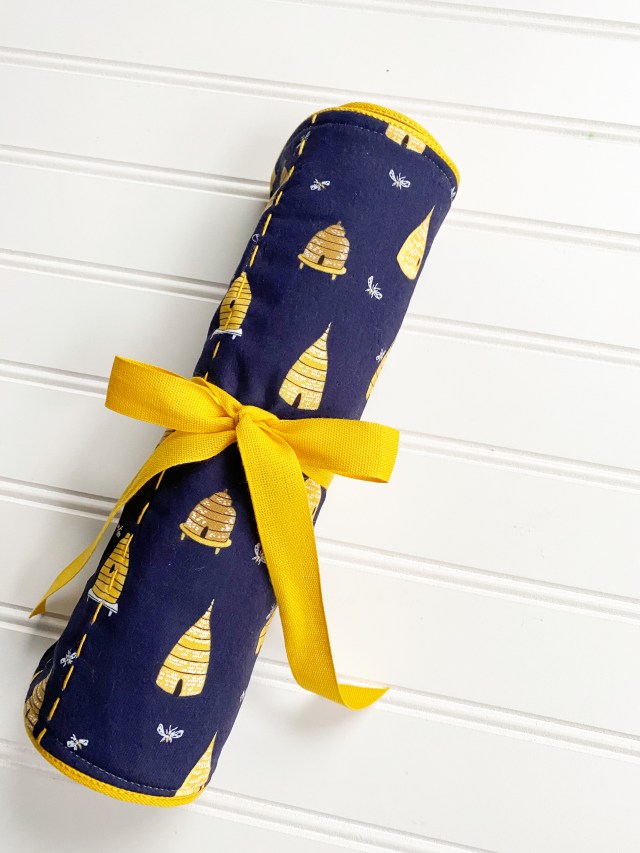
Take a look at my quilted travel roll:

Now I have to say, I don’t wear a lot of jewelry, but when I travel, I want to make sure I have all of the items that I do wear or would like to wear with the outfits in my suitcases. This case stores my jewelry in a safe, scratch-free place.

Quilted Travel Roll: Finished Product

Here’s how I created this quilted travel roll:

 Materials:

2 Coordinating Fat Quarters – Honey Bee Collection
Batting
Aurifil Floss – 2140
Aurifil 12wt – 2140
Pins
Sewing Machine (BERNINA 570 QE)
90/14 Topstitch needle
Quilting Ruler
Cutting Mat
Studio Carta Tight Weave Cotton Ribbon – Marigold
Studio Carta Cotton Ribbon – Marigold
Fabric Pen/Chalk
Scissors
Sashiko Sewing Needle

Quilted Travel Roll: Materials

Let’s begin:

Step 1: Cutting fabric

Cut fabric and batting to 20 inches x 10 inches.

Step 2: Create a quilt sandwich

Lay the bottom fabric (exterior fabric) down first, the wrong side facing up.

Then place the batting on top of that.

Place the top fabric (interior fabric) on top of the batting, right side facing up.

Quilted Travel Roll-Create a quilt sandwich

Pin in place.

Quilted Travel Roll-Create a quilt sandwich

Step 3: Prepare the fabric for hand quilting

Using a quilting ruler, draw a centerline horizontally across the fabric using a fabric pen or chalk if your fabric is dark.

Quilted Travel Roll: Prepare the fabric for hand quilting

Measure 2.5 inches from the short edge and draw a vertical line. Next, measure 5 inches from that line and draw another line. Repeat till the end.

Step 4: Hand quilt

Thread a sashiko sewing needle with Aurifil Floss 2140 and begin hand stitching on all of the drawn lines.

Quilted Travel Roll: Hand Quilt

The rule of thumb is to measure the thread by the length of your arm.

Quilted Travel Roll: Hand Quilt

Step 5: Add binding

I used Studio Carta Marigold Tight Weave Cotton Ribbon for the binding. Place one edge of the ribbon against the raw edge of the quilted fabric and pin.

Go around the entire piece, create a mitered corner at each corner.

Quilted Travel Roll: Add binding

Pin the ribbon on the inside of the binding and in the middle of the roll.

Quilted Travel Roll: Add binding

Step 6: Sew the binding

Sew the binding a quarter inch around the entire piece.

Quilted Travel Roll: Sew the binding

When you finish, change the top and bobbin thread to Aurifil 12wt thread.

I sew with a BERNINA 570 QE sewing machine, and they have a high thread tension bobbin case (golden-yellow bobbin case), which allowed me to add the 12wt thread in the bobbin.

Change the needle to a new 90/14 Topstitch needle.

Quilted Travel Roll: Sew the binding

Fold the binding over to the back and stitch in place.

Quilted Travel Roll: Sew the binding

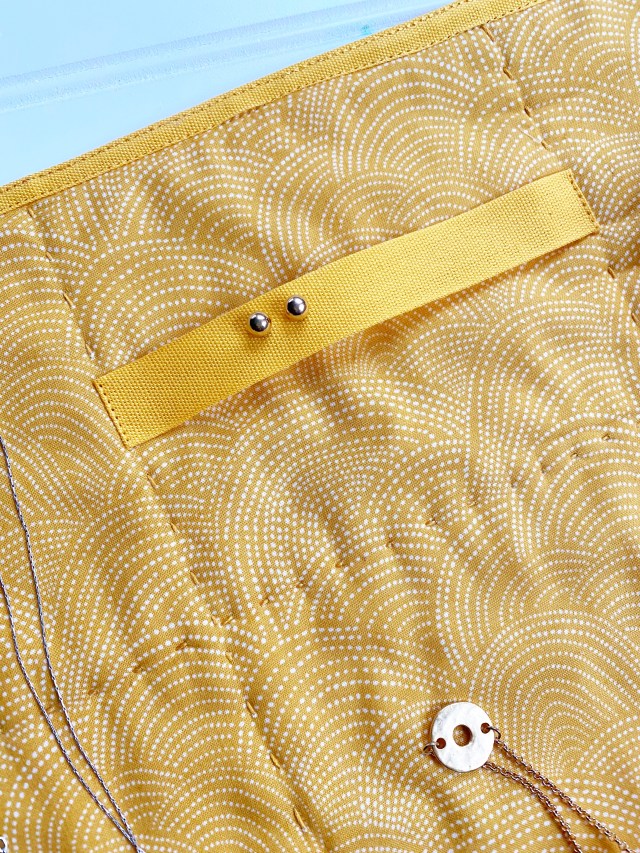
Step 7: Stitch the ribbon on the inside


This step could have taken place when the hand quilting was happening, but I decided to do it now. 

Change out the top thread and the bobbin thread to a microfilament thread so that you can’t see the thread on either side.

Quilted Travel Roll: Stitch the ribbon on the inside

Stitch the two ribbons on the inside.

Complete!

Quilted Travel Roll: Finished Product

Here’s how I use it:

I tie my bracelets with the hanging ribbon and hanging my necklaces from the broad ribbon.

Quilted Travel Roll: Finished Product


Quilted Travel Roll: Finished Product

I hook my earing to the broad ribbon.

Quilted Travel Roll: Finished Product


Quilted Travel Roll: Finished Product

Super cute and fun!

Quilted Travel Roll: Finished Product

Quilted Travel Roll: Finished Product

So what do you think? I hope this inspires you to try and make your own quilted travel roll.

Supplies used:

There are some compensated affiliate links used at no cost to you. 


Bernina 570QE
Thank you so much for stopping by!

It’s A Crayola World Curtains

Hello everyone! I’m here today to show you my brand new It’s A Crayola World Curtains!

Yes, I made some curtains for my small craft space. The great thing about them is the color. They match the colors on my wall. They were so easy to make, I know for sure you can create some for yourself.

Let’s take a look at my curtains:

Finished curtains

I’m giddy with glee. Look at how cute they are.

Let’s talk about this fabric collection:


Five amazing fabric panels were inspired by nature and loaded with color. The amazing thing about these images, you will find Crayola® crayons blended into the artwork. It’s amazing. My sisters stopped by when I was working on the curtains; they were blown away by the crayons they spotted in the flowers.

This collection is the newest official licensed fabric line from Crayola®.

Here’s how to create these curtains:

curtain materials

Materials:

Note: Some of the links below contain affiliate links.

It’s a Crayola World fabric
Sewing Machine
Matching Thread
Cutting Mat
Pins
Rotary Cutter
Curtain Grommets
Scissor
Ruler

Step 1: Cut the panels

Cut the panels into two pieces. They measure 36 inches by the WOF.

cut the fabric

Step 2: Prepare the panels

Double hem three sides of the panel by a 1/2 inch.

double hem

For the top hem, fold the raw edge over a 1/2 inch and press. Fold 3 inches and press again.

Step 3: Sew the hems

Using the 10D# Edgestitch Bernina presser foot, sew on the panel’s right side as close to the folded edge.

sew on the right side

Repeat on all sides.

Step 4: Prepare the top edge for grommets

Measure the width of the fabric and multiply it by the number of grommets you want to use.

The grommet will be placed at 4.25, 8.50, 12.75, 17.25, 21.50, 25.75, and 30.25 inches.

equally measure grommets

equally measure grommets

Using the template that comes with the grommets, draw circles at the points above.

draw circles

Cut the circles out.

cut circles

Step 5: Adhering the grommets

adhering grommets

Place one side of the grommet underneath the circle and one on top.

adhere grommets

Snap the grommets into place.

adhere grommets

adhere grommets

Repeat for all of them.

Step 6: Finish the curtains

Press both curtains and snip any loss threads.

Done!! This is an afternoon project, and you can do it.

finished curtains

Now it’s your turn!

Supplies used:

  Bernina 570QE              
Thank you so much for stopping by!

Altenew Twinkle & Shine Stamps/Dies/Stencils/Embossing Folders Collection Release Blog Hop + Giveaway

Hello, and welcome to Altenew Twinkle & Shine Blog Hop!! Today we are showcasing brand new stamps, dies, stencils, and embossing folders. If you arrived here from the talented blog, Emily Midgett then you are on the right track. If this is your first stop, then you will want to start at the beginning, the Altenew Card Blog.

Let’s take a look at my planner page:

What is a blog hop without an amazing gift? Yayyy!!!

Prizes:

To celebrate this release, Altenew is giving away a $50 gift certificate to 3 lucky winners! Please leave a comment on the Altenew Card Blog by 11/10/2020 for a chance to win.

Altenew will also draw a winner to receive a $15 gift certificate from the comments left on each designer’s blog on the blog hop list below. All winners will be announced on the Altenew Winners Page on 11/12/2020.

Next Stop on this Blog Hop is:

Dana Joy

You do not want to miss out on her amazing creations!!

Just in case you lose your place along the way, here is the complete list of participants so that you can find your way back:

Altenew Card Blog

Laura Bassen

Erum Tasneem

Kelly Griglione

Therese Calvird

Jennifer McGuire

Amber Rain Davis

Tenia Nelson

Nicole Watt

Terri Koszler

Nathalie DeSousa

Jenny Colacicco

Jaycee Gaspar

Victoria Calvin

Tania Ahmed

Amanda Baldwin

Emily Midgett

Kymona Tracey ←you are here

Dana Joy

Lilith Eeckels

LauraJane

Norine Borys

Vicky Papaioannou

Virginia Lu

Nenette S. Madero

Svitlana Shayevich

Keisha Charles

Maryam Perez

Vicki Finger

Laurie Willison

Reiko Tsuchida

Amy Hill

Agnieszka Małyszek

Anna Veach

Supplies used:

(Thank you so much for stopping by. Compensated affiliate links are used at no cost to you. The Altenew products were given to me since I’m on the design team. The other products were personally purchased. This post was not paid or sponsored.)

eucalyptus Hobonichi Planner

Thank you so much for stopping by!