Shaker Card – Sketch and Color Challenge #54

I’m here today with Your Next Stamp (YNS) and the Sketch and Color Challenge #54 and my final post as a DT member.

I’ve been on this team for the past year and a half.  I had an amazing time. Karen has been amazing and her design are super cute and fun to work with.   I’ve made some great friend with my fellow design team members.  Deciding to step down was a hard decision to make but a much needed one for me.

I will continue to support Your Next Stamp and because a participant in these challenges, LOL!! That will be fun.

Each challenge has a sketch and a color combo to choose from.

Take a look at the color combo:

ynscolor-54

Take look at the sketch:

ynssketch54

For my last card, I went with my signature shaker card!  It was a must.  It’s my favorite technique and I used my favorite stamp set from 2016!

tweet-news-yns

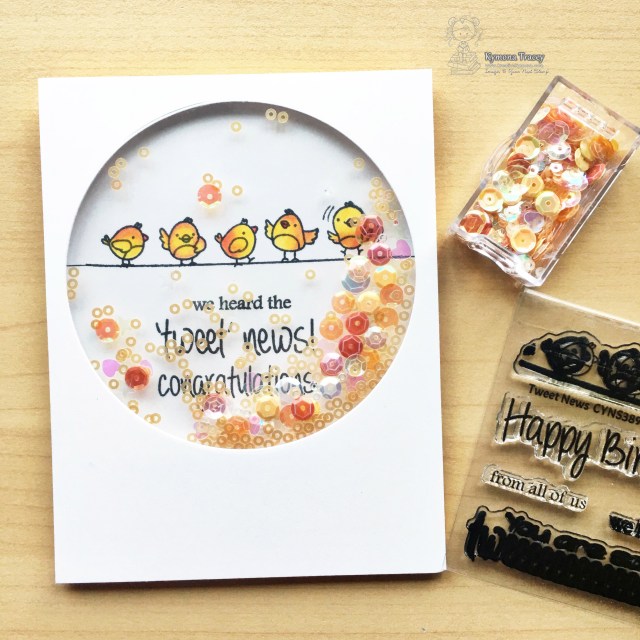
YNS Supplies: Tweet News, Circles Die Set

Other Supplies: Bristol White Cardstock, Tombow Irojiten Vivid Coloring Pencils, (Retired) Lucy Abrams Just Peachy Sequin

What do you think?  Super easy sketch! Let me know below.

So are you ready for the new challenge?

You have until January 5, 2017 at midnight EST to play along and submit your project on the YNS Blog post.  One random participant will win a $15 gift certificate to the Your Next Stamp Store.  If YNS stamps or dies are the focal point then the winner receives and additional $5 gift certificate f0r a total of $20.  The winner will be announced on the YNS Blog the Sunday after the challenge closes.

I hope to see your projects!!

Supplies listed above!!

Thanks for stopping by!

~Kymona

{Clean and Simple} CASology 229 – Toast

Hello everyone!!  It’s CASology Tuesday!!  We are back with another Clean and Simple Cue Card just for you!!

This week’s cue card:

week-229-toast

Take a look at my card:

cheers

For this week’s cue card I used Your Next Stamp Cheers stamp set with some Copic markers ( YG03, YG25, YG17, Y38 and YR68) and glossy accents.

I do not drink alcoholic beverages. When I go out with friends I order a fruit juice of some sort and my friends ask the bartender to jazz it up so that it looks like a nice pretty drink.  I laugh all the time.

Cheers!!!!

Nice and easy!

Are you inspired to play along?  Please let me know below!

Note: This is a 2 week challenge due to the holidays!!!

For more inspiration, check out my fellow Design Team members blog for more awesome work.

DT Badge

Our sponsor this week is STAMPlorations!

Supplies used:

yns-cheers Ranger Ink - Glossy Accents - Clear Dimensional Embellishment - 2 ounces

Thanks for stopping by!!

~Kymona

{Clean and Simple} CASology 228 – Bow

Hello everyone!!  It’s CASology Tuesday!!  We are back with another Clean and Simple Cue Card just for you!!

This week’s cue card:

week-228-bow

Take a look at my card:

its-time-to-jingle

For this week’s cue card, I used a couple different stamps from different companies!!  I love spreading the love!

I used Concord and 9th Love You.Mean It stamp set for the circles that created the wreath. Then I used Mama Elephant Jingle Greetings for the sentiment.  I stamped both of those with Clearsnap Colorbox Wicked Black Ink.

Here comes the interesting part.

I used a paper piercer to make a small hole at the top of the wreath. Then I strung two small jingle bells to a piece of twine and pushed the other end through the hole.  I tied a small knot. I used a piece of washi tape to hold it down. I added a piece of cardstock (4 x 5.25) to cover up the washi tape.

After that I die cut three of the cute bow from Reverse Confetti Tagged Tote Confetti Cuts out of red cardstock.  I adhered them together and placed it right over the pierced hole.  Now the jingle bells look like they are attached to the bow.

Clever right?  Believe it or not it was really simple and easy.

Are you inspired to play along?  Please let me know below!

For more inspiration, check out my fellow Design Team members blog for more awesome work.

DT Badge

Our sponsor this week is Birch Press Design!

Supplies used:

Love You. Mean It. Stamp Setjingle_greetings    rc-tagged-tote   

Thank you so much for stopping by!

~Kymona

Winter Wonderland Designer Showcase – YNS

Hello everyone!  I’m up on Your Next Stamp Blog today sharing what I created for our new Designer Showcase!

winterwonderlandgraphic

Our theme is Winter Wonderland!  My card is a bit unconventional!

Lets take a sneak peek:

holiday-joy-sneak-peek-yns

Stop on by Your Next Stamp Blog to see the full card and to get the tutorial on how to create this card.

YNS is generously giving away a $10 gift certificate to the store. All you have to do is leave a comment on this post on the YNS blog for a chance to win.

Thanks for stopping by!

~Kymona


Winter – Where Creativity Meets C9

Second Post for today
If your looking for the CS Take It Make It Challenge post, click here

Hello everyone!!  Can you believe its December already?  I remember when the year started!!  Another year under our belts, totally awesome.

I’m here today with the Where Creativity Meets C9 Blog Challenge Design Team!! This is fourth and final challenge for 2016!! Exciting right!!  I think so!!

So without further-a-do, take a look at our challenge theme:

winter

Take a look at my card:

warm-up-wcmc9

For this challenge, I used one of my favorite stamps sets from Concord and 9th for 2016, Cozy Up!

These warm winter socks are perfect for the winter!!  I love wearing thick comfy socks in December!!  It adds to the holiday feel!!  LOL!!

All I did was stamp the image 4 times using Clearsnap Colorbox Wicked Black Ink and colored it with a limited edition of Caran d’Ache Discovery Set Watercolor Pencil in Cobalt blue and used an ADORNit watercolor brush to spread the color!!

Once the watercolor dried, I used a glue pen and added Ranger Distress Rock Candy Glitter to the top of the socks.

Nice and easy.

What do you think?  Please let know below.

I can’t wait to see how you interpret our challenge theme this month.

c9-banner

Did you know that we have a giveaway going on? Yes, we do!! Our sponsor Concord and 9th is giving away a $25 gift certificate to their shop!!  Yes!!!  Isn’t that big.  Plus the winner gets to be a guest designer for a future challenge.

Here’s how: Create a project using Concord and 9th and upload it on the Where Creativity Meets C9 blog by the 29th of every month of for a chance to win.  A random winner will be chosen and it could be you!!

Are you ready?  So, go and create!!

Please don’t forget to follow Where Creativity Meets C9 on Facebook, Instagram and the Blog.

Supplies used:
Cozy Up Stamp Set   

Thank you so much for stopping by!

I hope to see all of you in 2017!!  We have some great challenges for you in the new year!!  See you there!!!

~Kymona

Snowy Ornament: CS Take It Make It Challenge

Hello everyone!!  I’m here today with CS Take It Make It Design Team for our CS Take It Make It: Take a Stamp Challenge for the month of December.

I’m so sad to say that this is my last post as a CS Take It Make It Design Team member.  I want to thank Trish for the opportunity to be apart of this amazing design team since 2014!! This was one of my very first design teams and I’ve had a blast. It was a hard decision to step down but it’s time for me to focus on other things.

I hope all of you continue to play along with this challenge because its super fun. I will participate from time to time when I can.  Maybe I could win one of those fabulous prizes, LOL!!!

Well enough of this mushy talk, let’s get on with the challenge!

This month’s theme is Snow and Ice!!  Create a seasonal project or use lots of white products!  Think gesso, embossing paste, white paint, embossing powders and glitters. Just remember to include a rubber/polymer stamping on your project somehow, somewhere!!

Take a look at my card:

snow-ornament

I went with some white and some snow!!  This WPlus9 Merry Ornament Shaker Die is so super cute and fun to play with.

To create this card, I die cute the shape out of the white cardstock. Then I used We R Memory Keepers Fuse Tool and We R Memory Keepers 4 x 6 Waterfall Photo Sleeves to create the shaker pocket. I added some Stampendous Shaved Ice into the pocket.  Then I added 3M Foam tape around the shaker pocket and to the perimeters of the white panel. I attached the white panel to the red card base to finish the card off.

Where is my stamping you ask?  It’s on the inside of my card.  The front was so pretty, I just couldn’t stamp on it so I added my stamping to the inside of my card!!

Take a look:

merry-christmas-inside-timi

I used Mama Elephant Jingle Greetings Stamp set for the inside of the card.

Nice and easy!

Sooooo, what do you think? Please let me know below.

Prizes:

We have two prizes to offer this month, the first is our sponsor prize. This winner will be chosen randomly from all of the entries in the challenge! The sponsor for December is: Craft Box!

craft-box prize

Prize: A Bundle of Goodies

Our second winner is our Design Winner. This winner is chosen by our DT, who all vote for their favorite design from all of the entries. This winner will have their winning project published in Craft Stamper Magazine, they will have a GDT slot for an upcoming challenge, and will also feature in their very own Winners Profile blog post!

Now if that isn’t a reason to play along I’m not sure what is!!

I can’t wait to see what you come up with.

Supplies used:

wplus9-merry-ornament-shaker jingle_greetings

Thanks again for all of your support and for stopping by!

~Kymona

How to Display Your Children’s Work

Hello everyone!!  I’m up on the Deflecto blog today sharing you how to display your children’s work using Deflecto’s VersaGrip Magnetic Sign Holder.

Here’s a sneak peak:

kt-coloring-card-magnetic-holder-2

Do you want to know more?  The entire tutorial and tons of photos are on the Deflecto blog for your review.

Let me know what you think and if you would display your little ones art work.

Thanks for stopping by!

~Kymona

Using Stickers to Decorate a Frame

Hello everyone!!  I’m up on the Deflecto blog today sharing my how use sticker to decorate a Deflecto Curved Magnetic Frame.

Here’s a sneak peak:

kt-christmas-curved-magnetic-frame-sneak-peek

Do you want to know more?  The entire tutorial and tons of photos are on the Deflecto blog for your review.

Let me know what you think and if you would adapt this list making project for Thanksgiving this year.

Thanks for stopping by!

~Kymona

Hero Arts Shaker Tag – a2z Scrapbooking December 2016 Challenge

Hello everyone!!  I’m here today with a a2z Scrapbooking Challenge. The theme this month is Anything but a Card!!

anthing-but-a-card-banner

Take a look at my tag:

img_8128

Here is how I created this tag:

I gather all of my supplies needed to create a tag:  Hero Arts Joyful Tiding Tag Set, Hero Arts Raspberry Ink, Hero Arts Black Ink, Lucy Abrams Ivory Sequin, We R Memory Keepers Fuse Tool, We R Memory Keepers Photo Sleeves,  and Tombow Mono Adhesive Plus, We R Memory Keepers Crop-a-dile and a ColorBox Art Dauber.

I die cut three tags so that I could stack them on top of each other.  Then I used the sponge dauber to add some color using the Hero Arts Raspberry Jam Ink.

happy-holiday-tag-supplies-a2z

Once the top tag was inked to my liking, I adhered the two additional tags with Tombow Mono Adhesive Plus.

happy-holiday-tag-stacking-a2z

happy-holiday-tag-3

Once all of the pieces were in place, I used the Mini MISTI to stamp the sentiment on the tag.


happy-holiday-tag-stamping-a2z

Now the tag is ready to become a shaker.

happy-holiday-tag-together-a2z

I gathered all of the supplies need to create the shaker portion of the tag.

You need a We R Memory Keepers Fuse Tool, We R Memory Keepers Fuseable Photo Sheets.

happy-holiday-tag-fuse-a2z


Place the finished tag inside the plastic and line the die up over it.  Use Washi tape to hold it down.  Then you want to glide the fuse tool around the die, sealing it.

happy-holiday-tag-fusing-2-a2z

Once you add the sequin is added inside, seal the top of the tag the same way you did the body of the tag.

Punch a hole using a We R Memory Keepers Crop-a-dile and string a piece of string.

Nice and easy! Super cool to create!

img_8128

What do you think? I would love to hear what you think below.

I hope you love what you see and that it inspires you to join us this month. You have the entire month to create a new project and enter it into our challenge. By entering you will have a chance to win a $25 Gift Certificate to the a2z Scrapbooking Store. Winner will be announced on the 7th of September.  Good Luck!

If you would like to purchase any Hero Arts products please head on over to the store and use the coupon code KYMONA15 to get 15% off your purchase.

Supplies used:

ha-joyful-tidingha-raspberry-inkTombow Permanent Adhesive Plusivory-sequin

Thanks for stopping by!

~Kymona