Top Dog Dies – Balloon Sneak Peek

Hey everyone!!!  Its Top Dog Dies Wednesday!!  I’m here with a sneak peek of Top Dog Dies Balloon Die Set!!

This set is super cute and versatile.  This set, along with 4 other die sets will go live August 4!!  Your going to love the new dies, trust me!! Plus I’ll have a giveaway on the release date!!

So stay tune!

Now on to my card:

Go and Celebrate (TDD)

The Balloon Die Set comes with 6 balloon dies ranging from small to big!!

I used the largest die to create this card.  Super easy to use and check out that stitching!!  It gives the balloon such a nice finished look.

To create these cards, I just die cut the balloon adhered them to the top left portion of the card.  I used Stampin’ Up! Whisper White Bakers Twine.  I used Mama Elephant Make A Wish Stamp Set to stamp my sentiment using Lawn Fawn Deep Sea Ink.  I added Clear Wink of Stella to the sentiment and the stars. 

Check these out:

Lets Party Celebrate (TDD)


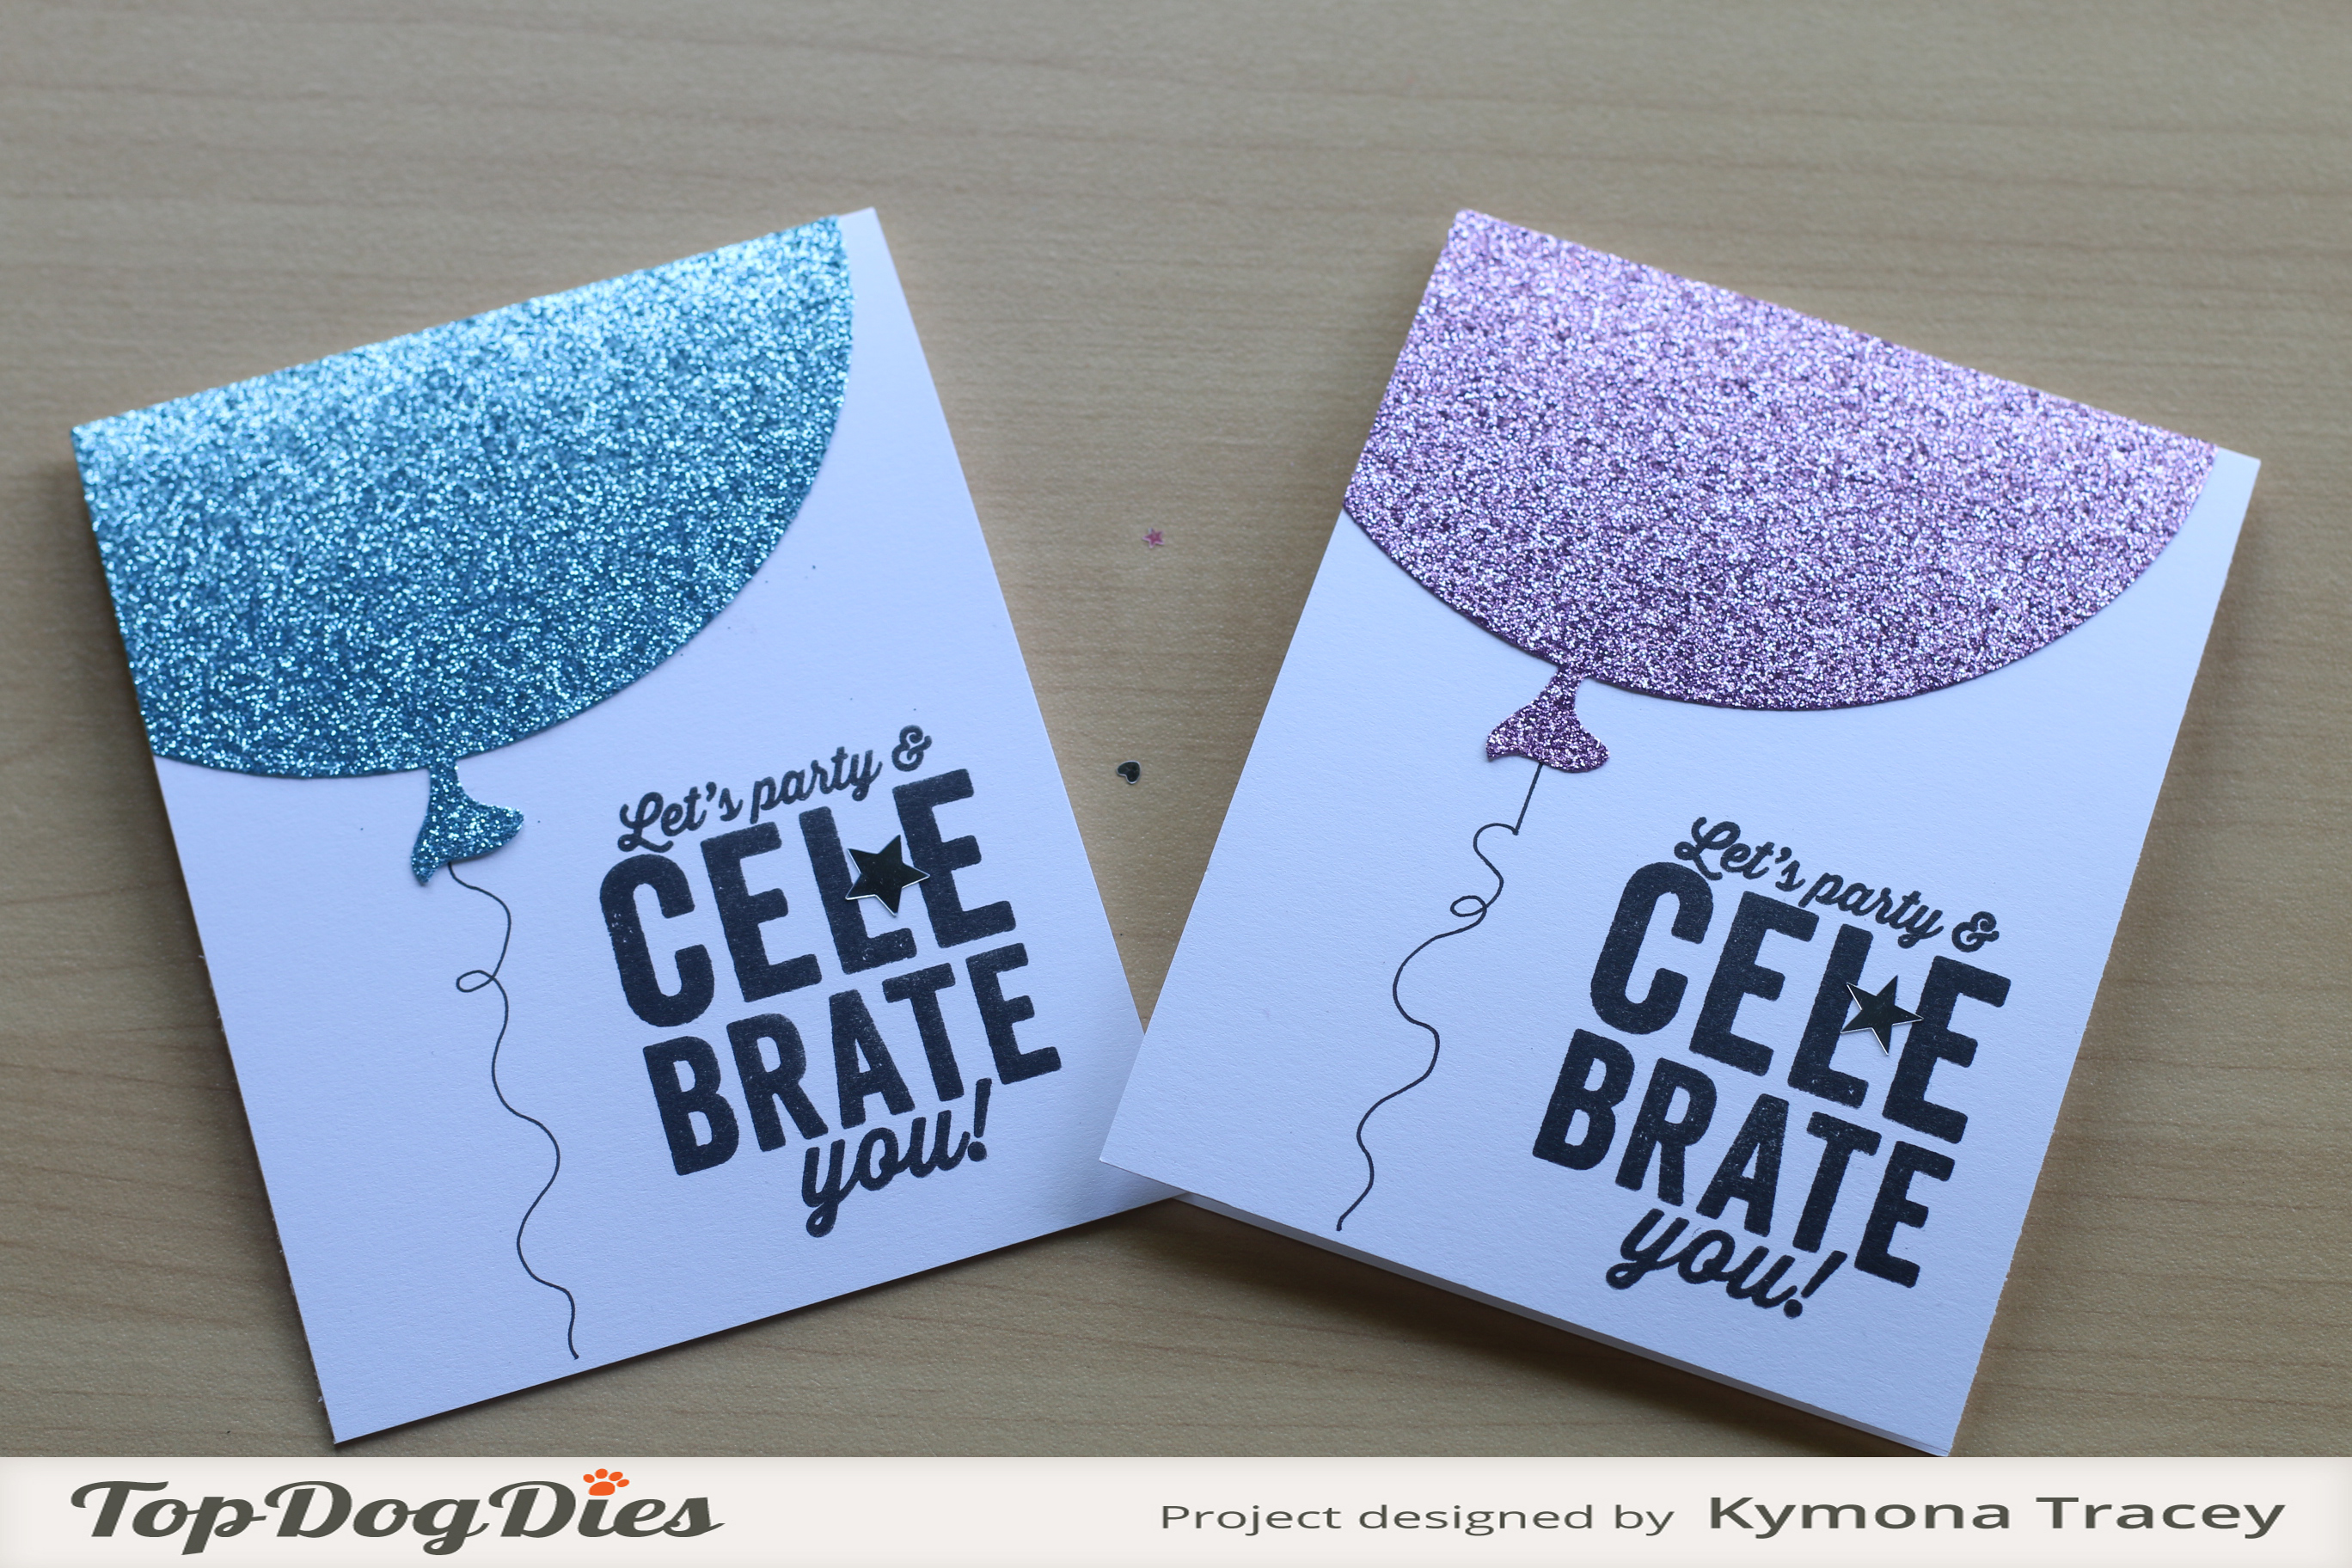
I used some glitter paper to create these balloons.  I love how they turned out.

To create these cards, I just die cut the balloon adhered them to the top left portion of the card.  I used my Copic Multiliner to draw the strings.  I used Simon Says Stamp Birthday Big Wishes Stamp Set to stamp my sentiment using My Favorite Things Hybrid Ink.

Now you see those two stars in between my sentiment?  Well, I had to add those because some of the black ink caught my paper on the pink balloon while I was stamping it.  I think I saved it pretty well. I used Lucy Adams Star Shine Sparkly Sequin to save the day.

So what do you think?  Let me know below.

I can’t wait for you to see the full reveal!!  You are going to love this die set!

Supplies used:

Big Birthday WishesMFT Hybrid Black Ink Copic MultilinerMAKE A WISHDeep Sea Ink

Whisper White Baker's TwineLA Star Shine Sparkly Sequin Wink of Stella clear


Thanks for stopping by!!

~Kymona

OCC: Background Check Homework Day 2

Hello everyone!!  I’m here today just popping in to share my homework for my new Online Card Class called Background Check!!

Its all about creating different backgrounds for our card designs.  Day 2 was all about creating backgrounds using stamping techniques. The possibilities are endless with this type of designs.

So I started with Kristina’s technique which is Dye and Pigment Ink Stamping.

Take a look at my card panel that I created:

Dye and Pigment Stamping Finish (OCC)

I used Lawn Fawn Argyle Backdrops to create this pattern.  I used Papertrey Ink Summer Sunrise, Hawaiian Shores, and Berry Sorbet Dye Ink.  I also used Hero Arts Unicorn Pigment Ink.

Dye and Pigment Stamping (OCC)

I love how this turned out.  I have to try this with other pattern stamps that I have in my stash.

Now I have to go to finish up Day 2 and start on Day 1.  I’m working backwards but I’m ok with that.

What do you think?  Let me know below.

Supplies used:

PTI Berry Sorbet InkPTI Summer Sunrise InkHawaiian ShoresHero Arts Unicorn Pigment InkLF Argyle Backdrops

Thank you for stopping by!!

~Kymona

CASology 157 – Wings

Hello everyone!!  It’s CASology Tuesday!!  We are back with another Cue Card for you!!!

This week’s cue card is super simple!!


Week 157 - WingsTake a look at my card:

Wings (CAS)

My butterflies were punched out of the watercolor panels I created a week ago.  Take a look at how pretty they turned out.

Watercolor pieces

I used Stampin’ Up! Elegant and Bitty Butterfly Punch to punch out my butterflies out of one of the watercolor panels above.

I adhered them with glue dots.

I used stamped and embossed Papertrey Ink Lunchbox Love  with Hero Arts White Embossing Powder.

I rounded the bottom left corner and that’s it!!  I’m done.

I love how this card turned out!!  I hope you do to!  Let me know below.

Now its your turn!! I can’t wait to see what you come up with!

For more inspiration, check out my fellow Design Team members blog for more awesome work.

Design-Team

Gillian Ross

Hannelie Baster

Hazel Hodgkins

Jen Wills

Joyce Mehrberg

Judy Marino

Kimberly Wiener

Kymona Tracey ←Me

Melissa Chipperfield

Tracey McNeely

Our Sponsor this week is 7 Kids College Fund.

Supplies used:

SU Bitty Butterfly PunchElegant Butterfly PunchPTI Lunchbox LoveHero Arts Clear Embossing Powder

Thank you so much for stopping by.

~Kymona

YNS Sketch and Color Challenge #19

Hello everyone!!!  I’m here today with Your Next Stamp (YNS) and this week’s Sketch and Color Challenge #19!!

Each challenge has a sketch and a color combo to choose from.

Take a look at the sketch:

YNSSketch19

Take a look at the color combo:

YNS Color Challenge 19

I choose to go with the sketch! Take a look at my card:

Hello Fishes

YNS Supplies: Sea Creatures Set One, Sea Creatures Set Two, Whatnot Sentiment Five,
Love Earth Gumdrops

Other Supplies: Broken China Distress Ink, Copic Markers, Versafine Ink, MFT Hybrid Ink, foam adhesive

I cut my front panel to match the sketch. I used Broken China Distress Ink to blend my sea background.  I stamped the seaweed and bubbles using Versafine Ink.

I used My Favorite Things Hybrid Ink to stamped my fish and whale. I colored them using Copic Markers: whale C1, C3, C5, O and the fish B12, YR68

I attached the whale, fish and front panel with foam adhesive.

Staying with the sketch I added YNS Love Earth Gumdrops in the corners of the scene.
I have to admit creating scene are hard for me.  I’m not sure why but they are.  I hope a did a good job here.

So are you ready for the new challenge?

You have until August 6th at midnight EST to play along and submit your project on the YNS Blog post.  One random participant will win a $15 gift certificate to the Your Next Stamp Store.  If YNS stamps or dies are the focal point then the winner receives and additional $5 gift certificate fro a total of $20.  The winner will be announced on the YNS Blog the Sunday after the challenge closes.

Supplies used:

YNS Love EarthSea Creatures One Sea Creatures twoWhatnot Sentiments FiveMFT Hybrid Black InkCopic Markers3M Double Coated Foam TapeDistress Ink Broken ChinaOnyx Versafine Ink

Thank you so much for stopping by!!

~Kymona

Top Dog Dies – Watercoloring

Second Post for today
If your looking for YNS – July Feature Day, click here

Hello everyone!!!  Its Top Dog Die Wednesday!!  I’m here showcasing Top Dog Dies Hot Air Balloon Die Set!!

Hot Air Baloon Die


I love this set.  Its so cute when you die cut the balloons and clouds out!! The detail stitch lines give off a great finishing touch.

Take a look at my card:

Sending Smiles (TDD)

I love how this card turned out.  I used one of those watercolor pieces that I create last week.

Watercolor pieces

Having these ready to go makes it so much easier to get cards done at the last minute.  I used one sheet and cut a bunch of balloons out.  So to use now and some to use later.

Creating this card was super simple.

All I did was die cut the balloons out of the watercolor panel and cut the balloon basket out of black cardstock.

I adhered the pieces the way I wanted with liquid glue and foam adhesive to the card base.

I used Mama Elephant Up and Away Stamp Set to stamp my sentiment under the balloons.

I used We R Memory Keepers Corner Chomper to round the bottom right corner of the card.

Sending Smiles

So what do you think?  Let me know below!  I’m sending this card over sees to a great friend of mines. I hope she likes it.

Supplies used:

Hot Air Baloon Die UP AND AWAY We R Memory Keepers Corner ChomperSSS Fog cardstockMFT Hybrid Black InkWhite Vellum


Thank you for stopping by!

~Kymona

YNS – July Feature Day

F207711523

Hello everyone!!!  I’ here today with another YNS creation to inspire you and a chance to win a stamp set of your choice!!

Since this is my first time participating in feature day let me explain!

On the 22nd of every month, YNS Design Team creates more samples featuring YNS products and shares them with all of you!!

The super duper awesome part of it all besides our awesome samples, you could win a stamp set of your choice!!  Now how super cool is that!!

Scroll to the bottom to find out how!!

This month we are focusing on “Dear Summer = What Sings Summer to You”!!  Yes, summertime!!  How doesn’t love the summer time.  Its the best season for me.  I love the brightness of summer and the long hours!  Oh even the summer rainbows!!

Now take a  look at the card I created to inspire you:

Rainbows (YNS)

Tell me summer rainbows aren’t a pleasant sight in the afternoon sky.  They will make you smile after a small rain shower!

Clean and simple is the name of my summer game.  I hope I’ve inspired you to think of what summer sings to you?

What do you think?  Let me know below!!

Now on to that prize!!

DTDare2candy-547x232

All you have to do is leave a comment on the YNS blog for a chance to WIN a YNS stamp set of your choice!!  Super simple and easy!!  You will get to see my fellow DT’s projects as well.

So head on over, you don’t want to miss this one!!


Supplies used:

Rainbows and Happiness  Copic Markers clear gumdrops small

Thank you for stopping by!!

~Kymona


Watercoloring with Ken Oliver Color Burst

Second Post for today
If your looking for the Playing with Secondary Colors, click here

Hello everyone!!  I’m here again for a second time!!  Yes, two in a row.  Once again I’m trying to get my homework done for MFT Summer School!

Lesson #8 – Primary Colors

Primary colors are the most basic colors on the color wheel!!  They are Red, Yellow and Blue!!  These colors create all of the other colors you see in the world around you.

Colors Wheel


They form a triangle, take a look at the color wheel above!!

Amazing right!!  Now take a look at my card:

Hello down (MFT)

I used two primary colors to create that watercolor hello!! I love how it turned out.

I used Ken Oliver Color Burst Lemon Yellow and Alizarin Crimson which are primary colors.  I added Pthalo Green which is a secondary color for added interest.  I don’t have the blue color burst yet. I will get it very soon.

Take a look at that watercolor piece:

IMG_4093

To create the card, I just used the My Favorite Things Die-namics TRANSFORM-ables Say Hello Die and cut out the hello and attached it to my card base that I previously cut out.

Hello (MFT)

Super simple and easy.

So what do you thing of primary colors?  I have to say this lesson really gave me a different perspective about colors.

What do you thing?  Please let me know down below.

Supplies used:

MFT Say HelloKen Oliver Color Burst - Alizarin Crimson Color Burst Lemon Yellow Pthalo Green Color Burst

Thank you so much for stopping by!

~ Kymona

Playing with Secondary Colors

Hello everyone!!  I popping in here with some homework for My Favorite Things Summer School Lesson this week.

Lesson #9 is all about Secondary Colors!!

What are Secondary colors you ask?  They are the direct counterparts of the primary colors, red, yellow and blue.  They are Orange, Green and Purple!!

Colors Wheel

Take a look at my card:

Best of Luck

For my card I used 2 primary and one secondary color!! I love how my card turned out.  I was able to combine two of my favorite products from My Favorite Things!  The Adventure is Calling Stamp Set and the New Jumbo Peek-A-Boo Die Set!!

I used my Fuse Tool to create my shaker pocket and I added Lucy Adams French Lavender Sequin.

I colored the little girl with : R39, E23, E00, E11, E33, V15, R20.

I stamped the sentiment using My Favorite Things Hybrid Black Ink.

If you want to know how to make the shaker pocket, check out this post!

So how do you think I did with this lesson?  Let me know below!!

Supplies used:

MFT Adventure Is CallingMFT Peek-a-Boo Circle DieFrench Lavender fuse bundleCopic MarkersMFT Hybrid Black Ink


Thank you for stopping by!

~Kymona

CASology 156 – Line

Hello everyone!!  It’s CASology Tuesday!!  We are back with another Cue Card for you!!!

This week’s cue card is super simple!!  The shortest distance between to points is a straight line!!!

This week we are all about lines!!

Week 156 - LineTake a look at my card:

Thank you (CAS)

I went with Chevron lines!! Those embossed chevron lines are totally amazing.

The lines in the banner and the lines in the leaves are a plus!!

Here’s how I created this card:

1.  Cut my card base to an A2 size card, 4.25 x 5.50.

2. I used Stampin’ Up! Chevron Embossing Folder to create my card panel.

3. I used Lawn Fawn Our Friendship Grows stamp set and die set to create my flower and leaves focal point.

4. I used Copic Marker Y32, Y35, Y38, G07, E33, E35, E37 to color the flower and leaves.

5. I stamped the sentiment from the same stamp set and flag the end.

6. I adhered the card panel with fun foam to the card base.  I adhered the leaves to the back of the flower with tape runner and the banner to the card panel with foam tape.

7. I added Clear Wink of Stella the flower.  I added to crystal clear gumdrops underneath the banner for balance.

I love how this card turned out!!  I hope you do to!  Let me know below.

Now its your turn!! I can’t wait to see what you come up with!

For more inspiration, check out my fellow Design Team members blog for more awesome work.

Design-Team

Gillian Ross

Hannelie Baster

Hazel Hodgkins

Jen Wills

Joyce Mehrberg

Judy Marino

Kimberly Wiener

Kymona Tracey ←Me

Melissa Chipperfield

Tracey McNeely

Our Guest Designer this week:

Anita

I’m linking my card up to Addicted to Clean and Simple Challenge this week.

It’s all about Chevron!!!

ATCAS codeword chevron

Supplies used:

Chevron FolderLF Our Friendship GrowsLF Our Friendship Grows dieCopic MarkersFun FoamTombow Xtreme3M Double Coated Foam Tapeclear gumdrops small Wink of Stella clear

Thank you so much for stopping by.

~Kymona

Muse Challenge #124

Second Post for today
If your looking for The Alley Way Stamps post, click here


Hello everyone!!  I’m so happy to be here today.  I’m playing with the Muse Challenge today.  I haven’t played in a long time. I just haven’t had the time.

So it feels good to be able to play now.

The Muse this week is Ardyth and here is her card:

Ardyth

Take a look at my card:

Our Friendship Grows (MUSE)

I totally love this stamp set from Lawn Fawn.  Its called Our Friendship Grows.

To create this card, all I did was distress the background with Distress Ink Broken China and Mowed Lawn.

Then I stamped and die cut three of the flowers.  I used Copic Marker E33, E35, E37 to the center of the flower.

I attached the flower with foam adhesive and used my ruler and Copic Multiliner to draw in the stem.

I added Clear Wink of Stella to the center of the flower.

I stamped the sentiment using My Favorite Things Hybrid Ink.

I trimmed my card panel down and adhered it to the card base.

Super easy and Fun!!

You will see more of theses flowers this week.  Such a pretty set of flowers.

Supplies used:

LF Our Friendship Grows Distress Ink Broken China Mowed LawnCopic Markers3M Double Coated Foam TapeWink of Stella clearCopic MultilinerMFT Hybrid Black Ink

Thank you for stopping by!

~ Kymona