Hello everyone!! I’m here today with the long awaited We Are Memory Keepers Planner Punch Review!!

I learned about the Planner Punch before Creativation this year. I don’t remember where but when I saw it I knew that I had to stop at the We R Memory Keepers booth to test this one out. That I did and I’ve been waiting for this product to hit the stores so that I could get one for myself.
Let’s get started:
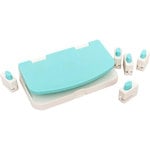
The Planner Punch Board comes with Adjustable Punches

The Planner Punch Board comes with 5 circle inserts. Use these inserts for ring binder planners.

The Planner Punch Board has a Punch Position Number chart. You use these numbers to align the punches up correctly.

The Planner Punch comes with hole catcher that opens so that you can empty it out.

You can store your inserts flat within the base.

The directions are printed directly on the back of the punch board. (After reading the direction, I found the sticker for the happy planner

Lets see how this tool works:
Mind you, I did not read the directions before playing with it. I wanted to see if I could figure this tool out just by playing with it.
The paper I used was Canson Watercolor paper weighting 140lbs.
I started with the circle binder inserts that came with the punch board. I have a two ring binder that I wanted to add a watercolor insert.
- I measured one of the pages inside the binder to cut the watercolor paper to the correct size.

- Then I used the middle line in the page protector to center my paper. Once that was done, I placed the inserts in the corresponding punch position number. Which is 10 and 63.
- I punch the holes.

- The holes were punch cleanly.

- The page fits perfectly in the binder.

For the next test I used the circle inserts to create a watercolor panel for a 6 ring binder.
- Follow steps 1 and 2 from above.
- For the 6 ring binder, you only need three of the inserts.
- Line the paper up using the grove on the left side of the punch and punch the first three holes 11, 21, 30.

- Turn the paper around and move the punches down to 14, 24, 33 and punch.

- Fits perfect in my 6 ring binder.

The planner punch board is only for ring binders. They have inserts to fit the other planners on the market.
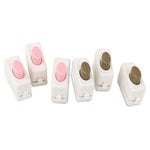
Check out the other inserts:

The inserts on the left are called the Disc Punch Inserts and the ones on the right are called the Spiral Punch Inserts.
The disc punch inserts work in the same fashion as the circle inserts. The spiral punch inserts work a bit differently.
Lets start with disc punch inserts:
- For the disc inserts, I used one of the pages from my mini planner to line up the disc inserts.
- There are 7 rings but the package comes with 6 inserts. So you have to turn the paper over to punch the last hole.

- The planner position numbers are 2, 15, 28, 53, 65 and 2 again for the last one.

- It fits perfectly in my planner.

The spiral inserts are a bit different. You only get one punch for the different punches.
The pink insert punches 4 holes per inch.
The gold insert punches 3 holes per inch.
The teal insert punches 2 holes per inch.
Lets take a look:
According to the directions, you place the punch at line 37 and use the center line to start. I didn’t do that. So you will see my photos different then what the company may show.
- Place the insert inside the punch board.
- I used the line guide to line my paper up so that I can punch.
- Then I used the guide on the side of the punch to punch even space holes in my paper.
- Punch the entire side of the paper.


I went against the directions and started where I wanted to.


Take a look at all three of them together.

All punch and the inserts are super easy to use. The possibilities are endless with this tool. You can make a varsity of handmade pages.
Here is a tip for your inserts:
They clip together so that you don’t lose a piece.

So here you have it!! The Planner Pouch Board!
What do I think?
I love it!! I recommend it for those of you who are planner lovers.
- This tool is easy to carry vs. the bigger punches for each planner system.
- It fits right in your bag.
- With this tool, you can create pages for any planner, not just the one you have.
- It’s inexpensive.
- You can create custom pages for your planner.
- You can also create your own book with it.
- It cuts though thick paper with ease.
I put in an order with Simply Charming Bags for a custom bag for my punch and the additional inserts. I will share it when it arrives.
So what do you think? Would you add this to your planner supply collection? I would love to hear from you. Leave a comment below.
Supplies used:
(Thank you so much for stopping by. Compensated affiliate links used at no cost to you. All products were personally purchased. This post was not a paid or sponsored post.)

Thank you so much for stopping by!


Such a great review of this fun new product! Love it!
Hello Mendi!! Thank you so much!! I had fun using the punch!
First, thank you for you tutorial on this punch. I saw it previewed early winter and waited impatiently for it to come available. I checked my local craft stores weekly until it came out. Bought it as soon as it was in stock. I have had a day planner for years, but haven’t used it recently as I wanted to customize it for my needs since I retired. Make it more fun, artistic. So now I am adding watercolour inserts with more expression. I have added the spiral punch inserts so far and waiting for the others to become available in the store. These will be how I bind my grandchildrens keepsakes for the future. All at my fingertips to recount their accomplishments.
Totally awesome Wanda!!! Its always fun when we can create artistic pieces and carry them with us in our planners and notebooks. The best part is saying I created that. Yes, creating keepsakes for your grand-babies is awesome. Please share. I would love to see them.
Pingback: Planner Punch Board Roundup | We R Memory Keepers Blog
Hi! I am curious if this puncher board works well for Big Happy Planner with 11 holes? Does it works well with thicker or laminated paper? =) Thank you.
I’m trying to figure out how to use this for the Blue Sky Planners 19-hole Day Designer. Could you help? I can’t figure it out.
Hey Deb!! Yes, I can help! Send your email address in the contact me and I’ll send you some photos!
Hi! I just got this punch and tried using the numbers listed on the packaging for the happy planner mini and it did not line up even close! So I am going to try your measurements! Would they be the same for the Big size?
Hey Chelsey!! What are the numbers printed on the back of your punch. They sent an updated label and I have 3, 15, 28, 40 for the mini. My numbers came from my trial and error before I had the new label. As I look at my numbers it looks like one is missing between 28 and 53. Let me look again and get back to you. I didn’t test for the Big size since I do not own a Big Size happy planner.
Thank you for this detailed review! I just bought one in the clearance at Michael’s and wasn’t sure if I made a good purchase but got it anyway as I knew it probably wouldn’t still be there. So glad I made the purchase! I am new to planners and also got a classic Happy Planner for 2019. I have a mini one I want to reuse for a craft planner and this will help me make my own pages. Thank you again 😀
You are more then welcome!! It’s a great tool can be used to create many planner options!!
Hi! Could you tell me what numbers you used for the 6 hole punch? The chart doesn’t have information for a 6 hole. Thank you!
Hey Renee! I updated the post. Place the three punches at 11, 21, 30. Flip the paper and move the punches down to 14, 24, 33 and punch. Fits perfectly.
Thank you SO MUCH!!!
You are more than welcome!!!
Will the spiral inserts only work to add pages to a binder? I have one on order but didn’t notice until now that it makes slits. Can you do a whole book that way?
Thanks
Hello Alisa!! The Planner Punch Broad comes with the circle punches that you need to make a spiral bound book. You will need the spiral rings for that. The additional punches that you see do have slits because those are made specifically for planners that comes with disks like the happy planner. I hope this answers your question.
Great!!Thanks so much!
Welcome.
hi, It was the best review!!! I want to see some like this but for TAB PUNCH BOARD. Please can you do it?
Hello Gisele!!! Thank you so much! I appreciate your kind words. I will check to see if I still have my tabs punch board. A friend borrowed it, and I don’t remember if I got it back, LOL. I will let you know.