Summer Coffee Lovers Bloghop

Summer-Coffee-Lovers-Blog-HopThis is my second post for the day

If your looking for the CS Take It Make It Post, click here

Hello everyone!!  I’m so excited to be apart of this fun Summer Coffee Lovers Blog Hop again!!

I love this hop because I love Mugs!!  Coffee, Tea, Hot Chocolate Lovers all need great mugs to enjoy their morning, afternoon and evening hot beverage.

I’m here today representing Top Dog Dies, who is a Super Sponsor.  They recently released a Mini Coffee Die Set that is to die for.

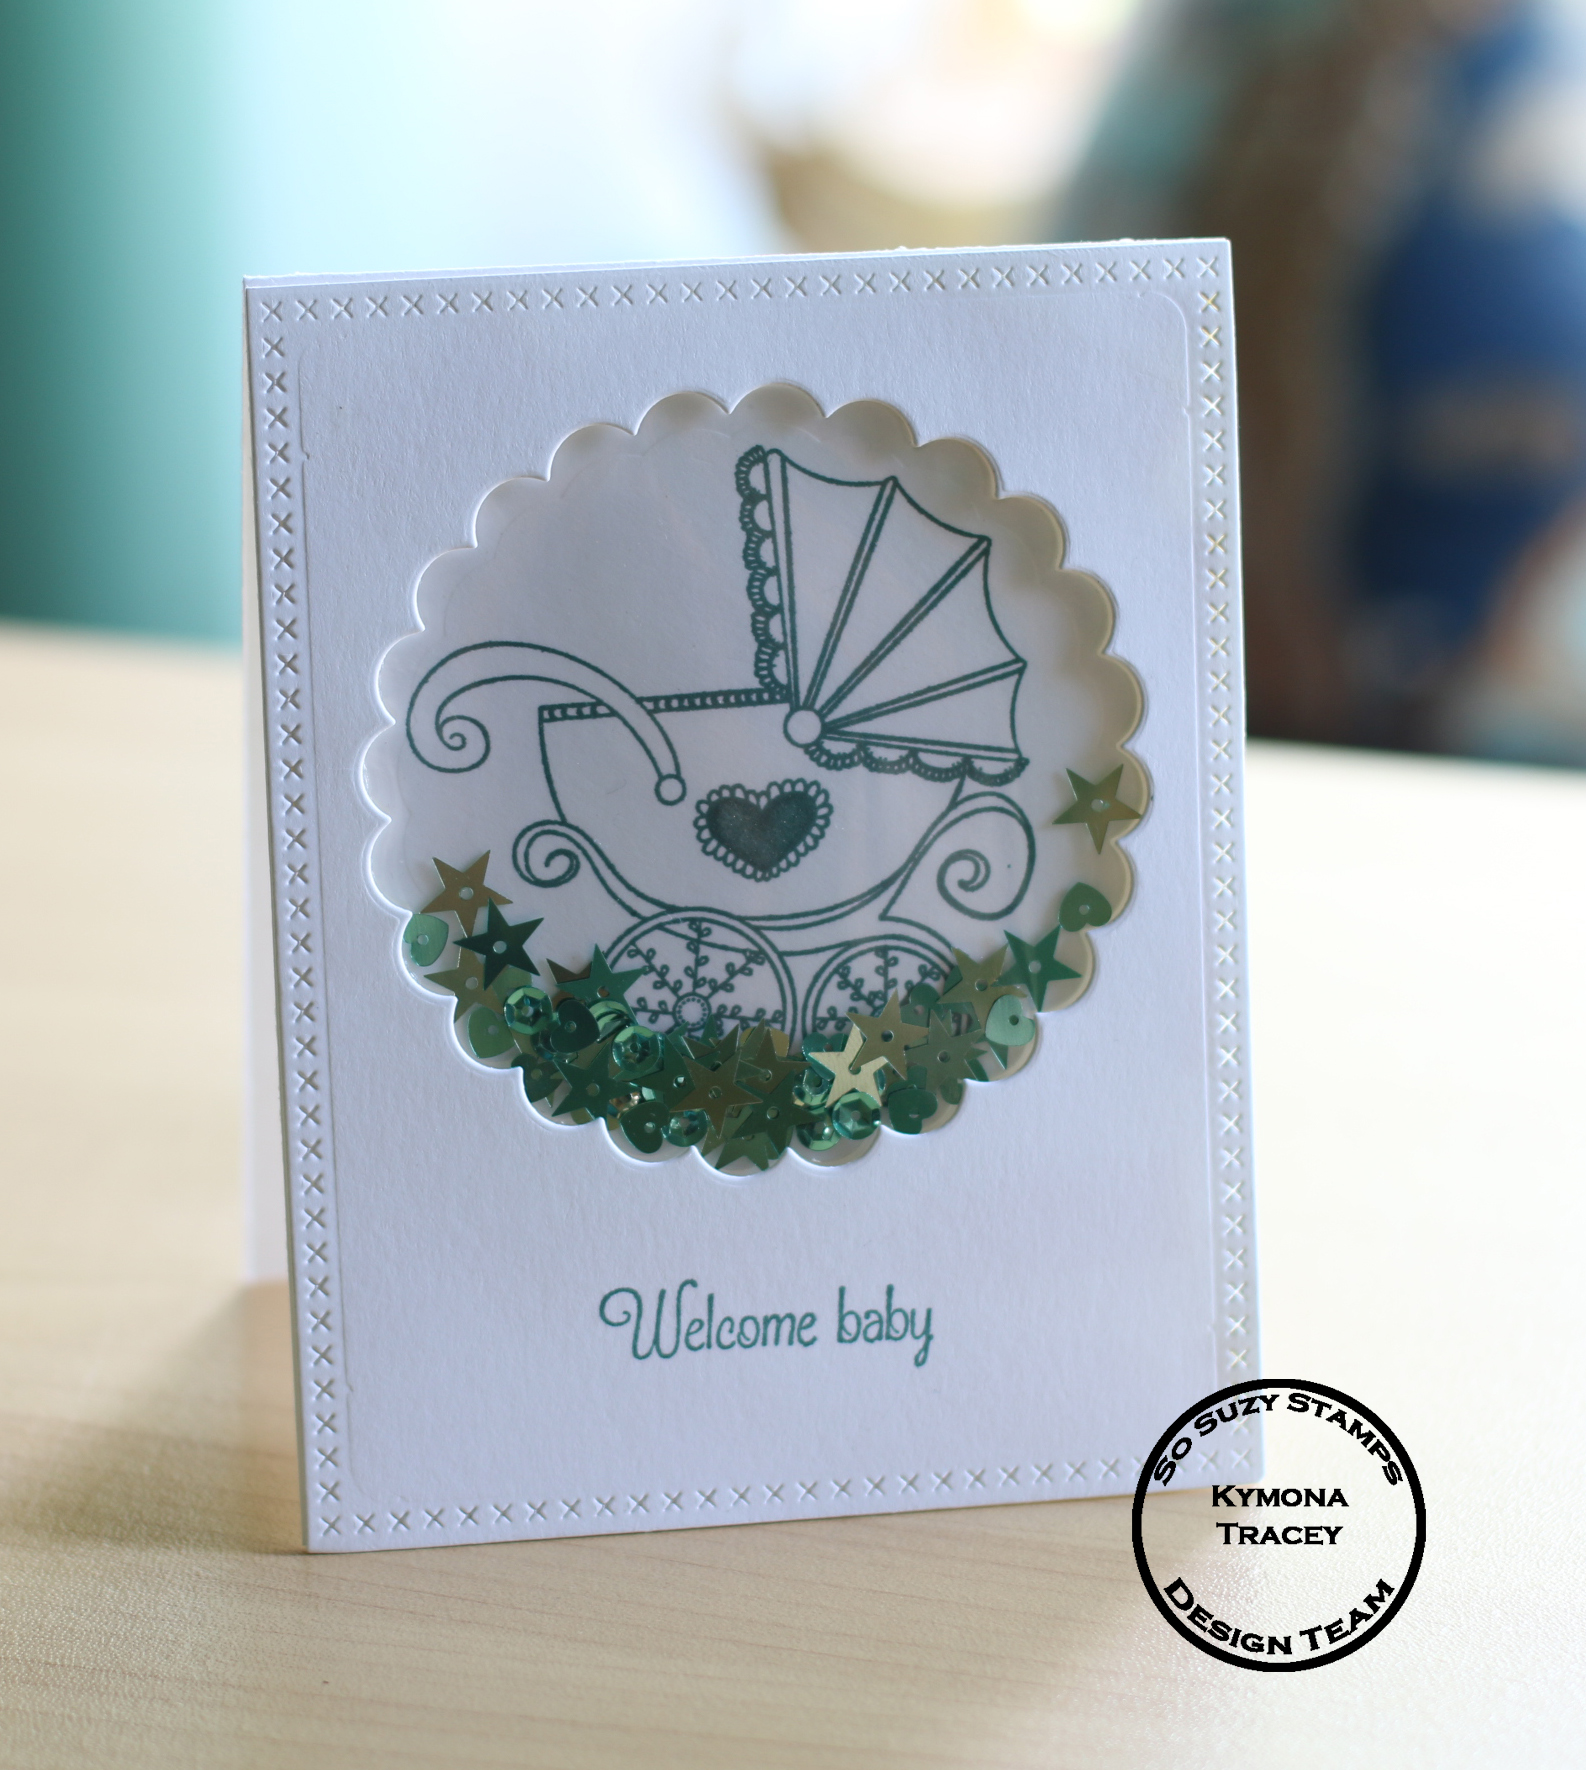
Lets take a look at my card that I created for this hop:

Awesome Coffee

For those of you who follow me know that I have this new found love of shaker cards.  I couldn’t help myself to create one for this hop!!

Here is how I created this card:

1. I cut my Neenah Desert Storm cardstock to an A2 size card (4.25 x 5.50).

2 I stamped My Favorite Things BG Pinstripe Background using Simon Says Stamp Khaki Stamp pad unto the card base.

3. I cut my card panel out of  Neenah Solar White cardstock to a size smaller then the card base.

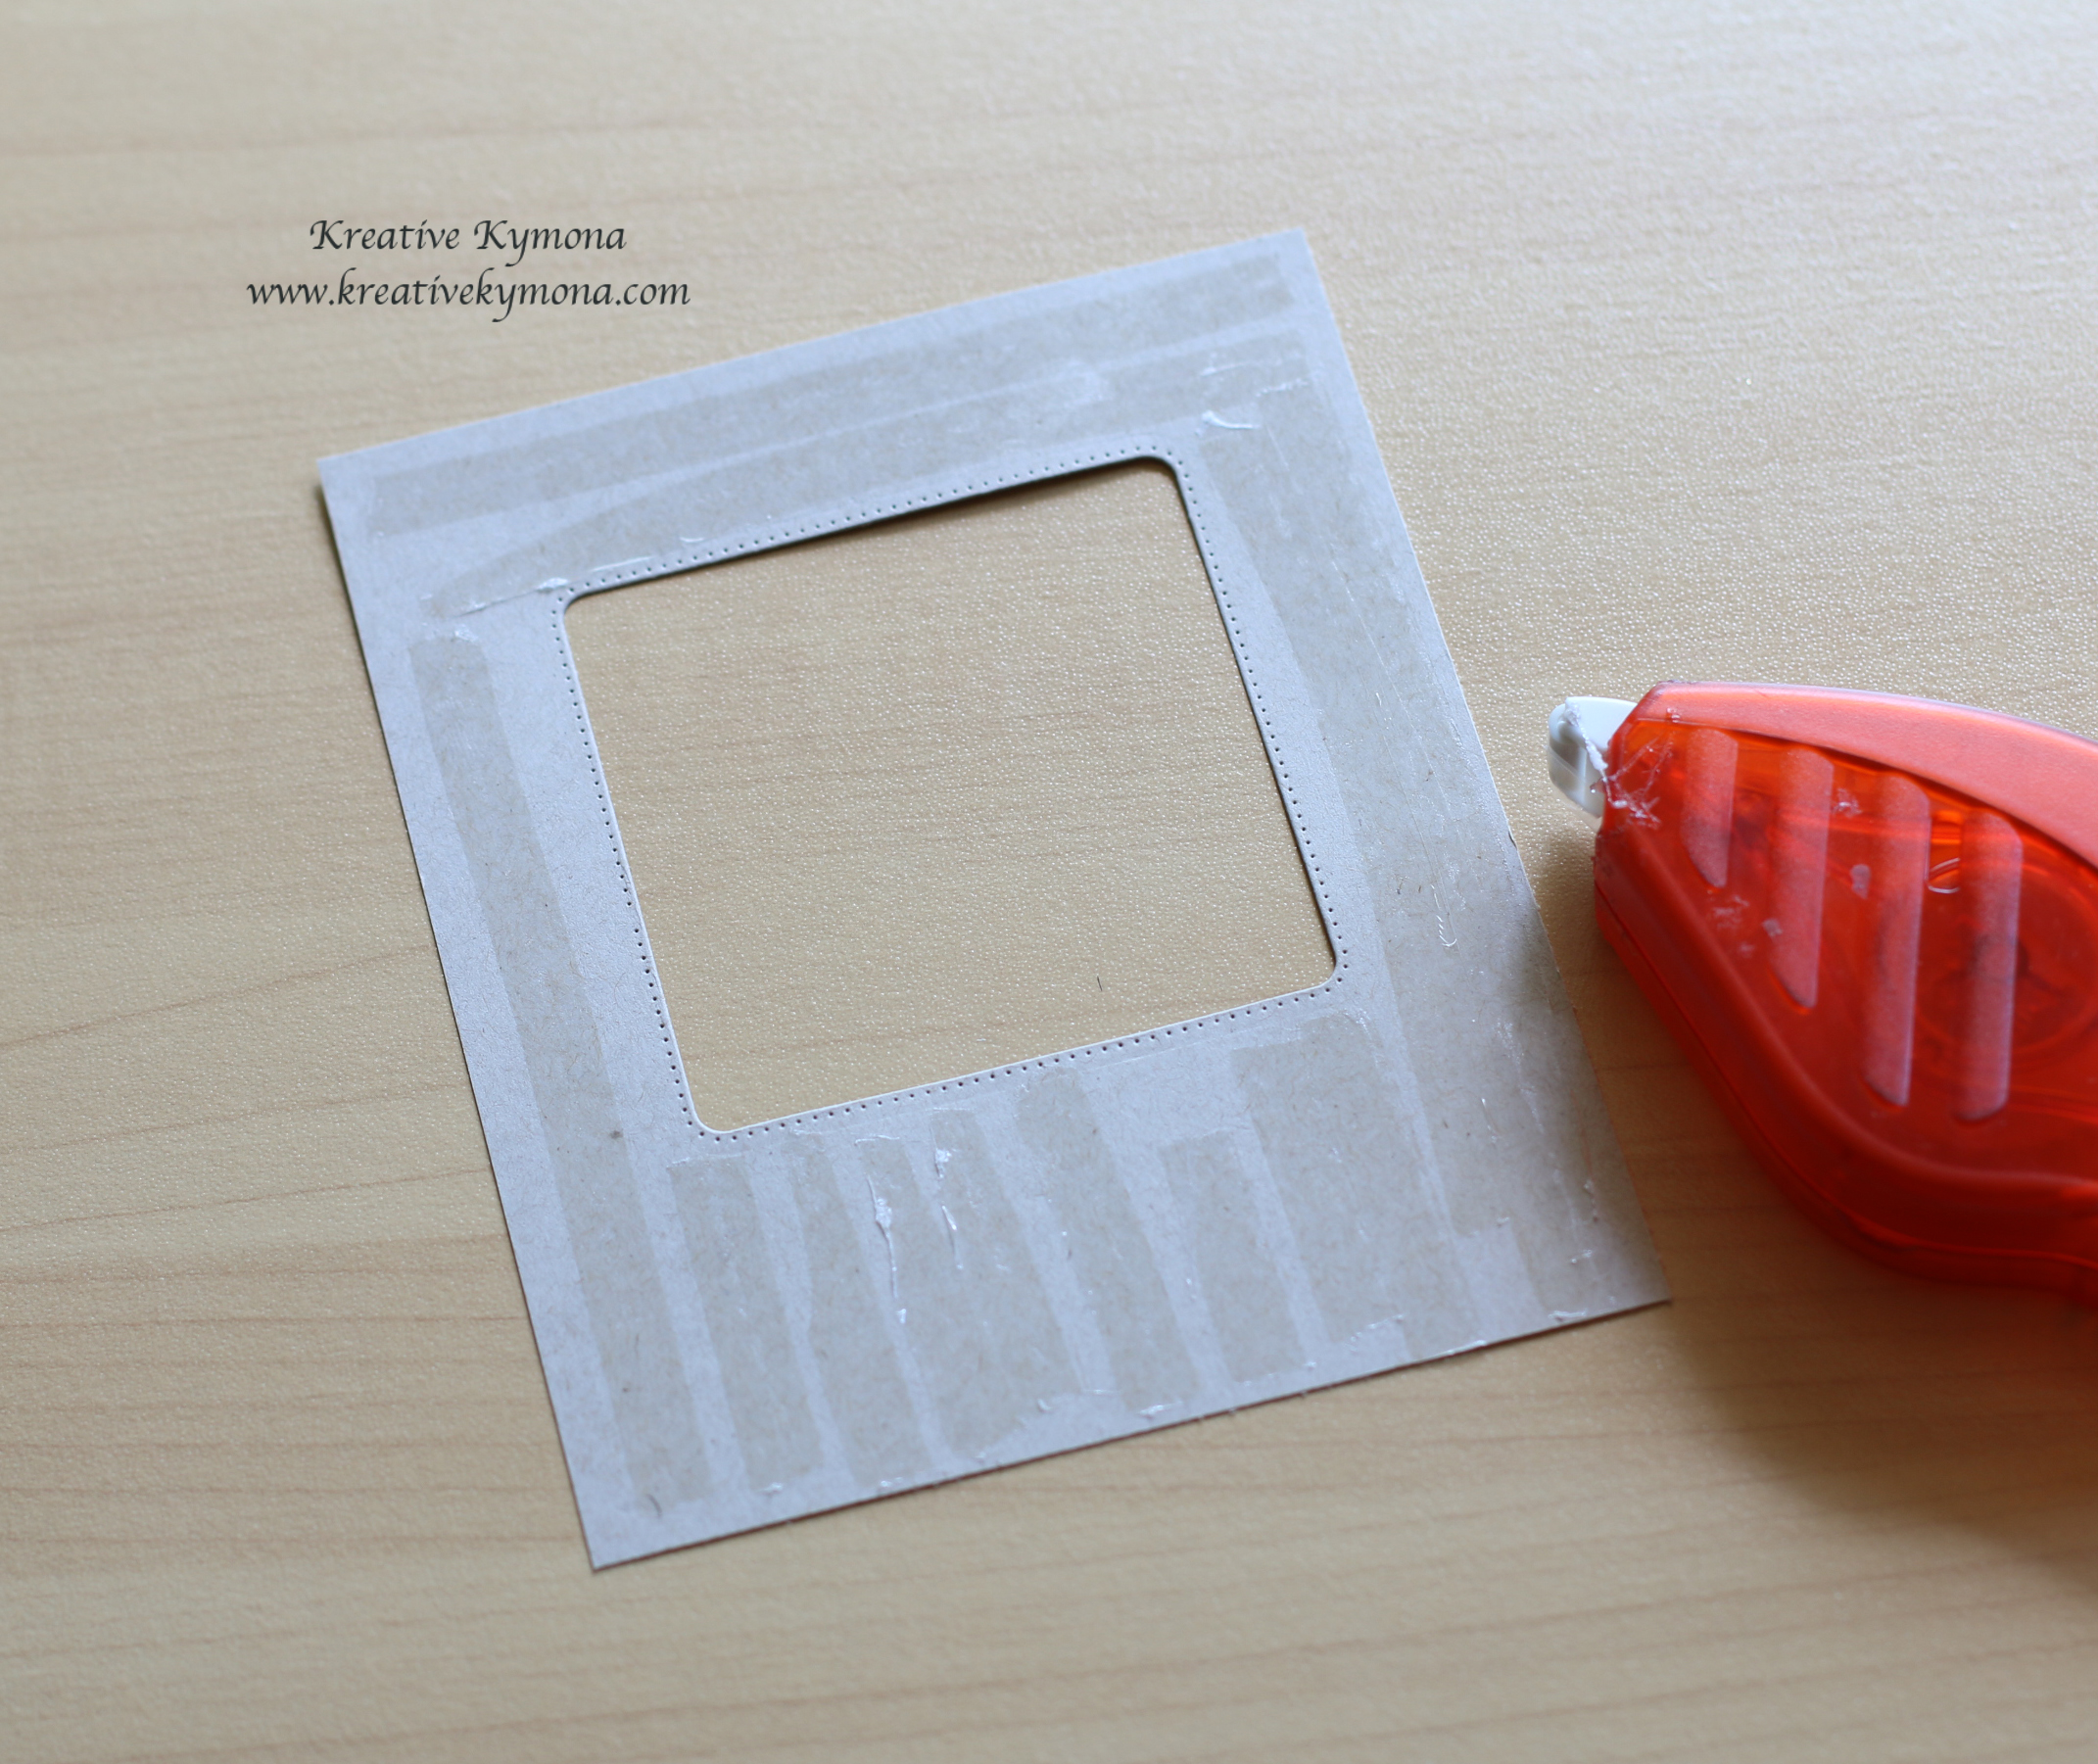
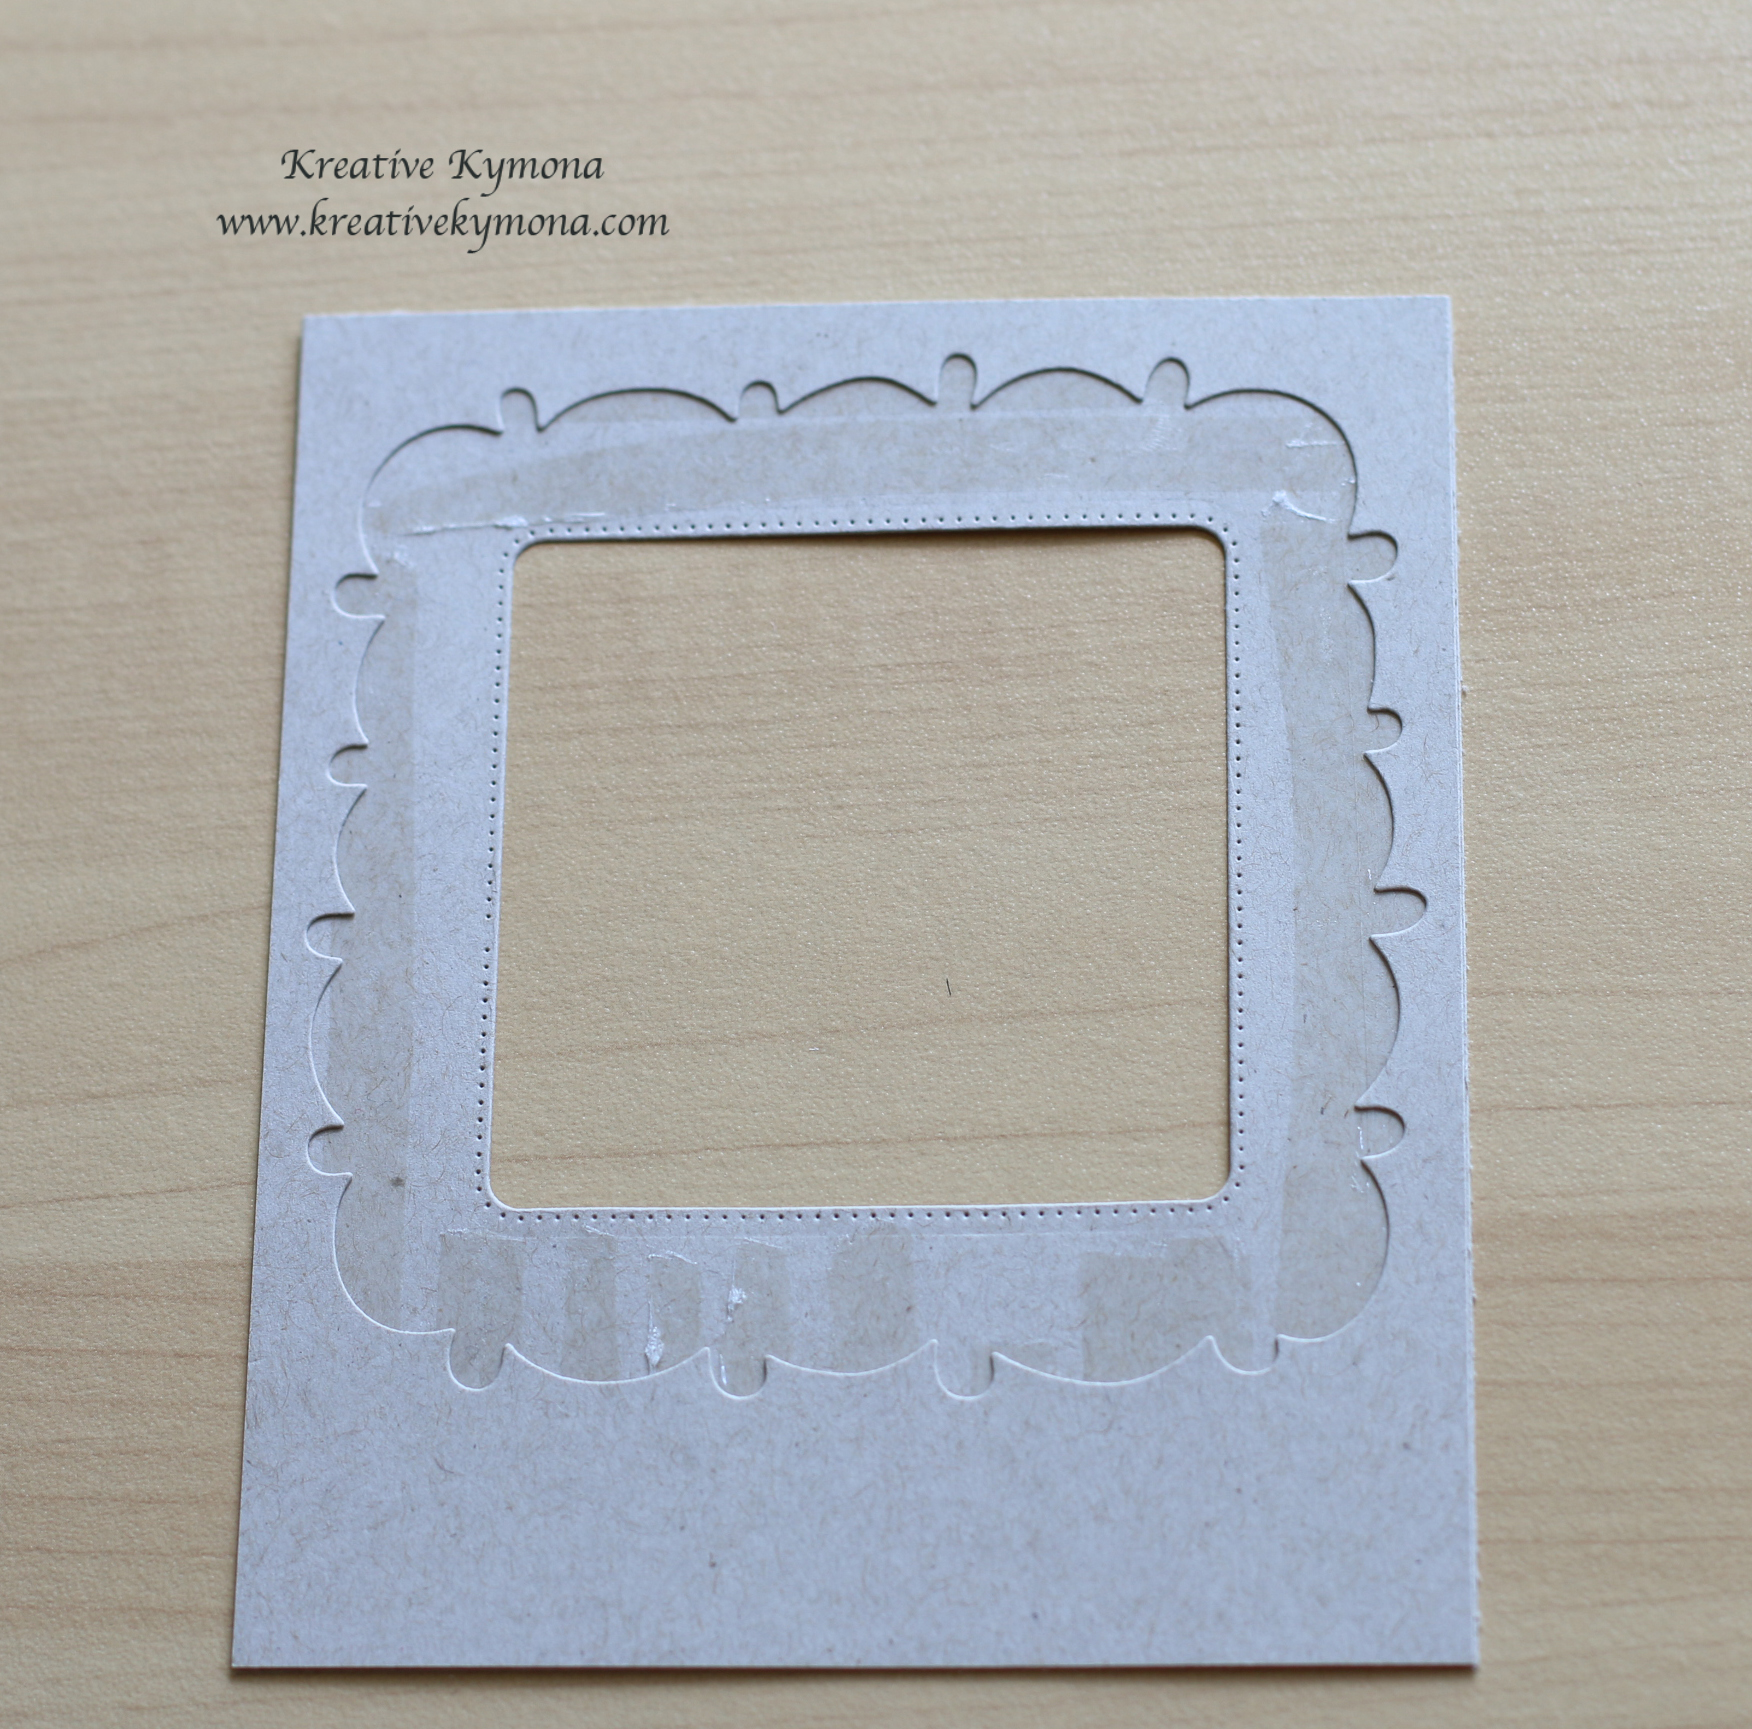
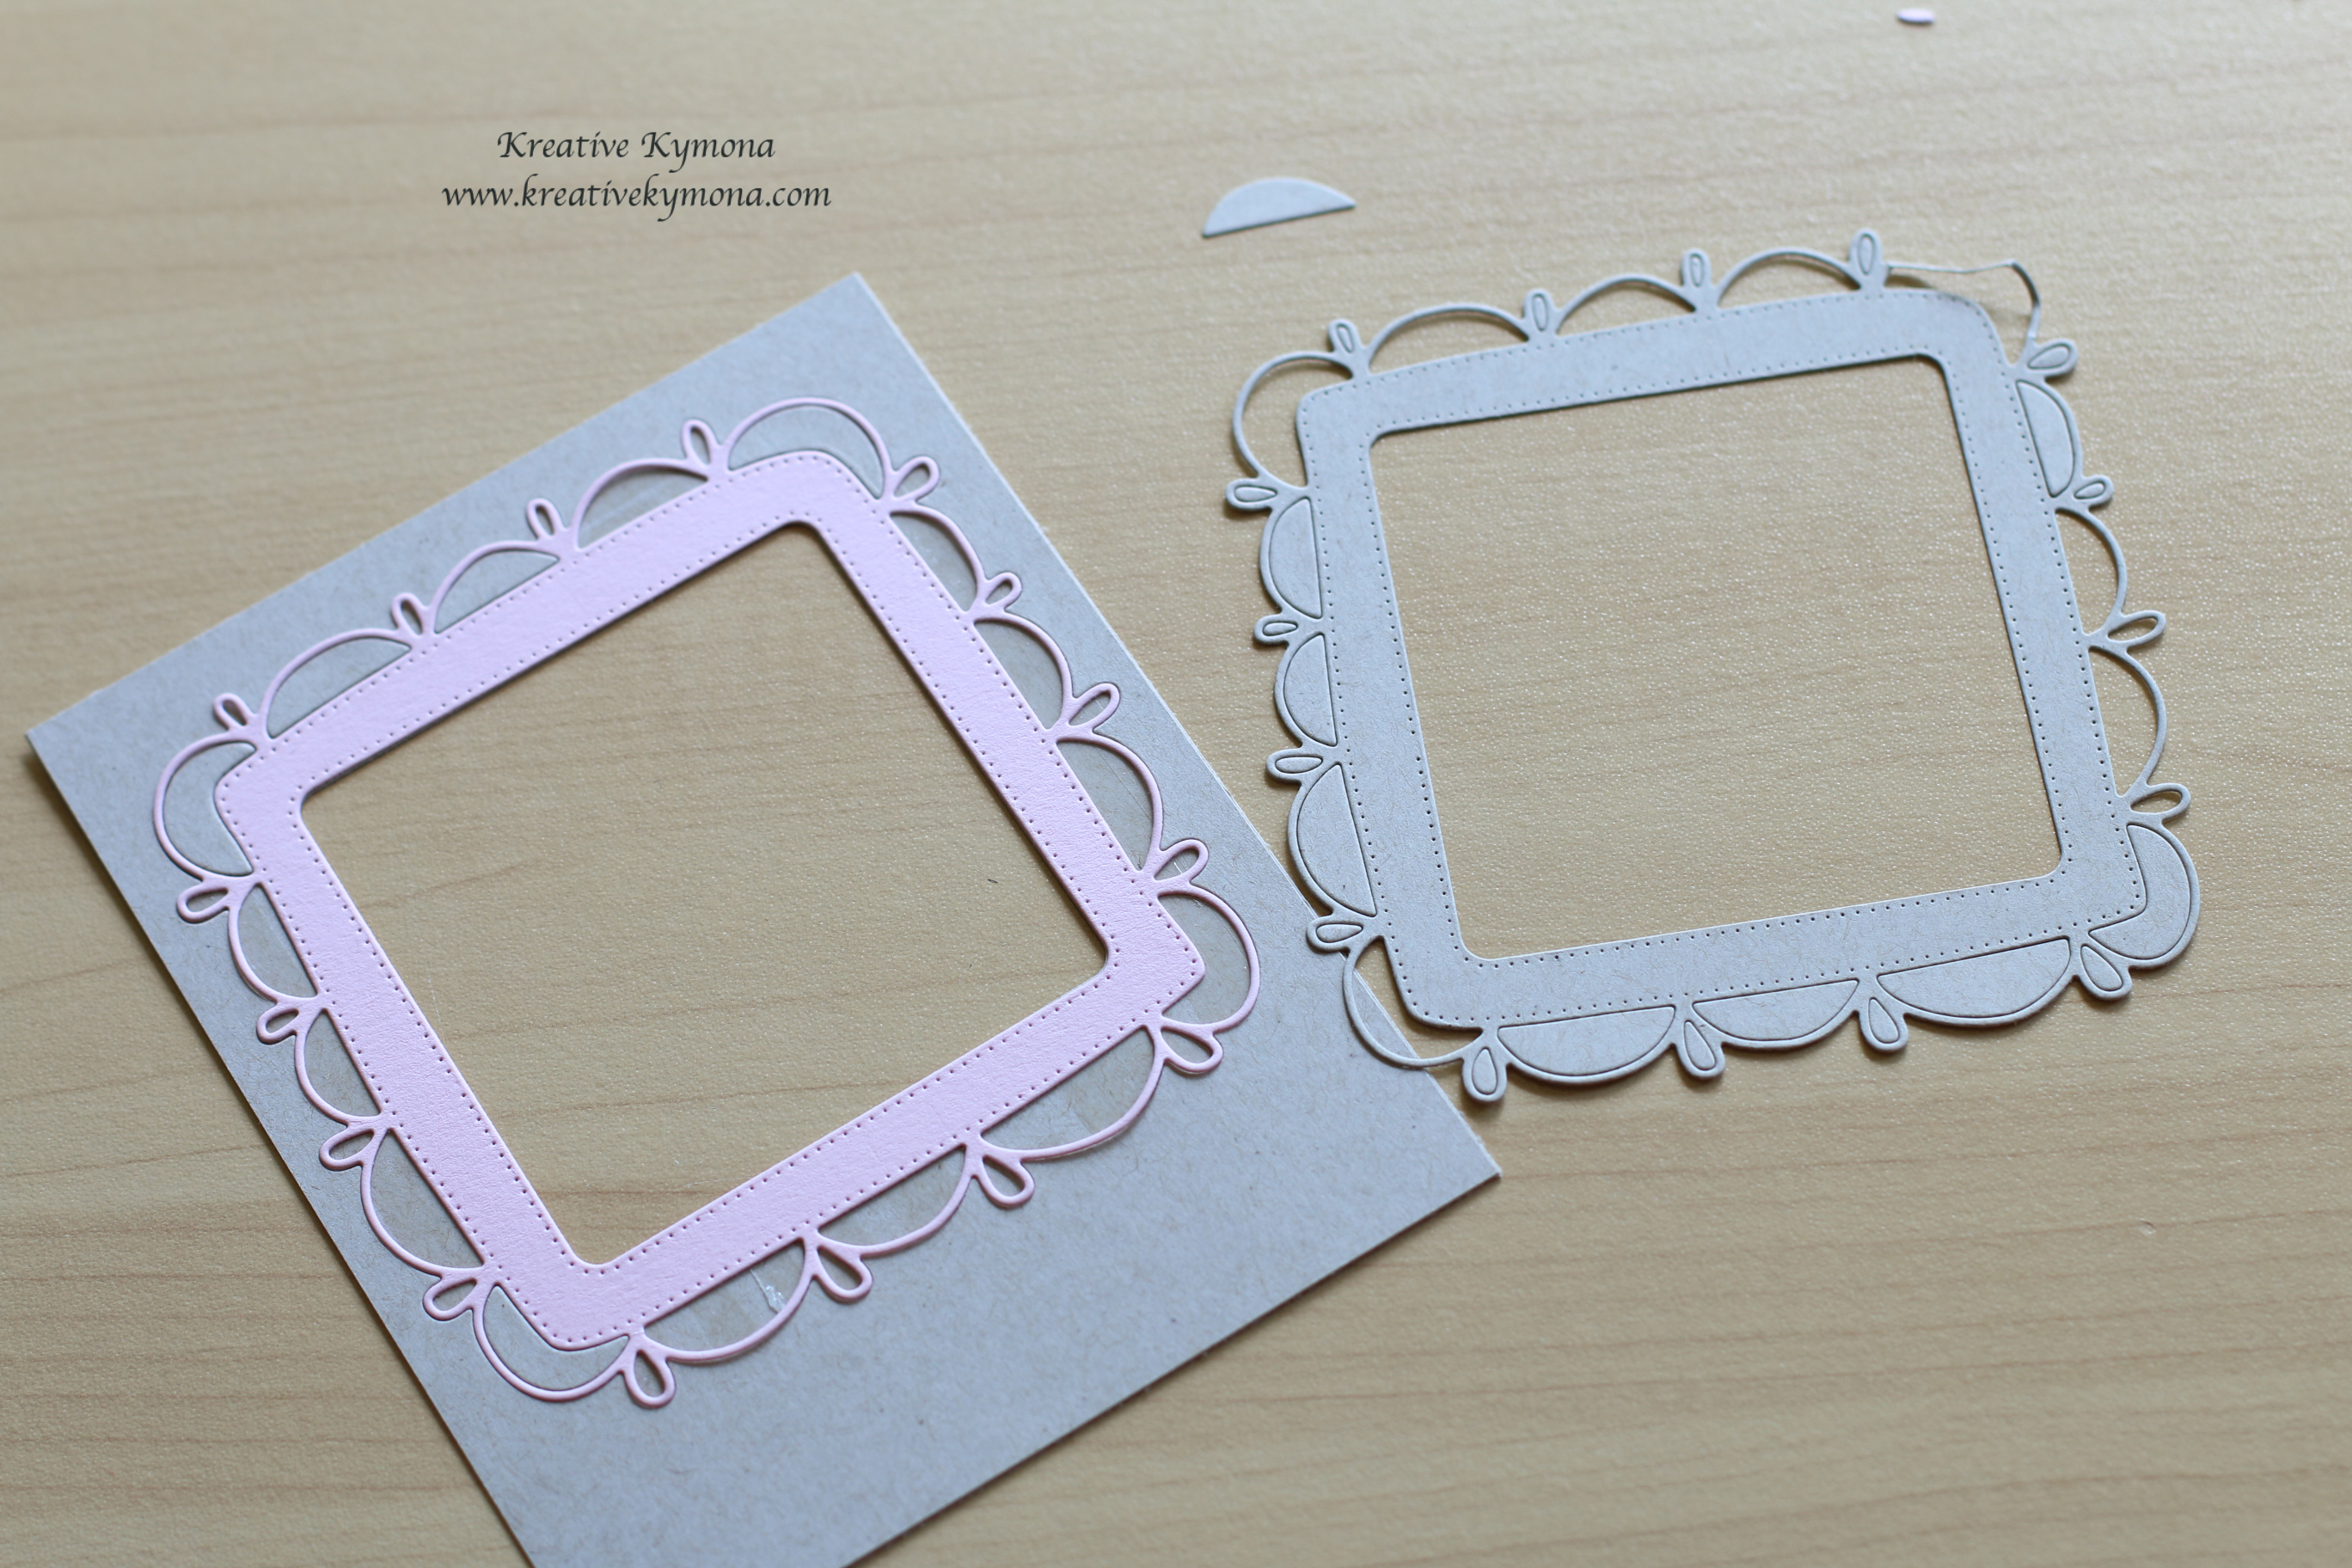
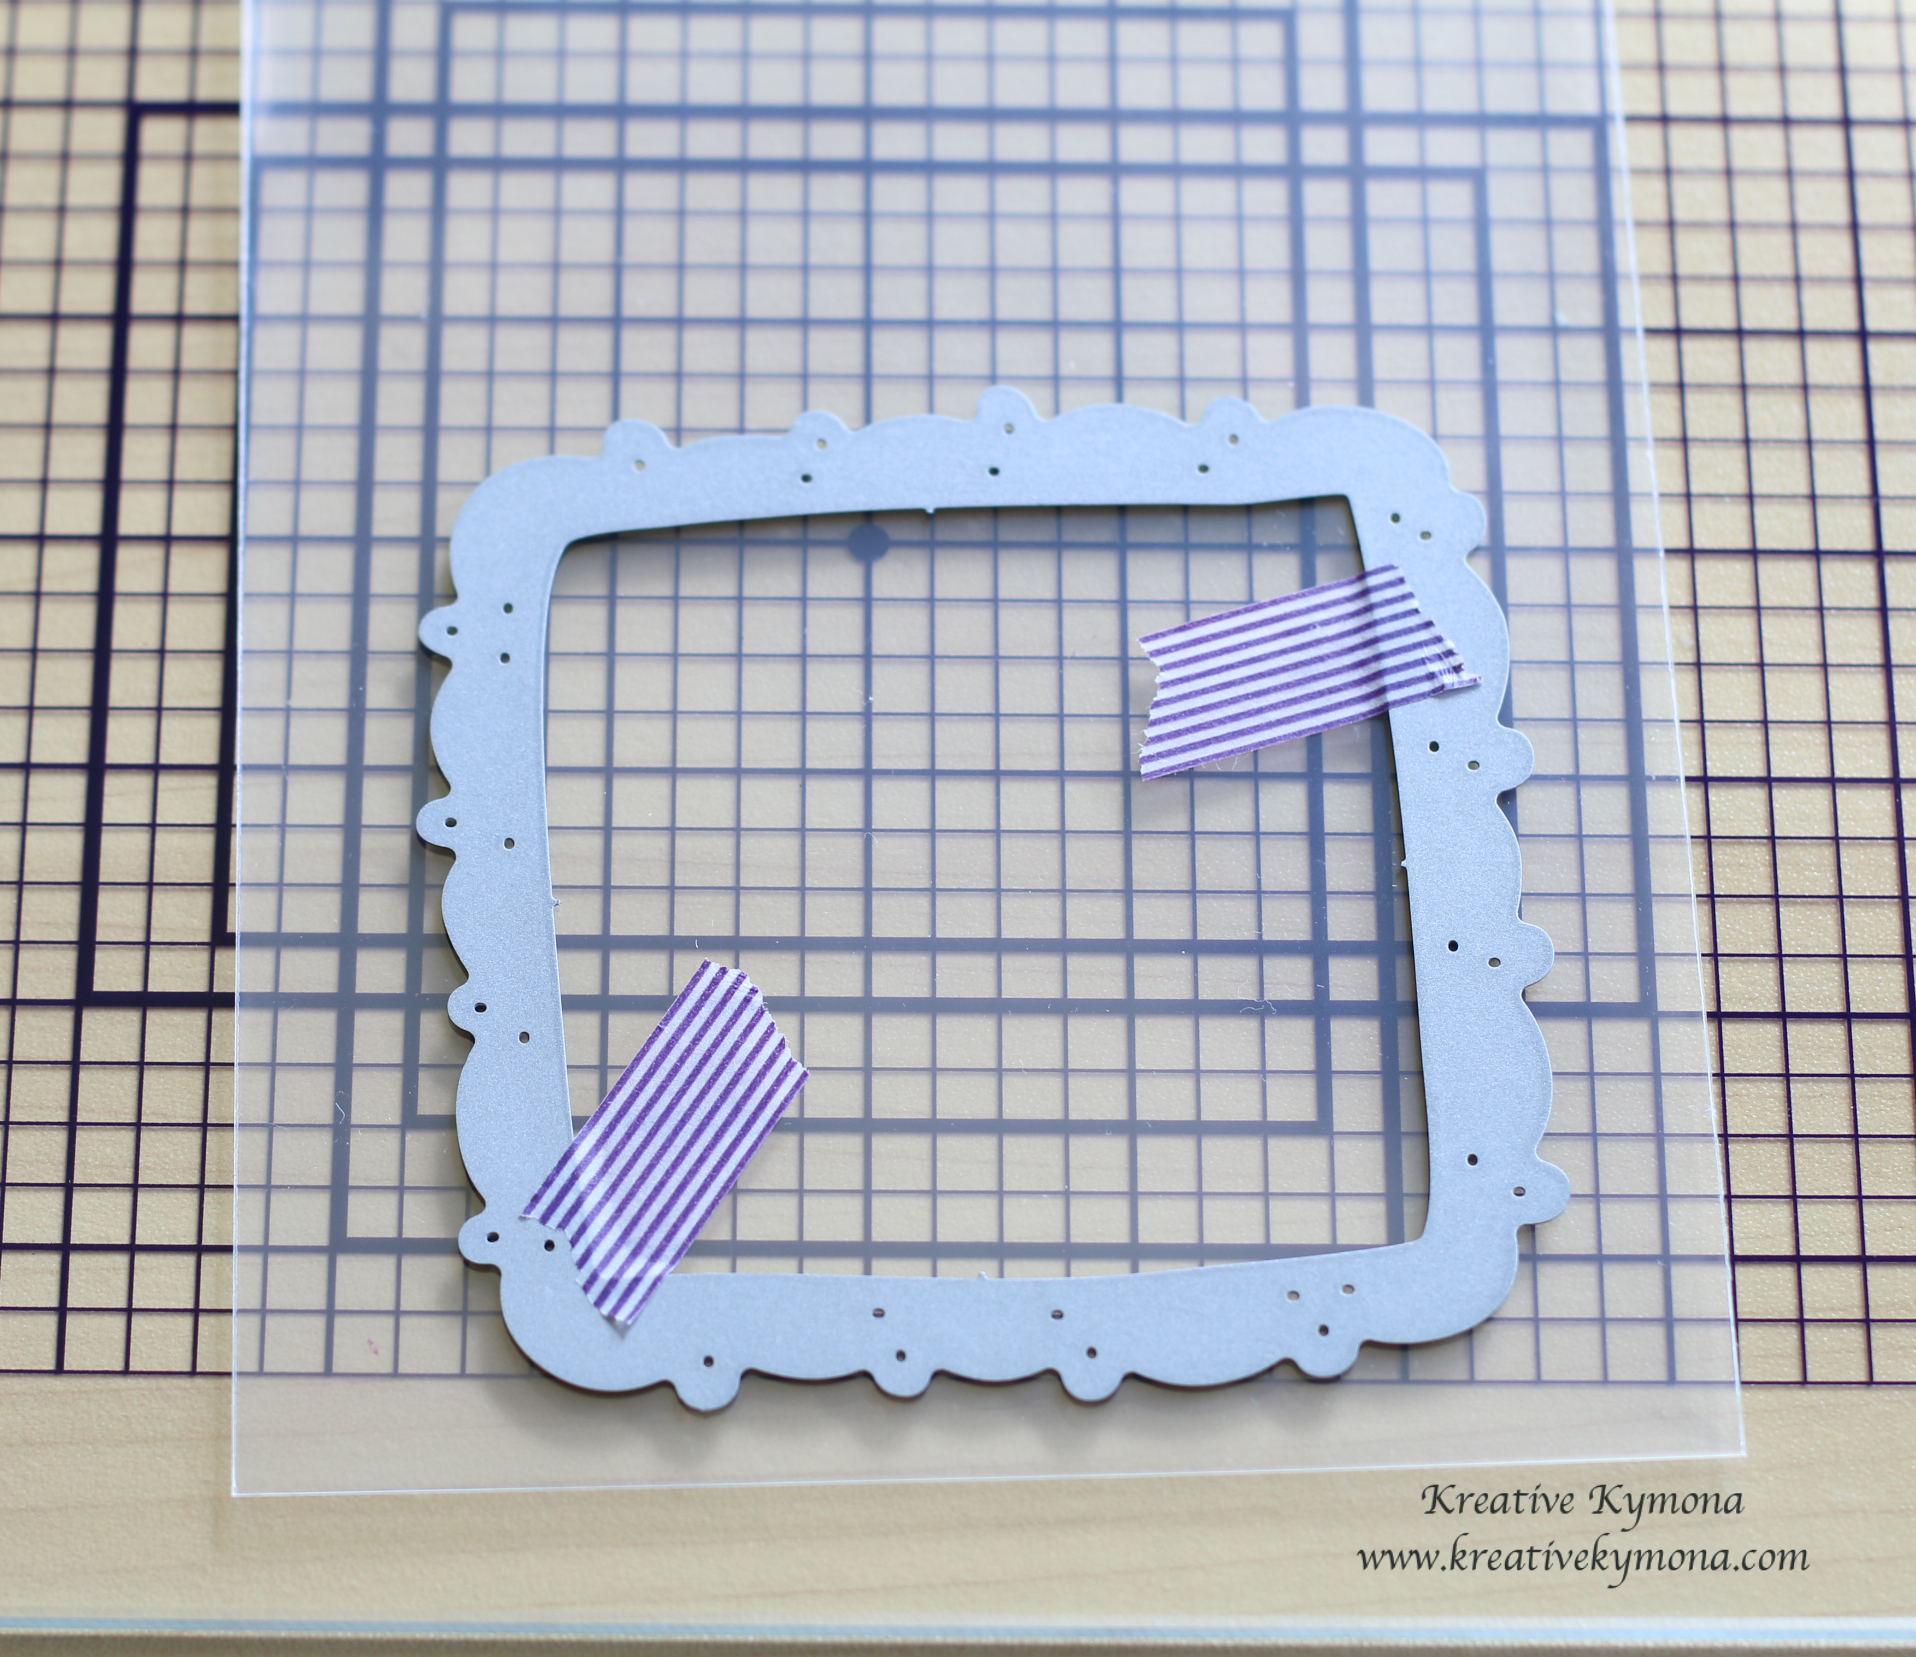
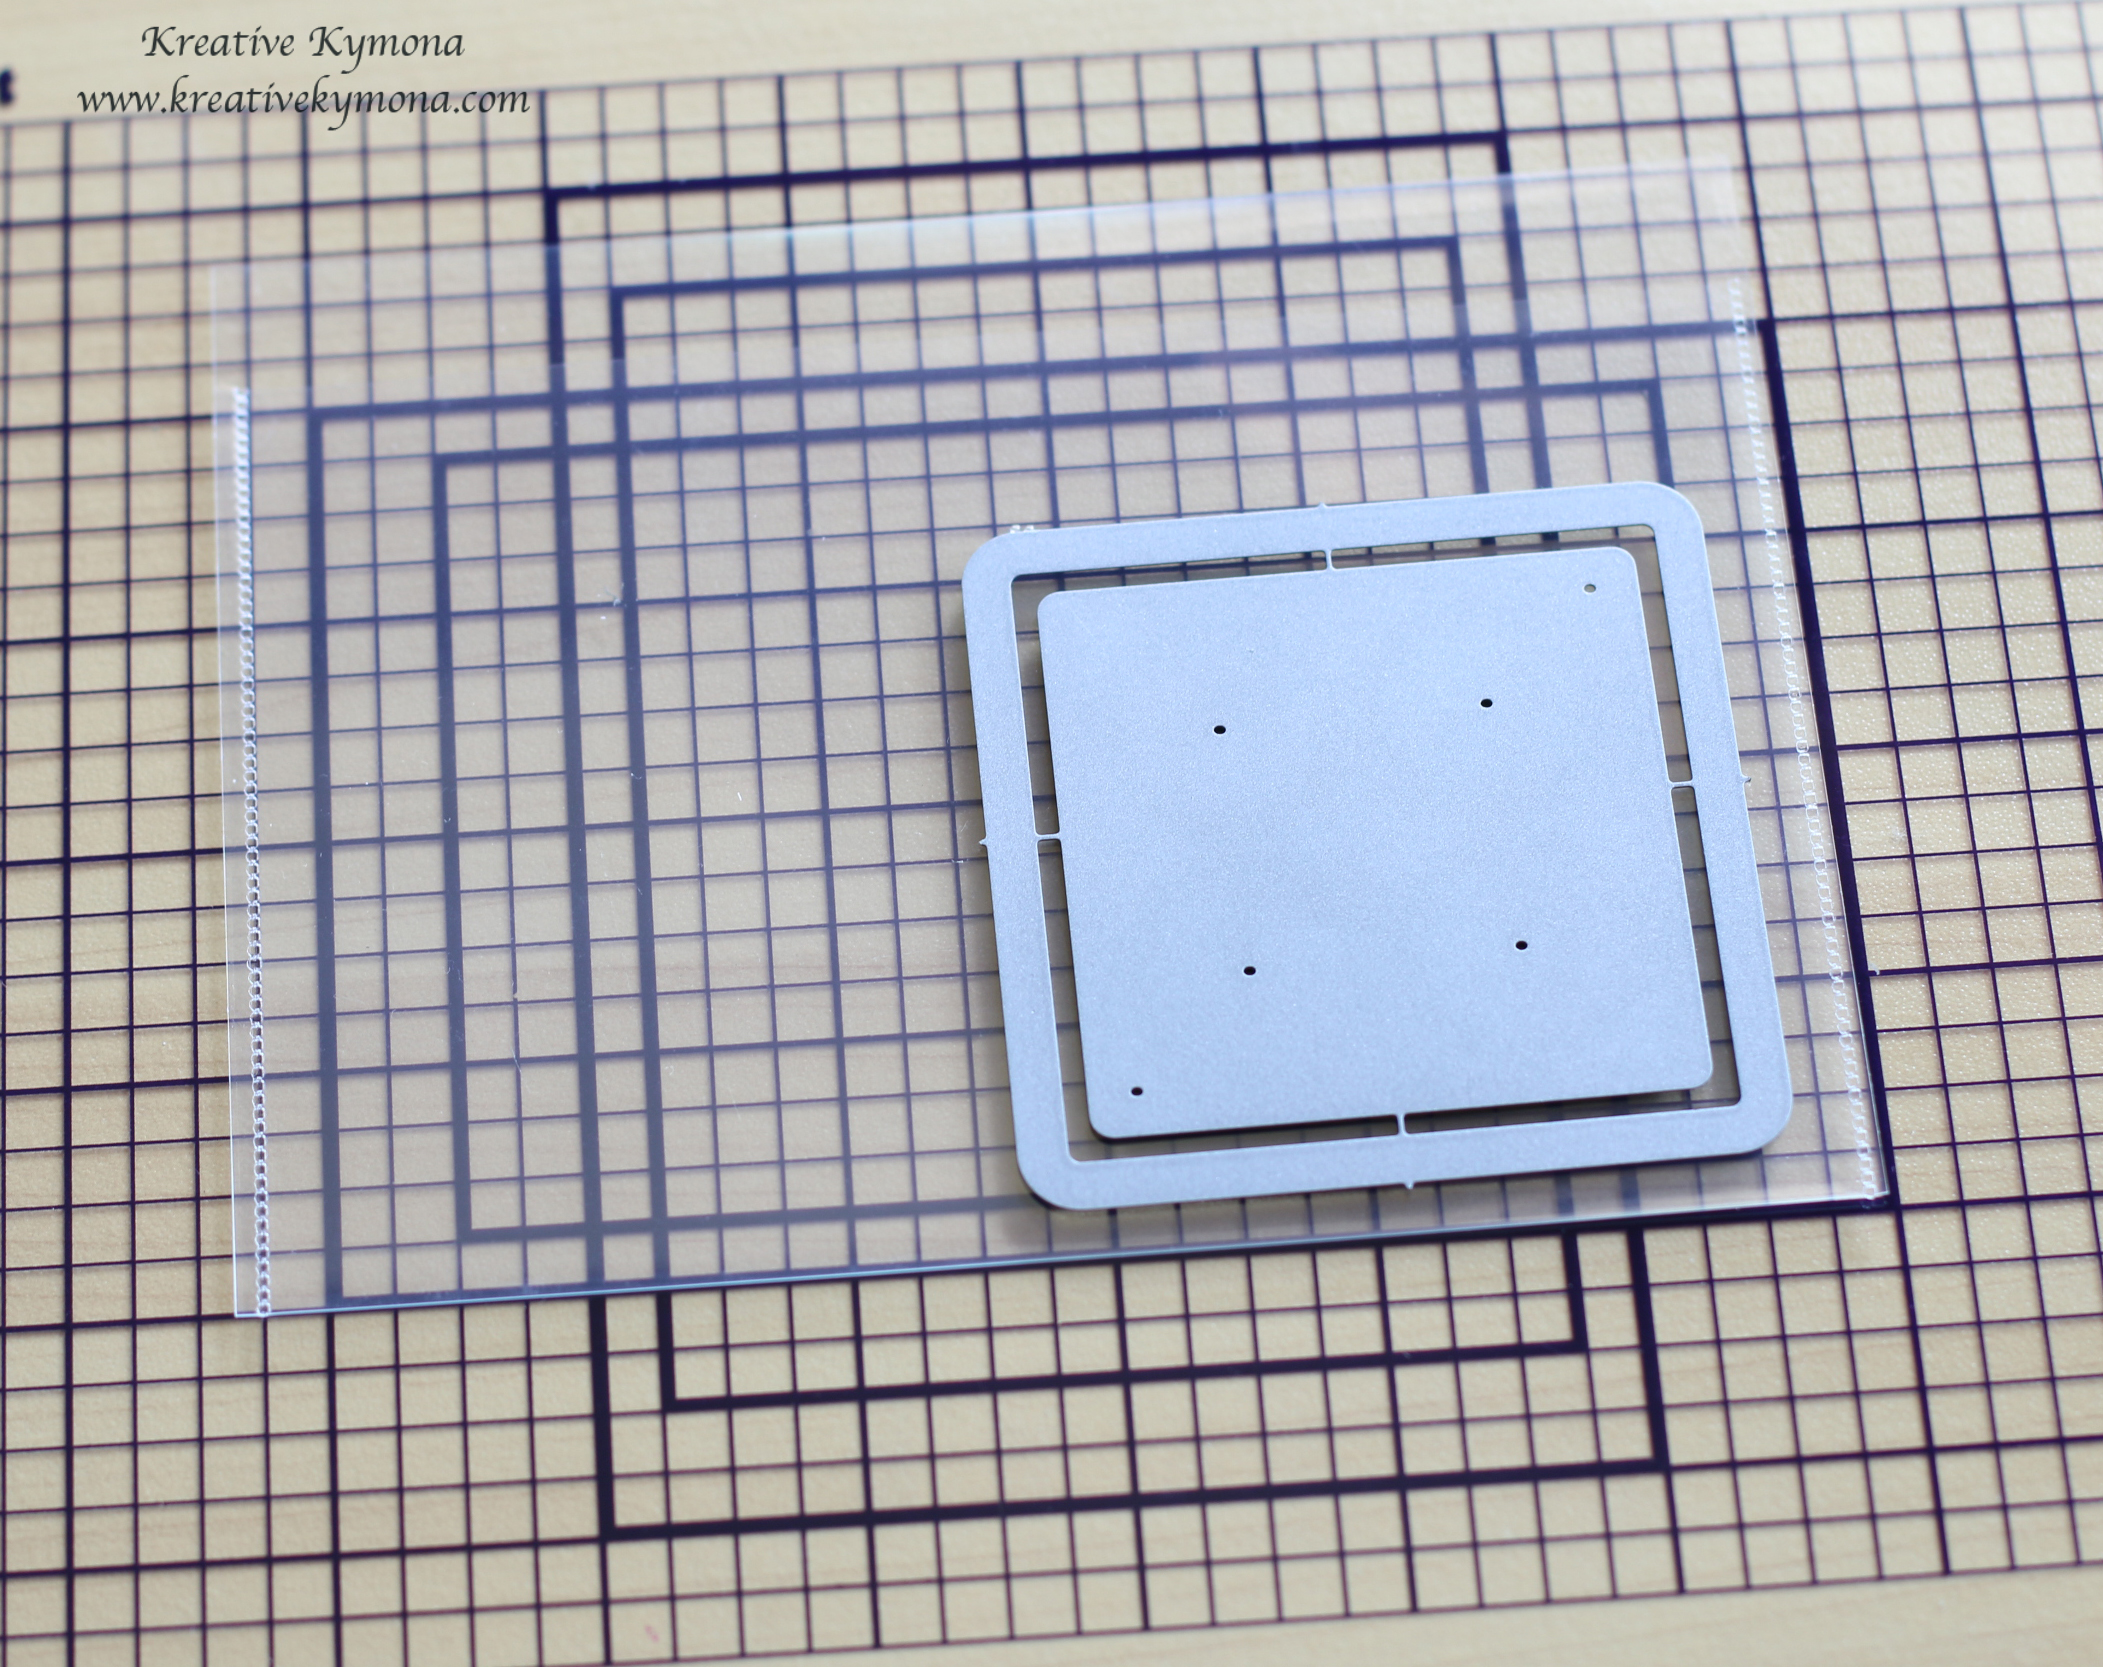
4. I centered the largest Simon Says Stamp Circle Stitch Die in the middle of the white card panel and die cut it out.

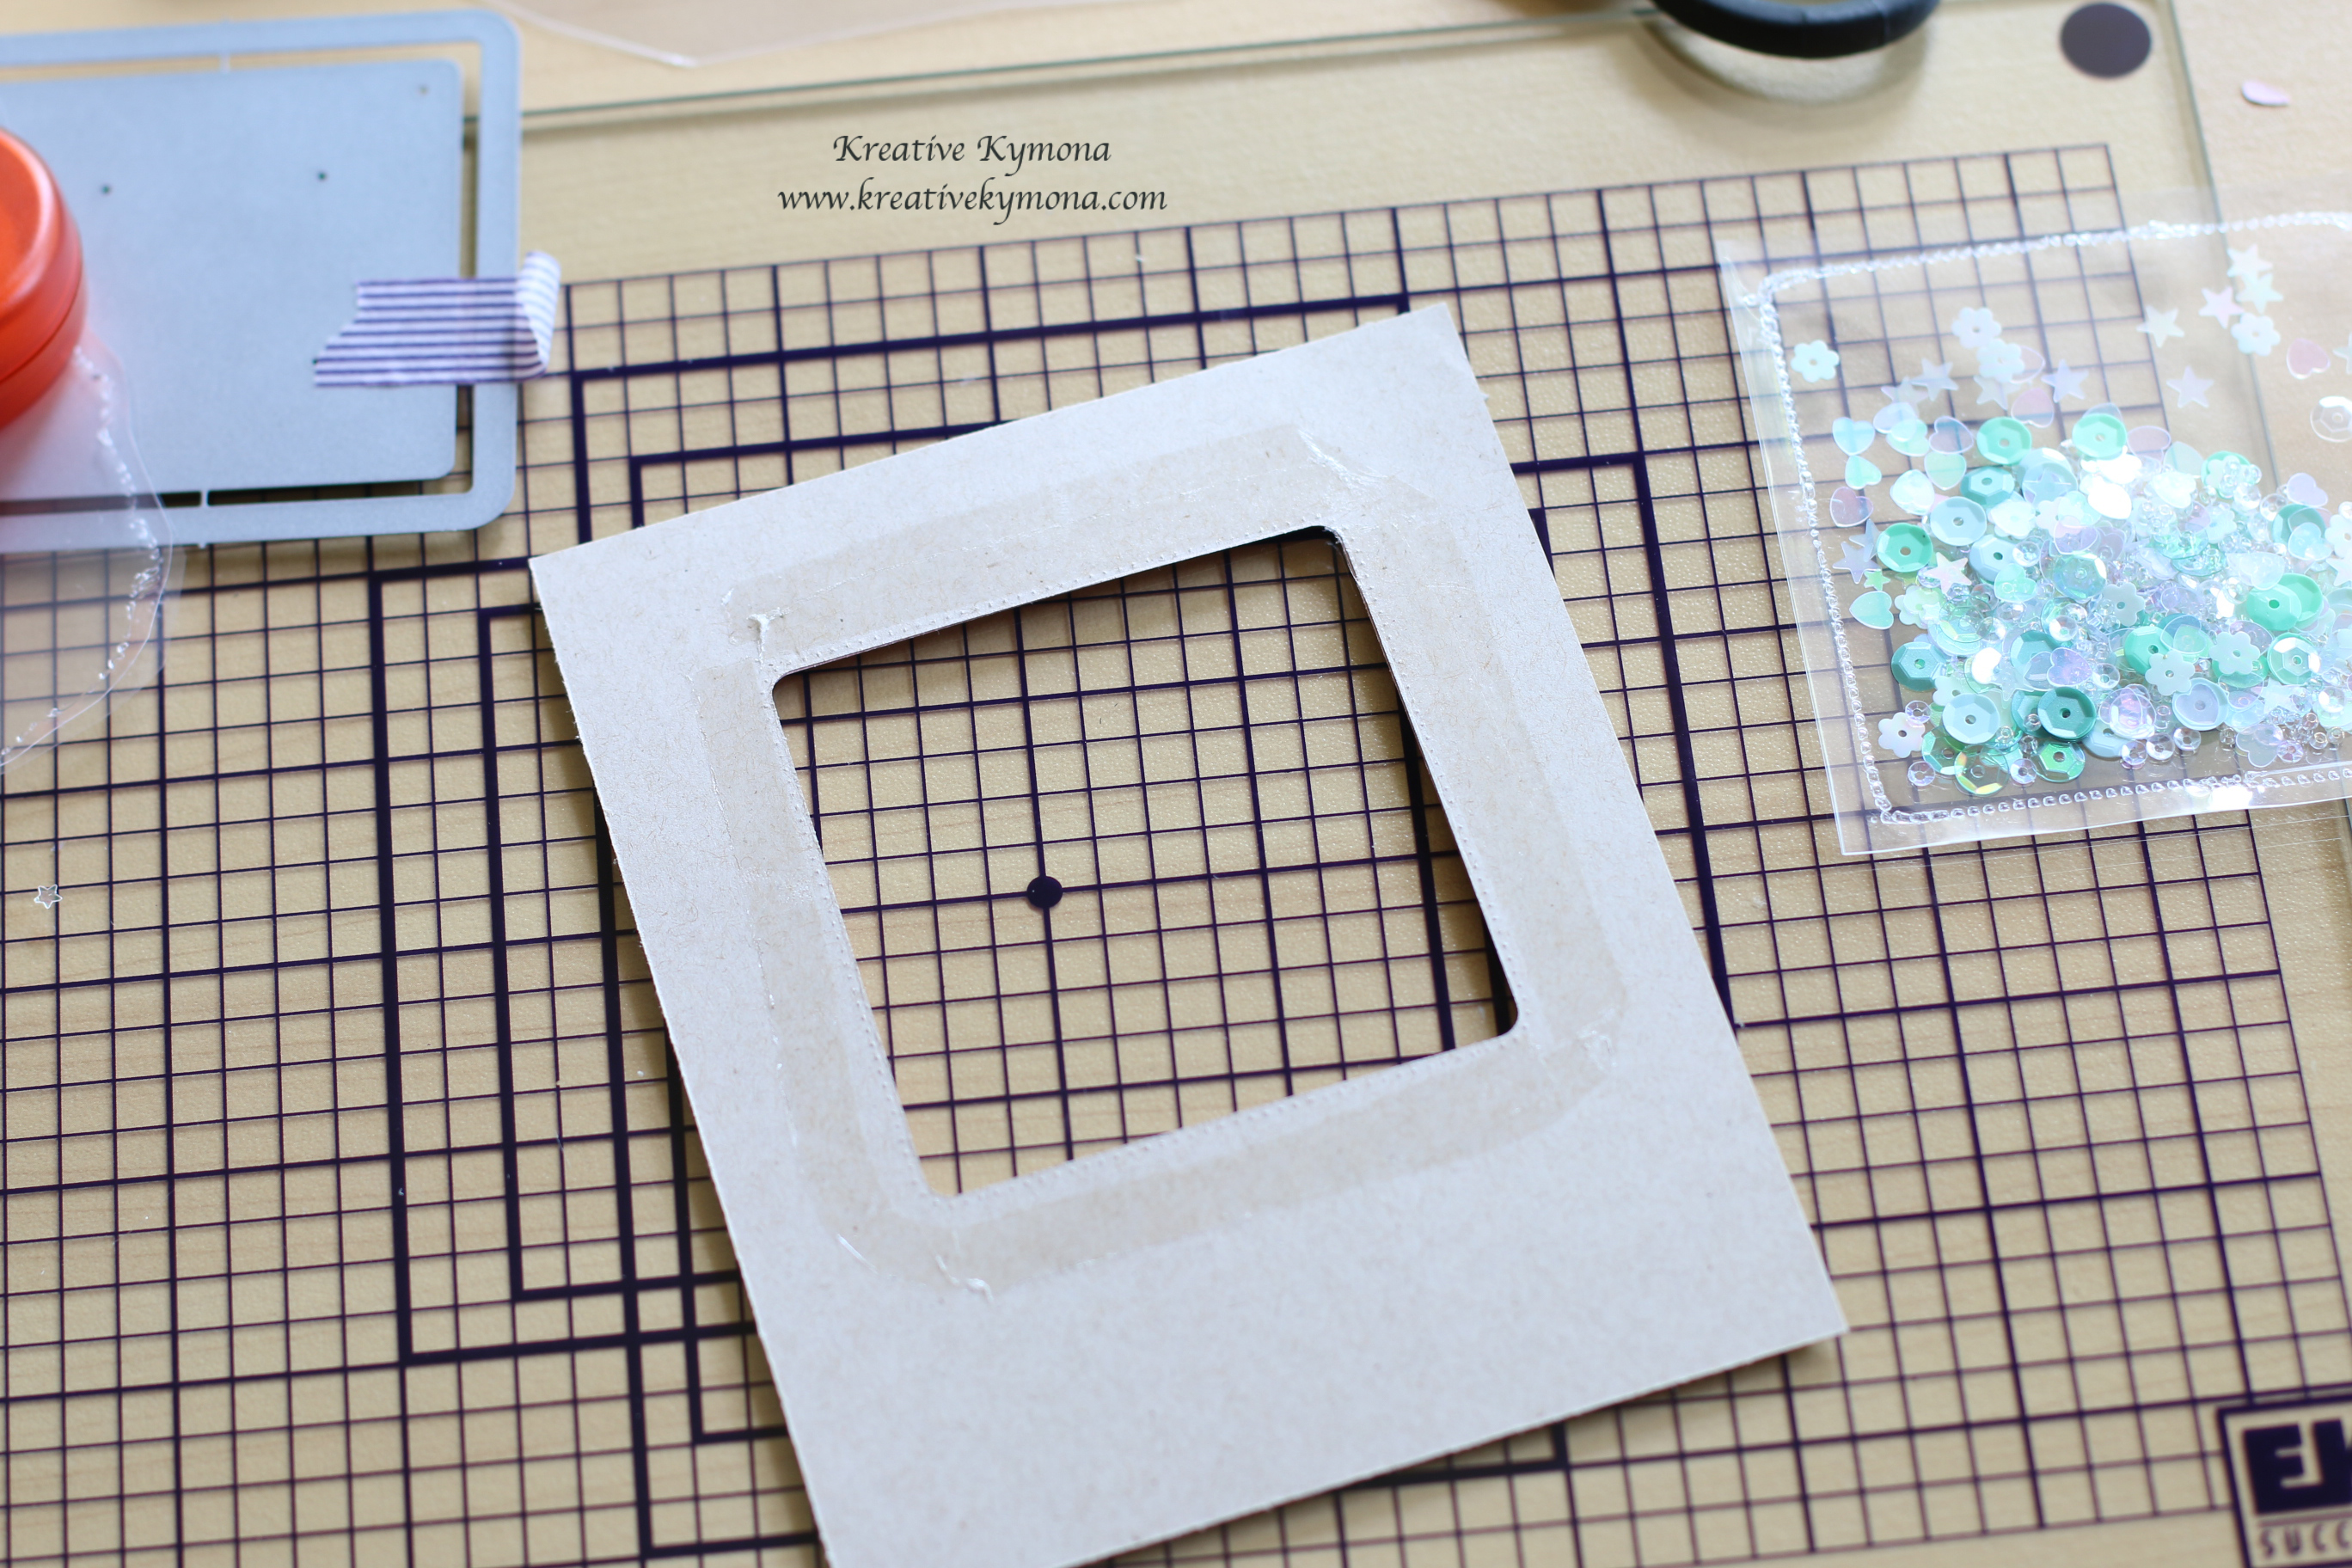
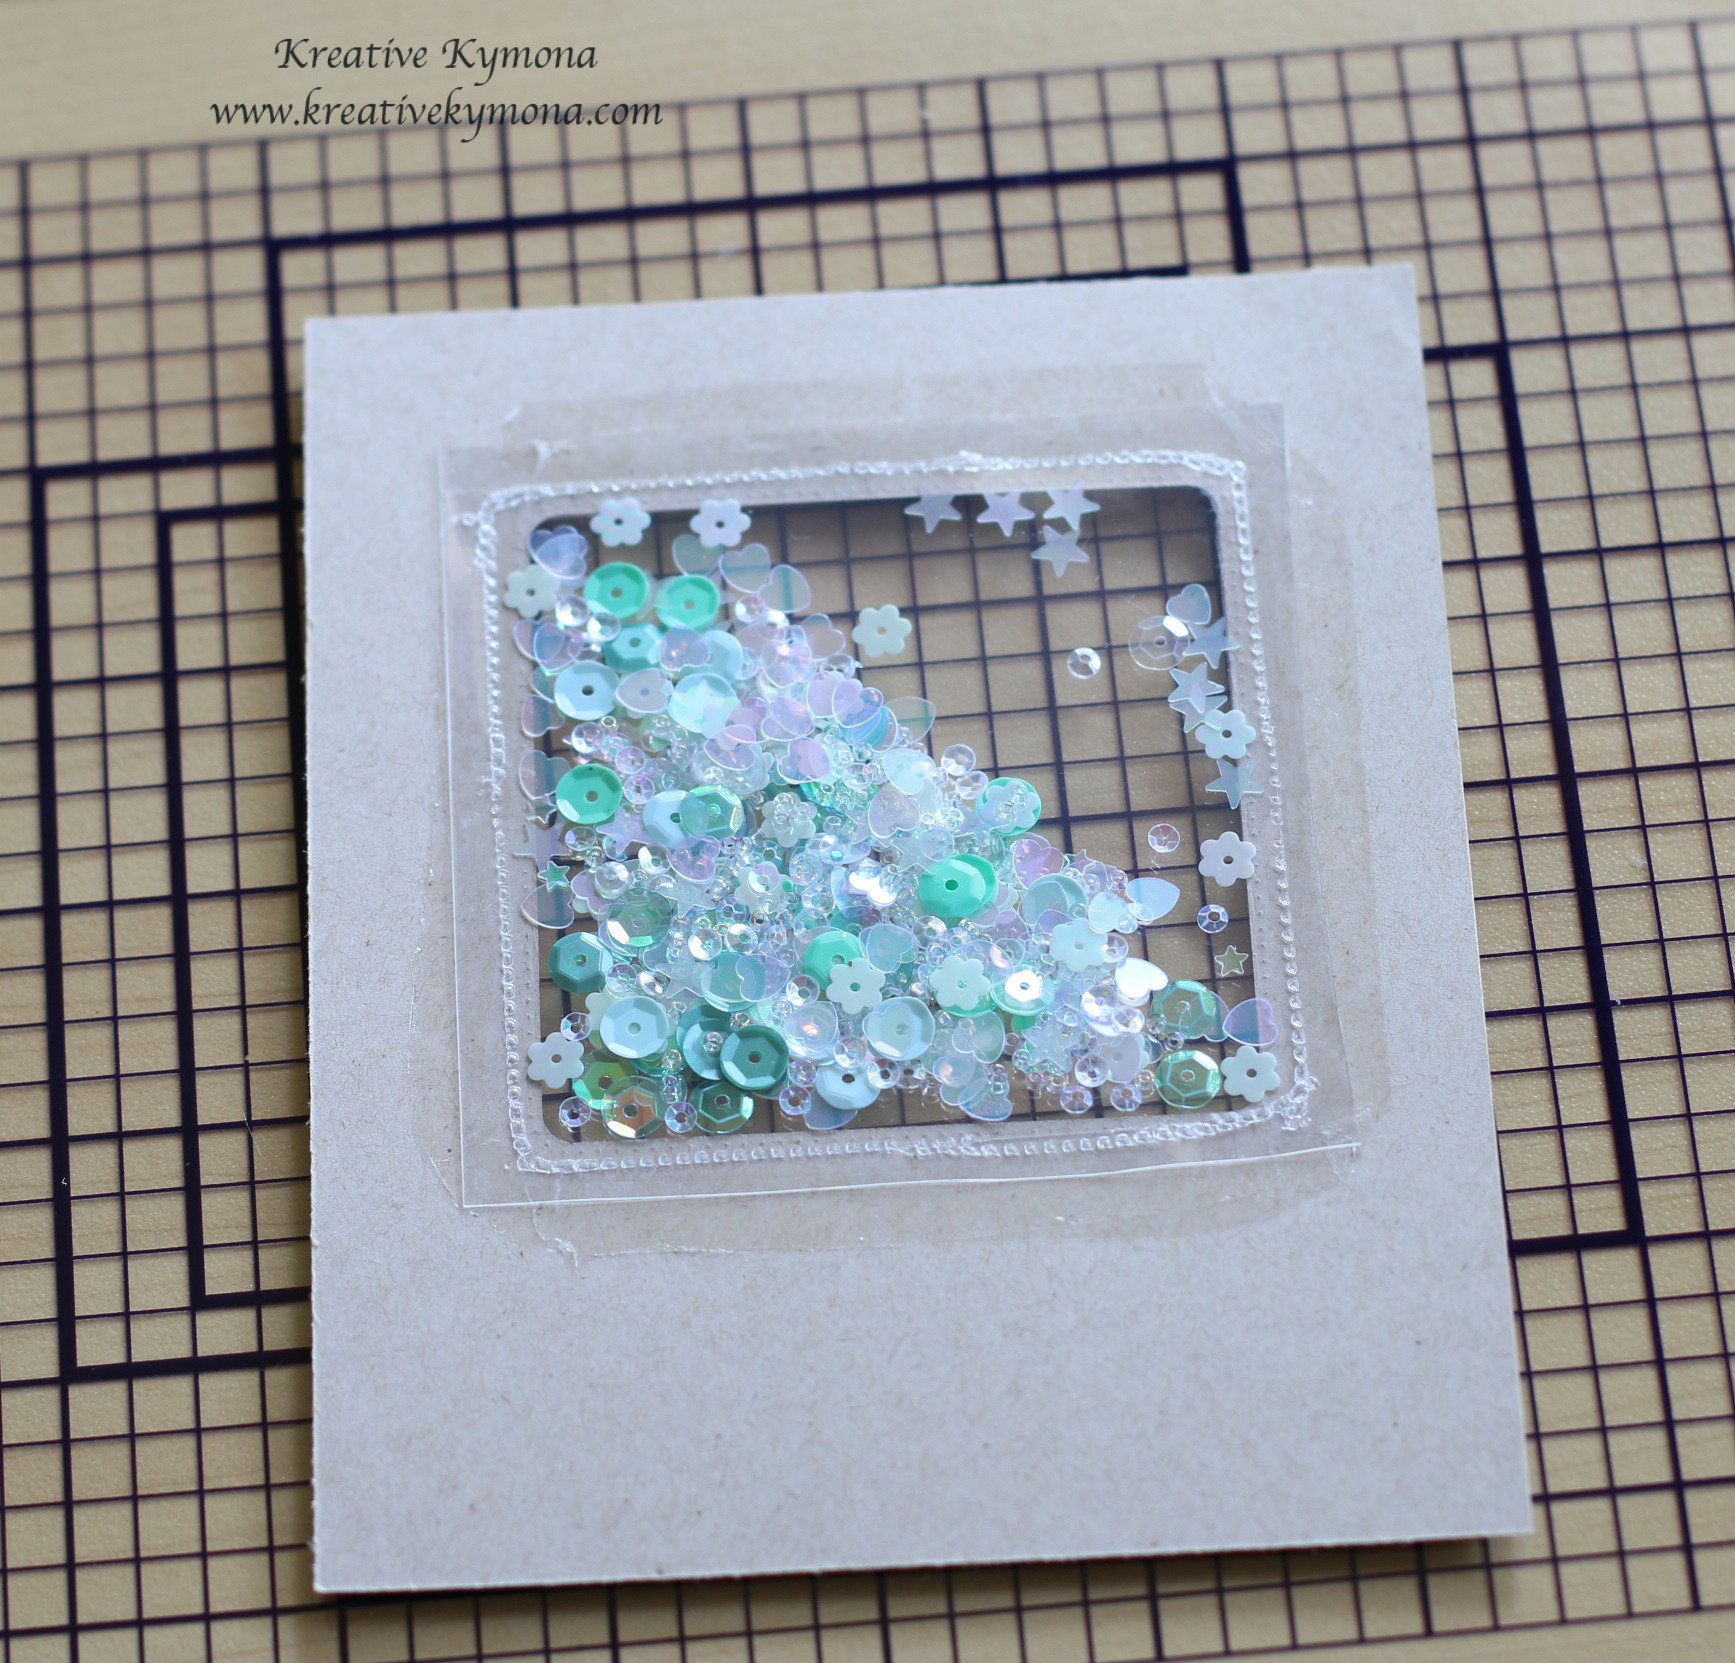
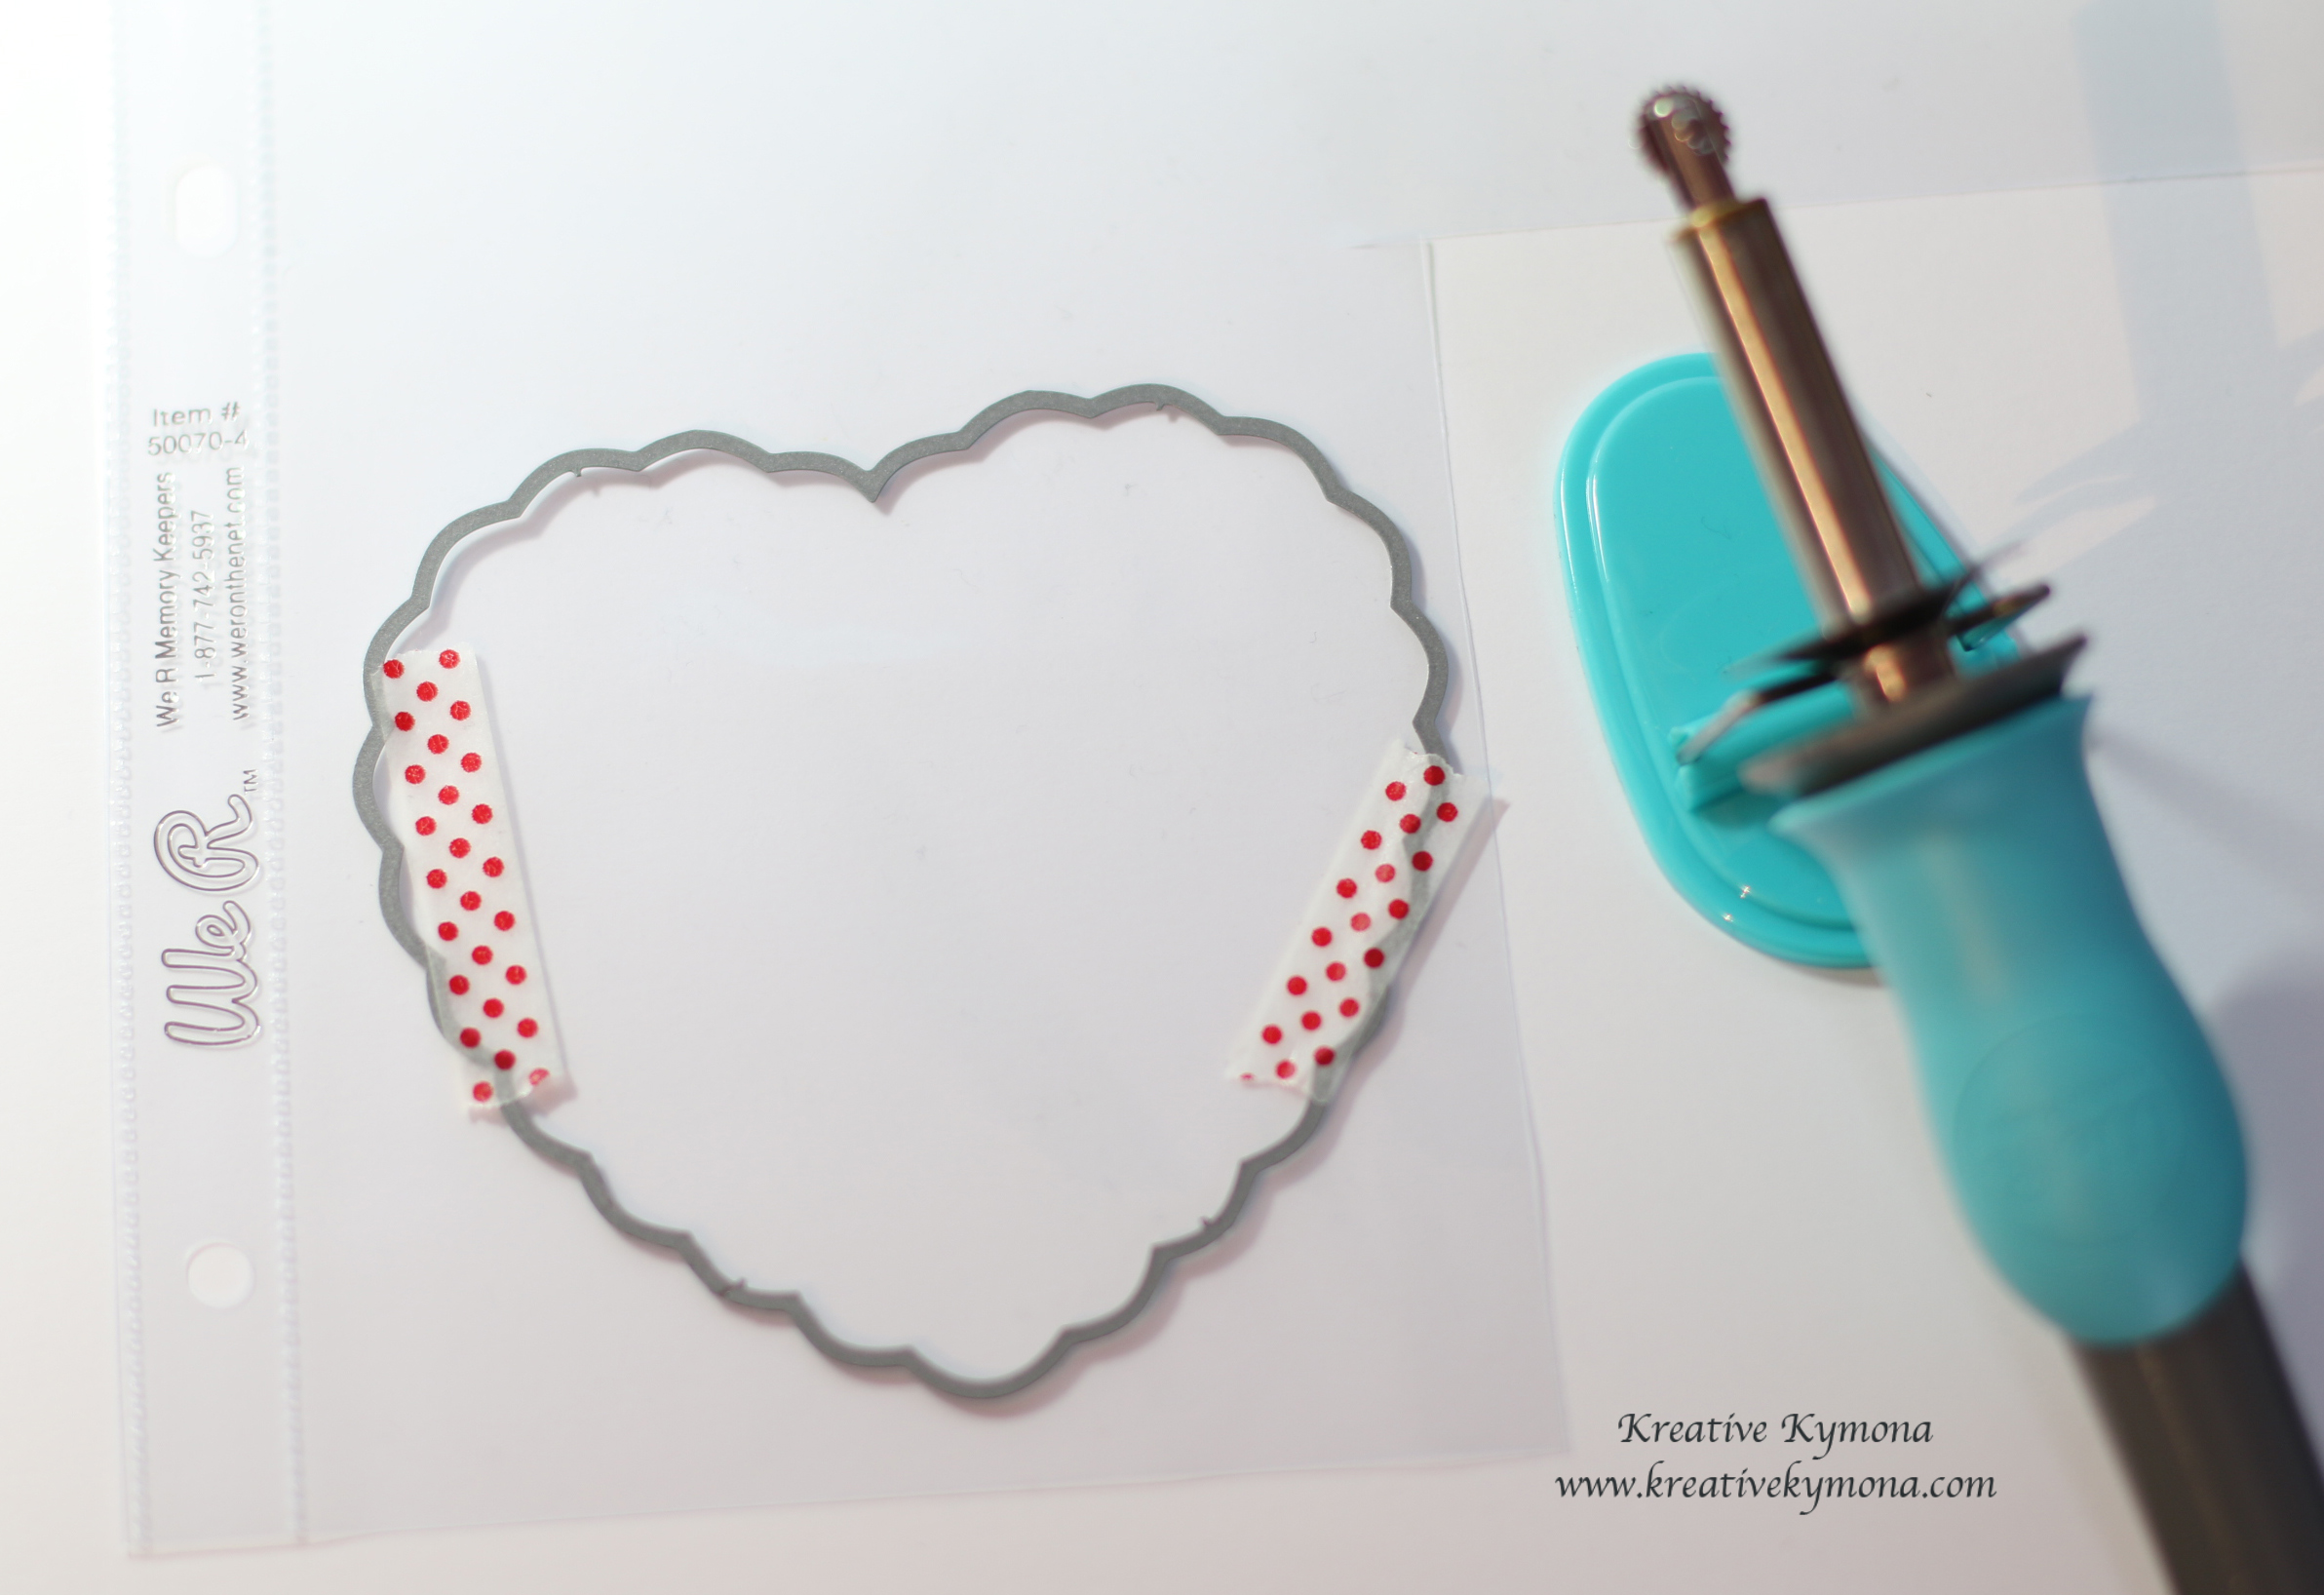
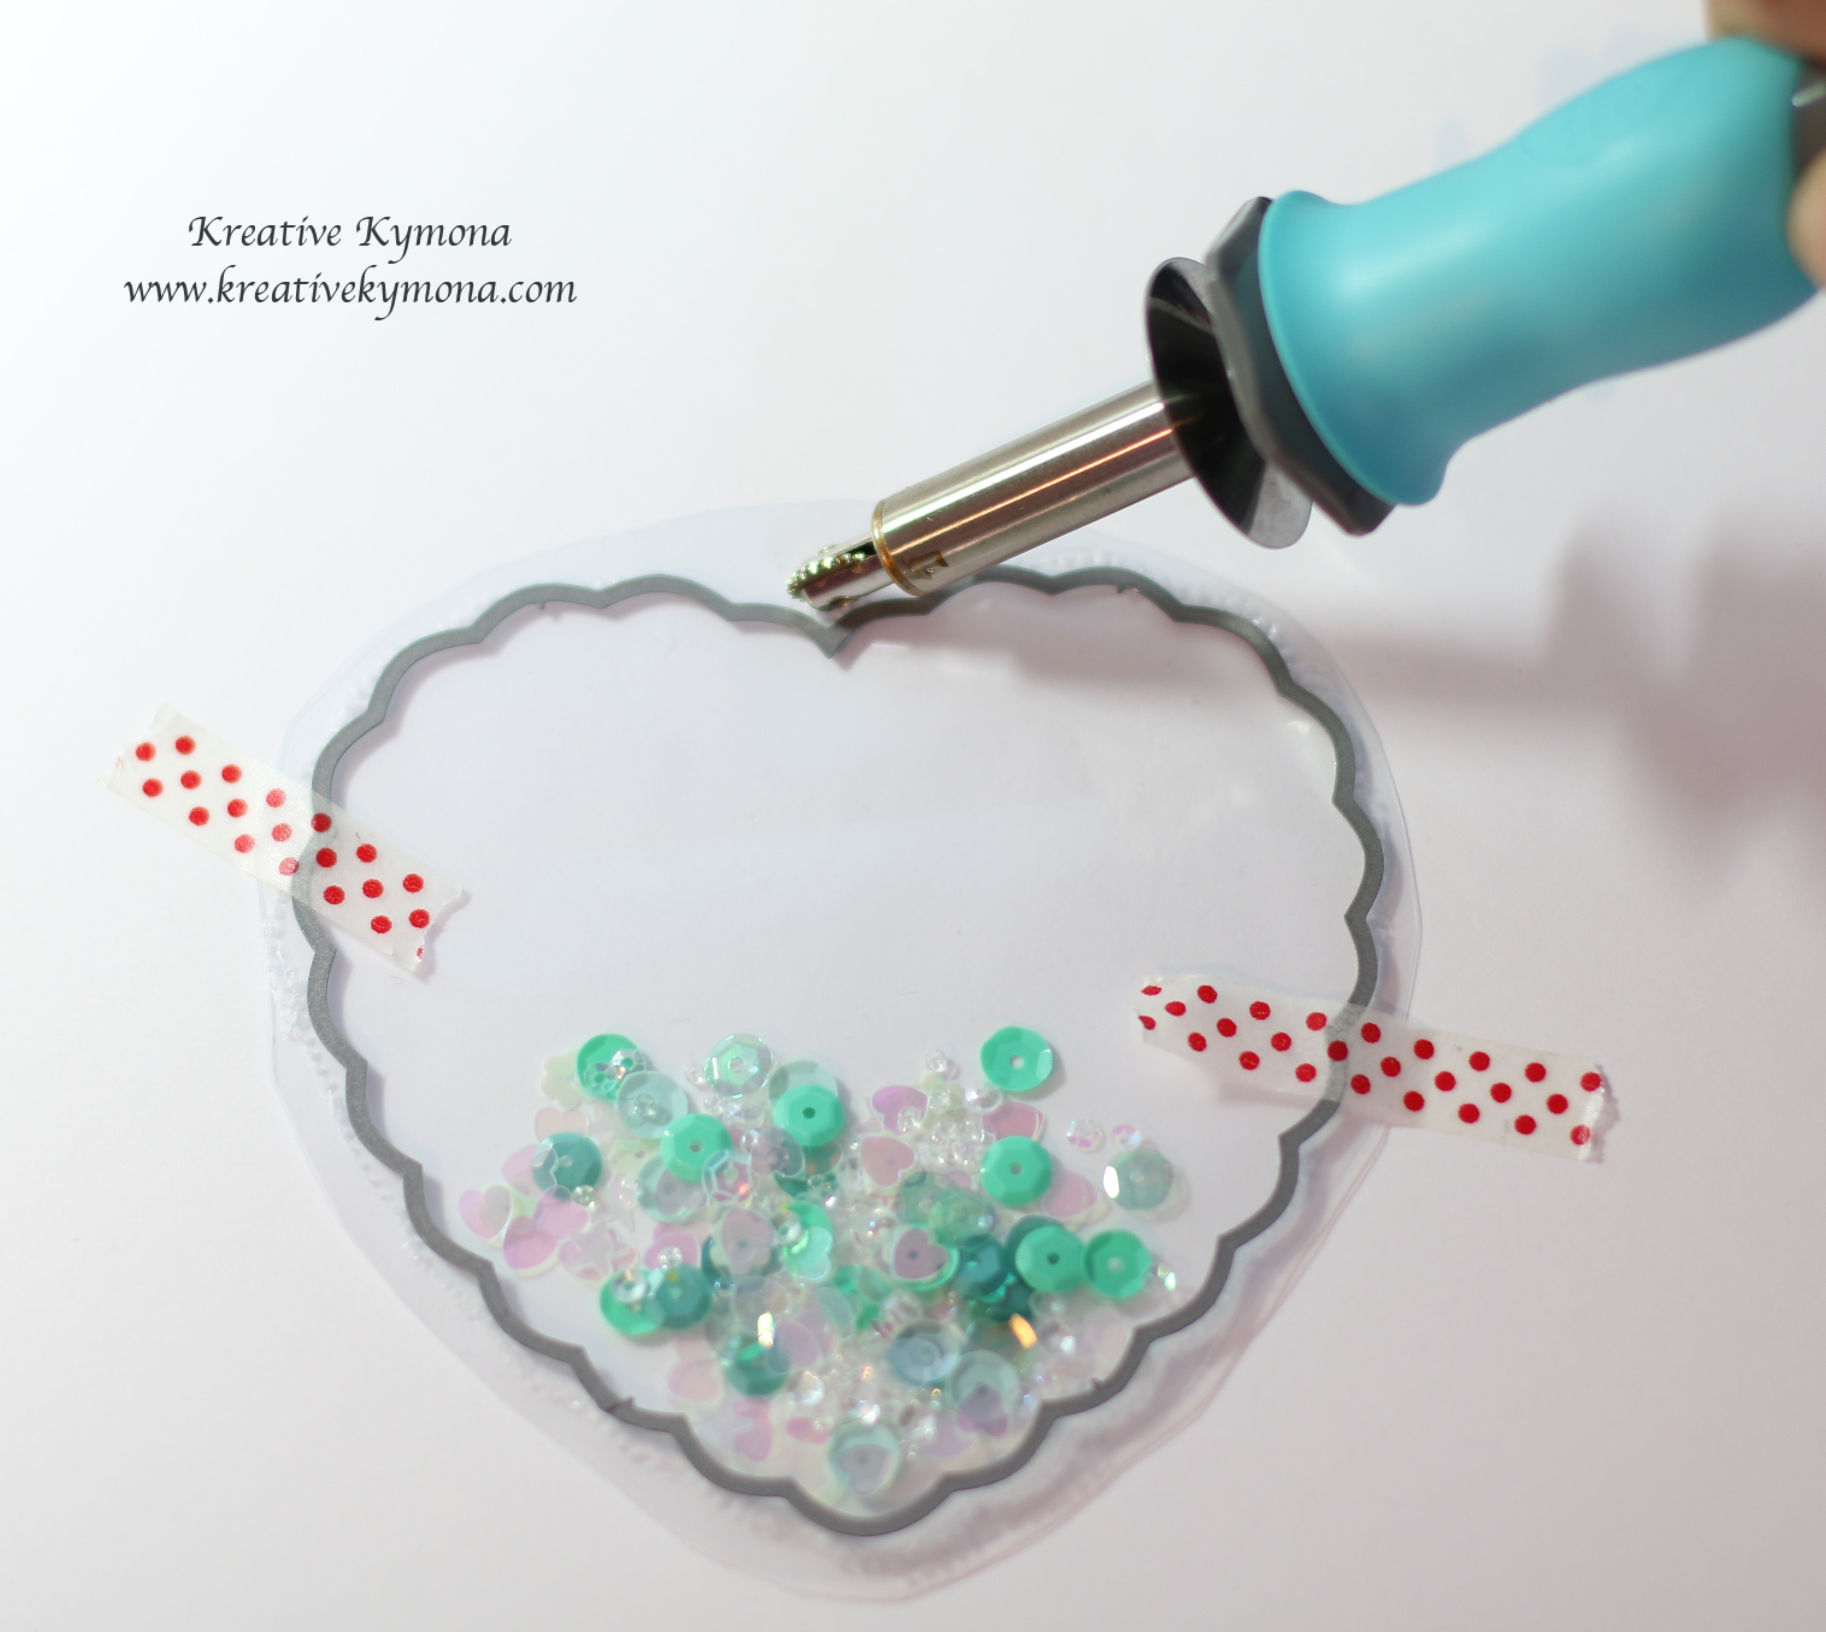
5. I used my We R Memory Keepers Fuse Tool to create my shaker pocket.

(To see how I did that check out this post.)

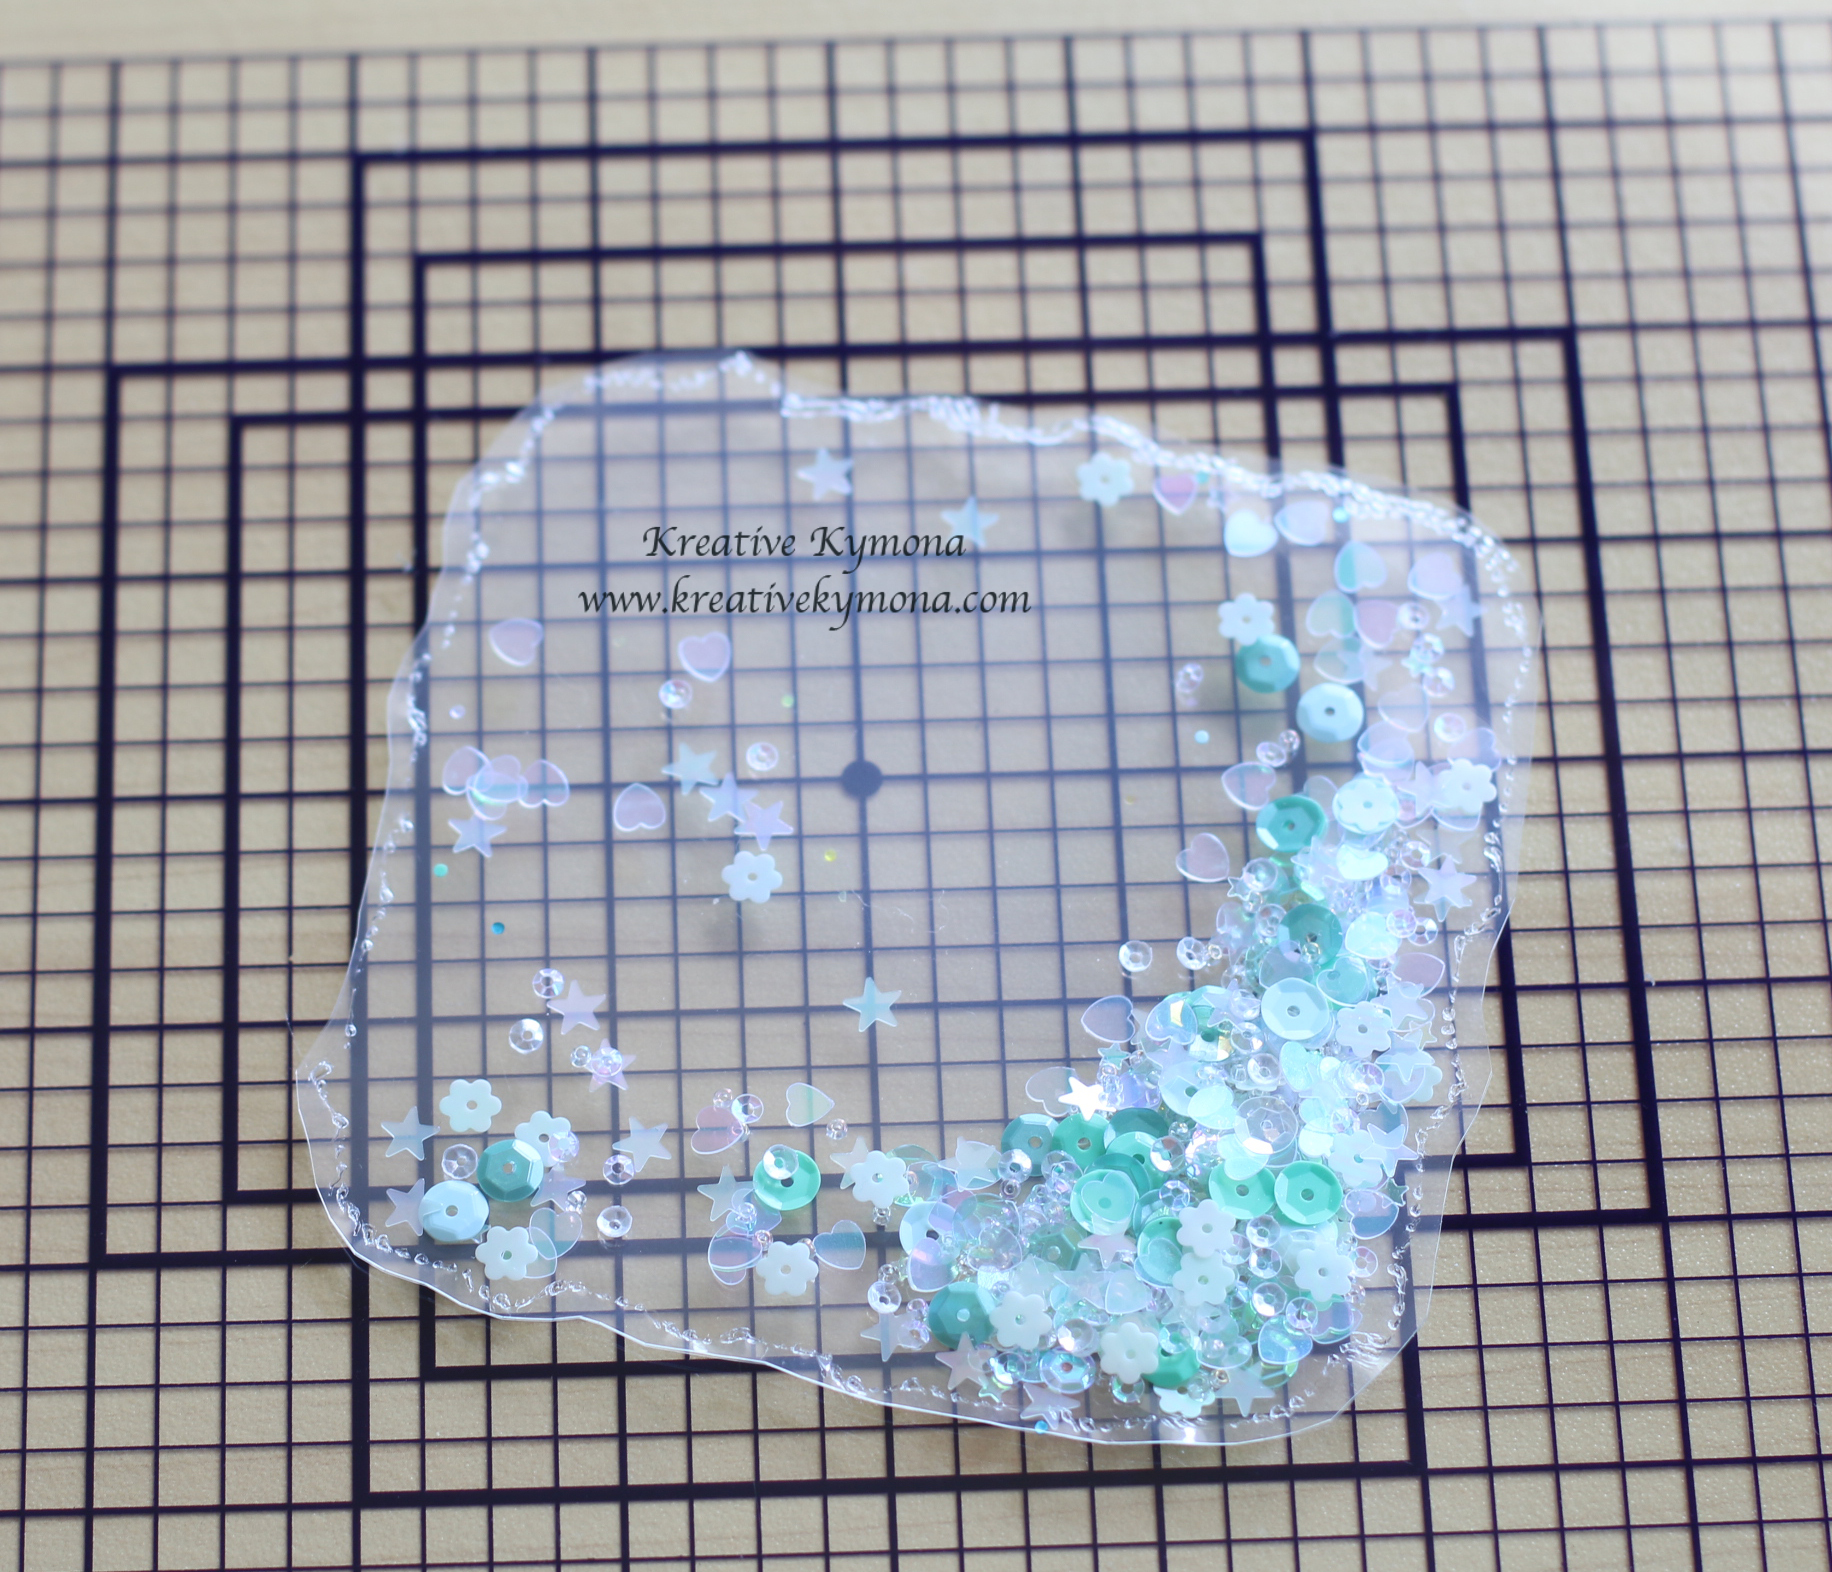
6.I added Pretty Pink Posh 4mm Metallic Bronze to the shaker pocket and then I used the Fuse Tool to seal it close.

7. I attached the shaker pocket to the back of the card panel with tape.

8. I added foam adhesive to the card panel to pop it off of the card base.

9. I die cut my coffee cup, lid, wrapper and heart.

10. I put the coffee cup together and adhered it to the front of the shaker circle.

11. I stamped a sentiment using Lil inker designs Seriously Awesome Stamp on the front of my card panel.

13. I added some of the same sequin to the front of the card.

That’s my card!!  So what do you think? I would love to here from you!

Now on to the blog candy giveaway!!

I have this awesome prize pack that includes 3 Kelly Purkey Dies and this super cute coffee ribbon that So Suzy Stamps recently released.  I think is so cute and so fitting for this hop!

FullSizeRender(6)

All you have to do is leave a comment below for a chance to win this blog candy!!

You also have a chance to winning something from any one of these sponsor’s below!!

 Here is a list of all the Super Sponsor’s this year!!

 Super Sponsors

All you have to do is link up a newly created project on the Coffee Lover’s Blog.  These prizes are picked by random drawing from linked hop participants only.

The linky for this party will end Friday, June 12, 2015 at 11:59pm PST.

I hope to see you there!!  Remember have fun!!

Supplies used:

Neenah Desert Storm CS BG Pinstripe Background classiccrestsolarwhtieStitiched Circlefuse bundlePPP Metallic Bronze LID Seriosly Awesome Stamps top dog die coffee.-d

Thanks for stopping by!!

~Kymona

So Suzy Stamps Challenge Blog Hop

Congratulations

Third post for the day

If your looking for a2z Scrapbooking June 2015 Challenge, click here

If your looking for So Suzy Stamps New Release, click here

Hello everyone!! I’m here with So Suzy Stamps!  Welcome to our challenge blog hop!  This is the last stop on this hop!!  I’m super happy you made it here.

If you arrived here from the talented  Jennifer‘s blog, then your on the right track.  If you arrived randomly, the blog hop starts at So Suzy Stamps blog.  You don’t want to miss out on any of my design team members cards.  The did a fabulous job.

Check out the card I created for this hop:

Welcome Baby (SoSS)

Once again a shaker card!!  My favorite card type to make these days!!

Here is how I created this card:

1. I used Mama Elephant Sew Fancy Die to cut out to my card panel.

2. I used Lawn Fawn Scalloped Circle Stackables Die to cut out the shaker window.

3. I stamped So Suzy Stamp Pretty Baby Carriage in the center of the shaker window using Stampin’ Up! Lost Lagoon Ink.

4. I used my We R Memory Keepers Fuse Tool to create my shaker pocket.

5. I added Stampin’ Up! 2013-2015 In Color Sequin in my shaker pocket.

6. I adhered the shaker packet to the back of the card panel with tape.

7. I added foam adhesive to the card panel and adhered it to my card base.

8. I stamped So Suzy Stamp Welcome Baby on the front of the card using Stampin’ Up Lost Lagoon Ink.

Super Doper Easy!! Now its your turn to play along with us!!  You can link up your project on So Suzy Stamps blog.

Just in case you get lost along the way, here is a complete list of blog hop participants:

ShaSharon ron

Kymona ← Your here

Speaking of design team members, we have three new members joining us!!

First up is Payel Ray from Beau Monde Design.
Second up is Amy Almeida from Lil Cutie Creations.
 Third up is Amy Davis from Amy’s Artsy Stuff.
Amy Davis
You can read all about them here.

What is a blog hop without a Giveaway??

Giveaway:

So Suzy Stamps blog is hosting a giveaway, she will be giving away a $15 Gift Certificate to a random winner who comments on all of the blogs in the hop!

The Giveaway expires June 3, 2015 at 11:59pm.  The winner will be posted on So Suzy Stamps Blog and Facebook page on June 6th, 2015.

I hope you enjoy what you see and hop along with us.  You won’t be disappointed!!

Free shipping

Free Shipping USA and International only June 1st

Supplies used:

SEW FANCYPretty Baby Carriagefuse bundleLost Lagoon Ink2013-2015 In Color SequinWelcome Baby

I’m also linking my card up to Simon Says Stamps Wednesday Challenge.

wednesdayblog-logo


Thank you so much for stopping by!

~Kymona

Hello Hippo!!

Hello everyone!!  I popping in today with a cute card I created this weekend! I had some time to sit and color with my daughter.

FullSizeRender(5)

This image from Gerda Steiner Designs!!  It’s the Hippo with Butterfly digital image.  Her hippos are super cute.  I have them all!!  I just need more time to color.

So which color shirt do you like?  I went with the orange one.  It just looks so cute on that hippo.

Take a look at my card:

Hello Hippo

Oh, look how cute that hippo looks!!  He tickles me!!

Wait before I continue, did you see my new watermark for my pictures!!!  I’m excited about it.  My good friend Kristina Beagle from Live Love Laugh Scrap created it for me.  Oh man, can I say she made my day yesterday!! Thanks you so much Kristina!!  Go and check her out, she is a fabulous card maker!

Now if you’ve been following me lately, you know that I have a love for shaker cards because of my new Fuse tool.  I can make shaker cards all day long.

This card was pretty easy to make as well.

1. I used Mama Elephant Femme Frames (which I can’t find as a stand along die anymore, I see them under the Basic Set) to cut out to frames from the Simon Says Stamp June 2015 card kit.

2. I used Mama Elephant Sew Fancy Circle die to cut a circle in the yellow pattern paper.

3. I used my We R Memory Keepers Fuse tool and the plastic slips to created a shaker pocket.

4. I added Pretty Pink Posh 4mm and 6mm sparkling clear sequins to the shaker pocket and used the fuse tool to seal it shut.

5. I adhered the shaker packet to the back of the yellow pattern paper with adhesive.

6. I attached that top panel to the orange panel with foam tape.

7. I attached the entire panel to the card base with adhesive.

8. I used Copic markers to color my hippo.

Y17, Y38, T0, T1, T2, B000

9. I used Top Dog Dies Hello Die to cut 2 hello’s for my sentiment. I adhered the two pieces together then attached it to the card front.

And there you have it!!  My cute hippo card.  Nothing to it!

Gerda Steiner Designs is have a Design Team Call and I figured why not put my name in the pot!

Gerda DT Call

I’m also linking up my card up to Challenge Up Your Life.

IMG_3263

and

Simon Says Stamps Wednesday Challenge.

wednesdayblog-logo
So what do you think? Let me know below.

Supplies used:

Hippo with ButterflySSS June CK FEMME_FRAMES-CC_large SEW FANCY fuse bundlePretty Pink Posh Sequins 4mm Pretty Pink Posh 6mm Sequins TDD Hello Die Set


Thanks for stopping by!

~Kymona

Waffle Flower Craft – Photo Inspiration Challenge

Hello everyone!! I’m here with our new Waffle Flower Crafts Photo Inspiration Challenge!!!

This is our ninth challenge for 2015! I love this challenge, it really takes me out of my safe space when creating.

This weeks photo is so lovely!

Take a look:

Waffle Flower Photo Inspiration May 25

This photo inspired me to create a shaker card!

Take a look:

With Love (WFC)

I told you I love the new release dies and stamps!! I couldn’t help myself in using this die again.

I’m also obsessed with shaker cards now that I know how to make them with ease!!

Let’s look at how I created this card:

1. I die cut all of my frames using Waffle Flower Craft Doily Square Die.

With Love 1

2.  To start I added adhesive to the front panel base die cut layer. I’m doing this so that my frames will stay in place.

With Love 2

3. I added the second die cut base that will hold my actually frame in place.

With Love 3

4. I added my pink frame to the base.  I also added the Kraft inserts around the pink frame.  I added to much tape so I decided to add these pieces to over up the tape.

With Love 4

5.  Now its time to make the shaker part of my card!!  Yayy!  I love this part.

Ok, I took one of my memory keepers scrapbook sleeves and cut it in half.  I taped down my die with washi tape to keep it in place.

With Love 5

6. I meant to take a photo of my actually using the fuse but I forgot but you will see it below.

I used my We R Memory Keepers Fuse Tool to seal the edges.  Then I cut off the excess plastic. After tracing the edge of the die, your shaker pocket looks like this. Can you see what I did wrong here?  Yes, I sealed the entire thing before adding my sequin, LOL!  Ok, easy fix.  I just use my Kraft knife to open up a small portion.

I told you I love making these.  I get so excited.

With Love 6

7. After filling the pocket with Lucy Adams Phosphorescence Sequin, I used the fuse tool to seal the shaker pocket up. I just laid the die back on the pocket lining it up with the previous fuse.

With Love 7

8. Here is what the pocket looks like when its sealed and ready to add to your card.

What I notice what this pocket fit but it was to big.  I used the bigger die and didn’t need to.  I need to use the smaller die from that set.  So I started over.

With Love 8

9.  Ok, this die is much better.  The actually frame where the shaker will show is this size so there was no need for the bigger one.

So, I did the same thing I did above.

With Love 9

10. See here you can see me using the fuse to seal the sides of my shaker pocket.

With Love 10

11. Here you can see that I added the sequin and trimmed the edges down.  I’m sealing the opening so that my sequin doesn’t fall out.

With Love 11

12. Here is my finished pocket!  I left some of the edge so that I can adhere it to my card base.

With Love 12

13. I add tape to my card panel. So that my shaker pocket will stay in place.

With Love 13

14. I adhered the shaker pocket so that the fused line doesn’t show through the window of the card.

With Love 14

15. I added foam tape to the card panel that it will stick to the card base with some room for my sequin to shake.

With Love 15

16. I added the front panel to my card base. So how easy that was.  Super fun to create.

With Love 16

17.  To finish the card off, I die cut 4 Waffle Flower Craft With Love Word Die out of Simon Says Stamp Lemon Chiffon Yellow Cardstock.

With Love 17

18. I adhered them with Tombow Multipurpose Glue and adhered it to the front of my card.

That’s my card for this challenge.  I challenge you to make a shaker card. It’s super fun and pretty.

Do you see how I used the colors to create my card.  I love this color scheme.

So what do you think? Please let me know.

Now its your turn!! I can’t wait to see what you come up with.

Supplies used:

Doily Square Die fuse bundlePhosphorescence SSS Lemon Chiffon YellowTombow Multi-Purpose Adhesive

Thank you for stopping by!!

~Kymona

Time To Shake!!

dtbh_bloggraphic

Shake, Shake, Shake That Card! It’s blog hop time again at Top Dog Dies. We have a whole lotta shaking going on this time for our blog hop. Shaker Cards! They are always a fun card to receive and make.

To add extra fun to our blog hop…we are offering up a prize! Three winners will receive the New Top Dog Dies Hot Air Balloon Die Set. For your chance to win, enter your email address below by 5/20/15. Winners will be posted on the Top Dog Dies blog after 5/20/15.

Here’s how it works…
Visit each blog on the hop in order. Each Design Team member has created a special shaker card using dies from Top Dog Dies. Visit each blog, check out the shaker projects and leave your comments. I’ve listed all of the participants below for your convenience. Don’t forget to enter to win.

So lets get start!!!

If you arrived from the fabulous Marcia Dehn-Nix then your on the right path.  If you didn’t please start at the talented Piali Biswas blog as to not miss any of the blogs and your chance to win our awesome prize.

Take a look at my card:

Hello There Shaker

I love making shaker cards but in the past they use to be so cumbersome with the foam tape and all.  Now that I have the We R Memory Tool Fuse, making shaker cards are a breeze!!  No bulk and no foam tape.

Thank you Jennifer McGuire for this amazing tip!!

You want to know how I created this?

Here you go:

1. I trimmed my card panel slightly smaller then my card base.

2. I used Top Dog Dies Heart Doily Die to cut a heart in the center of my card panel.

3. I used the negative and saved the heart shape for another card.

4. To create my shaker pocket, I used the heart die and placed it on my plastic window sheet.

heart fuse 1

5. I used the fuse tool and traced around the outside of the die to seal the plastic together, leaving a small portion open to add the sequin.

heart fuse 2

6. I add Lucy Adams Phosphorescence sequin from Lucy’s Card Little Things Collection to my shaker pocket.

heart fuse 4

7. I lined up the heart die with the shaker pocket and used the fuse to close up the hole in my shaker pocket.

heart fuse 5

8. I trimmed off the excess plastic around the heart.

9. I die cut my Studio Calico pattern paper, which is the NYC skyline, with the same heart die and adhered it the card base.

10. I used Mama Elephant Good Times Stamp Set to stamp my sentiment with My Favorite Things Hybrid Ink.

12. I adhered the shaker pocket to the back of the card panel with adhesive.

13. I wanted the card panel to lift off of the card base so I added Stampin’ Up! Dimensionals and adhered the card panel the card base.

Super easy to create!!  This has to be my all time favorite card to make now that its so easy.

Now on to talented Nicki Sheck for her fun shaker card!!

Just in case you missed someone or need to start over, I’ve listed my fellow design team members blog for your convenience.

Piali Biswas
Natalie Dever
Marcia Dehn-Nix
Kymona Tracey ← You’re here
Nicki Sheck
Jeanne Jachna
Vickie Zimmer
Kelly Griglione

Now all I need you to do is fill out the form below for your chance to win.  Super easy and exciting.

Fill out my onlineform.

I’m also linking my card up to Virginia’s View Challenge.

Layers and Dimensions

Supplies use:

fuse bundleTDD Heart Doily DiePhosphorescence  May Card Kit Good TimesMFT Hybrid Black Ink

Happy Hopping and Shaking!

Thanks for stopping by!

~Kymona