So Suzy Stamps February 2016 Challenge

Hello everyone!!  I’m here with So Suzy Stamps and our second challenge for 2016!!!

Check out our new challenge:

Color of Love

Check out my mini notepad:

Hello Crafty friends (SSS)

Now let me tell you something before I start on how I created this card!!  I love the new stencils and brushes Suzy has in her store!!

They are called the Clarity Stencils and Clarity Brushes!!  They work wonders together!! Check out this quick video I posted on Instagram so you can see some of what I did.

After applying the ink on my Recollection White Card-stock, I trimmed it down to fit on the front of the Recollection Black Card-base.

Then I stamped So Suzy Stamp new Hello Crafty Friends stamp that is available today, on the front panel using Versafine Black Ink.

The black card base was cut to 4.50 x 8.50, scored at 4.50 and 4.

Inside

On the inside, I adhered a purple post-it note pad.

I stamped the corners of the post-it note using So Suzy Stamps Smile Stamp set.

I added Your Next Stamp Clear Gumdrops to finish the card off.

Nice, pretty and easy to create.

Supplies used:

Clarity BrushesClarity Stencil Abstract SquaresRecollections Black HeavyweightRecollections White HeavyweightTombow XtremeOnyx Versafine Ink clear gumdrops small Smile Hello crafty friends

Thank you for stopping by!!

~Kymona

So Suzy Stamp January 2016 Challenge

Happy New Year Everyone!!!

Hello everyone!!  I’m here with So Suzy Stamps and our first challenge for 2016!!!  I can’t believe this!!  It feels like 2015 was just starting.

Check out our new challenge:

So Suzy Stamps challenge

Check out my card:

I'm sorry (SSS)

I’m super excited about this card!!  I’m super proud of myself and this coloring!!  I used the Derwent Inktense Pencils to coloring my image in!!

This new stamp is called Surf Shack!!  I love it for a couple of reasons.

  1. Its a pretty big stamp with plenty of space to color!
  2. It reminds me of the beach which is a super fun place to spend time at during the summer.

Here is how I created this card:

  1. I stamped the image on watercolor paper and used Intense pencils to color the image in.
  2. The colors are Iron Blue 0840, Deep Blue 0850, Oak 1730, Saddle Brown 1740, Burnt Orange 0260, Tangerine 0300, Mustard 1700, Amber 1710, Indian Ink 2020, and Chinese Ink 2030.
  3. Once my piece dried, I proceed to have my Brother Scan and Cut cut out the image but the watercolor paper wouldn’t stick to my mat, so I had to fussy cut the image out.
  4. I used Lil’inker designs Quilted Stitched Pattern Cover Plate to die cut the front panel of the card.
  5. I stamped the So Suzy Stamps I’m Sorry stamp using Versafine Black ink.
  6. I added foam tape to the front panel and the cut out stamped image.

Take a closer look:

I'm Sorry closeup (SSS)

What do you think?  So are you asking why the sentiment says, I’m Sorry.  Well, some of you are dealing with snow, cold weather and storms.  Here in NY, its seasonable warm, it feels like summer.  This one time I get to brag about not being cold!! LOL!!

Let me know what you think and I can’t wait to see what you create!!

Supplies used:

Intense pencils Onyx Versafine Ink LID Quilted Stitched Pattern Die 3M Double Coated Foam Tape Recollections White Heavyweight

Thanks you so much for stopping by!!

~Kymona

So Suzy Stamps December 2015 Challenge


Hello everyone!!  I’m here with So Suzy Stamps and our last challenge for 2015!!!  I can’t believe this year is almost over!!  So why not send 2015 off with a bang!!

Check out our new challenge:

So Suzy Stamps

Check out my card:

Joy (SSS)

Oh man check out how those colors really pop off of my card.  I love the purple and blue!!  Getting gifts bring me joy, wish I received some. LOL!!

I used the new release So Suzy Stamps Present stamp!  Awesome stamp to color and play with.

Here is how I created this card:

  1. I stamped the present randomly on my card panel using My Favorite Things Hybrid Ink. 
  2. Then I stamped another present and used my Brother Scan and Cut 2 to cut it out.  I used Copic Marker: V06, Y02, Y15, Y19 to color my image in.
  3. I adhered the present to the card panel using foam tape.
  4. After that I used Lawn Fawn Scripty Joy Die to cut out the sentiment three times out of fun foam.
  5. I adhered the sentiment on the card panel using Tombow Multipurpose Glue.
  6. I adhered the card front to the card base using fun foam.

Super simple and easy to duplicate.

What do you think? Please let me know below.

Supplies used:

MFT Hybrid Black Ink Brother Scan and Cut2Copic Markers Fun Foam Tombow Multi-Purpose Adhesive

Thank you so much for stopping by!

~Kymona

So Suzy Stamps November 2015 Challenge -Thanksgiving/Fall

Third post for today
If your looking for the a2z Scrapbooking November 2015 Challenge, click here
If your looking for the So Suzy Stamps November New Release, click here

Hello everyone, I’m here today with So Suzy Stamps November 2015 Blog Challenge.

banner

Check out my card:

Thank you, fall(SSS)

I love how these butterflies look embossed!! The true meaning of Thanksgiving is to give thanks!!  I plan on doing that this November!!  Stay tune for that.

Here is how I created this card:

  1. I used WPlus9 Sunshine Layers Die to die cut my white panel frame.
  2. Then I stamped my butterfly 3 times with Versamark ink.
  3. I used retired Stampin’ Up! Melon Mambo, Tempting Turquoise Gumball Green embossing powder to color my butterfly.
  4. I stamped my sentiment, then I tied some string around my card panel.
  5. I attached my card panel to my card base.
  6. I attached some of Lucy Abrams Fairy Lights Sparkly Shaker to the front of my card.

So what do you think?  Please let me know below!!

Check out my fellow design team members!!  You will not want to miss it..

I hope you join in our challenge this month.

Supplies used:

Sunshine DieVersamarkButterfly 3 Thank you Neenah Desert Storm CS Lucy Fairy Lights Sequin

Thank you for stopping by!

~Kymona

So Suzy Stamps October 2015 Challenge – Halloween

Third post for today
If your looking for the a2z Scrapbooking October 2015 Challenge, click here
If your looking for the So Suzy Stamps October New Release, click here

Hello everyone,  I’m here today with So Suzy Stamps October 2015 Blog Challenge.

11082498_10153720285210558_7666493263852333524_n

Check out my card:

Halloween (SSS)

I just love how that background turned out!!  I’m not use to making background but I wanted to give this a try and I’m so glad I did!!

Here’s how I created this card:

  1. I cut out a circle mask and adhered it to the card front so that I could blended Distress Ink Salty Ocean and Seedless Preserves together to create the night sky.IMG_5380
  2. Then I used Heidi Swap Star Stencil and Hero Arts Unicorn Ink and added some stars in the sky.
  3. Then I used WPlus9 Shimmer Spray Mist to add shimmer dimension in the sky.
  4. After that I stamped So Suzy Stamps Safest Day Stamp Set using My Favorite Things Hybrid Ink.
  5. Then I stamped the So Suzy Stamp Halloween Cat using the same Hybrid Ink .
  6. Then I used the Hybrid Ink to add color to my Unique Laser Deisgns Halloween Mini Chipboard and adhered it within my moon.

It might look hard, but it was the easiest card I could have created!!

So what do you think?  Please let me know below!!

Check out my fellow design team members!!  You will not want to miss it..

I hope you join in our challenge this month.

Supplies used:

WPlus9 Shimmer Spray MistSafest DayMFT Hybrid Black InkHalloween CatHero Arts Unicorn Pigment InkMini Halloween Chipboard0421.1443553989.451.416

Thank you so much for stopping by!!

~Kymona

So Suzy Stamps Happiness Is.. and a Giveaway!!

Hello everyone!!  I’m here today with So Suzy Stamps Blog Challenge!!  The theme is Happiness is…!

This is such an awesome theme.  All of us have things that simply make us happy!!

For me its, hanging out with my children, nieces and nephew and my brothers and sisters!! I’m so grateful for all of them.

Here’s a picture of my siblings and I:

FullSizeRender (1)

We love having fun!! I love these people!!

We also love traveling together.  We have such a great time together.  So when I created my card I thought of them.

Take a look at my card:

Happiness is..an open road

All of us love adventures and we aren’t afraid to take them.  All we need is an “open road and a sunset to chase”, when we hit the road.

For details on how I created this card, please visit So Suzy Stamps Blog.

You have no reason to not play along with our challenge this month because you can download the SVG “Happiness Is…” File for Free from the So Suzy Stamps Store.

Giveaway:

I’m giving away the Happiness Stamp and the Vintage Balloon to one lucky winner who leaves a comment on my Suzy Stamps Blog post letting me know what happiness is to you!  This giveaway ends September 17 at 11:59pm EST!

Good Luck!!

I can’t wait to see what you create!!

What do you think of my card?  Let me know below!

I’m also entering my card in the NBUS Challenge #5:

NBUS

Supplies used:

Happiness is Open Road Vintage Balloon  SU Watercolor Wonder

MFT Hybrid Black Ink


Thanks for stopping by!!

~Kymona

So Suzy Stamps September 2015 Challenge

Third post for today
If your looking for the CASology post, click here
If your looking for the a2z Scrapbooking blog post, click here

 Hello everyone, for the third time today!!!  I’ve been super busy!!

I’m here today with So Suzy Stamps September 2015 Blog Challenge!!

Happiness is.

Check out my card:

Happiness is..hot coco

Here’s how I created this card:

  1. I stamped So Suzy Stamps Tall Coffee Cup using Versamark ink onto my card base.
  2. Next I stamped So Suzy Stamps Happiness Is… Stamp and Hot Cocoa onto vellum with My Favorite Things Hybrid Ink.  
  3. I cover the stamped sentiment with Hero Arts Clear Embossing Powder before the ink dried.  I heat set it and the sentiment now has a glaze on top of it.
  4. I flagged the vellum pieces and adhered them to the card front with Tombow Multipurpose Glue.
  5. I added two gold stars and gold ink to the center of the hot cocoa steam to finish the card off.

Super easy and doable!!!

So what do you thing?  Please let me know below!!

Check out my fellow design team members!!  You will not want to miss it..

I hope you join in our challenge this month.

Supplies used:

Tall Cofee Cup VersamarkHappiness is  Hot Cocoa MFT Hybrid Black Ink Hero Arts Clear Embossing PowderTombow Multi-Purpose Adhesive

Thank you so much for stopping by!

~Kymona

So Suzy Stamps July 2015 Challenge

Hello everyone again!! I’m here with So Suzy Stamps and our July Challenge!!

Have you seen the new stamps that were released today!! Simply amazing!!  Head on over to the store and see for yourself.  I also included a link up above for you.  All of the stamps are super cute and adorable.  Perfect for our new challenge this month which is Christmas by the Sea!!

10985881_10153794928550558_1806752028310528101_n

Check out my cards:

Eskimos (SSS)

Yayyyyy!!  I love shaker cards, you know that!! I couldn’t help myself with this card!!

Hugs and Kisses (SSS)

These So Suzy Stamps penguins totally stole my heart.

Here is how I created these cards:

Card One:

I used Papertrey Ink Sunshine Impression Plate to emboss my card front.

Then I used Simon Says Stamps Stitched Circle Die to cut a circle out of my card front.

I adhered the cut circle to the card front using adhesive.

I created my shaker pocket and added it to my card panel.  If you want to see how I created that using my fuse tool, click here.

I added foam adhesive to the back of the card panel and attached it to my card base.

I used my Copic marker to color my So Suzy Stamps Penguin Hat, then I adhered him with foam adhesive.

I stamped So Suzy Stamps Eskimo Kisses sentiment onto the card front using My Favorite Things Hybrid Ink.

Card Two:

I used Stampin’ Up! Brick Wall Embossing Folder and embossed my card front.

I used Your Next Stamps Circle Stitching Marks Die set to create the holes on my card front.

I colored my Penquin with Copics and attached her to the card panel.

I adhered the card panel to the card base.

I added some Your Next Stamp gumdrops for embellishment.

So what do you thing?  Please let me know below!!

I hope you join in our challenge this month.

Supplies used:

pti Sunshine impressions die Penguin Hat Eskimo KissesStitiched CirclePhosphorescence fuse bundleMFT Hybrid Black Ink Brick Wall Embossing Folder

Stitching marks circle dieRuby Red Gumdropclear gumdrops smallblack gumdrops small

Thanks for stopping by!!

~Kymona

So Suzy Stamps Challenge Blog Hop

Congratulations

Third post for the day

If your looking for a2z Scrapbooking June 2015 Challenge, click here

If your looking for So Suzy Stamps New Release, click here

Hello everyone!! I’m here with So Suzy Stamps!  Welcome to our challenge blog hop!  This is the last stop on this hop!!  I’m super happy you made it here.

If you arrived here from the talented  Jennifer‘s blog, then your on the right track.  If you arrived randomly, the blog hop starts at So Suzy Stamps blog.  You don’t want to miss out on any of my design team members cards.  The did a fabulous job.

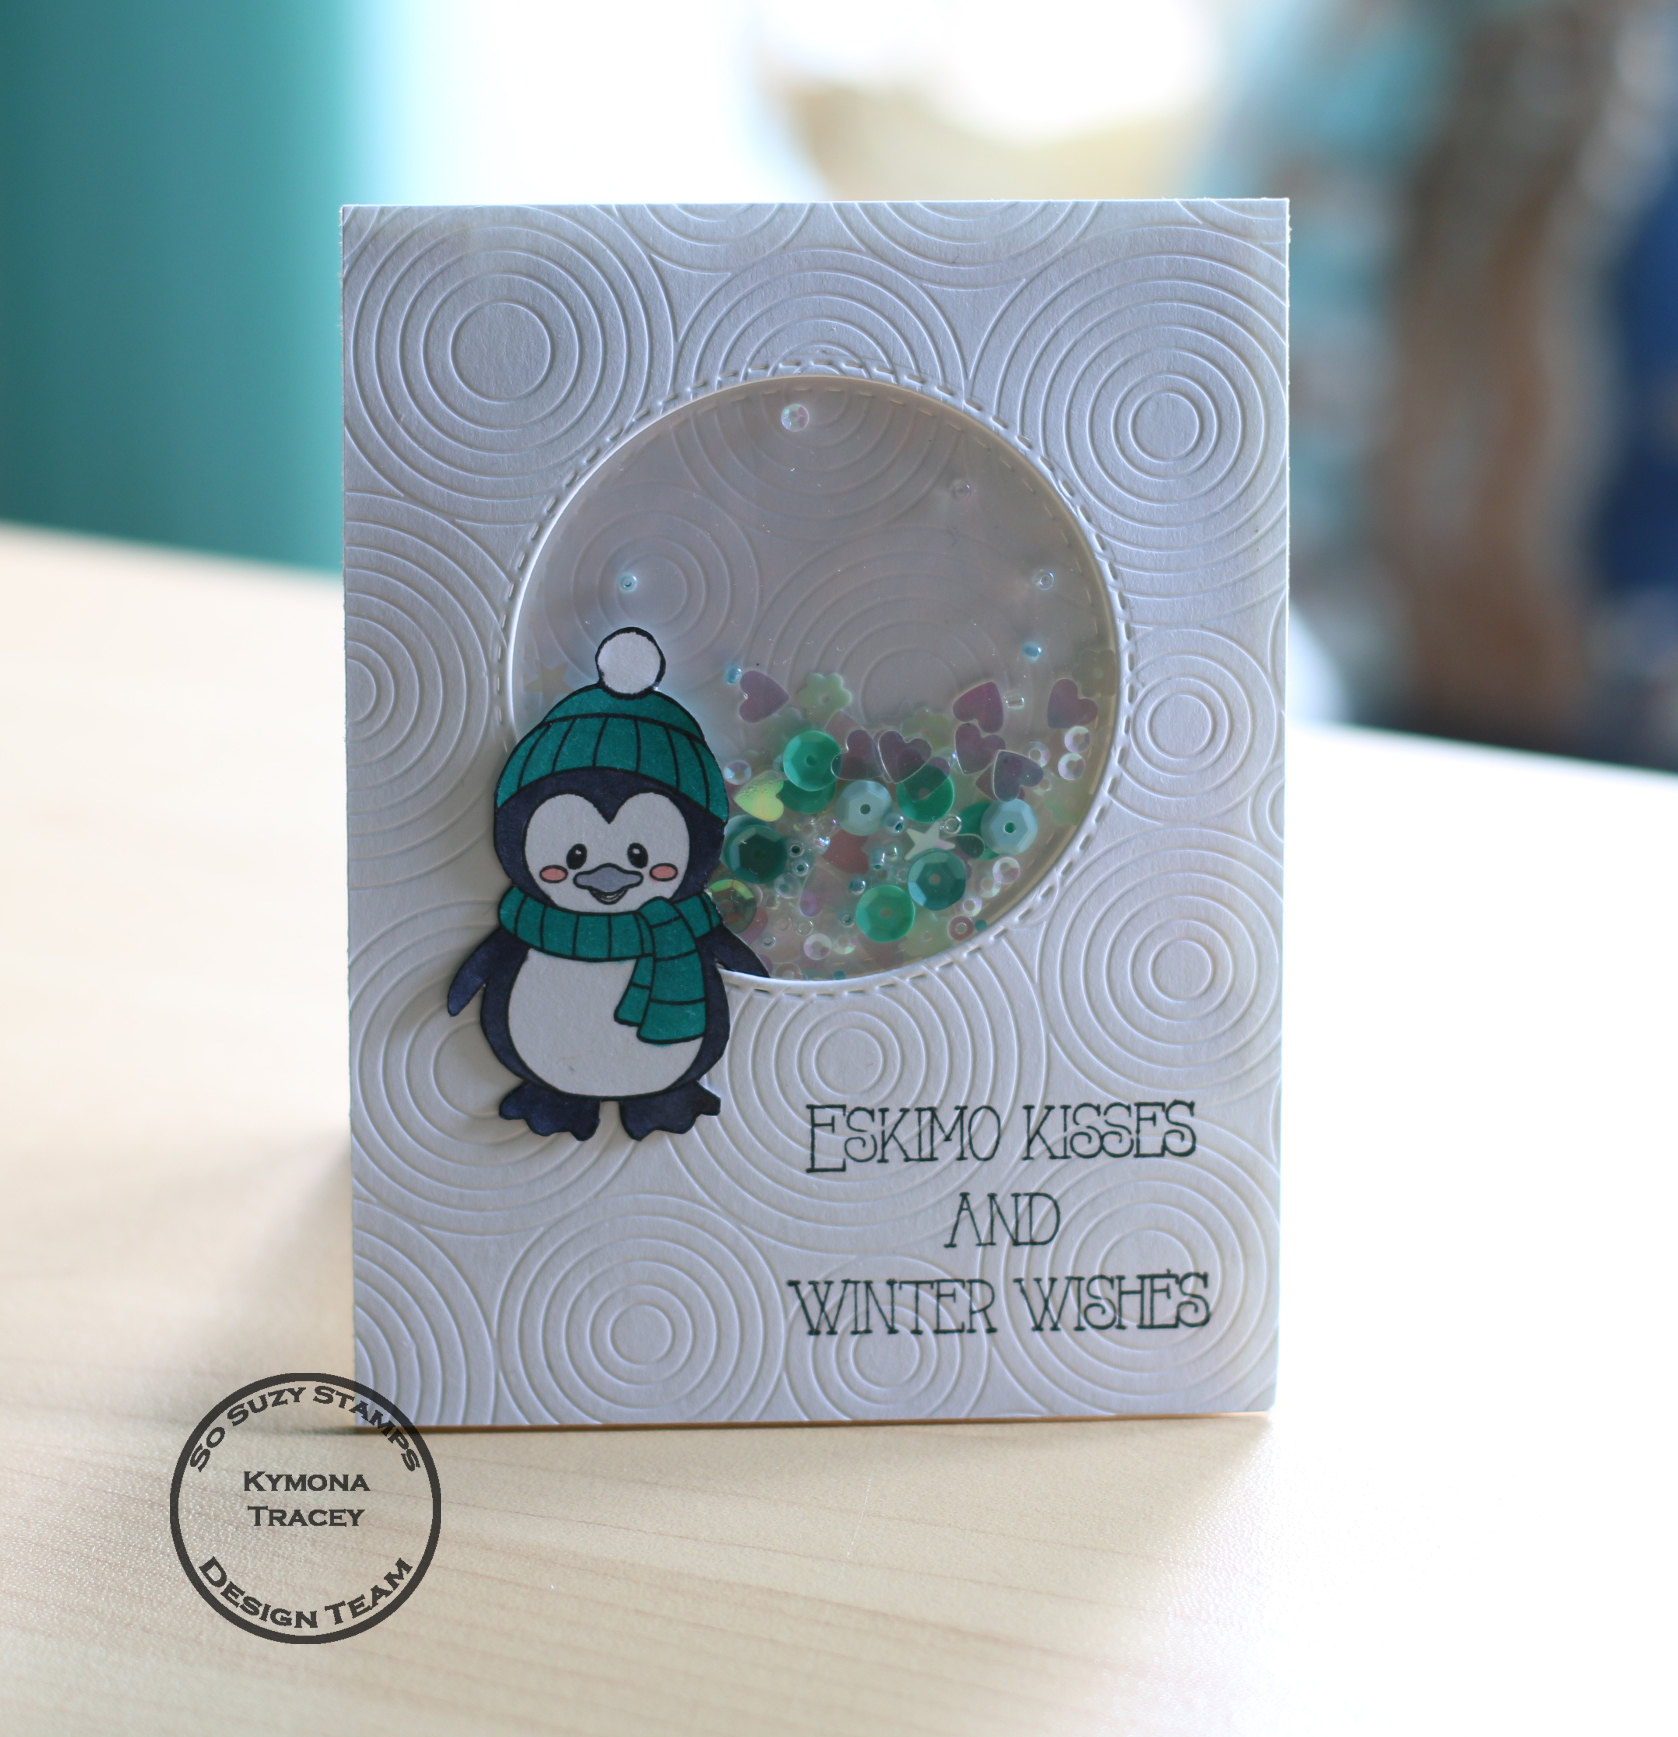
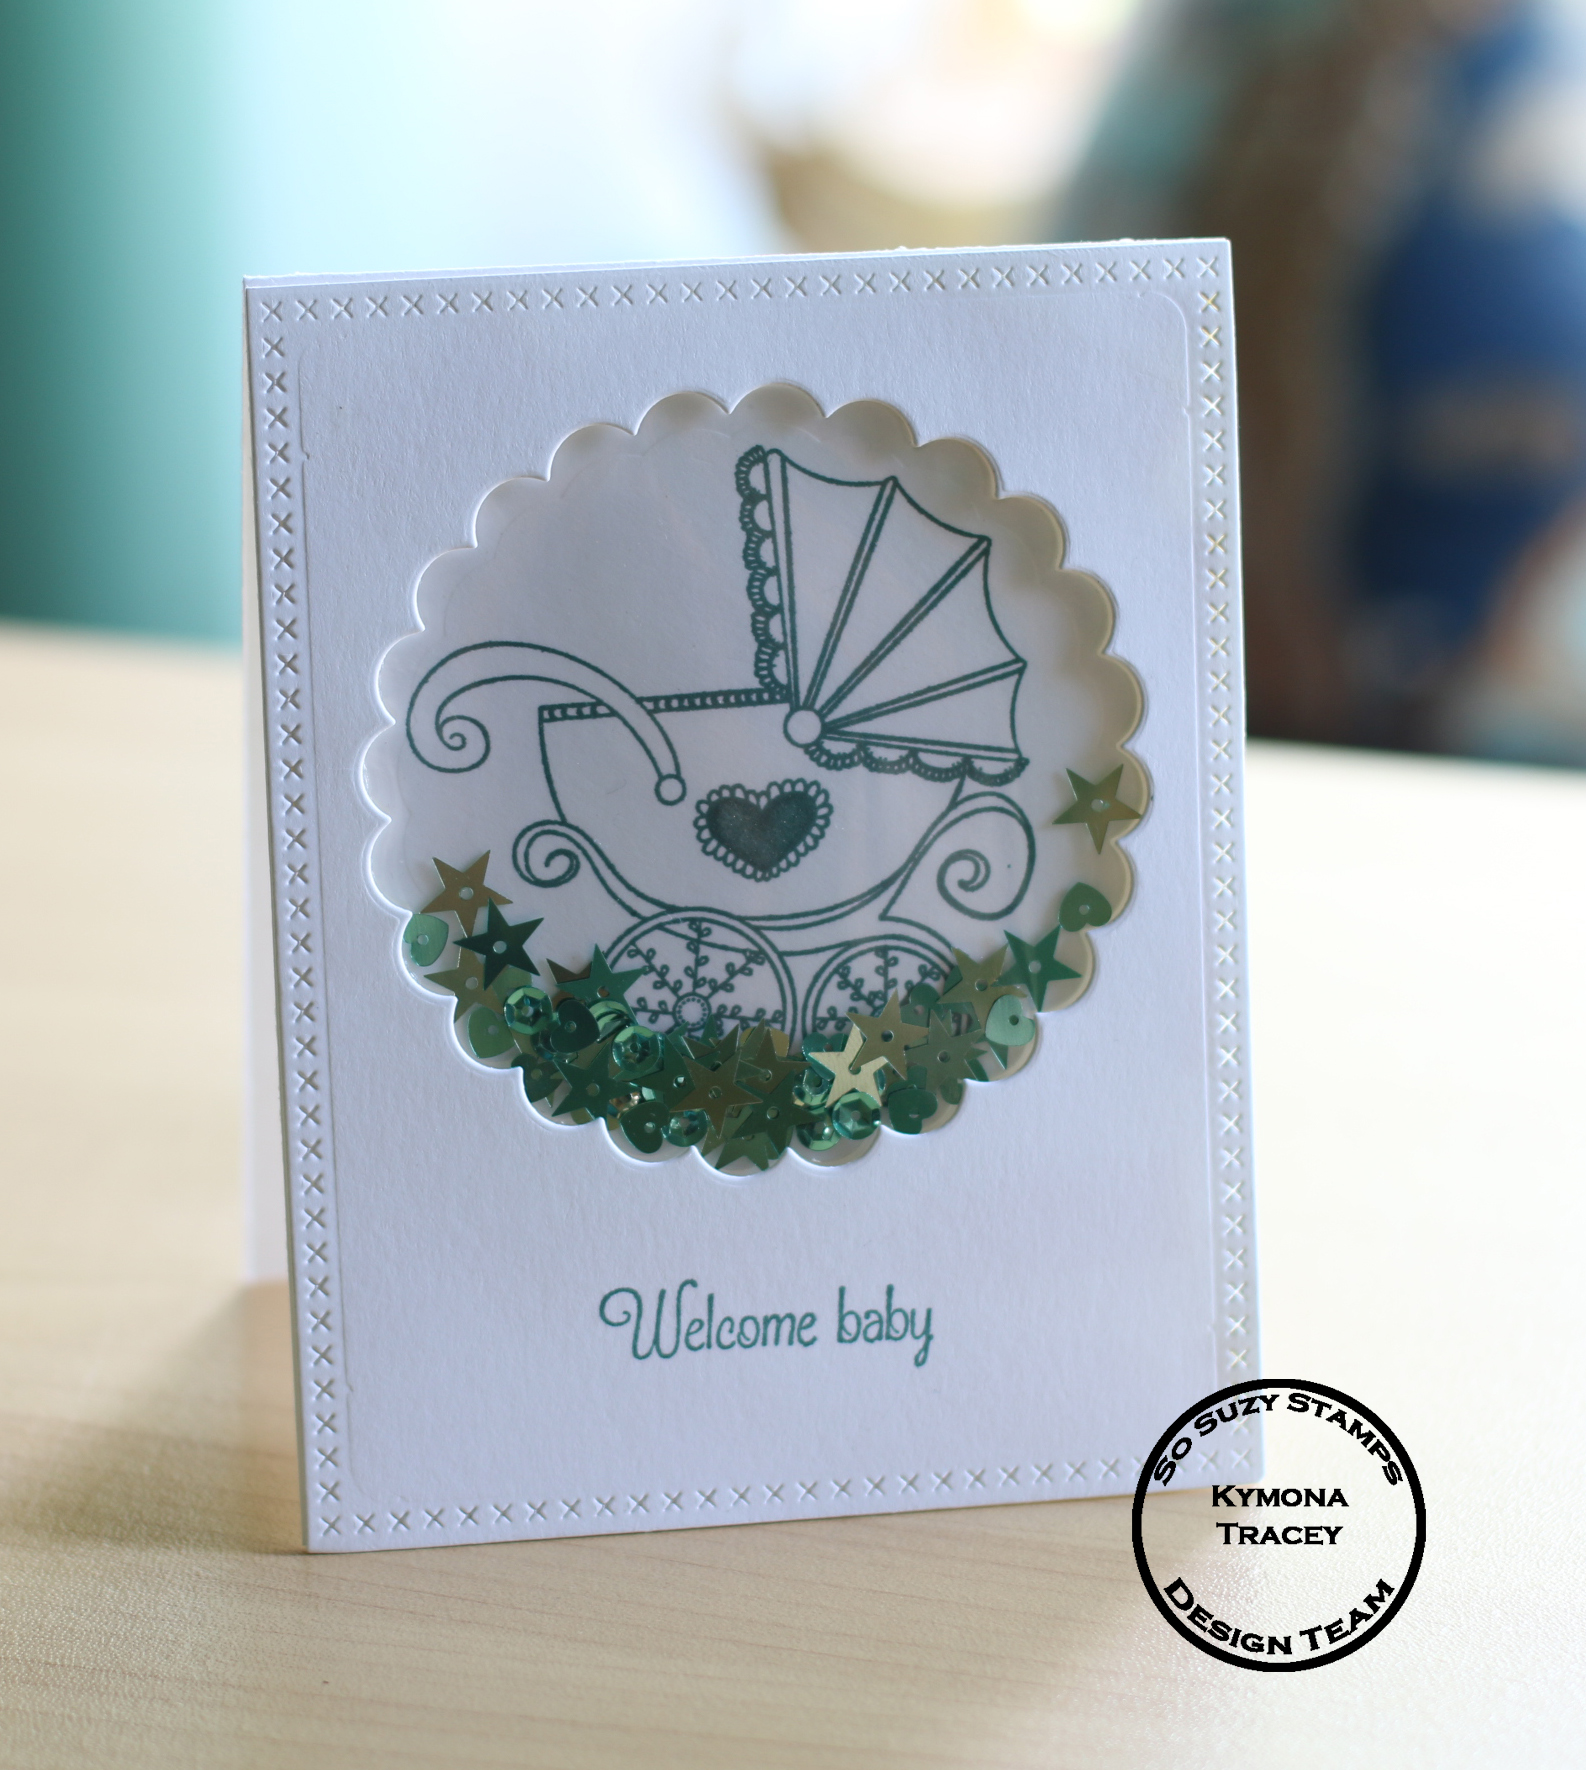
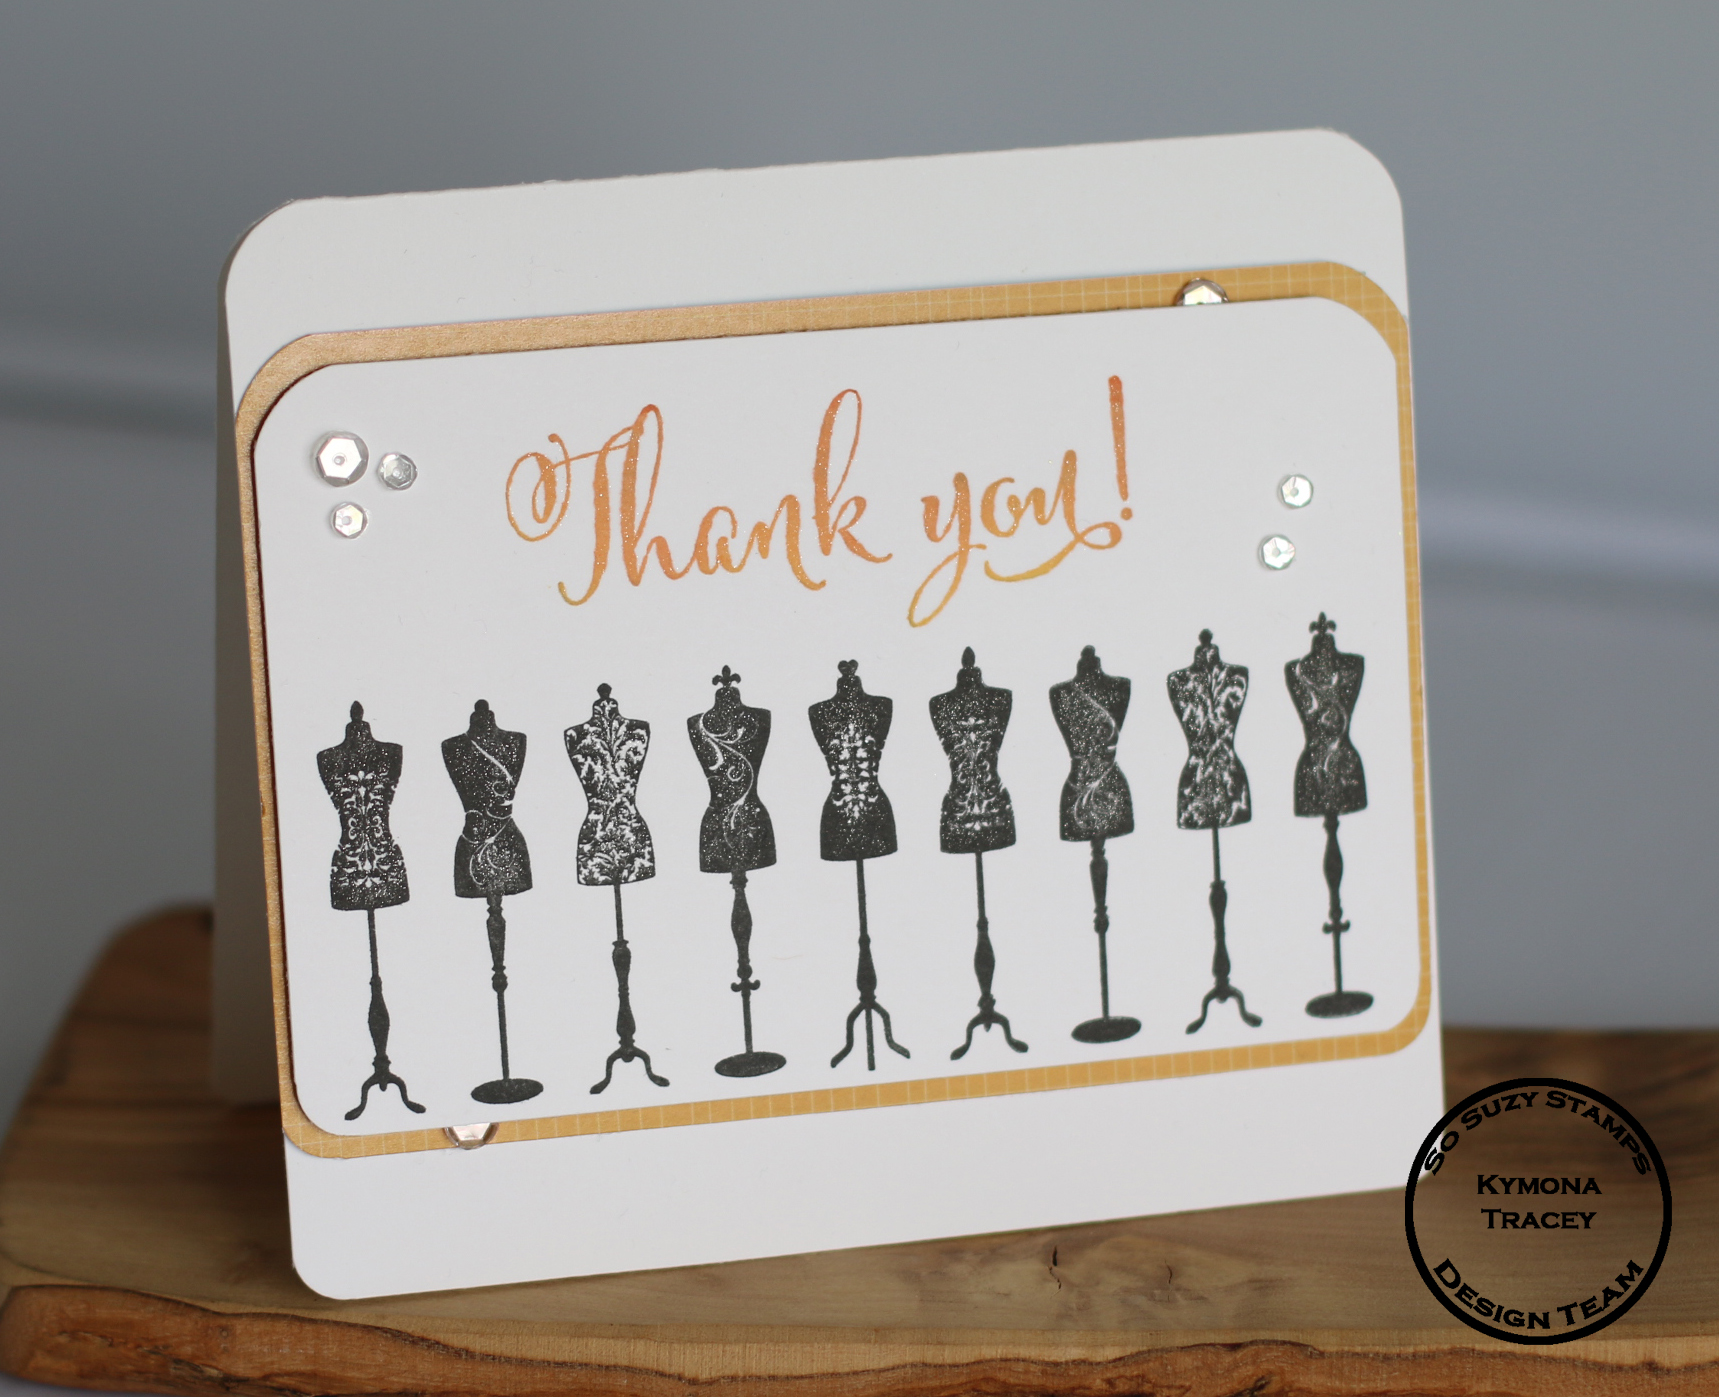
Check out the card I created for this hop:

Welcome Baby (SoSS)

Once again a shaker card!!  My favorite card type to make these days!!

Here is how I created this card:

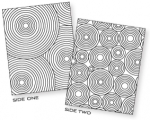
1. I used Mama Elephant Sew Fancy Die to cut out to my card panel.

2. I used Lawn Fawn Scalloped Circle Stackables Die to cut out the shaker window.

3. I stamped So Suzy Stamp Pretty Baby Carriage in the center of the shaker window using Stampin’ Up! Lost Lagoon Ink.

4. I used my We R Memory Keepers Fuse Tool to create my shaker pocket.

5. I added Stampin’ Up! 2013-2015 In Color Sequin in my shaker pocket.

6. I adhered the shaker packet to the back of the card panel with tape.

7. I added foam adhesive to the card panel and adhered it to my card base.

8. I stamped So Suzy Stamp Welcome Baby on the front of the card using Stampin’ Up Lost Lagoon Ink.

Super Doper Easy!! Now its your turn to play along with us!!  You can link up your project on So Suzy Stamps blog.

Just in case you get lost along the way, here is a complete list of blog hop participants:

ShaSharon ron

Kymona ← Your here

Speaking of design team members, we have three new members joining us!!

First up is Payel Ray from Beau Monde Design.
Second up is Amy Almeida from Lil Cutie Creations.
 Third up is Amy Davis from Amy’s Artsy Stuff.
Amy Davis
You can read all about them here.

What is a blog hop without a Giveaway??

Giveaway:

So Suzy Stamps blog is hosting a giveaway, she will be giving away a $15 Gift Certificate to a random winner who comments on all of the blogs in the hop!

The Giveaway expires June 3, 2015 at 11:59pm.  The winner will be posted on So Suzy Stamps Blog and Facebook page on June 6th, 2015.

I hope you enjoy what you see and hop along with us.  You won’t be disappointed!!

Free shipping

Free Shipping USA and International only June 1st

Supplies used:

SEW FANCYPretty Baby Carriagefuse bundleLost Lagoon Ink2013-2015 In Color SequinWelcome Baby

I’m also linking my card up to Simon Says Stamps Wednesday Challenge.

wednesdayblog-logo


Thank you so much for stopping by!

~Kymona

So Suzy Stamps May Challenge!!

Second post for today

If your looking for the CS Take It Make It post, click here

Hello everyone again!! I’m here with So Suzy Stamps and our May Challenge!!

Have you seen the new stamps that were released today!! Simply amazing!!  Head on over to the store and see for yourself.  I also included a link up above for you.  All of the stamps are super cute and adorable.  Perfect for our new challenge this month which is Thank You!!

1450095_10203311420565552_2248967912574082881_n

Check out the card I created for this challenge:

Thank you release

This is just the beginning!!  The rest of the Design Team created some amazing projects featuring some of the new stamps as well. Check out Suzy’s blog.

Creating this card was rather simple.  It’s a matter of layering the cardstock and pattern paper.

The amazing thing about this particular stamping is the repetitiveness of the it.  To achieve that I used my Misti tool!!  I have to say, this tool really comes in handy for me when doing stamping like this.

Take a look:

Misti stamping

I used So Suzy Stamps Dress Form to create this repeated stamping.

I used So Suzy Stamp Thank You to stamp my sentiment using Hero Arts Ombre Butter to Orange Ink.

I attached my layers with adhesive. I added Pretty Pink Posh 4mm Sparkling Clear Sequin and 6mm of Sparkling Clear Sequins to my card front.

I rounded the corners of my card panels with my We R Memory Keepers Corner Chomper.

Nice and easy!!! Now its your turn and I can’t wait to see what you come up with!!!

Supplies used:

Dress Form Set Thank you HR Ombre Orange Pretty Pink Posh Sequins 4mm Pretty Pink Posh 6mm Sequins We R Memory Keepers Corner Chomper

Thank you for stopping by!

~Kymona