Postage Shape Card – a2z Scrapbooking June 2017 Challenge

Second Post for Today
If your looking for Rubber Dance Stamp Challenge post, click here

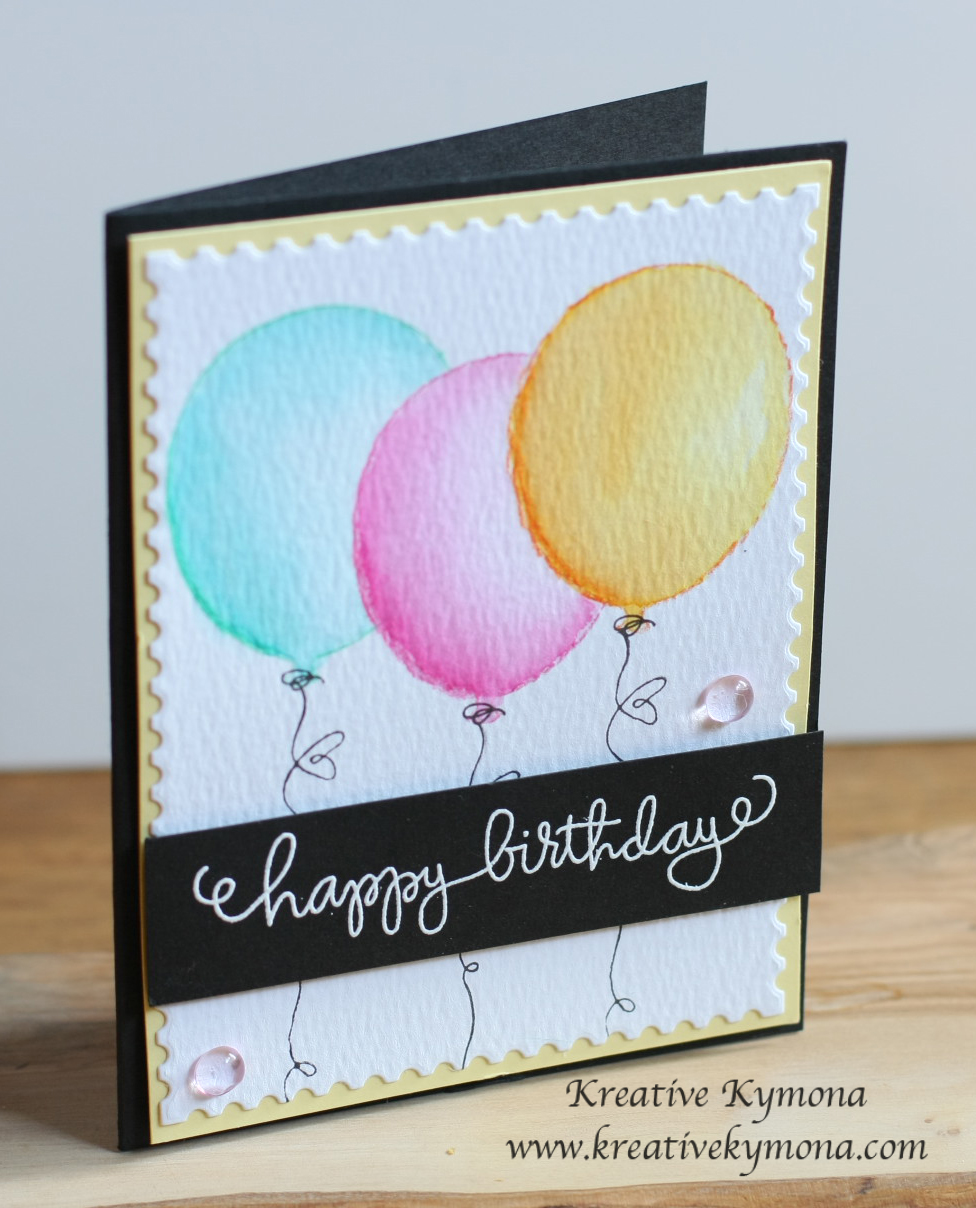
Hello everyone!!  I’m here today with a a2z Scrapbooking Challenge. The theme this month is Take Shape!!

Take a look at my card:

To create this card:

  • Open up photoshop and chose one of the stamp images you want to use.
  • Place the stamp in the pattern you want.
  • Add color to each stamp image using the paint bucket tool in photoshop.
  • Print the image.
  • Die cut the cardstock using Winnie Walter Lana Cutaways.
  • Die cut the thanks 6 times for dimension.
  • Add on top of some thread using Tombow Mono Liquid Glue.

Clean and simple design!

What do you think? I would love to hear what you think below.

I hope you love what you see and that it inspires you to join us this month. You have the entire month to create a new project and enter it into our challenge. By entering you will have a chance to win a $25 Gift Certificate to the a2z Scrapbooking Store. Winner will be announced on the 7th of July.  Good Luck!

If you would like to purchase any Hero Arts products please head on over to the store and use the coupon code KYMONA15 to get 15% off your purchase.

Supplies used:

digital image journal bordersthanks postage card 

Thank you so much for stopping by!!

Watercolor Birthday…

Hello everyone!  I’m here with DoubleClick Skittles Design Team Challenge.  This month the theme is Anything Goes.

I decided to create a card for my Aunt’s birthday.

I use Simon Says Stamp Balloons Die to create a stencil for my balloons.  Then I used my retired Stampin Up! watercolor pencils to fill them in.

Take a look at my card:

Watercolor birthday

1. After I created the stencil, I traced the balloons with a pencil very lightly on to Tim Holtz Watercolor Cardstock that was die cut using Simon Says Stamp Postage Stamp Edge Frames Die.

2. Then I used my color pencils and traced over the pencil mark.

3. For each balloon, I colored just the base and the side of the balloon.

4. Then I used my paint brush and water to pull the color from the side and base, to the rest of the balloon.

5. I stamp the strings to the balloons.

6. I stamped and embossed the sentiment from Simon Says Stamp Birthday Balloons on a strip of Stampin’ Up! Basic Black cardstock.

7. To top of my card I added Pink Sherbert Skittles to my card front for added embellishment.

For those of you who are wondering about my skittles embellishments, the owner Carri, has put together a video to answer any question you might have regarding their size, color, and how to adhere them to your projects. Please click here for that video.

I love the colors of these balloons.  What do you think?  Please let me know.

Now its your turn, come on over an play along with our Anything Goes Challenge over on the DoubleClick Connection Blog.  The winner will receive this great prize pack:

100_4900

Supplies used:

SSS Balloons Craft DiesStampin Up Watercolor Pencils Birthday BalloonsPink Sherbet Basic BlackSo SaffronTim Holtz Watercolor CardstockPostage Stamp Edge Frames

Thanks for stopping by!

~Kymona