Destashing Again!!

It’s that time again for me to make some room in my craft corner.  I have to let go and allow these supplies to make someone else happy. So let’s DESTASH!!!!

Some of the items are new, and some are slightly used.

Destash Boxes

Here are the details:

Each package costs $65, which includes shipping.

If you are interested, email me at kreativekymona@gmail.com with the following information:

→ The address you would like your package sent.

→ First come, first serve. These boxes are ready to go.

→ Each box is full of stamps, dies, and other surprises.

→ Pay Paypal friends and family.

→ Packages will be mailed within 24 hours of payment with a tracking number sent to you.

Thanks for stopping by!

Clearly Planned May 2017 New Release

Hello everyone!!  Yayy!! It’s release day for Taylored Expression Clearly Planned stamps today!!

CpLogo-500x394


Here’s a recap of what I shared during the sneak peek!

I’m starting with Wag More, Bark Less!

Here’s the full spread with those super cute sweet goodies from the Super Sweet stamp set.

Here’s the full spread using the I Am stamp set!!

I can’t wait for you to see the entire release.  All of the stamps are so pretty and fun. You will not be disappointed at all.

The new release has:

  • 10 new stamp sets
  • 2 new die sets

Which set will you pick up?  I can’t wait to see what everyone chooses.

WAIT BEFORE YOU GO!!!!!!

For a limited time, earn DOUBLE CRAFTY POINTS on our Clearly Planned Super Sweet Stamp and Coordinating Dies Bundle and on ANY of our spiritual Clearly Planned stamp sets! If you’re not a Crafty Points member, it’s free and easy to join. Just create an account at the TE webstore and you’re automatically enrolled to begin earning crafty points with every purchase.

You’ll earn DOUBLE CRAFTY POINTS on the purchase of one or more of these Clearly Planned products:  74 Crafty Points on our Super Sweet Stamp and Coordinating Dies Bundle30 Crafty Points on our Faith Hope Love stamp set; and 16 Crafty Points EACH on our Yahweh, Faith Fulland I Am stamp sets!

Offer valid on qualifying purchases made between 9am CST on Thursday, May 18, 2017 and 11:59 pm CST on Sunday, May 21, 2017 and only while supplies last. Crafty Points are only available on purchases made via our retail site: www.tayloredexpressions.com.

clearly planned faith stamp sets

Thank you so much for stopping by!!

Wishing you were here…

Hello everyone!!  Kymona here sharing my very first Top Dog Dies Design Team post with you today!!  I’m super excited to be here and I hope you love what I’m about to share with you!!

Today I’m working with one of the new dies that was released on Tuesday!!

tc084_1Top Dog Dies Feathers Die Set

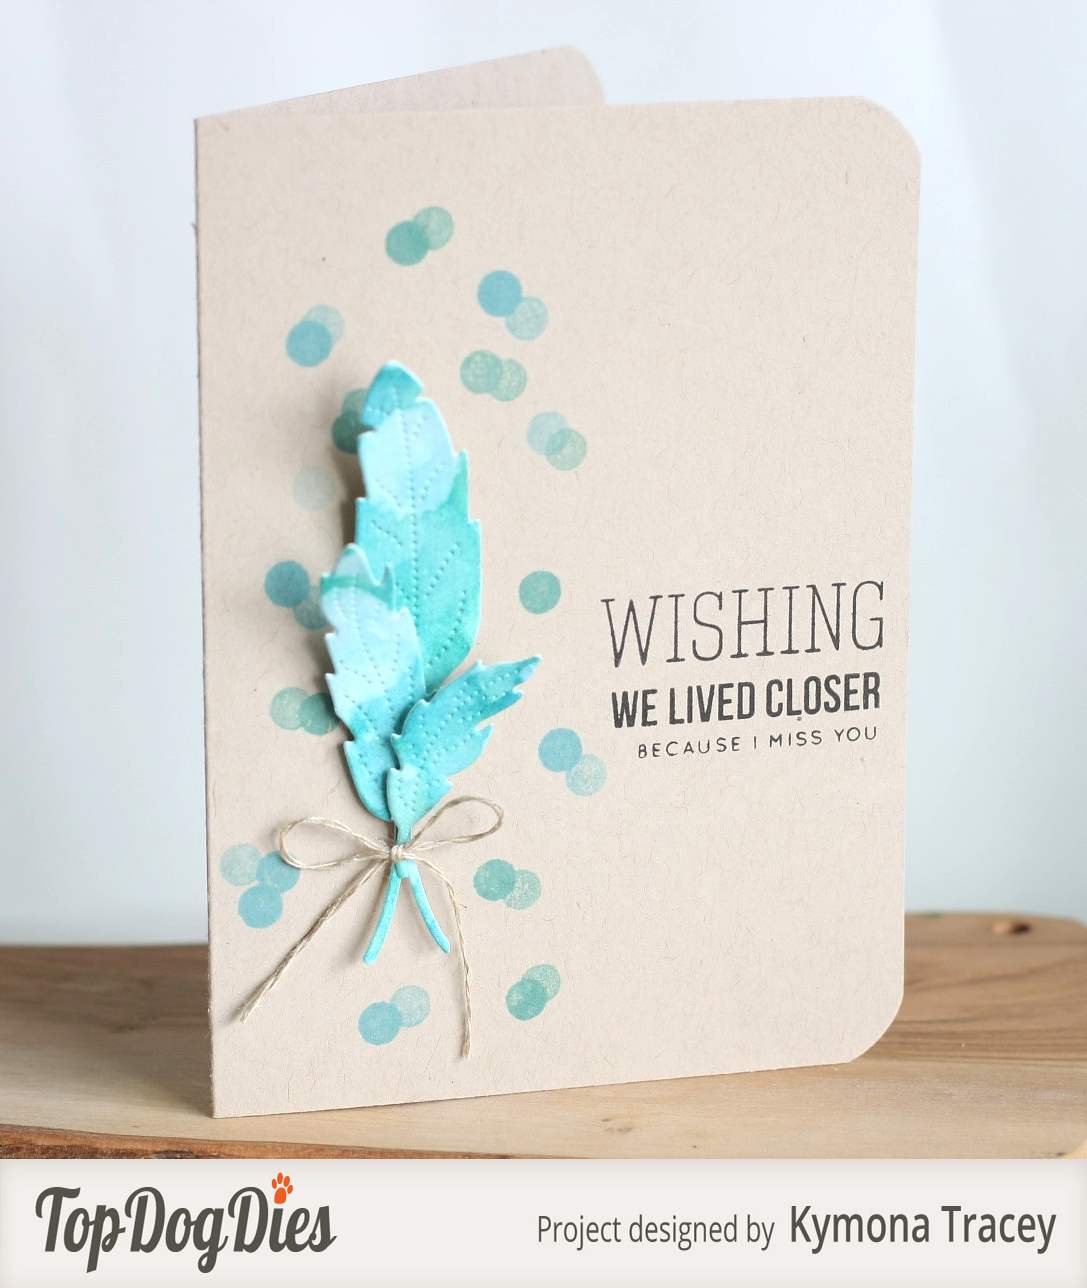
Take a look at what I created for you:

Wishing you were closer

These feathers are super fun to work with.  I love the detail on each feather! So you want to know how I created this card?

Here you go:

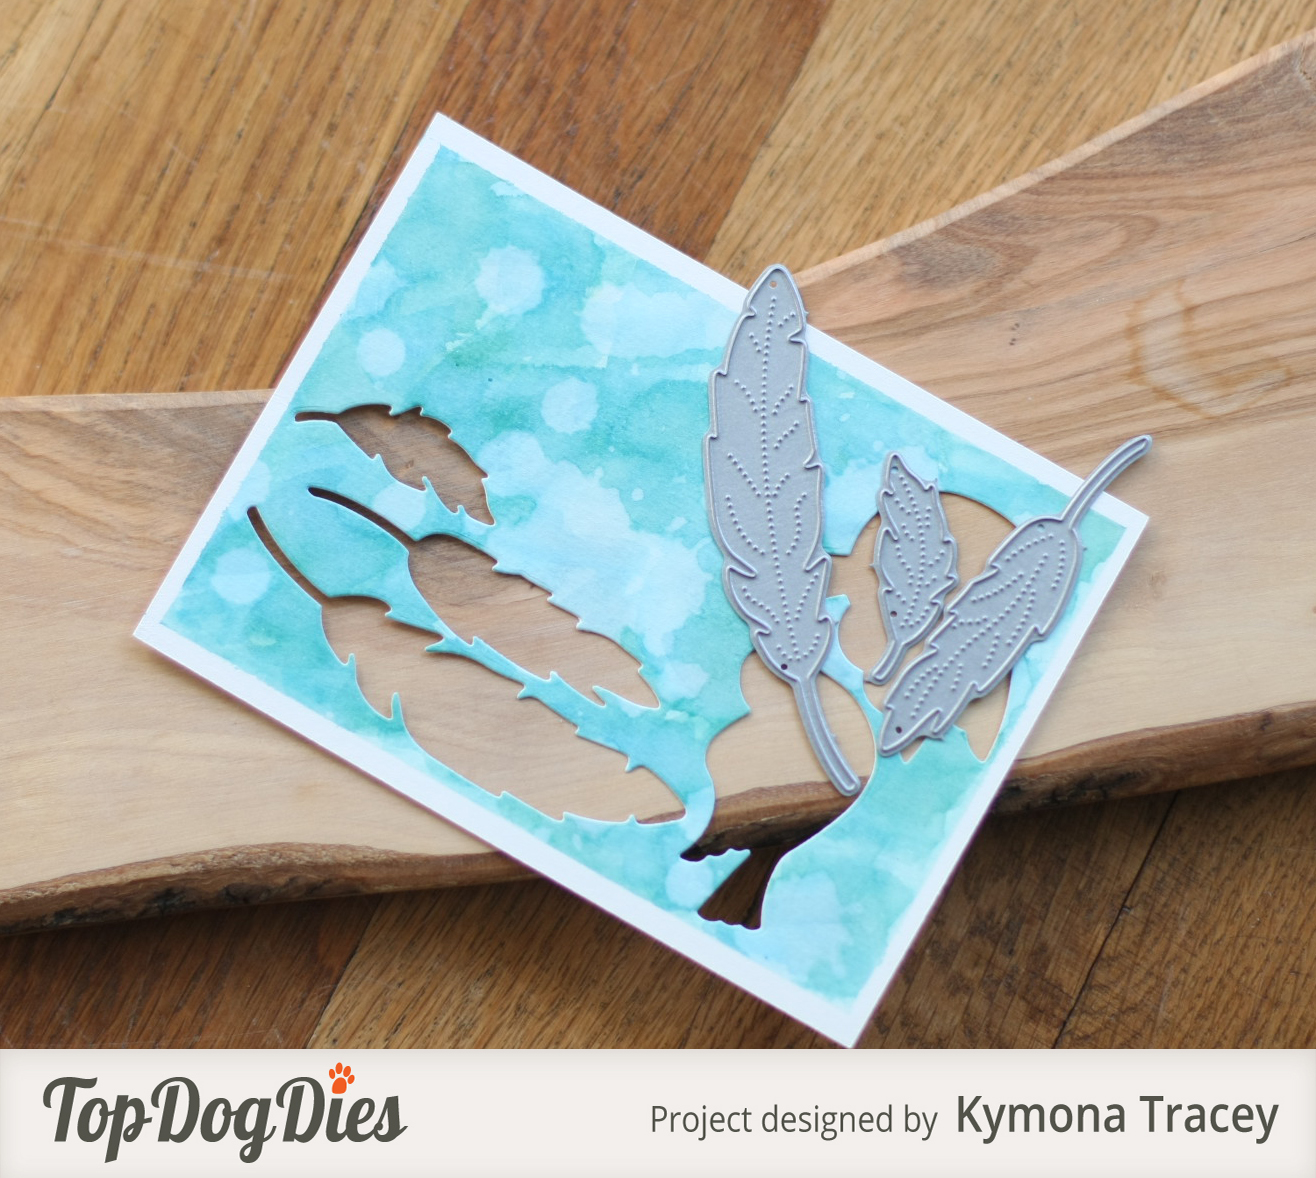
1. I cut a piece of watercolor paper down to 4.25 x 5.50 and taped it down to my work station.

2. I added a good amount of water to my watercolor paper.

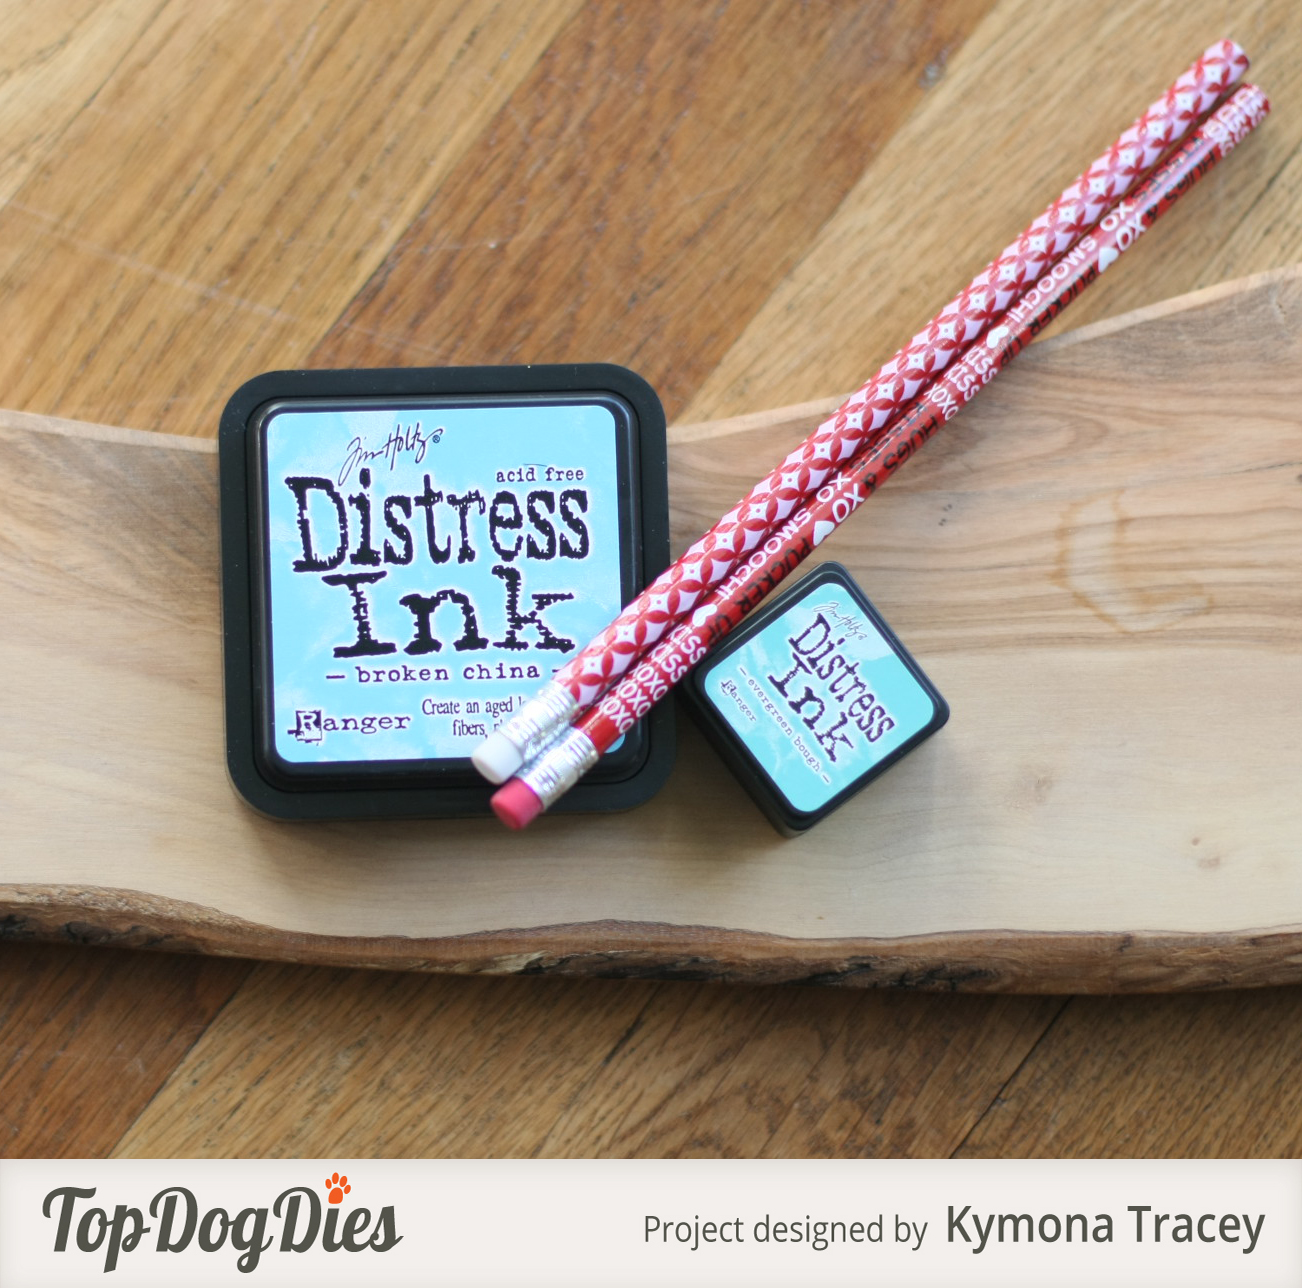
3. Then I dropped Distress Inks Broken China and Evergreen Bough to my paper and let the color spread all over my paper.  I heat set it.  Then I sprayed water in my hand and drop some drops of water onto my paper to create blotches of white spots.

TDD feather tutorial

4. Once my watercolor piece dried.  You can see in the next photo how watercolor dries lighter.

TDD feather Tutorial 1

5. I used my feather dies and cut out three feathers.

6. I adhered the flowers together with glue dots and tied a bow using linen thread.

7. I used the same color inks and a clean pencil erasers and added the dots surrounding my feathers.

TDD feather tutorial 3

8. I adhered the feathers over those dots using glue dots.

9. I used Simon Says Stamp Sending & Wishing stamp set to create my sentiment.  I stamped it to the right of the flowers.

TDD feather tutorial 2

10.  I used my corner chomper to round two of the cards corners.

That is all it took to create this card.  I love how it turned out and I hope you will give this technique a try.

Very elegant without any real hard work.

So what do you think? I would love to hear from you.

Supplies used:

Canson Watercolor Paper Distress Ink Broken ChinaDistress Ink Evergreen BoughLinen ThreadStampin Up glue dotsSending and WishingWe R Memory Keepers Corner Chomper

Thanks for stopping by!

~Kymona

Count Me In…

Hello everyone!!  I’m here today playing along with Lawnscaping Challenge 94: Count Me In!!

94

This challenge asked us to use numbers somewhere on our project!  Boy was I excited to see this challenge.  I have so many Lawn Fawn numbers stamp and dies that I’ve haven’t used yet.  I was excited to pull them out.

For the past couple of weeks, I’ve had so much fun creating tags and gift boxes.  So for this challenge I wanted to do the same.

I create two tags for this challenge.  The first one I created yesterday before I even knew about the challenge.  I wasn’t sure about this tag because I felt like something was missing in the top right hand corner.  So I put the tag down.  After seeing the challenge this morning I decided that I will add a number to the corner.

Happy Birthday tags

Take a closer look:

Happy Birthday tag 1

Look inside:

Tag 2 inside

What do you think about this tag?

For my second tag, I wanted to use my die cuts to cut out the number and use he negative space.  I really love how this tag turned out as well.

Take a look:

Happy Birthday tag 2

Take a look inside:

Tag 2 inside

What do you think about this tag?

Let me know!!

Supplies used:

TagMeToo1 Sweater Weather Petite Paper PackHello Sunshine Petite Paper Packslate skittlesShel PinkBlue Jay Lawn TrimmingsWhisper White Baker's TwineSSS Suprise Party Stamp Set and Die

Thank you for stopping by!

~Kymona