Your Next Stamp DT Dare – Pattern Pizzazz

Hello everyone!!  I’m here today with Your Next Stamp and our DT Dare!!!

What is a DT Dare you ask? It’s a fun monthly challenge for the YNS design team to show case more fabulous projects using the new release products!!

YNS-DARE-Badge

Fun right!!

Wait there is more!!  If you leave a comment on the YNS blog post you could Win a YNS Stamp Set of your choice!!! 

Exciting right!!  It sure is for me!!

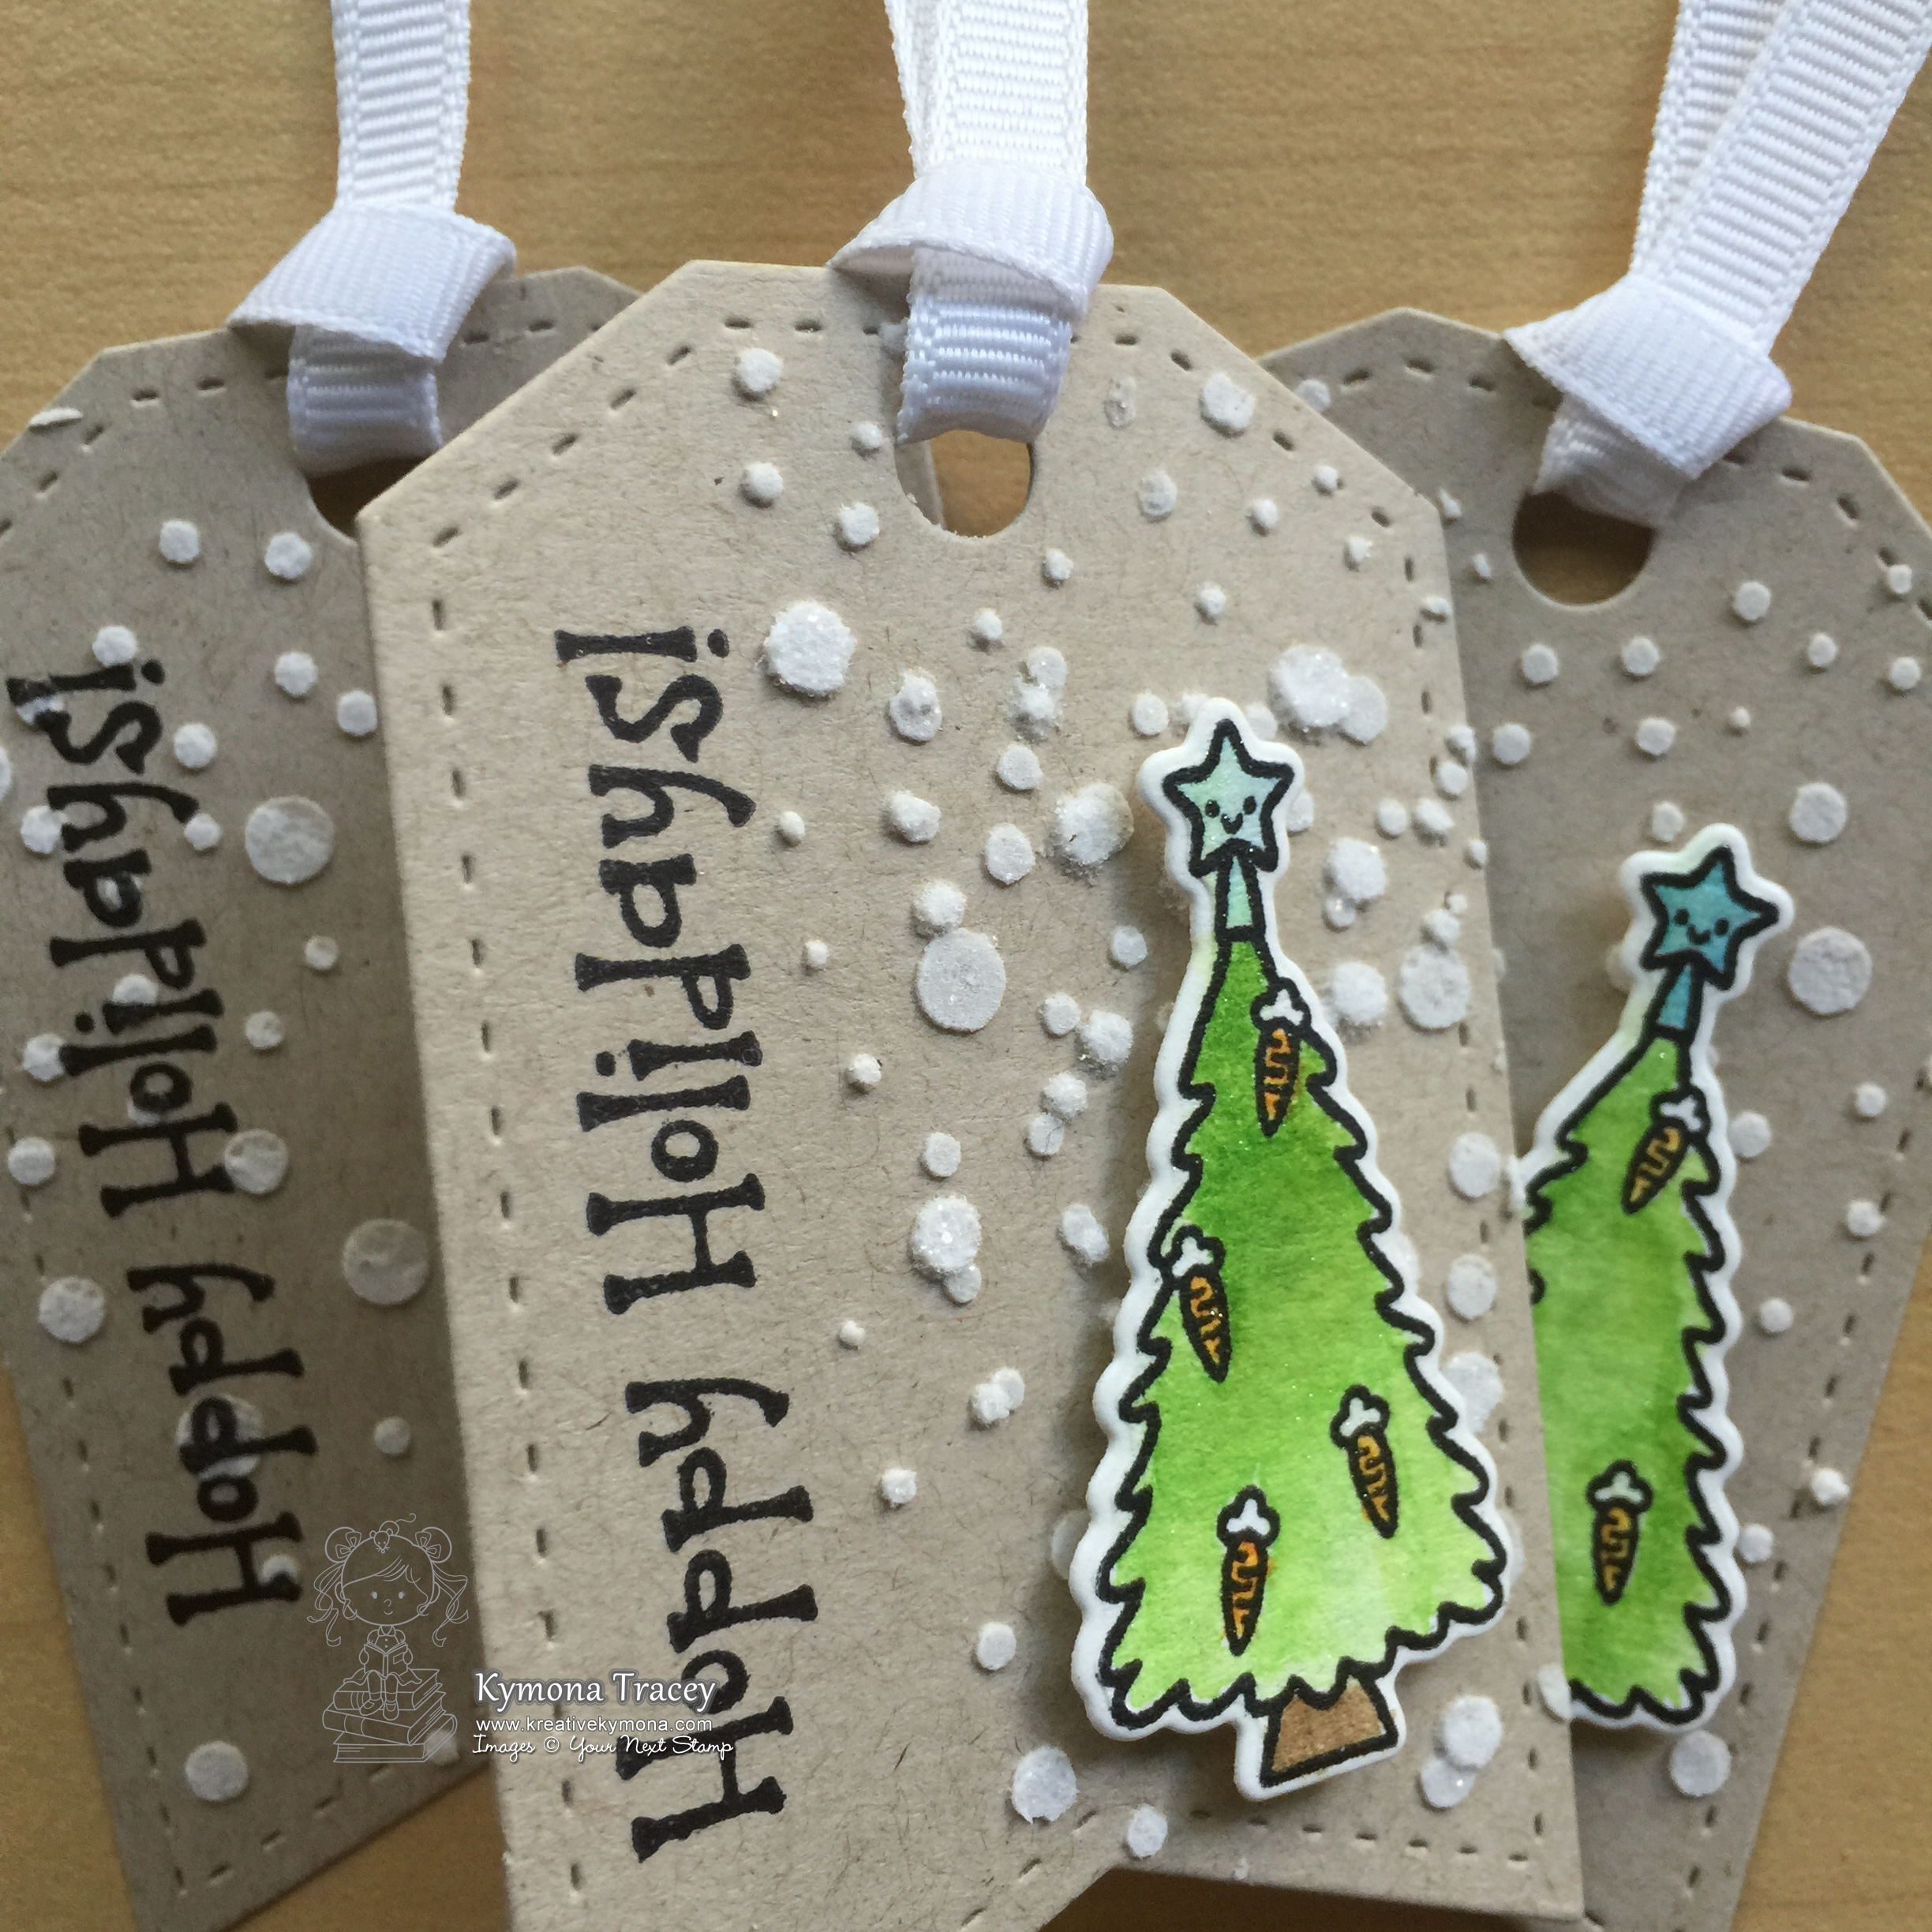
The DT Dare Challenge this month is Pattern Pizzazz!!  The design team was asked to create a project using one of the new stamp sets from the November release.

Take a look at my card:Falalalala (YNS)

YNS: Sprinkles Spreading Christmas Cheer, Ice Ice Baby Sparkly Gumdrops, YNS Circles Die Set, Circles – Stitching Marks Die Set

Other Supplies: Recollection Heavyweight Cardstock, BoBunny Altitude Pattern Paper, Copic Markers, Clear Wink of Stella, My Favorite Things Hybrid Ink

Here is how I created this card:

  1. I cut stripes of pattern paper and cover a smaller piece of cardstock
  2. Then I pop that card panel up using foam tape.
  3. After that I die cut the circle out and stamped my sentiment on it.
  4. Then I stamped my bunny, colored him in and used my Brother Scan and Cut to cut him out.
  5. I popped him up next to the sentiment.
  6. I added gumdrops and Wink of Stella to finish off my card.

I made two of these cards, I wanted to see what this card would look like if I added a sentiment at the top.

Take a look:

Falalala sentiment (YNS)

What do you think?  Please let me know below.

Super simple and easy.

So tell me what you think of this challenge? I would love to know, let me know below!

Don’t forget to head on over to the Your Next Stamp Store to take advantage of the online discount code below and save an extra 20% on everything in the store!!

Don’t forget we have Blog Candy for you!!  If you leave a comment on the YNS blog today you have a chance of winning the blog candy.

DTDare2candy-547x232

Supplies used:

IceIceBabyGDLSprinkles Spreading Christmas CheerYNS circle diesStitching Marks Circle DieRecollections White HeavyweightBo Bunny Altitude Pattern Paper Copic Markers Wink of Stella clearMFT Hybrid Black Ink Brother Scan and Cut2

Thanks for stopping by!!

~Kymona

Your Next Stamp DT Dare – Sparkle and Shine

Hello everyone!!  I’m here today with Your Next Stamp and our DT Dare!!!

What is a DT Dare you ask? It’s a fun monthly challenge for the YNS design team to show case more fabulous projects using the new release products!!

YNS-DARE-Badge

Fun right!!

Wait there is more!!  If you leave a comment on the YNS blog post you could Win a YNS Stamp Set of your choice!!! 

Exciting right!!  It sure is for me!!

The DT Dare Challenge this month is Sparkle and Shine!!  The design team was asked to create a project using one of the new stamp sets from the September release.

Take a look at my project:

Hoppy Holidays (YNS)

YNS Supplies: Sprinkles – Hoppy Holidays, Sprinkles – Hoppy Holidays Die Set, Stitched Fishtail Tags Two Die Set

Other Supplies: Wendy Vecchi Embossing Paste, Simon Say Stamps Falling Snow Stencil, Random Ribbon, Neenah Desert Storm Cardstock, Ranger Archival Jet Black Ink, Distress Ink Mowed Lawn, Spiced Marmalade and Broken China, Distress Glitter Clear Rock Candy, Clear Wink of Stella 

Here is how I created these tags:

I simple die cut the Stitched Fisthtails Tags Two Dies out of Neenah Desert Storm Cardstock.  Then I covered them with the Simon Says Stamp Falling Snow stencil and added the Wendy Vecchi Embossing Paste to them. Then I sprinkled some Ranger Distress Glitter Clear Rock Candy on top of the paste before it dried.

Hoppy Holiday 2 (YNS)

You can see it somewhat in this photo, on the snow.

Then I stamped my trees from the Sprinkles – Hoppy Holiday Stamp Set using Ranger Archival Jet Black Ink and used Distress inks to watercolor the image.  Once it dried I used the Sprinkles – Hoppy Holiday Die set and cut them out.  I added Clear Wink of Stella on top of the trees for some shine.  I used foam tape to adhere them to the tags.  Once everything was put together I stamped my sentiment using the same ink and added my ribbon.

Super simple and easy.

So tell me what you think of this challenge? I would love to know, let me know below!

Don’t forget tohead on over to the Your Next Stamp Store to take advantage of the online discount code below and save an extra 20% on everything in the store!!

OctHopSale2015

Don’t forget we have Blog Candy for you!!  If you leave a comment on the YNS blog today you have a chance of winning the blog candy.

DTDare2candy-547x232

Supplies used:

Sprinkles-Hoppy Holidays Sprinkles - Hoppy Holiday Die Stitched Fishtails Two Die Embossing PasteSSS Falling SnowDistress Glitter Neenah Desert Storm CS Distress ink mini 2Distress mini ink kit 1Distress Ink Mini 14Distress Ink Mini 6Wink of Stella clear

Thank you so much for stopping by!

~Kymona


Your Next Stamp DT Dare – Anything But A Card

Hello everyone!!  I’m here today with Your Next Stamp and our DT Dare!!!

What is a DT Dare you ask? It’s a fun monthly challenge for the YNS design team to show case more fabulous projects using the new release products!!

YNS-DARE-Badge

Fun right!!

Wait there is more!!  If you leave a comment on the YNS blog post you could Win a YNS Stamp Set of your choice!!! 

Exciting right!!  It sure is for me!!

The DT Dare Challenge this month is ABC (Anything But A Card)!!  The design team was asked to create a project using one of the new stamp sets from the September release.

Take a look at my project:

Dill 1 (YNS)

YNS Supplies: Dill-ightful Stamp Set, Dill-ightful Die Set

Other Supplies: Retired Stampin’ Up Storytime DSP, Retired Stampin’ Up Kraft box, Copic Markers, Stampin Up Button, My Favorite Things Hybrid Ink 

Here’s how I created this card:

All I did was cut 4 pieces of the  DSP to 3.50 x 2.50 for the sides and the pieces for the top of the box was cut to 3.50 x 3.50 and 3.25 x 3.25.  I adhered the pieces to the box.

Then I color the pickles using my Copic Markers: YG23, YG25, R20.  I die cut them out and adhered them to the box.

After that I stamped my sentiment and adhered it behind the baby pickle.

I cut 3 strips of the same DSP and created a bow for the top of the box. I added a button in the center of the bow.

Dill (YNS)

Nice and Easy!!

So tell me what you think of this challenge? I would love to know, let me know below!

Don’t forget we have Blog Candy for you!!  If you leave a comment on the YNS blog today you have a chance of winning the blog candy.

DTDare2candy-547x232

I’m also entering my project into the NBUS Challenge #5:

NBUS
Supplies used:

Dill-ightful Dill-ightful diesMFT Hybrid Black Ink

Thanks for stopping by!!

~Kymona

Your Next Stamp DT Dare – Shake, Shake, Shake

Hello everyone!!  I’m here today with Your Next Stamp and our DT Dare!!!

What is a DT Dare you ask? It’s a fun monthly challenge for the YNS design team to show case more fabulous projects using the new release products!!

YNS-DARE-Badge

Fun right!!

Wait there is more!!  If you leave a comment on the YNS blog post you could Win a YNS Stamp Set of your choice!!! 

Exciting right!!  It sure is for me!!

The DT Dare Challenge this month is Shake, Shake, Shake!!  The design team was asked to create a project using that has a shaker pocket.

Take a look at my card:You're so sweet

 YNS Supplies: Scrapworks Mini Sunburst Dies, Zero Calories

Other Supplies: We R Memory Keepers Fuse Tool, MFT Hybrid Black Ink, Lucy Abrams Star Shine Sequin, 3M Foam Tape

Here is how I created this card:

1. I cut my card base to a A2 size card, 4.25 x 5.50 scored at 5.50.

2. I cut the white card panel to 4.25 x 5.50 and used Your Next Stamp Scrapworks-Mini Sunburst Die Set to cut a flower in the center of the paper.

3. I used a retired Stampin’ Up! embossing folder to add dimension to the card front.

4. I stamp the sentiment and the smily faces from the Your Next Stamp Zero Calories stamp set with My Favorite Things Hybrid Black Ink.

5. I used the We R Memory Keepers Fuse Tool to create my shaker pocket.  I added Lucy Abrams Star Shine Sequin to the pocket then sealed it.

6. I added the shaker pocket to the card panel with tape adhesive.  I added foam take to the back of the panel and added it to my card base.

Whoa La!!  My card is complete!!

So tell me what you think of this challenge?  I would love to know, let me know below!

Don’t forget we have Blog Candy for you!

DTDare2candy-547x232

Just a reminder….we have a Birthday Sale!!!

2015 special bday stamp set badge

Don’t for get to take advantage of the special promo code to choose your own discount!!

sale badge 6th birthday

Supplies used:

Zero CaloriesScrapworks Mini Sunburst Diesfuse bundleMFT Hybrid Black InkStar Shine Sequins 3M Double Coated Foam Tape

Thank you so much for stopping by!!

~Kymona

Your Next Stamp DT Dare – Floral

Hello everyone!!  I’m here today with Your Next Stamp and our DT Dare!!!

What is a DT Dare you ask? It’s a fun monthly challenge for the YNS design team to show case more fabulous projects using the new release products!!

YNS-DARE-Badge

Fun right!!

Wait there is more!!  If you leave a comment on the YNS blog post you could Win a YNS Stamp Set of your choice!!! 

Exciting right!!  It sure is for me!!

The DT Dare Challenge this month is FLORAL!!  The design team was asked to create a project using anything floral (pattern paper, embellishments, etc.).

Take a look at my card:

Sweet Baby (YNS)

YNS Supplies: Word Critters – Exotic Animals and Scrapworks-Mini Sunburst Die Set

Here is how I created this card:

1. I cut my card base to a A2 size card, 4.25 x 5.50 scored at 5.50.

2. I cut the Simple Stories Summer Vibes pattern paper to 4.25 x 5.50 and used Your Next Stamp Scrapworks-Mini Sunburst Die Set to cut a flower in the center of the paper.

3. I used the pattern paper as a guide to draw a light flower on my card panel where I want my swing for the bear to appear.

4. I used the Misti and stamped the swing stamp where I wanted it. I erased the pencil mark.

5. I stamped the sentiment from the Words Critters – Exotic Animal Stamp Set with My Favorite Things Hybrid Ink.

6. I adhered the pattern paper to the card base using foam adhesive.

7. I colored my bear with Copic Markers: black, BG34, E13, R20.

8. I adhered my bear on top of the swing using foam adhesive.

Easy as 123!!

So tell me did I live up to the challenge?  I would love to know, let me know below!


Just a reminder….we have a New Release Sale!!!

July2015salebadge

Please go to YNS blog and leave a comment to WIN a YNS Stamp Set of your choice!!

DTDare2candy-547x232

Contest ends July 10th at midnight EST.  The winner will be announced on July 12th on the YNS blog!!

Supplies used:

Word Critters-Exotic AnimalsScrapworks Mini Sunburst DiesMFT Hybrid Black InkSummer Vibe paperCopic MarkersMisti

Thank you so much for stopping by!!

~Kymona