Top Dog Dies – Die Cut Card

Hello everyone!!!  I’m here with Top Dog Dies!!  I’m here showcasing one of their new dies that was released 3 weeks ago!!

Lets jump right in!

Today I’m working with the Top Dog Dies Onesie Dress Die Set!! It’s a super doper cute die set and the possibility are endless!!

Top Dog Dies Onesie Dress Die Set

Take a look at my card that I created with this die:

Baby Onesie Dress

This card is all about die cutting and no stamping. I just die cut all of the pieces then I needed.

I die cut the card base using Top Dog Dies Onesie and retired Stampin Up! Peach Parfait cardstock.

Then I cut the dress pieces from Top Dog Dies Onesie Dress Die Set and retired Stampin’ Up! Just Add Cake DSP and Micheal’s Heavyweight White Cardstock.

Then I used a Plus Glue Tape Runner to adhered all of the pieces to the card base.  Super easy if you needed to create tons of these cards.

Baby dress onesie 1

So what do you think?  Can you see yourself creating cards like this? Let me know below.

Supplies used:

TDD Onesis cardjust add cake dsp Peach Parfait Recollections White HeavyweightPlus Glue Tape

Thanks for stopping by!!

~Kymona


CASology 161: Plaid

Hello everyone!!  It’s CASology Tuesday!!  We are back with another Cue Card for you!!!

This week’s cue card is:

Week 161 - Plaid

Take a look at my card:

Thanks Plaid (CAS)

Now that plaid section on my card came from this panel I create weeks ago in the Background Check Online Card Class.

Plaid content

I never go to use the piece so I thought it was fitting now.

Plaid background

So I used Simon Says Stamp Stitched Circle die to cut a circle piece and adhered it to my card panel.

Then I die cut the Simon Says Stamp Thanks twice and adhered it to the center of die cut circle.

Super doper easy!!

Now its your turn!! I can’t wait to see what you come up with!

For more inspiration, check out my fellow Design Team members blog for more awesome work.

Design-Team

Gillian Ross

Hannelie Baster

Hazel Hodgkins

Jen Wills

Joyce Mehrberg

Judy Marino

Kimberly Wiener

Kymona Tracey ←Me

Melissa Chipperfield

Tracey McNeely

Our Guest Designer this week:

Karen

No Sponsor this week.

Supplies used:

SSS Thanks dieStitiched CircleNeenah Desert Storm CS Recollections Black Heavyweight

Thanks for stopping by.

~Kymona


YNS Sketch and Color Challenge #20

Hello everyone!!!  I’m here today with Your Next Stamp (YNS) and this week’s Sketch and Color Challenge #21!!

Each challenge has a sketch and a color combo to choose from.

Take a look at the sketch:

YNSSketch21

Take a look at the color combo:

YNScolor-21

You know me, I went with the sketch!!  I never seem to have the colors need for this.  I hope I can change for the next challenge, LOL!

Take a look at my card:

Let's Celebrate (YNS)

Yes, another shaker card.  I’m addicted to these cards.  Or is it the sequin that I love seeing move about in the card. LOL, LOL, LOL!!

YNS Supplies: Happy 6th Birthday Stamp Set, Balloon Buddies Die Set

Other Supplies: Retired Stampin’ Up! Watercolor Wonder DSP, My Favorite Things Hybrid Black Ink, Foam Tape, Lucy Abrams Peachy Sequin, We R Memory Keepers Fuse Tool, Recollections White Heavyweight Cardstock, Recollections Black Heavyweight Cardstock

Creating this card was a bit easy.

All I did was cut my DSP to make the sketch.  I adhered the yellow panel to the card base with a tape runner.

I die cut a circle in the front card panel.  That is where my shaker packet will go.

I created my shaker pocket using my Fuse Tool.  If you want to know who to do that you can check out my tutorial here.

I attached the shaker pocket to the card panel with the tape runner.  I added foam tape the back of that card panel and attached the entire piece to the card base.

I cut two strips of DSP to different sizes.  I stamped the sentiment on the bigger piece and attached both pieces with the tape runner.

I die cut the two balloons out of the same DSP and attached them to the front of the shaker window.  I die cut the balloon strings out of black card stock and attached them to the balloons.

I told you it was easy.  Now its your turn!!

So are you ready for the new challenge?

You have until September 3rd at midnight EST to play along and submit your project on the YNS Blog post.  One random participant will win a $15 gift certificate to the Your Next Stamp Store.  If YNS stamps or dies are the focal point then the winner receives and additional $5 gift certificate fro a total of $20.  The winner will be announced on the YNS Blog the Sunday after the challenge closes.

Supplies used:

YNSBDay2015  Balloon Buddies DieMFT Hybrid Black Ink 3M Double Coated Foam Tape Just peachy fuse bundleRecollections White HeavyweightRecollections Black Heavyweight

Thank you so much for stopping by!!

~Kymona

Freshly Made Sketches 200th Challenge

Hello everyone!!  It’s Top Dog Dies Wednesday!!  Today we are playing along with Freshly Made Sketches.  They are celebrating their 200th Challenge!!

Top Dog Dies is one of the sponsors for this special occasion.

Take a look at the sketch for this week:

FMS200

Take a look at my card:

Hello There (TDD)

Here is how I created this card:

I adhered retired Lawn Fawn Hello Sunshine Pattern Paper to the bottom half of the card base.

I die cut Top Dog Dies Sheep Die to cut out two sheep, a big and small sheep.

I adhered the sheep to the top of the pattern paper.  I also die cut a heart from the same pattern paper and adhered it to in between the two sheep.

I used Technique Tuesday Say if Hello Stamp Set to stamp my sentiment on the pattern paper using My Favorite Things Hybrid Black Ink.

Nice and easy.

Now its your turn to participate for a chance to win some of the great prizes!!!

Head on over to Freshly Made Sketches Blog before the challenge closes and enter your project!!

Supplies used:

Technique-Tuesday-Say-It-Hello-Clear-Stamps-MediumTDD SheepHello Sunshine Petite Paper Pack MFT Hybrid Black InkRecollections White Heavyweight

Thank you so much for stopping by!

~Kymona


My Overhead Table Top Tripod

Hello everyone!!  I’m here today with a tutorial on how I created my overhead table top tripod for my iPhone!!

I posted this picture:

Overhead Tripod

on Instagram the other day and everyone was totally amazed by it.  So I decided to create a little tutorial on how I made it.

Now I have to say, I was not the creator of this idea.  Sarah Shotts did a Periscope showing us how to put this overhead table top camera mount together.  She got the idea from Katie.

So props to these young ladies for sharing this idea with all of us!!!

Now let get to work!!

First you will need to go to either Home Depot, Lowes or any hardwood store that sells PVC pipes.

I went to Home Depot with my dad to buy all of the materials.
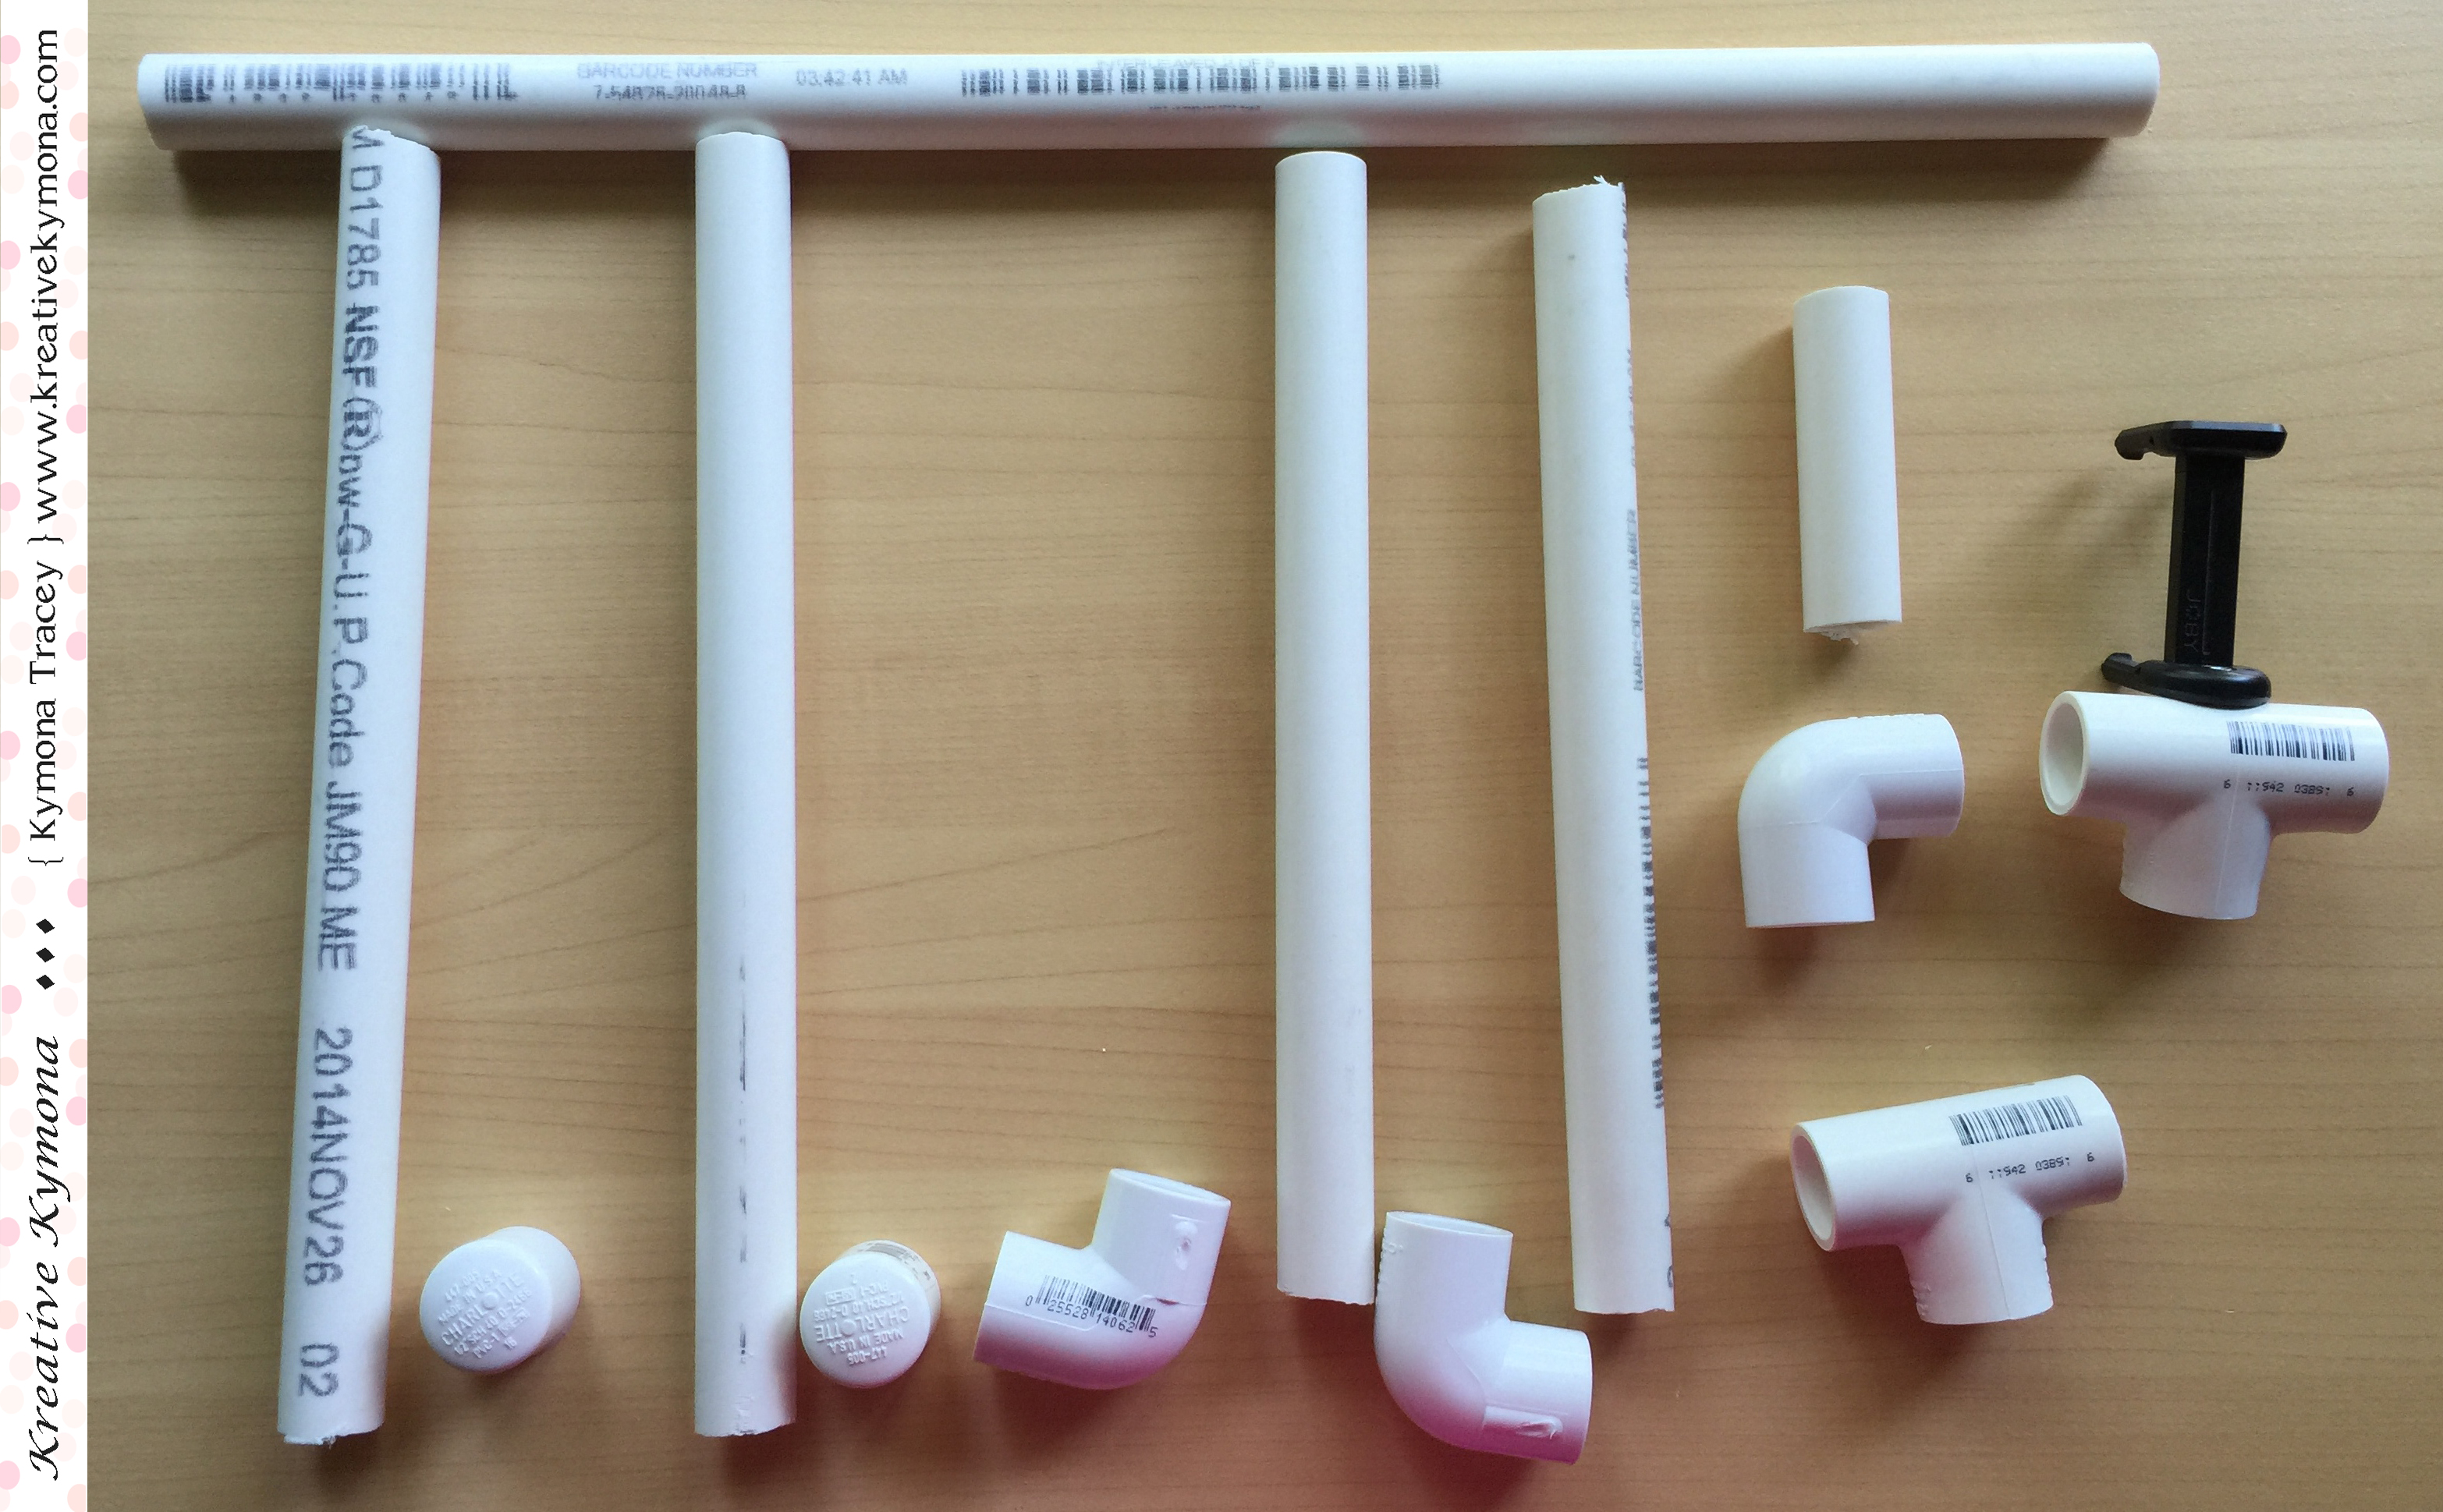
My dad and I take one

We picked up:

1 10 foot piece of 1/2 inch PVC pipe

2 1/2 inch PVC Caps

3 1/2 inch PVC 90 degree Elbows (slips, on threading)

2 1/2 inch PVC Tees (slips, no threading)

1 1/4 20 x 12 bolts

Drill

15/64 Drill Bit

Now I had to cut that 10 foot pvc pipe. Home Depot lets you cut the pipe yourself.

Cutting with a saw

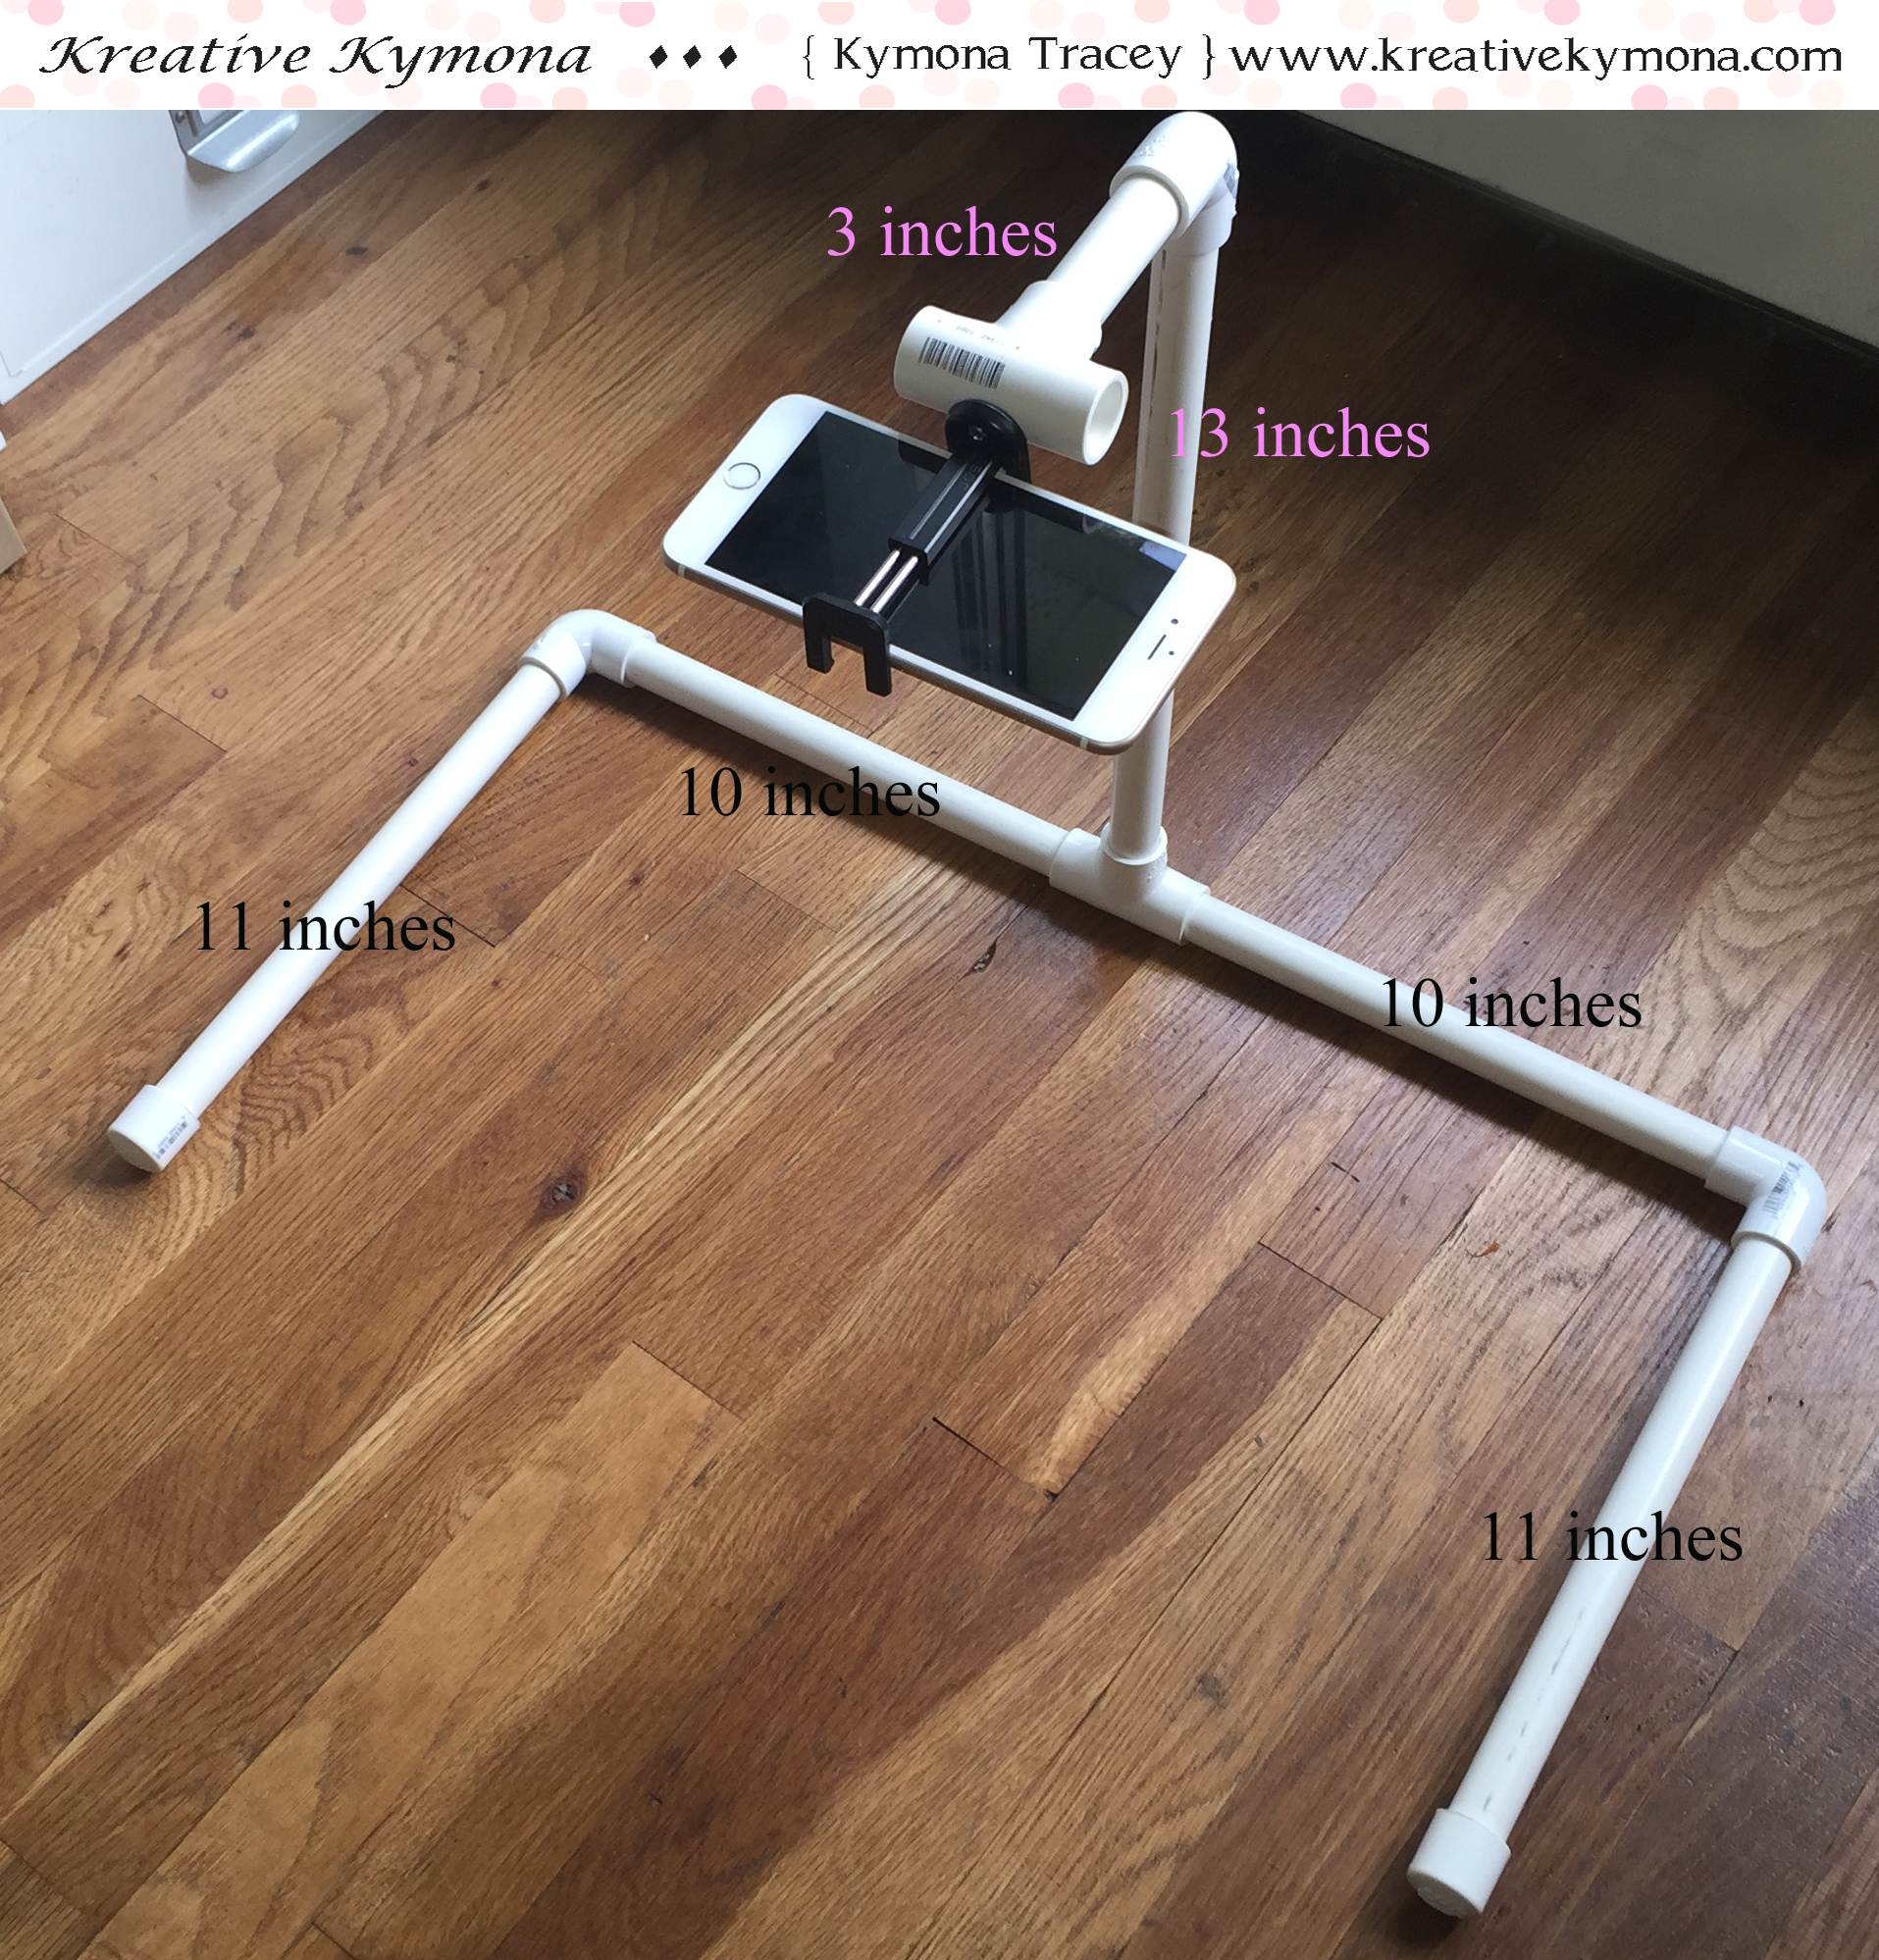
Here are the sizes that I cut my pipes. They are based on the size of my desk:

2 11 inch pieces

2 10 inch pieces

1 13 inch piece

1 3 inch piece

PVC pipes pieces

After those cuts I was left with long piece, so I cut other pieces. I cut some longer pieces:

1 18inch piece

1 23 inch piece

I will use these interchangeable, depending on how high or low I want my camera to sit.

Ok, now lets put the tripod together:

Overhead Tripod 1

Putting this together is super doper easy. The pieces just slid right into the elbows and the tees with ease.  You can take it apart and travel with it as well.

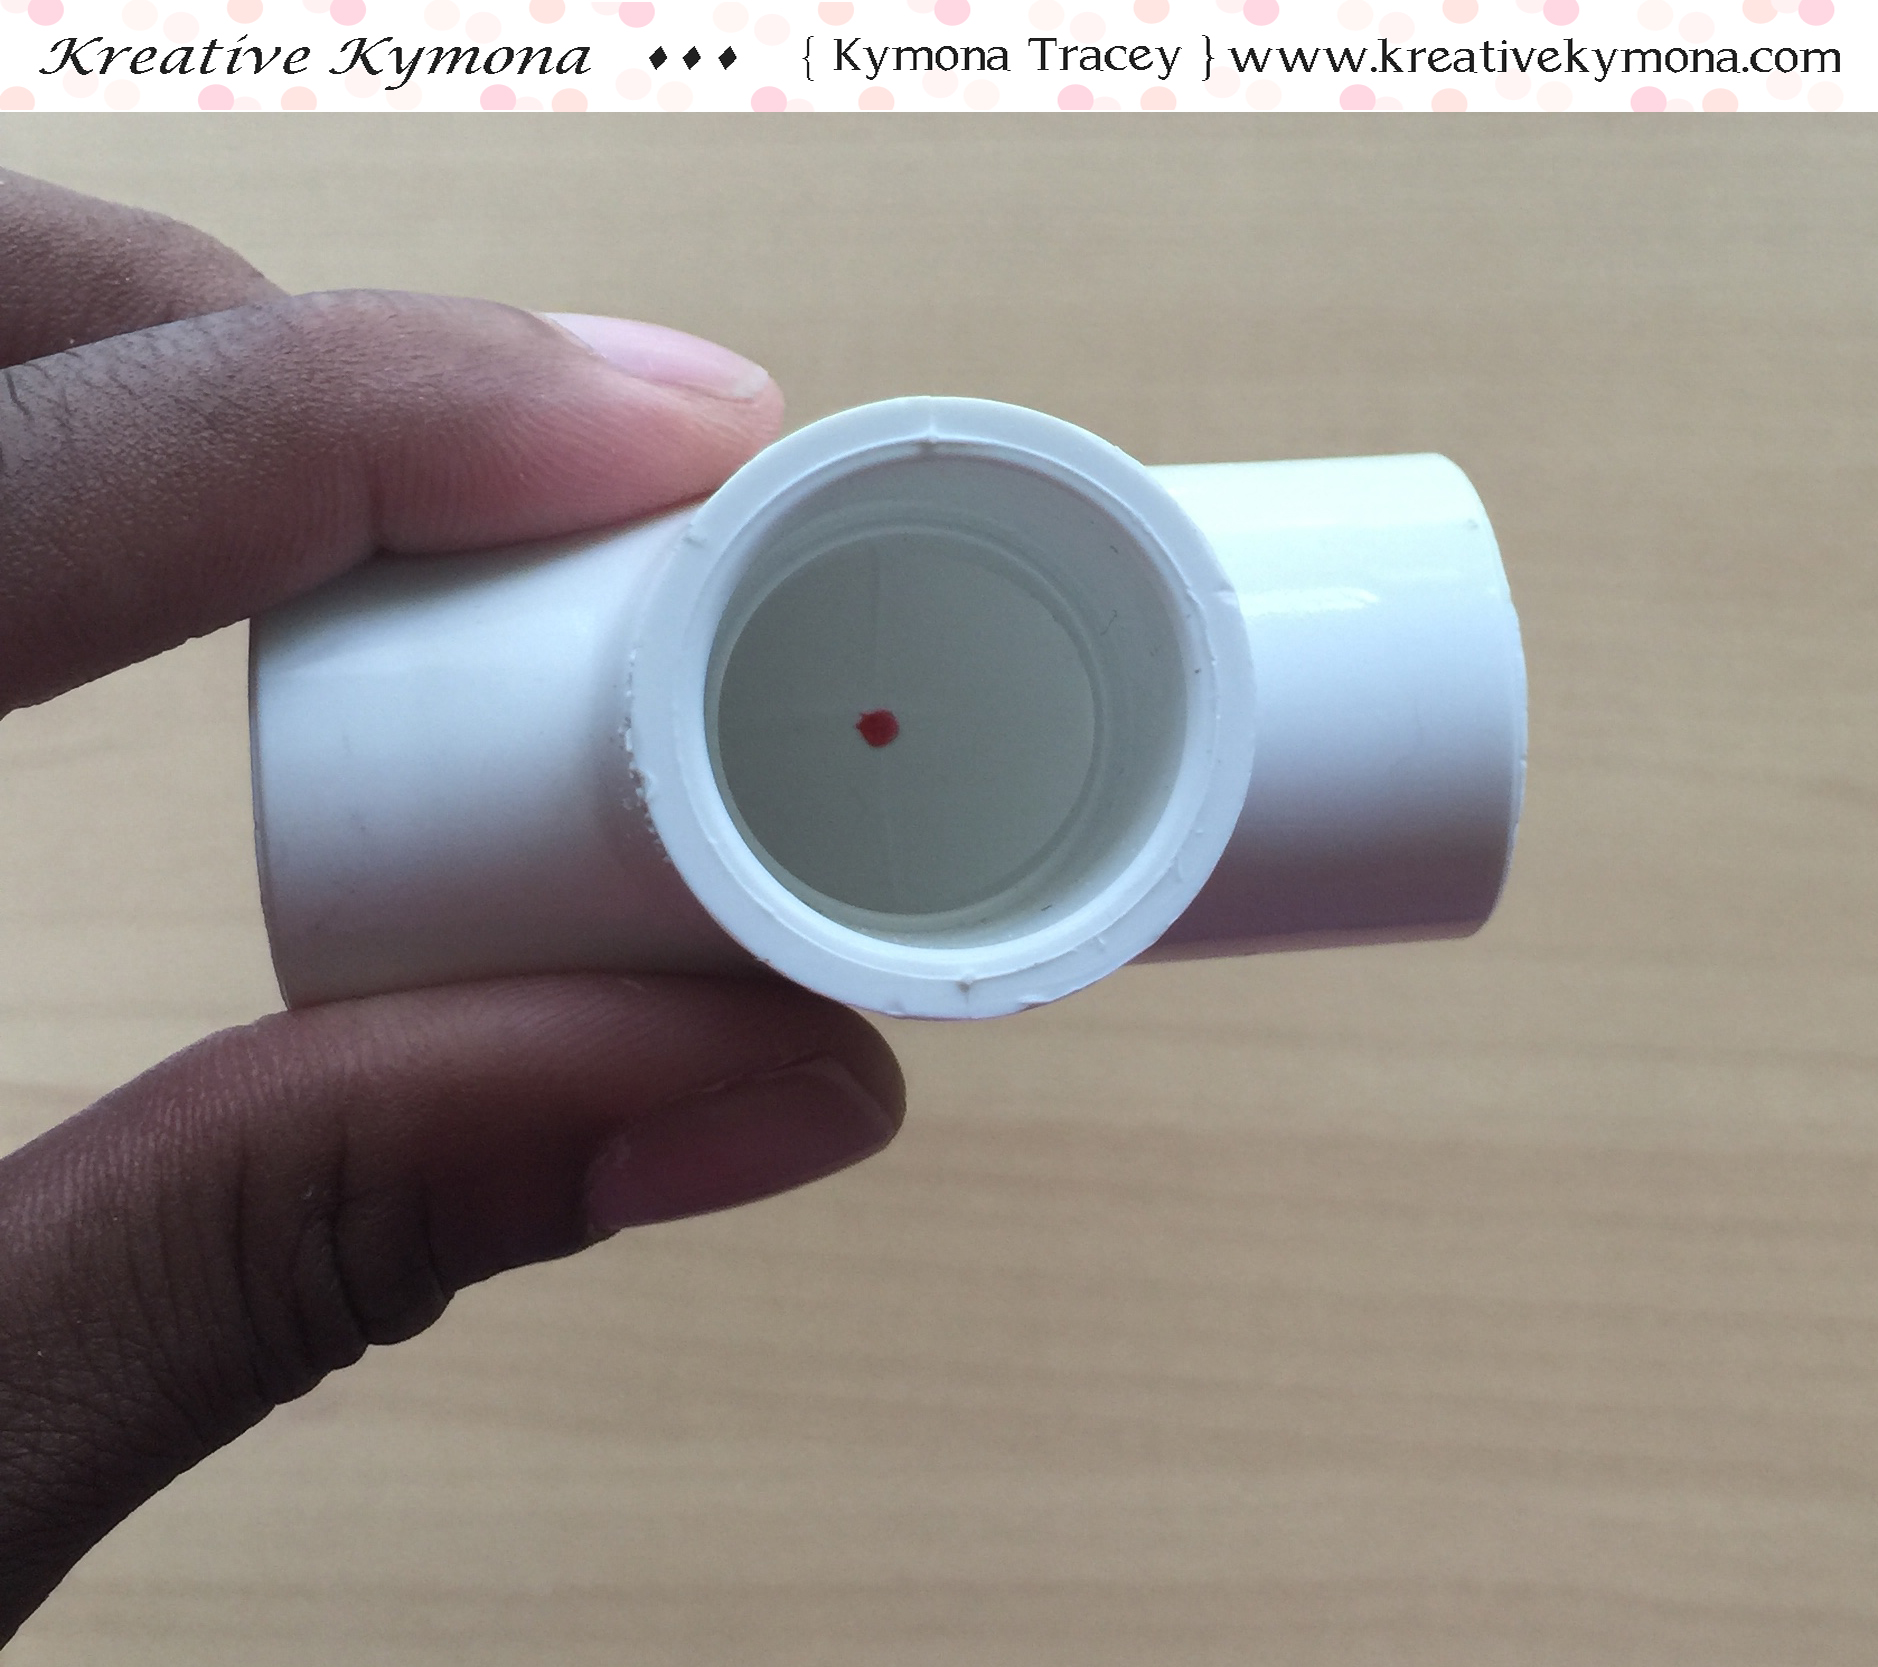
Now on to assembling the actual camera mount:

I took a sharpie marker and placed a dot on the inside of the second tee.

Dot in the pipe

Then I took the drill and drilled a hole where you see that red dot.

PVC pipe with screw

Then I screwed the screw into that drilled hole.

Small camera mount

I bought this mini tripod from Amazon for my iphone last year but it to small so I just unscrewed the part that holes the camera.

Mounted on the PVC

I screwed that camera mount on to the screw and here you have it!!

Super doper easy and portable!!  That is the best part!!

Overhead Tripod

What do you think? Will you build one?  I would love to hear from you.

Thanks for stopping by!

~Kymona


CASology 160 – Number

Hello everyone!!  It’s CASology Tuesday!!  We are back with another Cue Card for you!!!

This week’s cue card is:

Week 160 - Number

Take a look at my card:

Numbers Birthday (CAS)

Can you believe I still have pieces of watercolor paper that I created weeks ago?  I do.  I love it.  It makes my card making process so much easier!!

Here is how I created this card:

I used the Penny Black By The Number Die and die cut the numbers out of per-created watercolor paper, seen below.

Watercolor pieces

I adhered the die cut numbers to my black card base with Tombow Multipurpose Liquid Glue.

I used Your Next Stamp Birthday Stamp Set to stamp my sentiment on vellum.  While the sentiment was still wet, I added Stampin’ Up! Clear Embossing Powder. I heat set it and it gave the sentiment a glossy look.

I flagged the vellum and adhered it to the numbers with Tombow Multipurpose Liquid Glue.  I used the We R Memory Keepers Corner Chomper to rounded the top corners.

Easy Peasy!!

Now its your turn!! I can’t wait to see what you come up with!

For more inspiration, check out my fellow Design Team members blog for more awesome work.

Design-Team

Gillian Ross

Hannelie Baster

Hazel Hodgkins

Jen Wills

Joyce Mehrberg

Judy Marino

Kimberly Wiener

Kymona Tracey ←Me

Melissa Chipperfield

Tracey McNeely

Our Guest Designer this week:

Marilyn

Our Sponsor this week is Stamplorations.

Supplies used:

By the number dieTombow Multi-Purpose AdhesiveSU Clear Embossing PowderWe R Memory Keepers Corner ChomperYNSBDay2015

Thank you for stopping by!!

~Kymona

Unicorn Die Winner!!!

Hello everyone!!  I’m popping in to announce the winner of the new Top Dog Die Unicorn Die!!

Top Dog Dies Unicorn Die SetAre you ready?

Here goes…….

The winner is Julia L.

Unicorn winner

The winner was chosen using Random.org.

Unicorn winner2

Congratulations Julia!!

Please send me an email(kreativekymona at gmail dot com) with your
address that you want your die set sent to you.

I want to say thank you to all of you who participated!!

Thank you so much for stopping by!

~Kymona

CS Take It Make It: Take a Technique Inspiration

Hello everyone!! I’m here with CS Take It Make It: Take a Technique Challenge for our August.

Our theme is Take a Technique!

This months challenge is going to be super fun!!  Its all about Pens and Pencils!

This means using your pens and pencils on your projects!! You could draw or sketch a design, or use your pens and pencils for coloring.  Copics, Distress Markers, Spectrum Noirs, Watercolor Pencils, Paint Pens, and markers, whatever floats your boat!!  You could add detail with fine liner pens, gel pens or smudgy Stabilo pencil…..the only limit is your imagination!! Remember there, MUST be real stamping on your projects.  Digital images CAN be used, but must be used alongside rubber/acrylic stamping!

Take a look at my card:

You're Awesome

I used Mama Elephant Three Amigos stamp set to stamp and die cut my little raccoon.

I used my Copic Markers: W1, W3, W5  to color the raccoon.

I used My Favorite Things Peek-a-Boo Circle Window Die  to cut a window out of my card panel.

I added a piece of Stampin Up! Cherry On Top DSP behind the scallop circle die cut.

I adhered the card panel to my card base with fun foam.

I added the cut out skunk to the card base with Stampin’ Up! dimensional and adhered it to the card front.

Nice and easy!!

Now its your turn to play along with us.

We have a great prize pack for you.

We have two prizes to offer this month, the first is our sponsor prize. This winner will be chosen randomly from all of the entries in the challenge! The sponsor for August is: Chocolate Baroque.bluepark-header-bar-25

Plate

 Stamp Plate Artistic Affirmations

Our second winner is our Design Winner. This winner is chosen by our DT, who all vote for their favorite design from all of the entries. This winner will have their winning project published in Craft Stamper Magazine, they will have a GDT slot for an upcoming challenge, and will also feature in their very own Winners Profile blog post!

Now if that isn’t a reason to play along I’m not sure what is!!

I can’t wait to see what you come up with.

Supplies used:

THREE_AMIGOS_largeTHREE_AMIGOS die set. jpg MFT Peek-a-Boo Circle DieSU Cherry on Top DSP

Fun Foam Dimesional


Thanks you so much for stopping by!!

~Kymona

Your Next Stamp DT Dare – Shake, Shake, Shake

Hello everyone!!  I’m here today with Your Next Stamp and our DT Dare!!!

What is a DT Dare you ask? It’s a fun monthly challenge for the YNS design team to show case more fabulous projects using the new release products!!

YNS-DARE-Badge

Fun right!!

Wait there is more!!  If you leave a comment on the YNS blog post you could Win a YNS Stamp Set of your choice!!! 

Exciting right!!  It sure is for me!!

The DT Dare Challenge this month is Shake, Shake, Shake!!  The design team was asked to create a project using that has a shaker pocket.

Take a look at my card:You're so sweet

 YNS Supplies: Scrapworks Mini Sunburst Dies, Zero Calories

Other Supplies: We R Memory Keepers Fuse Tool, MFT Hybrid Black Ink, Lucy Abrams Star Shine Sequin, 3M Foam Tape

Here is how I created this card:

1. I cut my card base to a A2 size card, 4.25 x 5.50 scored at 5.50.

2. I cut the white card panel to 4.25 x 5.50 and used Your Next Stamp Scrapworks-Mini Sunburst Die Set to cut a flower in the center of the paper.

3. I used a retired Stampin’ Up! embossing folder to add dimension to the card front.

4. I stamp the sentiment and the smily faces from the Your Next Stamp Zero Calories stamp set with My Favorite Things Hybrid Black Ink.

5. I used the We R Memory Keepers Fuse Tool to create my shaker pocket.  I added Lucy Abrams Star Shine Sequin to the pocket then sealed it.

6. I added the shaker pocket to the card panel with tape adhesive.  I added foam take to the back of the panel and added it to my card base.

Whoa La!!  My card is complete!!

So tell me what you think of this challenge?  I would love to know, let me know below!

Don’t forget we have Blog Candy for you!

DTDare2candy-547x232

Just a reminder….we have a Birthday Sale!!!

2015 special bday stamp set badge

Don’t for get to take advantage of the special promo code to choose your own discount!!

sale badge 6th birthday

Supplies used:

Zero CaloriesScrapworks Mini Sunburst Diesfuse bundleMFT Hybrid Black InkStar Shine Sequins 3M Double Coated Foam Tape

Thank you so much for stopping by!!

~Kymona

CASology 159 – Aquatic

Hello everyone!!  It’s CASology Tuesday!!  We are back with another Cue Card for you!!!

This week’s cue card is all about water and anything pertaining to water!!

Week 159 - Aquatic


Take a look at my card:

Sail away with me (CAS)

Here is how I created this card:

This is a simple one layer card.  I stamped the waves three times, slight on top of each other. Then I stamped the boat right on top of the waves.  I used Copic marker R27 to color in the bottom portion of my boat.

I stamped the main sentiment first then the smaller sentiment last.

That was it!!  A nice card to reproduce!!

Now its your turn!! I can’t wait to see what you come up with!

For more inspiration, check out my fellow Design Team members blog for more awesome work.

Design-Team

Gillian Ross

Hannelie Baster

Hazel Hodgkins

Jen Wills

Joyce Mehrberg

Judy Marino

Kimberly Wiener

Kymona Tracey ←Me

Melissa Chipperfield

Tracey McNeely

Our Guest Designer this week:

Jan

Our Sponsor this week is Unicko Studio.

Supplies used:

SSS Sailing StampDeep Sea Ink LF lobster Copic R27MFT Hybrid Black Ink

Thanks for stopping by!

~Kymona