Topflight Stamps Birthday Blog Hop

Hello and welcome!!! It is Topflight Stamps 2nd birthday!  To celebrate, we’ve teamed up with up some of our favorite crafters to bring you a blog hop showcasing some of the fabulous products available from Topflight Stamps.   Please hop along with us all and show all of the crafters some love!

If you arrived here from the talented Annette Allen blog, then you are on the right track. If you arrived here on your own, then you will want to start at the beginning, the Topflight Stamp blog so that you don’t miss a thing!

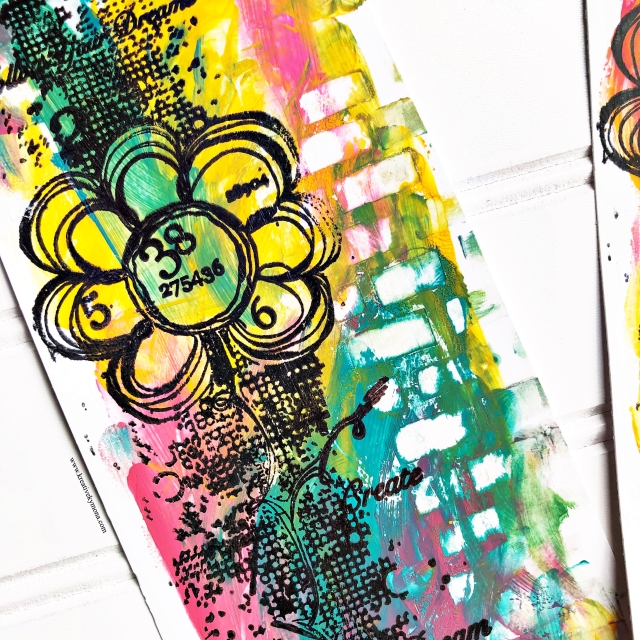
Take a look at my mixed media bookmark and mini notebook:

Let’s take a look at my tags:

Create It Grunge

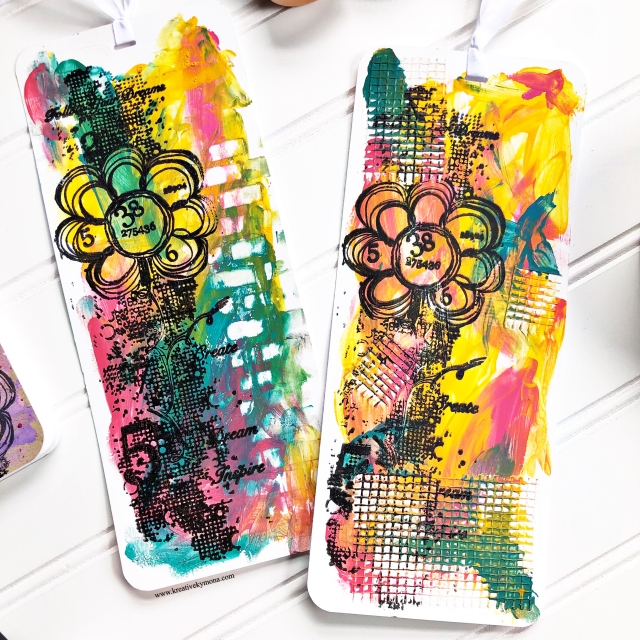
I created two tags that are similar but not quite. I used AALL & Create Create it Grunge stamp set to create both tags.

Let’s take a closer look:

For tag number one, I used a stencil and a baby wipe to create the grid look. I also used the dark paint more.

Create It Grunge

For tag number two, before adding gesso to the tag, I placed a couple of pieces of chicken wire like tape and painted right over it. The tape creates a different texture that looks fabulous.

Create It Grunge

Oversized tags are fun to make and I love grunge look of the stamp set.

Let’s take a look at my mini mixed media notebook:

Create It Grunge

I love this little notebook. It was so much fun painting with my fingers.  It’s not just the front that is decorated. Check out the back too.

Create It Grunge

For the cover I added a couple of glass beads and metal pieces to add character.

Create it Grunge

I even decorated the inside a bit.

Letters

I created a monoprint using Carabella Studio Letters stamp set. Then cut it out using my Cricut Maker.

Let’s take another look:

So what do you think?

What is a blog hop without amazing gift? Yayyy!!

Prizes:

Of course, it wouldn’t be a birthday celebration without prizes!  Topflight Stamps is giving one lucky winner a $50 Gift Certificate, and each stop on the hop has an additional $15 Gift Certificate up for grabs.  To be in with a chance to win, make sure to visit every stop on the hop and leave a comment by April 8th.

Winners will be announced on the Topflight Stamps blog on April 9th.  Good Luck!

Next Stop on this Blog Hop is the:

Ashlea Cornell

You do not want to miss out on her amazing creations!!

Just in case you lose your place along the way, here is the complete list of participants so that you can find your way back:

Topflight Stamps Blog

Sandy Allnock

Jenny Colacicco

Justine Hovey

Toni M Maddox

Kelly Martin

Annette Allen

Kymona Tracey ←you are here

Ashlea Cornell

Josefine Fouarge

Lisa Hoel

Laurel Beard

Ericka Strange

Ingrid Blackburn

Dana Joy

Amy Tsuruta

Lindsay Weirich

Discount:

The discount will be 20% off all orders over $20 through the end of the month Sunday 31 March.   

Supplies used:

(Thank you so much for stopping by. Compensated affiliate links used at no cost to you.  The Topflight Stamps products were given to me for this blog hop.  The other products were personally purchased. This post was not paid or sponsored.)

Create It GrungeLetters           Prima - Finnabair - Art Ingredients - Melange   Ranger Ink - Dylusions Paint - Bubblegum PinkRanger Ink - Dylusions Paints - Rose QuartzRanger Ink - Dylusions Paints - Laidback Lilac

Ranger Ink - Inkssentials - Dylusions Ink Spray - Rose Quartz

Thank you so much for stopping by!

Guest Designing for StencilGirl + Giveaways

Hello everyone!!! I’m super doper excited to be here with all of you today: I’m Guest Designing for StencilGirl today.

stencil girl blog

Why is this so exciting because I’ve always been a clean and simple artist but since Creativation this year I’ve been so intrigued with mixed media and stencils.  I met Mary Beth Shaw while at the show and was amazed at what she shared with me.

So I bought my first stencil and my life hasn’t been the same since!!

Here’s a sneak peek:

Maria McGuire Stencil Stencilgirl


To see all 4 of my creations and to get the complete tutorial, head on over to StencilGirl blog!!  I’m also doing a giveaway of 4 projects!!  You don’t want to miss this!

I can’t wait to hear what you think of my clean and simple mixed media projects, LOL!!!!! I know it sounds pretty funny but it can be done!!

Thanks for stopping by!!

Art Journaling – My Magical Garden

Second Post for today
If your looking the the Altenew Traveler’s Notebook post, click here


Hello everyone!!  I’m here today with a new found love of mine.  I recently started keeping an art journal and I’m having an amazing time with it.

I’m a beginner and I totally love getting my fingers dirty with paint!! It is totally freeing to just play!

Once I finished getting my paint down and dried, I used Lavinia Stamps to add my magical garden.

Take a look:

Lavinia Stamps

I love how this turned out!! I love that I created it!! I can’t wait to give this a try again.  I’m such a clean and simple crafter that when I see pieces like this I’m amazed.  It all makes sense to me now.

I’m going to enter this into the Craft Stampers Take It Make It Challenge. I miss those ladies so I’m stopping by to share my work with them.  I hope I’m able to amaze them.


Supplies used:

(Thank you so much for stopping by. Compensated affiliate links used at no cost to you.  All products were personally.  This post was not paid or sponsored.)

Thank you so much for stopping by!!

Rubber Dance Stamp June 2017 Color Challenge

Hello everyone!! I’m here today with Rubber Dance Stamp June 2017 Color Challenge!

Take a look at the colors for this challenge:

Check out my card:

To create this card:

Super easy and fun. What do you think?  I would love to hear from you.

Guess what!!!  If you like this stamp set or any other stamp set from Rubber Dance Stamp, use coupon code: KTFreeShip for free shipping!!  YES, Free Shipping.

Now onto the challenge prizes!

The winner will win five fabulous stamps fromRubber Dance Stamp!! Wait, if the winner used stamps from Rubber Dance Stamp, they will winner another five stamps! That’s a total of 10 stamps!! Wow!!!

You have until June 14, 2017, midnight Central European Time.  Which is 6:00 PM, June 14, 2017!! Please pay attention to this time. Here in NY, we are 6 hours behind Norway! 

Supplies used:

(Thank you so much for stopping by. Compensated affiliate links used at no cost to you.  All products were personally purchased.  This post was not paid or sponsored.) 


Gel Press 8 x 10 REUSABLE GEL PRINTING PLATE 10802Speedball Art Products - Pop-In Soft Rubber Brayer - 4 inches

Thank you so much for stopping by!!

Rubber Dance Stamp April 2017 Color Challenge

Hello everyone!! I’m here today with Rubber Dance Stamp March 2017 Color Challenge!

Take a look at the colors for this challenge:

They are so pretty!!  I would not have thought to put these colors together but I’m so glad I did.

Check out my card:

To create this card:

Lets take a closer look at that texture:

I love the textured on this card and the colors are so pretty!!

Nice and easy!!

Guess what!!!  If you like this stamp set or any other stamp set from Rubber Dance Stamp, use coupon code: KTFreeShip for free shipping!!  YES, Free Shipping.

Now onto the challenge prizes!

The winner will win five fabulous stamps fromRubber Dance Stamp!! Wait, if the winner used stamps from Rubber Dance Stamp, they will winner another five stamps! That’s a total of 10 stamps!! Wow!!!

You have until April 14, 2017, midnight Central European Time.  Which is 6:00 PM, April 14, 2017!! Please pay attention to this time. Here in NY, we are 6 hours behind Norway! 

Supplies used:

Thank you so much!!

Clean and Simple Ways To Use Rinea Foil Paper!

Hello everyone!! I’m super excited to be here!  I’m guest designing for Rinea today. I’m going to show you three clean and simple ways to use Rinea foil paper!

Lets get started!

Take a look at card number one:

Using Rinea Foil Paper as the Focal Point!

hello-foil

Using Rinea foil paper as the focal point creates a clean and simple card!

To create this card:

  1. Cut the card base to 6.25 by 7.50 scored at 3.75.
  2. Using die cutting machine, run the Rinea foil paper with The Ton Stamps Brushed Hello Coordinating Die, through the machine. Once with the Rinea silver foil paper and once with the Rinea blue foil paper.
  3. Adhere the silver sentiment first using Tombow Mono Liquid Glue. Then adhere the Rinea blue foil sentiment die cut on top of the silver, in an offset manner.  Offsetting the sentiment, creates dimension.
  4. Using a corner rounder, round all of the corners.

Nice and easy!  What do you think?  Pretty simple right!!

Take a look at card number two:

Using Rinea Foil Paper to Balance Out the Card Design!

many-thanks

Using Rinea foil paper with paints keeps the card design balanced!

To create this card:

  1. Cut you card base to 4.25 by 11 scored at 5.50.
  2. Then prepare your card stock for paint.  Add tape at the score line to prevent paint from touching the backside of the card. adding-paint
  3. Use an old gift card and pull the paint down the card stock.  After each swipe, wipe the gift card off. Then repeat the process until all of the paint dots are smeared.
  4. Using a die cutting machine, die cut My Favorite Things Many Thanks Die using the Rinea silver foil. 
  5. Adhere the Rinea foiled die cuts to the card front using Tombow Mono Liquid Glue.

Pretty easy! An easy introduction to mixed media! Another fun way to use Rinea foil paper! What do you think?

Take a look at project number three:

Using Rinea Foil Paper for the entire Project!

foiled-easter-baskets

Using Rinea foil paper as the project, takes foil paper to the next level!

To create these baskets:

  1. Using a die cutting machine, cut the Rinea blue and silver foil using Mama Elephant Cute Basket die cut and cut out all of the pieces with the Rinea foil paper.
  2. Assemble the basket according to the instruction that comes with the die.
  3. Change up the basket colors by mix and matching the different color Rinea oils.close-up-of-basket
  4. Once the baskets are together, add the cripple paper and eggs!

Lets look at those baskets again:

foiled-basket-2

I love how the Rinea foil looks.  So pretty and different then regular cardstock.  Rinea foil paper folds and rips just like paper but it is much prettier.  Its a bit lighter then cardstock but heavy enough to create these baskets and hold these eggs without fear of ripping.

Easy and requires a bit more assembling but it’s worth it.

So what do think?  Will you give Rinea foil paper a try?  I think you should.  The possibilities are endless. Please let me know what you think.  I would love to hear from you.

Supplies used:

rinea-embossed-foil hello-co-diemft970_thanks_webpreview_1_grandetombow-mono-liquid-glue-big Sizzix - Big Shot Machine - White and Grayali_acrylic_paint_bundle__2_original

(Affiliate links used at no additional cost to you.  Thanks!)

Thank you so much for stopping by!

name-tag

Rubber Dance Stamp February 2017 Theme Challenge

Hello everyone!! I’m here today with the Rubber Dance Stamp Theme Challenge!!

The theme is “Lots of Layers”!  All you have to do is create a piece of work that has a lot of layers.

Check out what I created to inspire you:

love-rds

I tried to keep my tag pretty simple since that is more my style, but I also wanted to play around with some mixed media.

Are you asking yourself, where are the layers?  I was hoping that you would ask.

Here you go:

  1. I add gesso on the top of the tag and let it dry.
  2. Then I blended Distressed Ink Mustard Seed, Spiced Marmalade, Fired Brick and Seedless Preserve.
  3. After that, I used Rubber Dance Stamps Round in Circles stamped paired with StazOn Jet Black Ink to stamp the circles.
  4. Then I used the Rubber Dance Stamps Think Again stamp set to stamp the sentiment with the StazOn Ink.
  5.  To finish the tag off, I colored the Crinkle Ribbon with Mustard Seed reinker and added it to the tag.

Thats four layers!!! Yayyy!

What do you think? Please let me know below. I would love to hear from you.

The winner will win five fabulous stamps fromRubber Dance Stamp!! Wait, if the winner used stamps from Rubber Dance Stamp, they will winner another five stamps! That’s a total of 10 stamps!! Wow!!!

You have until February 28, 2017, midnight Central European Time.  Which is 6:00 PM, February 27, 2017!! Please pay attention to this time. Here in the US is a day behind Norway! 

Supplies used:

round-in-circles  think-again

Thank you so much for stopping by!

~Kymona

CS Take It Make It: Using Different Inks

Hello everyone!! I’m here with CS Take It Make It: Take a Technique Challenge for June.

Our theme is Take a Technique: Lets Get Inky!!

For this month’s challenge the technique we would like you to use more then one type of ink on your project (ink pads, ink sprays, stains, acrylic inks, etc.)  Or more then one color of ink on your project…and don’t forget to include stamping somewhere too!!

This should be super fun to see what you come up with.

Take a look at my tag:

Hello Tag (TIMI)

I have to admit I’m super excited about this tag.  I don’t usually create tags, much less one with all of this ink on it, but I have to say I really had fun creating this tag.

Let’s check out how I created this:

I gather my supplies that I needed.

tag supplies (CSTIMI)

I used the ink blending tool to apply the ink to tag, overlapping the colors for seamless blending.

ink blending (CSTIMI)

Then I sprayed water in my hand, then sprinkled the water onto the tag.  The inks reacts to water so it creates water spot on the tag. Let the tag dry.

water splatter (CSTIMI)

Once the tag is dry, spray some wild honey distress spray stain to the tag. Let that dry.

ink sprayed (CSTIMI)

After that ink up the stamp with waterproof ink and stamp the image.

stamped image (CMTIMI)

Once the image is on the tag, ink the edges with wild honey distress ink.

Inked edges (CMTIMI)

Now that the tag is done, I inked up the ribbon with the wild honey spray and heat set the ribbon.

inked ribbon (CMTIMI)

You add the ribbon to the tag. I felt like this card needed a sentiment.  So I die cut 3 hello’s from Mama Elephant’s Venice Envelope die set.

Take another look:

Hello Tag (TIMI)

So what do you think? I love how this tag turned out.

We have two prizes to offer this month, the first is our sponsor prize. This winner will be chosen randomly from all of the entries in the challenge! The sponsor for June: PaperArtsy!

paperartsy

bottles

Prize: 5 bottles of Infusions

Infusions are water soluble particles with 2 components: dye color pigment suitable for paper/ fabric, mixed with Walnut Stain. The color powder particles dissolve faster than the walnut crystals, so you can control the color-to-brown stain ratio!

infusion

Color Chart Reference

Our second winner is our Design Winner. This winner is chosen by our DT, who all vote for their favorite design from all of the entries. This winner will have their winning project published in Craft Stamper Magazine, they will have a GDT slot for an upcoming challenge, and will also feature in their very own Winners Profile blog post!

Now if that isn’t a reason to play along I’m not sure what is!!

I can’t wait to see what you come up with.

Supplies used:

VENICE-ENVELOPE-CC_large

Thanks for stopping by!

~Kymona