Altenew Big and Bold Layout

Hello everyone!!  I’m up on Altenew’s Scrapbook Blog today for the first time sharing my big and bold layout!!

Here’s a sneak peek:

To see the complete layout and full tutorial, head on over to Altenew’s Scrapbook Blog.  I can’t wait to see what you think!

Supplies used:

Altenew Watercolor frames

Thank you so much for stopping by!

Stretch Your Pattern Paper!

Third post for today!
If your looking for Rubber Dance Stamp post, click here
If your looking for a2z Scrapbooking post, click here

Hello everyone!!  I’m up on Gossamer Blue’s blog today for the first time!! I have to say I’m tickled pink with excitement.  I’m sharing how to stretch your pattern paper by making 3 cards!!

Here is a sneak peek:

kt-3-cards-tan-background-copy

Stop on by Gossamer Blue’s blog to get the full tutorial and stepped out pictures. You don’t want to miss this!

Thank you for stopping by!

Kymona


YNS Feature Day – Spooky/Scary

Hello everyone!!!  I’ here today with another YNS creation to inspire you and a chance to win a stamp set of your choice!!

On the 22nd of the month, YNS Design Team creates more samples featuring YNS products and shares them with all of you!!

The super duper awesome part of it all besides our awesome samples, you could win a stamp set of your choice!!  Now how super cool is that!!

Scroll to the bottom to find out how!!

This month we are focusing on “Spooky/Scary”!!  The DT created projects related to anything scary or spooky.

Now take a look at the card I created to inspire you:

happy-batty-halloween-yns

YNS Supplies: Batty Background Ink Splatter Stamp Set, SpookTacular Halloween

Other Supplies: Distress ink Black Soot, Seedless Preserves, Salty Ocean, Blending Tool, Bristol Smooth Paper, Clearsnap Colorbox Black Embossing Powder, Versamark Ink

I love how those bats look so real on this card.  I would be scared if I saw all of those bats above my head.

What do you think?  Let me know below.

Now on to that prize!!

DTDare2candy-547x232

All you have to do is leave a comment on the YNS blog by September 26th for a chance to WIN a YNS stamp set of your choice!!  Super simple and easy!!  You will get to see my fellow DT’s projects as well.

So head on over, you don’t want to miss this one!!

Supplies used:

batty-background-splatter spooktacular-halloween

Thank you for stopping by!!

~Kymona

{Clean and Simple} CASology 203 – Congratulations

Hello everyone!!  It’s CASology Tuesday!!  We are back with another Clean and Simple Cue Card just for you!!

This week’s cue card:

Week 203 - Congratulations

Take a look at my card:

Congratulation ink splatters

I plan on having fun with this cue card this week.  My son’s big day is this Saturday and he has inspired me!  He is such a great son.  He has stayed focused to the very end.  Good grades and dominate in all the sports he played.  He walks away from high school as an All County Football Player, an All County Lacrosse Player and an All Conference Basketball Player.

INSPIRING right!!

This card is for him!

I used STAMPlorations Art Marks Stamp Set, who happens to be our sponsor  this week, to create this card.

Here’s how:

  1. I stamp the different ink splatters and the stars with Versafine ink.
  2. Then I stamped the sentiment using So Suzy Stamp Plum Passion Ink Bite.
  3. To finish the card off I rounded the top corners using the We R Memory Keepers Envelope Punch board.

Nice and easy!

What do you think?  I can’t wait to see what you come up with!

For more inspiration, check out my fellow Design Team members blog for more awesome work.

DT Badge

Waffle Flower Crafts – Photo Inspiration

Hello everyone!!  I’m here with our new Waffle Flower Crafts Photo Inspiration Challenge!!

This is our sixth challenge for 2015.  I can’t believe we are in April already!!

1507057_10206178018309803_1268318448649792502_n

Isn’t this butterfly’s colors pretty! I love it.  This photo reminded me of nature and the fall.  So that is what I went back to.

Take a look at my card:

Thankful For You (WFC)

The colors in the picture reminded me of Lawn Fawn’s Sweater Weather colors.  So I went straight to that paper pack for this card.

To create this card:

It’s pretty straight forward.

1. I dry embossed the front of my card panel with Stampin’ Up! Decorative Dots Textured Embossing Folder.

2. I used Simon Says Stamp Stitched Slopes and Hills  Die to cut Lawn Fawn Sweater Weather patten paper to a half circle.

3. I attached Lawn Fawn Trimming to the front of the pattern paper and then adhered the panel to the top of the card base.

4. I stamped my sentiment using Waffle Flower Crafts Holiday Labels – Give Thanks Set with My Favorite Things Black Licorice Hybrid Ink.

5. I added Your Next Stamp Black Gumdrops to tie in the black from the sentiment.

There you have it!! Not hard at all.

So what do you think? Please let me now. Now its your turn!! I can’t wait to see what you come up with!!

I also linking this card to Virginia’s View Challenge #14: Layers and Dimensions.

Layers and Dimensions

Supplies used:

Sweater Weather Petite Paper Pack Orchid Lawn Trimmings LF Cranberry Ink Pad Decorative Dots Embossing Folder Stitched Slopes and HillsHoliday Label1 Die MFT Hybrid Black Ink black gumdrops small

Thanks for stopping by!

~Kymona

Top Dog Die – Confident Corset

Hello everyone!!  Its Top Dog Die Wednesday!!  I’m here with yet another new die that was release last month!

Check out the new Top Dog Dies Corset Die and Corset Background Die:

Top Dog Die Corset Die  Top Dog Dies Corset Background Die

I also used the new Top Dog Die Borders Die Set:

Top Dog Die Dotted Borders Die Set

Take a look at my card:

Confident Corset

I love this corset die!!  Its so pretty.  Oh, how I remember wearing these corsets when I was younger.  They always look so nice to go out in!

Take a closer look at the corset:

Confident Corset closeup

I paired this set up with my awesome Confidence is Sexy sentiment stamp from So Suzy Stamps.

The pattern paper that I used is Stacked with Love from Stampin Up!

I used Stampin’ Up! Polka Dot Embossing Folder to add dimension to the front of my card.

Here is how I created my card:

1. I die cut the corset from black cardstock and the background corset from pattern paper. I glued them together using glue.

2. I die cut the border using one of the boarder dies at the bottom of the my black card front.

3. I added a small piece of pattern paper behind the border die cut with adhesive.

4. I stamped the sentiment using Versamark ink and add white embossing powder and heat set it.

5. I ran my card front through my embossing machine use the polka dot embossing folder.

6. I adhered my corset to the front of my card using dimensionals.

7. I added a rhinestone to the front of my corset.

Super easy and elegant.  So what do you think?  Let me know below in the comment section.

Confidence Stacked with Love Polka Dot Folder Textured Boutique Embossing MachineVersamarkTombow Multi-Purpose AdhesiveStampin' Dimensionals

Thanks for stopping by!!

~Kymona

Hello World, How are you?

Hello everyone!  I’m in such a great mood today, I can’t stop smiling.  I’ve been working really hard at my craft and slowly by surely its paying off.  So, I’m really proud of myself.

I’m here today with a card for the Muse Challenge #69. This is my first time playing along with them so I hope I don’t disappoint them.

Cornelia was chosen to create the Guest Muse this week and her card is full of bright colors, a cool technique and FUN!

Here is her card:

Cornelia

My job is to use the Muse card as inspiration and create one of my own.

When I looked at Cornelia’s card, it reminded me of my all time favorite technique, WATER-COLORING!!!  I love how she made the colors mix with one another and the splatters across the card.

So I knew right away that I had to pull out my Koi watercolors.  I decided that I wanted to use colors I hardly use that are bright and will stand out on the black cardstock I wanted to use.

Before I painted, I scored the watercolor paper to give it added texture.

I used colors #3, 12, and 16 to create my sentiment and hearts. You can see the colors on my swatch here.

Like Cornelia’s card I wanted to create a one layer card so I decided to create an inlay card with my sentiment and hearts.  So, I die cut my sentiment and hearts from the watercolor piece.

helloswatch

After I cut out all of my pieces that I need to create my card, I realized that I wanted my card to have a stitch edge so to create that I had to use my large journal stitch die, which in turn cut off a portion of my card.  I was ok with that because I love the stitch edge. That idea came from Nichol Magouirk.

After that cut, my card was no longer a one layer card.  I put all of the piece together and here is what I came up with.

Here is my card:

Hello

I added sequin, enamel dots and rhinestones to resemble Cornelia’s paint splatters.  I choose colors that were close to my watercolor sentiment and hearts.

Sooooo, what do you think? No stamping required. I love how it came out.

Supplies used:

Canson Watercolor PaperKio WaterColorsBasic Black CSLargeStitchedJournalingCardScripty HelloHello Sunshine Mixed SequinsBrights Candy DotsBasic Rhinestones Jewel AccentsStampin' TrimmerSnail AdhesiveStampin' DimensionalsclassiccrestsolarwhtieWe R Memory Keepers Corner Chomper

Thanks for stopping by!

~Kymona

What is Texture?

Happy Friday everyone!!! Today couldn’t get here fast enough.  The week was dragging and cold.  To keep my cool, I joined Addicted to CAS Challenge this week.  Their code word is Texture. How interesting!!  How often do you get a card with texture on it.  Think about it.

So, the question is what is texture?

According to Webster, texture is the visual and especially tactile quality of a surface.  For example a rough texture.

Well that is interesting, who wants a card with a rough texture.  When you think of cards, you think pretty, smooth, subtle, funny, and bright.  So how does texture play apart on a greeting card.

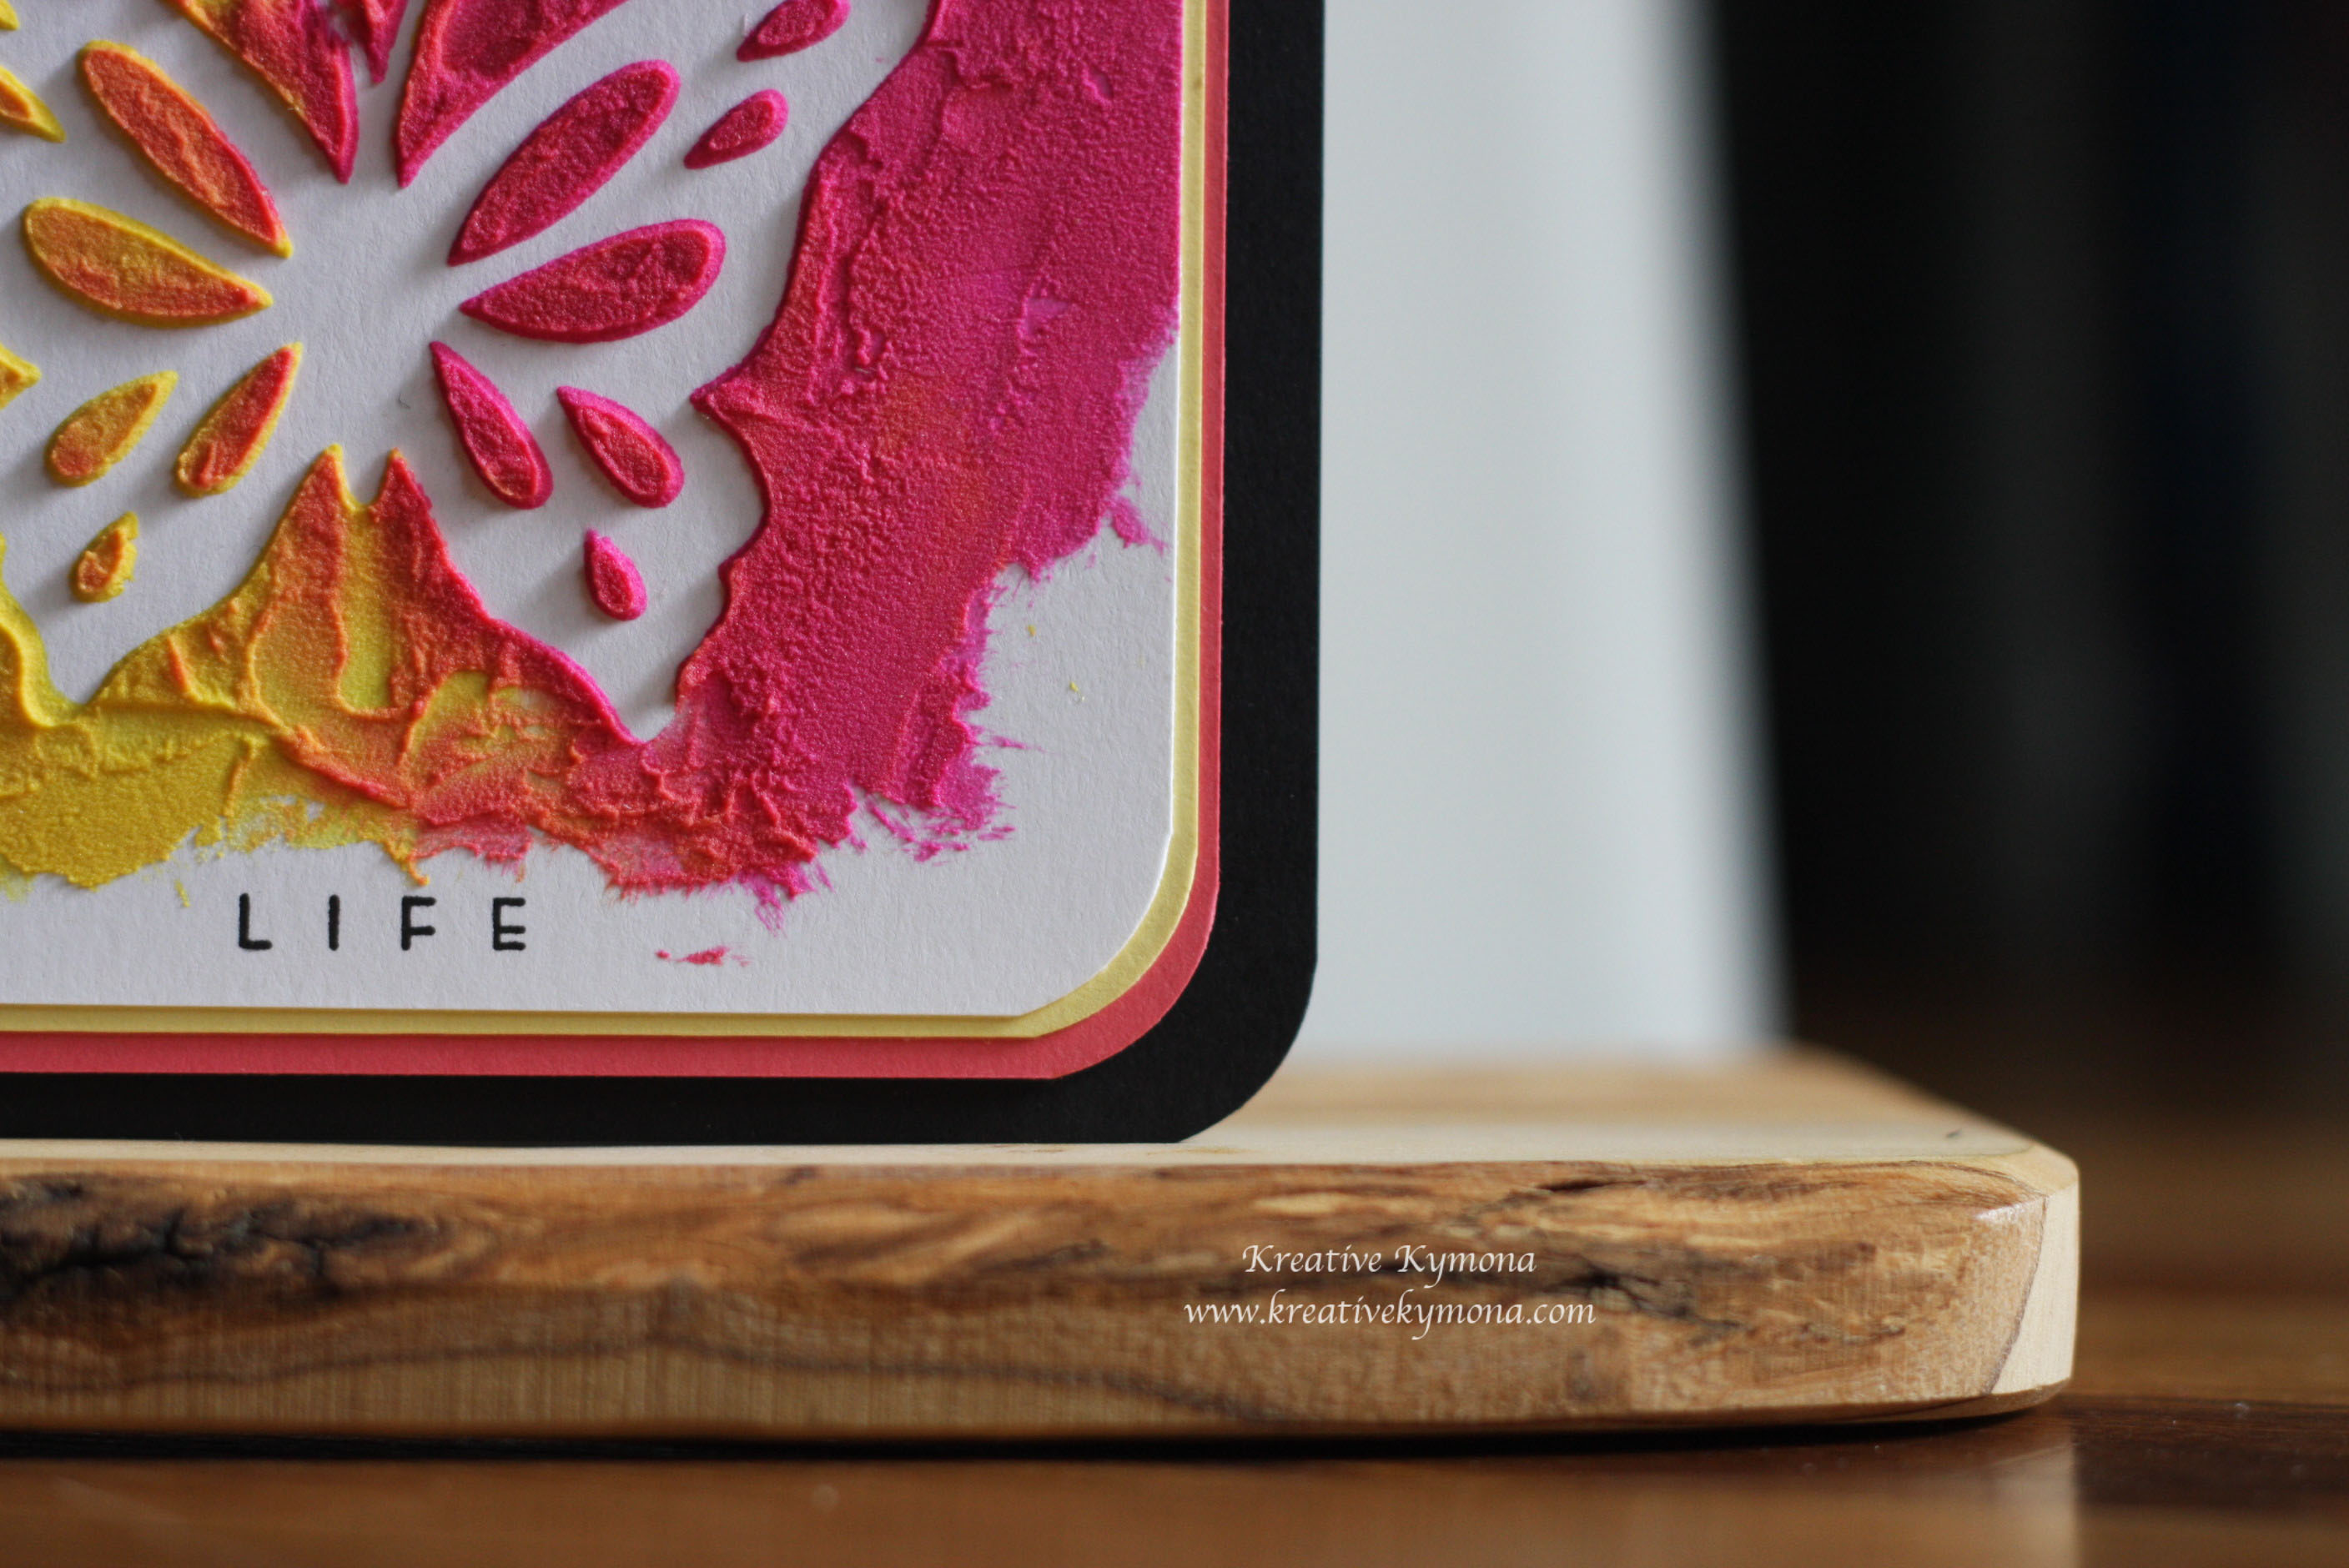
I will show you, take a look at the card I came up with.

Life

Can you say texture?  Yes, you can!! Guess what, it is rough!!!  It’s a pretty rough card!!

Life side

You can see the thickness of this textured butterfly.

Life close up

I saw Laura Bassen create a card like this and I wanted to give it a try.

1. I die cut 4 butterflies from Papertrey Ink’s Life is Beautiful die cut to create a butterfly stencil.

2. I attached the stencil to my white cardstock.

3.  I mixed two distress inks colors with embossing paste.

4. I spread a thick coat of the color embossing paste over my heart stencil.

5. Once I was done applying the paste, I lifted the butterfly stencil and WALA!!

Have you notice that one of my butterfly antenna’s are missing.  I think that is the beauty of this card and that is why I use the sentiment “Life”!  Life isn’t perfect and sometimes neither are we.

I hope you like my card just as much as I like it.

BTH: My seven year old daughter made a card for this challenge as well, take a look here.

Supplies used:

Basic Black CSWhisper WhiteStrawberry SlushDaffodil Delight CSDistress Ink Mustard SeedDistress Inks Picked RaspberryLife is Beautiful DieLife is Beautiful Stamp SetWe R Memory Keepers Corner Chomper


Please leave me a comment below and let me know what you think.

~Kymona

SSS Wednesday Blog Challenge – Happy Birthday Card 1

Simon Says Stamp is celebrating 5 years of challenges and they wanted to see some Happy Birthday/Birthday Celebration Creations!!

I love the month of April because I celebrate my birthday too!!!!  As a matter of fact, today April 4 is my birthday!!

Happy-Birthday-To-MeSo for the challenge, I created a couple of cards that I will post separately.  The first card is a black and white Happy Birthday card that I think is really simple and classy.

Take a look:

Happy Birthday Black and White

The stars have a Wink of Stella glitter that is hard to see, but its there.   I used SSS stamp and die along with Mama Elephant’s background stamp set.

Shhh! I have a secret!

I tied some bakers twine around the bottom of the large balloon but it didn’t look right after I added the smaller balloons so I just tucked it underneath the smaller balloons since I couldn’t take it off.

Please leave a comment below, I would love to know what you think.

Supplies Used:

Classic Crest Solar White CS

Classic Crest Solar White CS

Birthday Balloons

Birthday Balloons

SSS Balloons Craft Dies

SSS Balloons Craft Dies


On Point Borders

On Point Borders

White Baker's Twine 124262

White Baker’s Twine
124262

Big Shot Die-Cut Machine 113439

Big Shot Die-Cut Machine
113439


Stampin' Dimensionals 104430

Stampin’ Dimensionals
104430

Memento Tuxedo Black

Memento Tuxedo Black


Signature