CASology: Show off your Craft Space!

Second Post for today
If your looking for the YNS Sketch and Color Challenge #25, click here

CraftSpaceTour Badge

Hello everyone!!  I’m here with CASology today!!  Shocker right!!  Well don’t be!  We have a fun new series taking place every Thursday and Friday from now until mid-November.

Its called the:   CASology Craft Space Tour Series

On Thursday and Friday, you will get a peek inside each of the Design Teams Craft Space!!!  How exciting.  Yesterday, was the first day and Kimberly really showcased her craft space and it’s amazing!!  If only my space could look as cozy as hers!!

Now onto my space:

image1

So I’m not as fortunate as some of you with an actually craft room, I just have a corner.  This space is in my room, right under the TV.  There is were I sit and craft at 2am in the morning.  I have everything right at my finger tips.

On my desk to the far right under the gray cover is my Brother Scan and Cut and in front of that is a bin of cut cardstock.  On the left, behind the screen is my bins of pens and pencils that I need for everyday use.

Under the desk is a file cabinet that has color cardstock in the bottom draw and in the top draw I have washi tape, regular tape, stapler, scissors and other knick knacks!!

Carts

I have two of the Ikea carts filled with all of my fun favorite toys.  This one has all my markers, inks, embossing pastes and embossing powders.

IMG_5584

The second cart is full with my tapes, sprays, embellishments, mini distress inks, stencils and the big box items on the bottom.

IMG_5585

Shelves Under the Desk

Under my desk you will find a bin of dies that I have yet to file properly.  They are just in this bin and I know exactly what’s in there.  Dies from all companies!! LOL!  Next to that is black cardstock and stickers that I don’t use often.

Underneath that shelf, I have some miscellaneous stuff: a texture boutique, my banner punch board, 1-2-3 punch board, and some other things that I use every now and again.

IMG_5587

Additional Storage

All of my “craft stuff” can’t fit by my desk so I have an additional space in my living room and basement that houses the rest of my belonging.

IMG_5588

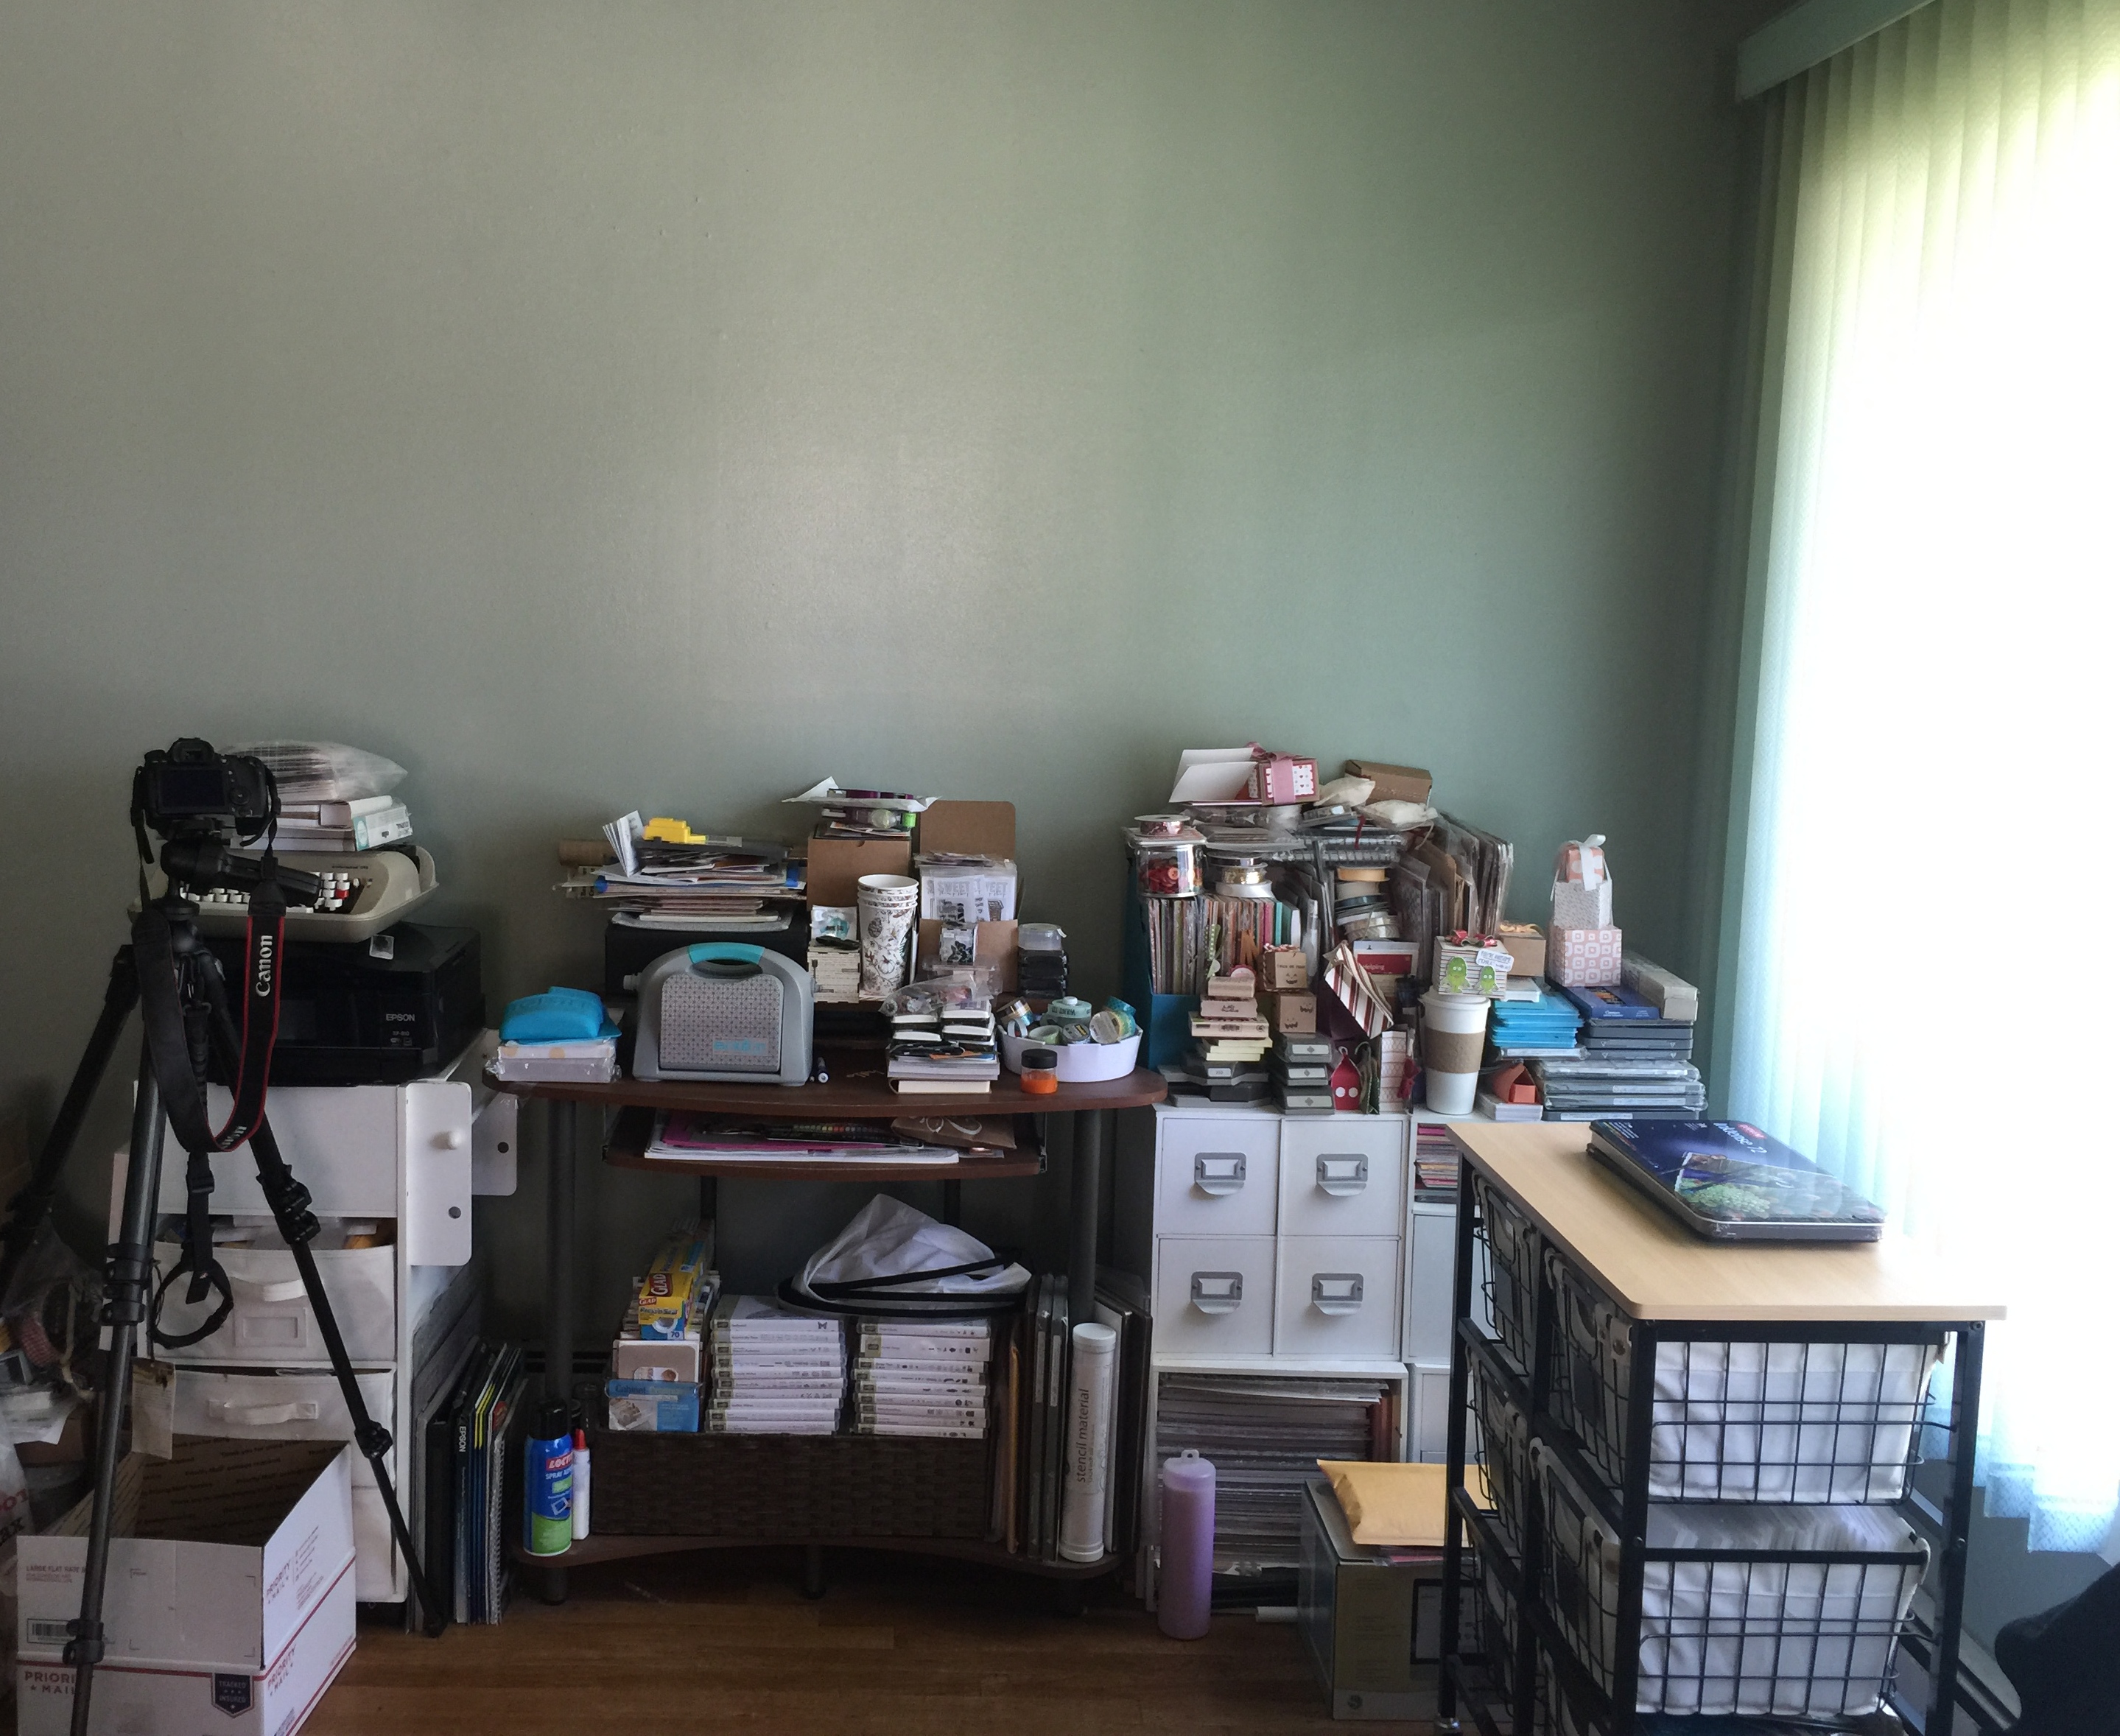
My living room is pretty big and it has this hug bay window so this is where I shoot most of my photos.  This area is usually a lot neater but I didn’t have time to clean it up but I also wanted you to see what it looks like while I’m using it.

The table by the window is what I take my pictures on and in the six drawers are all of my clear stamps.  I use this space to pack my packages, take my pictures, and its a place where my nieces, daughter and I craft together.  They love it.

I would show you the basement, but its under renovation. So we can’t go down there!!!  It would be a super nice craft space but the windows are super small and I need sunlight.

So this is my craft space and I love it!!  I hope you enjoyed this small piece of who I am!

Thanks you so much for stopping by!

~Kymona


YNS Sketch and Color Challenge #25

Hello everyone!!!  I’m here today with Your Next Stamp (YNS) and the Sketch and Color Challenge #25!!

Each challenge has a sketch and a color combo to choose from.

Take a look at the sketch:

YNSSketch25


Take a look at the color combo:

YNScolor-25

Yes, I did it again!  I went with the color combo!!  These colors are so fall that I couldn’t resist, plus the new release is so fitting for this color combo, why not!!

Take a look at my card:

You are Amazing (YNS)

YNS Supplies: Gingerbread Man Die Set, Whatnot Sentiments Set Six

Other Supplies: Distress Ink Fossilized Amber, Ground Expresso, Fired Brick and Dried Marigold, Winsor &Newton Cotman Water Color Paper

So are you ready for the new challenge?

You have until October 29th at midnight EST to play along and submit your project on the YNS Blog post.  One random participant will win a $15 gift certificate to the Your Next Stamp Store.  If YNS stamps or dies are the focal point then the winner receives and additional $5 gift certificate fro a total of $20.  The winner will be announced on the YNS Blog the Sunday after the challenge closes.

I hope to see your projects!!

Supplies used:

Gingerbread Die WhatnotSixDistress Ink Mini 14Distress Ink Mini 13Distress Inks Mini 9Distress ink mini 2Winsor & Newton Cotman Water Color Paper

Thank you so much for stopping by!!

~Kymona


Your Next Stamp October 2015 Blog Hop

Oct2015-hopgraphic

Hello everyone!!  Yayyy, my forth blog hop featuring new products from Your Next Stamps makes squeal!! LOL!!

I super doper love this release!!  Couldn’t you tell from yesterdays sneak peek?

If you’ve been hopping along, you would have arrived from Julie’s blog and if you’d like to start from the beginning, you can click on over to the linky at the bottom of this post and start at Kendra’s blog.

This new release will surly get you ready for Christmas!! You will squeal for joy when you see the new stamps and dies!! My favorite set is Santa’s Helpers and in close second is Sandy Squirrel Autumn Greeting!

Are you ready for my big reveal?  I made one card and one postcard to inspire you!

Take a look at my card:

You're so Adorably (YNS)

How cute is that little bunny!! He is adorable for sure!!

YNS Supplies: Sprinkles Hoppy Holidays Stamp Set and Dies, Windows for Waddles Die

Other Supplies: Salty Ocean Distress Ink, Clear Wink of Stella, My Favorite Things Hybrid Ink, Copic Markers, 3M Foam Tape

To create this card, I die cut the Window out of my card panel. Then I stamped the sentiment right underneath the window.  After that,  I stamped my bunny and colored him in using Copic markers. Then I cut a mask out and cover the bunny up so I could ink the area around him.  I masked off the window area on the card base and inked up the window area. I removed the mask and attached the card panel to the card base.  I stamped the gifts, colored and fussy cut the gifts out.  This set has dies but I didn’t have them so I fussy cut them out. I attached the gift boxes using foam tape.

Nice, easy and cute!!

Take a look at my postcard:

Thank You Postcard (YNS)

The left side is the front of the postcard and the left is the back of the postcard.

YNS Supplies: Sandy Autumn Greetings

Other Supplies: Derwant Inktense Pencils, Archival Ink, Winsor & Newton Cotman Watercolor Postcard Paper

I told you this was my second favorite stamp set from this release!!  I love these squirrels.  The funny thing is I do not like squirrels at all.  The ones by my house are super crazy and they look at you like you are in there space.

To create this postcard was simple, I stamp the image and then watercolor using my Inktense pencils.  My inspiration for the coloring came from this image:

Squirrel3Photo Source

Once it dried, I stamped my sentiment.  Then I turned the card over and stamped the acorns and watercolor those too!

Super easy and fun.  I love playing with watercolors on this image.

So what do you think?  I had so much fun creating these boxes and card to inspire all of you and show you the versatility of the stamp sets! Which one of these items are favorite?  I would love to hear from you!

Be sure not to miss any blog along the way, because one lucky commenter will have a chance to win a $25 YNS gift certificate. Winner will be announced on the YNS blog on October 18th.  So don’t forget to leave a comment on each of the blogs participating in the blog hop.


Don’t forget to take advantage of the special promo code to get
20% off your entire purchase!!

OctHopSale2015

Thanks for stopping by!!!

~Kymona

Top Dog Dies – October 2015 Release

Second post for today
If your looking for the Your Next Stamp October 2015 Release, click here

hpr-newdies-101315

Hello everyone!!  I’m Top Dog Dies Wednesday and their October 2015 Release!!

This one is a good one.  You’re going to love these dies!

Take a look:

TDD Polar Bear Die SetTDD Penguin Die SetTDD Cardinal Die SetTDD Snowman Die SetTDD Pocket Page Winter Die SetTDD Snowflake Mosaic Die Set

Don’t you just love these dies!!!

Check out a couple of cards I created using three of these sets:

All you need is love 2 (TDD)

TDD Supplies:  Top Dog Die Polar Bear Die Set

Other Supplies: Mama Elephant Smitten Stamp Set, Bo Bunny Altitude Pattern Paper, Ranger Distress Glitter and My Favorite Things Hybrid Ink

Baby its cold outside2 (TDD)

TDD Supply: Top Dog Dies Snowman Die Set

Other Supplies: Lawn Fawn Toboggan Together Stamp Set, Ranger Distress Glitter,  The Ton Holiday LyricsMy Favorite Things Hybrid Ink and Distress ink Chip Sapphire and Salty Ocean

You're My Favorite (TDD)

TDD Supplies: Top Dog Dies Cardinal Die Set

Other Supplies: Mama Elephant Smitten Stamp Set, Copic Markers, My Favorite Things Hybrid Ink

Supplies:

ME Smitten Stamp Setholiday lyrics Distress Glitter Bo Bunny Altitude Pattern Paper TobogganTogether MFT Hybrid Black Ink Copic Markers Chipped SapphireSalty Ocean mini

Thank you so much for stopping by!!

~Kymona

Your Next Stamp October 2015 Sneak Peek

Hello everyone!! I’m back again for this month’s Your Next Stamp Sneak Peek!

We are getting ready for our October Release Blog Hop tomorrow with a sneak peek today.  Are you excited?  I am!!

Take a look at my card that I’m giving you a sneak peek of:

Have a Jolly Cold Christmas (YNS)

YNS Supplies: Santa’s Helpers Stamp Set and Die

Other Supplies: Neenah Desert Storm Cardstock, Derwent Inktense Pencils, Wendy Veechi Embossing Paste, Simon Says Stamp Falling Snow Stencil, Canson Watercolor Paper, 3M Foam Tape, Ranger Archival Ink and Ranger Distress Glitter

Oh man creating this card was so much fun!  I initial colored this image for Kathy from The Daily Markers 30 Coloring Challenge as a sneak peek before the sneak peek and shared it on Instagram.  The response was amazing, 218 likes!!

IMG_5508

So I knew I need to really get it on a card!!  I love how it turned out.  It looks better in person.

Here is how I created this card:

  1. I stamped the YNS Santa’s Helpers image on Canson watercolor paper using Archival Ink because its waterproof.
  2. Then I watercolored the image using the Derwert Inktense Pencils.
  3. After coloring the image in, I used YNS Santa’s Helpers Die set and die cut the image out.
  4. I taped down the Neenah Desert Storm cardstock and the Simon Says Stamp Falling Snow Stencil down to my table and applied the Wendy Veechi Embossing Paste onto the cardstock.
  5. I lifted the stencil and add the Ranger Distress Glitter on top of the paste.
  6. Then I stamped my sentiment onto the card base.
  7. The finally step was to pop up my die cut image to the front of the card base using foam tape.

Super fun, I tell you.  This is one of my favorite stamp set for this release!!

So are you excited about what you see?  You have to see what my fellow team members came up with the rest of the release!

You can find all of the new projects on the Your Next Stamp Blog!!

I hope I see all of you tomorrow for the October 2015 Release Hop!!

Supplies used:

Neenah Desert Storm CS Derwent Inktense Pencils Embossing PasteSSS Falling SnowCanson Watercolor Paper 3M Double Coated Foam Tape Distress Glitter Archival Jet Black

Thank you so much for stopping by!!

~Kymona

CASology 168 – You

CASology Badge shadow

Hello everyone!!  It’s CASology Tuesday!!  We are back with another Cue Card for you, but before I get into that, CASology has resigned the website!!  I love the new look.  Super clean, sharp, crisp and classy!!  I hope you like it as much as I do!!  Now on to the cue card!!

This week’s cue card is:

Week 168 - YOU revised

Take a look at my cards:

For You (CAS)

When I saw the cue card, I remember getting Lawn Fawn’s For You Die!  I sat for awhile thinking about what I wanted to do.  Then I remember, I didn’t post my Monday Giveaway on Instagram and that is when it hit me, that I could make thank you cards to add to the package.

I’m always searching for a card to include in the package and now these are super easy to make and send.   I couldn’t make just one, I make tons of them.

I cut my paper to 3 x 6, scored at 3.  Then I used all of my used watercolor papers, I have lying around to cut out the sentiment.  I added it to the front of my card base and that’s it!!

FullSizeRender(7)

Super easy!  I love having already made watercolor sheets for my cards.  I try and use every inch of my papers.  Can you tell?  LOL!!

Now its your turn!! I can’t wait to see what you come up with!

For more inspiration, check out my fellow Design Team members blog for more awesome work.

DT Badge

Gillian Ross

Hannelie Baster

Hazel Hodgkins

Jen Wills

Joyce Mehrberg

Judy Marino

Kimberly Wiener

Kymona Tracey ←Me

Melissa Chipperfield

Tracey McNeely

Our Guest Designer this week:

Jennie

Our Sponsor this week is STAMPlorations!

Supplies used:

Scripty For You Recollections White Heavyweight

Thank you for stopping by!

~Kymona

CS Take It Make It: Take a Technique Challenge Inspiration

Second Post for today
If your looking for YNS Sketch and Color Challenge, click here

Hello everyone!! I’m here with CS Take It Make It: Take a Technique Challenge Inspiration for October.

Our theme is Take a Technique!

For this month’s challenge the techniques we would like to see involve the strapline on our new look Craft Stamper cover: Ink Stitch Paint Collage Print Paper. If your project involves any one (or more!) of those, (and stamping, of course!) then you’re good to go!

Now let me just say that the Design Team will showcase the ATB (Artistic Trading Blocks) as a part of the prize that the winner will receive.  Those of you who play along with us can enter any style of project you wish!!!

Take a look at my ATB box:

Possibility Begins (TIMI)

I love how this box turned out.  Very Clean and Simple!!

This box was created with some pattern paper and Tim Holtz products.

Now its your turn to play along with us.

We have a great prize pack for you.

We have two prizes to offer this month, the first is our sponsor prize. This winner will be chosen randomly from all of the entries in the challenge! The sponsor for October: Calico Craft Parts

Calico Crafts Parts

Prize

Boxes

Top row left to right: 3″ plain ATB cube kit, mini cogs style 1, geometric cut out ATC blank.
Middle row left to right: Mini fancy shapes 1 wood plaques, 2″ square aperture ATB cube kit,
mini crowns style 3.
Bottom row left to right: Fleur De Lis frame ATC blank, Mini butterflies style 3,
Fancy cut out frame ATC blank.

Our second winner is our Design Winner. This winner is chosen by our DT, who all vote for their favorite design from all of the entries. This winner will have their winning project published in Craft Stamper Magazine, they will have a GDT slot for an upcoming challenge, and will also feature in their very own Winners Profile blog post!

Now if that isn’t a reason to play along I’m not sure what is!!

I can’t wait to see what you come up with.

Thanks for stopping by!

~Kymona

YNS Sketch and Color Challenge #24

Hello everyone!!!  I’m here today with Your Next Stamp (YNS) and the Sketch and Color Challenge #24!!

Each challenge has a sketch and a color combo to choose from.

Take a look at the sketch:


YNSSketch24

Take a look at the color combo:

YNScolor-24

Yayyy, I finally went the color combo!!  These colors are amazing and I found it easy to use them.

Take a look at my card:

Happy Halloween (YNS)

YNS Supplies: Halloween Pumpkins, Dripping Goo Die, Circles Die Set

Other Supplies: Distress Ink Seedless Preserve, Distress Ink Salty Ocean, My Favorite Things Hybrid Ink, Michaels Recollections Cardstock Black and White

For this card:

I cut my cardstock base and ink blended it with distress ink.  After that I die cut the dripping goo and adhered it to the top of my card base.  Then I die cut the circle moon and adhered that to the card base.  After that I stamped the sentiment using the hybrid ink.  Then I stamped and masked all of the pumpkins and faces.

Super simple and easy!!

So what do you think?

So are you ready for the new challenge?

You have until October 15th at midnight EST to play along and submit your project on the YNS Blog post.  One random participant will win a $15 gift certificate to the Your Next Stamp Store.  If YNS stamps or dies are the focal point then the winner receives and additional $5 gift certificate fro a total of $20.  The winner will be announced on the YNS Blog the Sunday after the challenge closes.

I hope to see your projects!!

Supplies used:

Seedless PreservesDistress Ink Salty OceanMFT Hybrid Black InkYNS circle diesDripping GooHalloween Pumpkins Recollections Black HeavyweightRecollections White Heavyweight

Thank you so much for stopping by!!

~Kymona

Top Dog Dies – Hello Fall

Hello everyone!!!  I’m here with Top Dog Dies!!  I’m here showcasing one of their new dies that was released a couple of weeks ago!!

Lets jump right in!

Today I’m working with the Top Dog Dies Leaf Mosaic Die!! It’s a super doper cute die set and the possibility are endless!!

TDD Leaf Mosaic Die

Take a look at my card that I created with this die:

Hello Fall
This card was super doper easy to create. I took a long piece of card stock and did some ink blending with Distress Ink Spiced Marmalade and Barn Door.

Ink Blending (TDD)

Then I die cute the Leaf Mosaic out of the ink blended paper.

After that,  I die cut the word hello a couple of times out of black cardstock and then I layered them on top of each other. I adhered it to the front of my card.

Easy Breeze!!

So do you like about my creation?  Let me know below.

I’m also entering my card into Virginia’s View Challenge: All Things Colored.

All things colored (V. V. #19)

Supplies used:

Spiced MarmaladeDistress Ink Barn DoorTDD Hello Die SetTDD Leaf Mosaic Die

Thank you so much for stopping by!

~Kymona

CASology 167 – Silly

Hello everyone!!  It’s CASology Tuesday!!  We are back with another Cue Card for you!!!

This week’s cue card is:

Week 167 - Silly

Take a look at my card:

Poof (CAS)

Ok, did I tell you how much I love these Tim Holtz Crazy Birds??  The funny thing is I think the name really is Bird Crazy.  It just sounds better the other way, LOL!!

I love these birds for a number of reasons:

1. They are silly looking
2. They are fun to color.
3. They just plain out make me happy!!

Now tell me this bird doesn’t look super silly.  The sentiment really looks like he said it!!  Oh man, I should have dressed him up!! LOL! Next time.

On to how I created this card:

  1. I stamped the bird on Canson Watercolor Paper using Ranger Archival Black Ink since I was going to watercolor.
  2. Then I used Derwart Inktense Pencils to color the bird in. I used Fuchsia 0700, Sun Yellow 0200 and Teal Green 1300.
  3. Then I stamp the sentiment from Tim Holtz Crazy Thoughts and Crazy Talk Stamp Set.
  4. I colored the sentiment in using the same color pencils I used for the bird.
  5. I rounded the bottom right corner.

Super easy and fun.

Now its your turn!! I can’t wait to see what you come up with!

For more inspiration, check out my fellow Design Team members blog for more awesome work.

Design-Team

Gillian Ross

Hannelie Baster

Hazel Hodgkins

Jen Wills

Joyce Mehrberg

Judy Marino

Kimberly Wiener

Kymona Tracey ←Me

Melissa Chipperfield

Tracey McNeely

Our Guest Designer this week:

Claire

Our Sponsor this week is Serendipity Stamps!

I’m also entering this card into Virginia’s View Challenge: All Things Colored

All things colored (V. V. #19)


Supplies used:

Crazy Birds  Tim Holtz Crazy Thoughts Tim Holtz Crazy TalkArchival Jet Black Derwent Inktense Pencils Canson Watercolor Paper

Thank you so much for stopping by!!

~Kymona