Where Creativity Meets C9 Floral Challenge

Hello everyone!! I’m here today with my last Where Creativity Meets C9 Blog Challenge Design Team post!! I’m stepping down at the end of this month.  It’s been my pleasure to work with my teammates and Concord and 9th.

Now onto Our challenge this month which is Floral!!

Wow, my last challenge was a bit of a challenge for me. Florals aren’t my favorite because I’m never sure what to create with them. LOL!!  I made 4 cards before settling on this one.

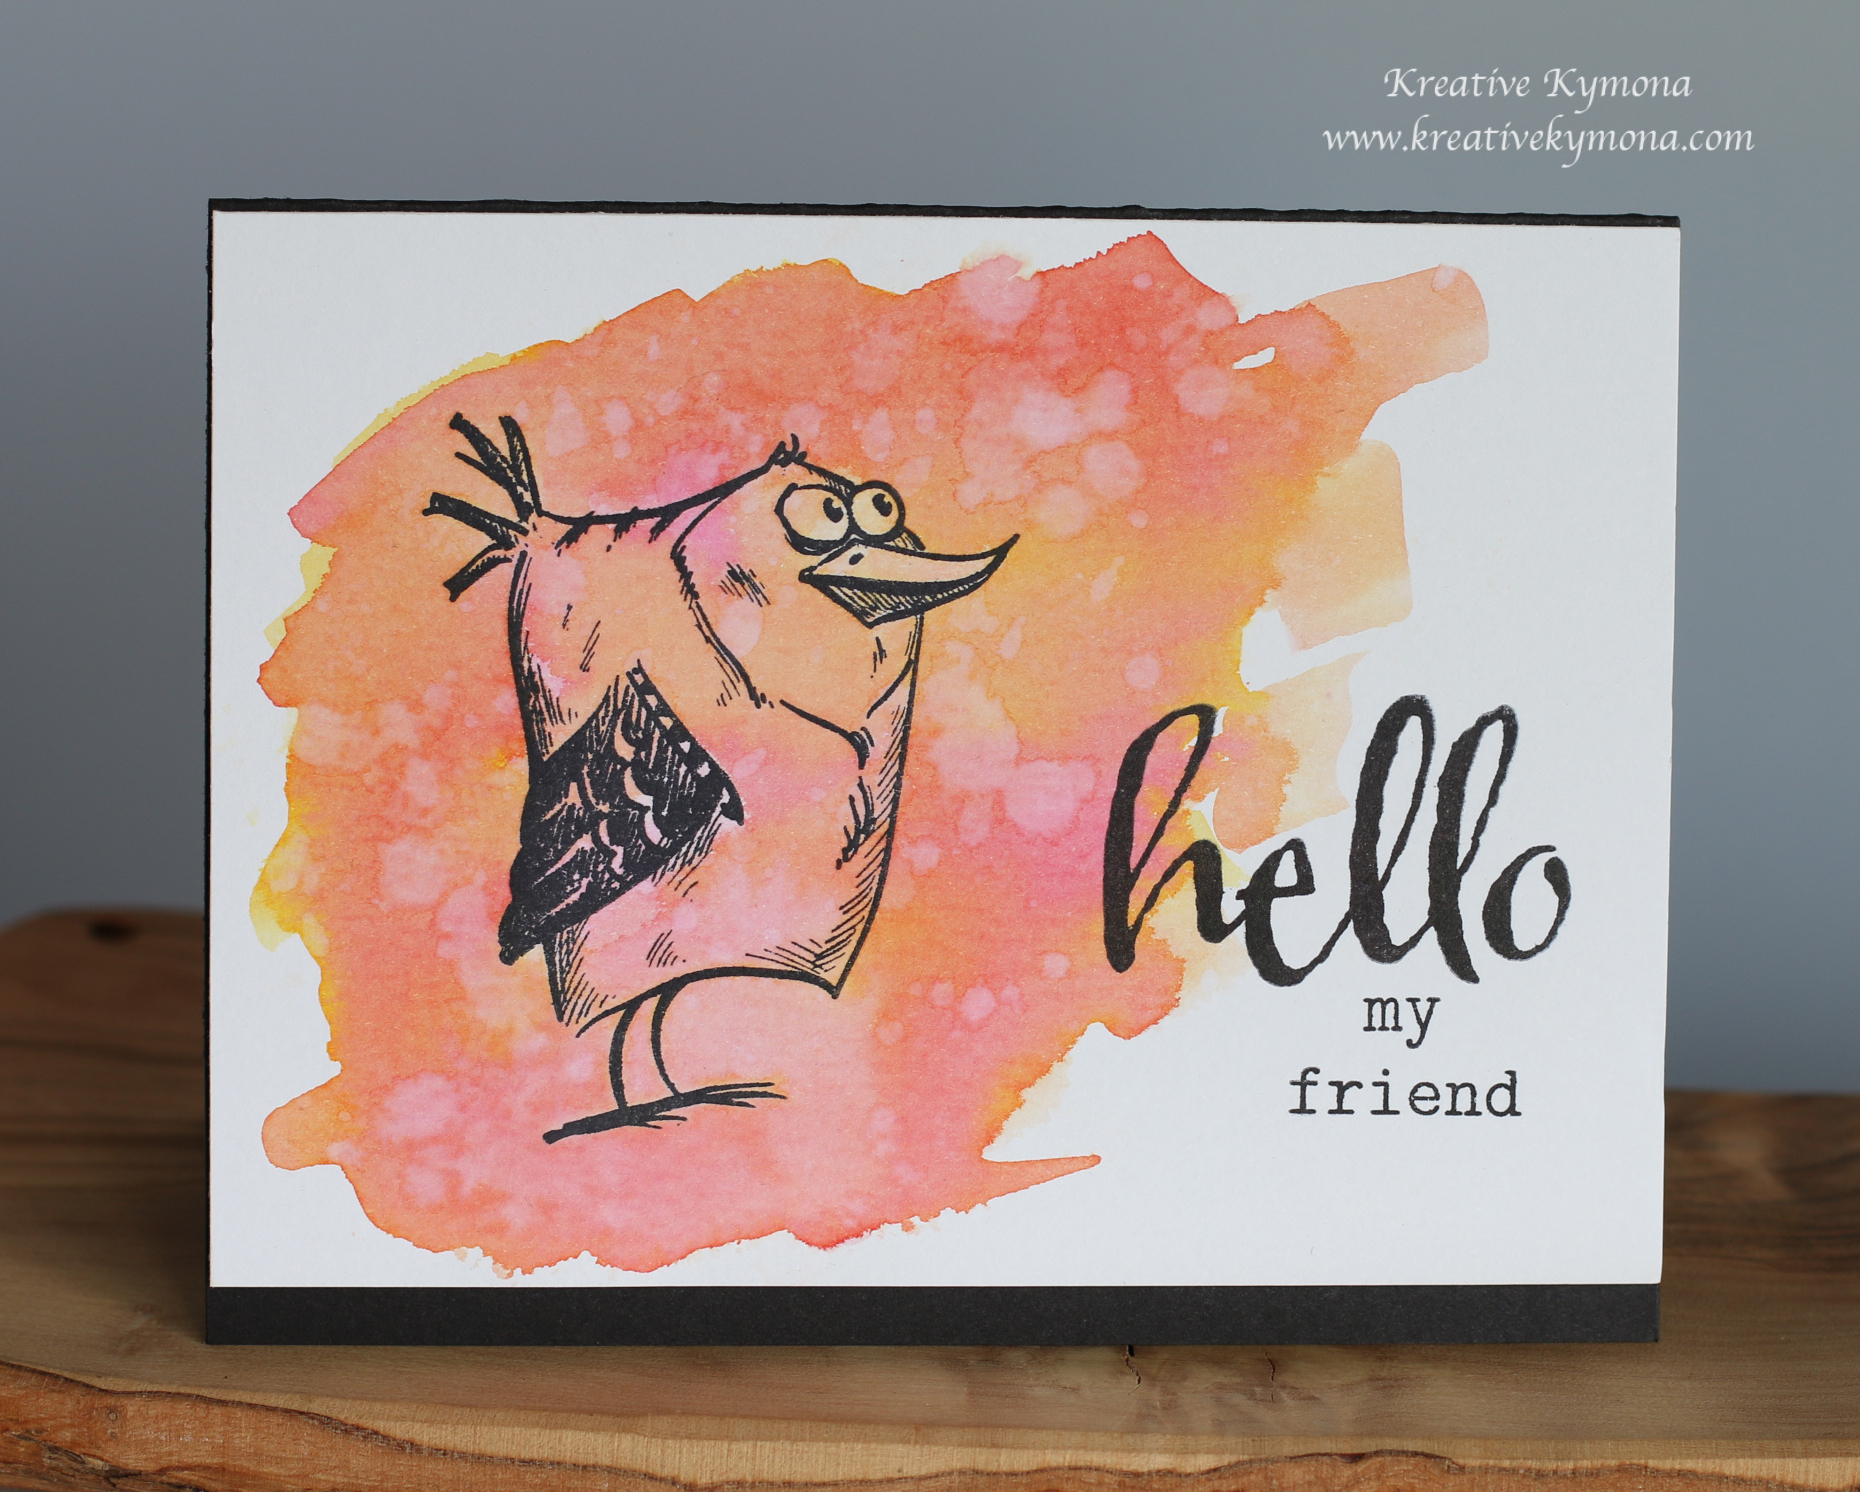
Let’s take a look at my card:

Pineapple PerfectionI love how this card turned out. I used Concord & 9th Pineapple Perfection stamp set.

Here’s how I created this card:

  1. Use one of the small flowers and stamp it four times, along with the sentiment with Altenew Jet Black Ink.
  2. Color each flower with a different color using Tombow Recycled Color Pencils.
  3. To get the light color in the center of the flowers, use Tombow Sand Eraser to remove some of the color.
  4. Round each corner using We R Memory Keepers 3 Way Corner Punch.

Super, super easy.

Working with florals wasn’t so bad after all. The sentiment is my favorite, as I say to my fellow teammates: All the Best Friend!!

What do you think? Please let me know below.

I can’t wait to see how you interpret our challenge theme this month.

c9-banner

Did you know that we have a giveaway going on? Yes, we do!! Our sponsor Concord and 9th is giving away a $25 gift certificate to their shop!! Yes!!! Isn’t that big. Plus the winner gets to be a guest designer for a future challenge.

Here’s how: Create a project using Concord and 9th and upload it on the Where Creativity Meets C9 blog by the 29th of every month of for a chance to win. A random winner will be chosen and it could be you!!

Are you ready?  So, go and create!!

Please don’t forget to follow Where Creativity Meets C9 on Facebook, Instagram and the Blog.

Supplies used:

(Thank you so much for stopping by. Compensated affiliate links used at no cost to you.  All products were personally purchased.  This post was not paid or sponsored.)


Pineapple Perfection Stamp SetWe R Memory Keepers - 3 Way Corner PunchRecycled Color Pencils   Sand eraserJet Black Ink

Thank you so much for stopping by!!

Clean and Simple Tag

Hello everyone!! I’m up on Where Creativity Meets C9 blog today.  I created a super cute tag with one of the new November stamp sets.

Here’s a preview:

kind-hearted-friend-sneek-peek-wcmc9

For the full tutorial and to see the entire tag, head on over to Where Creativity Meets C9 blog!!

Thanks for stopping by!!

~Kymona

{Clean and Simple} CASology 214 – Beach

Hello everyone!!  It’s CASology Tuesday!!  We are back with another Clean and Simple Cue Card just for you!!

This week’s cue card:

Week 214 - Beach

Take a look at my card:

Hello Friend (CAS)

I have I told you how much I do not like the fall or winter!  I hate being cold and to see the summer end is killing me.  I love how we are using this cue card now!  The weather is changing and its no longer 90 degrees outside.  So going to the beach is about to be in our distant memory.

When I sat down to create my card, I immediately thought of So Suzy Stamps new release. The Beach Grass stamp to be exact!! This stamp set is just perfect for this week’s challenge.

I love how the grass gives the feeling of motion, the nice ocean breeze.  Oh when I close my eyes, I can feel it!  Can you?

Creating this card was easy as 1-2-3!

  • I used a A2 (4.25×5.50) size card base to start with.
  • Then I used the Mini Misti to stamp the Beach Grass stamp set across the front of the card in black.
  • After that I used Concord & 9th Flourish stamp set to stamp the sentiment.
  • Last but not least, I rounded the top right corner for added interest.

Nice and easy, I must say.  I love how the black and white keeps the card elegant.  Concord & 9th sentiment font is so fitting for this card as well.

Are you inspired to play along?  Please let me know below!

For more inspiration, check out my fellow Design Team members blog for more awesome work.

DT Badge

Our sponsor this week is Cindy B Designs!

Supplies used:

Beach Grass Flourish_4x6_For_Web-01_grande   stamping tool

Thank you so much for stopping by!

~Kymona

Simple Stenciling with So Suzy Stamps

Hello everyone!  I’m here with So Suzy Stamps.  This month the design team is doing a year in review and I was given the month of February to showcase.  Do you remember what stamps were released in February of this year?

No worries, I’m going to refresh your memory.  Starting with this Hello Friend Stamp set!! I’m going to show you how to combine simple stenciling with stamping.

Take a look at my card:

Hello Friend (SSS)

See, simple stenciling with stamping.  I used a retired Stampin’ Up! Stencils and Distress Inks Scattered Straw, Fossilized Amber, Spiced Marmalade and Barn Door.  I took my time and blend the colors together from both directions.

Once the blending was complete, I stamped the sentiment using Versafine Black Ink.

I used the Nuvo Crystal Drops to create the black accented dots the the card front.

How fun was this!!

What do think? Please let me know below.

Now don’t forget to check out So Suzy Shop for all of her new goodies in her store.

Supplies used:

Nuvo Ebony Black

Thanks for stopping by!

~Kymona

a2z Scrapbooking July 2015 Challenge

Second post for the day

If your looking for So Suzy Stamps New Release, click here

Hello everyone!!  I’m here with a2z Scrapbooking today with our July Challenge!!!

Our new challenge is sure to please you this month!!  Our challenge this month is Clean and Simple (CAS)!!  I love this style of card making.  CAS cards have a lot of white space and are east to create.

Check out the card I created for this challenge:

Hello Friend (a2z)

Here is how I create this card:

1. I used Stampin’ Up! retired Polka Dot embossing folder to embossed my card base.

2. I used My Favorite Thing Die-namics Stitched Rounded Rectangle STAX Die to cut a panel for my focal point.

3. I stamped my images from Hero Arts Butterfly and Flower Stamp and Cut using My Favorite Things Hybrid Black Ink because I was going to color my images with Copic Markers G07, Y32. Y35, Y38, R35, E25, Y06

4. I die cut the flower using the die from the set and adhered it to the steam of the flower with foam tape.

5. To finish off my card I rounded the corners of my card base using the We R Memory Corner Chomper Tool.

Nice Clean and Simple!!  Now its your turn!!

Amazing isn’t it!! I hope you love what you see and that it inspires you to join us this month. You have the entire month to create a new project and enter it into our challenge. By entering you will have a chance to win a $25 Gift Certificate to the a2z Scrapbooking Store. Winner will be announced on the 7th of May.  Good Luck!

A good number of my supplies can be found at the a2z Scrapbooking Store. If you would like to purchase any of the supplies I used please head on over to the store and use the coupon code KYMONA15 to get 15% off your purchase.

Announcement

Oh wait a minute, before I go, Hero Arts is currently having a Holiday Pre-Sale and we have the items in the store right now!

Hero Arts PreSale


The items are:

2 Ombres, Light to Royal Red Ombre & Lime to Forever Green Ombre
Wood stamp: Peace &Joy
Clear: Color Layering Fall tree
Color Layering Christmas Tree

Be sure to check out the store for these items.

Supplies used:

HA Butterfly and Flower Stamp Cut  Copic Markers MFT Hybrid Black Ink We R Memory Keepers Corner ChomperMFT Rounded Stitched Die


Thank you for stopping by!Kymona

CS Take It Make It: Take a Technique

Hello everyone!!  I’m here today with CS Take It Make It Design Team for our April Challenge!

This months challenge is going to be super fun!!  Its all about getting Your Color On!

You can color anything as long as its bright, vibrant and full of color.  No monochrome, dark or grungy projects, they need to be BRIGHT!! You don’t have to use every color in the rainbow all at once…but think along those lines!!

I told you this well be super fun.  I was apart of a 30 day coloring challenge last month so this will be awesome to continue that fun.

Take a look at my project:

Hello my friend (CS)

If you’ve been following me on Instagram, you will know that I love these birds.  I think they are the funniest image ever.

They are such great images to practice your coloring on.  I’ve used all different types of mediums with them.

For this card I used distress inks to watercolor this bird.  I love how picked raspberry and mustard seed blend together.

Check out this card:

Hello Hello You (CS)

I told you I can’t get enough of this stamp set!  LOL!!

Creating these cards were so easy and stress relieving.

Here’s how:

1. I cut my watercolor paper panel a couple sizes smaller then my black card base.

2. I stamped Tim Holtz Bird Crazy onto my watercolor panel using Ranger Archival Jet Black Ink.  I used that ink because its waterproof, which means no smudging!!

3. I spread Picked Raspberry and Mustard Seed Distress Ink onto my craft sheet.  I spritz it with water and used my paintbrush to add the colors to my watercolor panel, very freely.

4. Once I had enough color on my paper I heat set it.

5. I used Winnie and Walters The Big, the Bold and the Happy to stamp my sentiment using the same jet black ink.

6. I adhered the watercolor panel to my black card base using fun foam. The fun foam keeps the watercolor panel straight and even.

7. For the second card I used Evergreen Bough and Mustard Seed Distress Ink.

I love how my cards turned out.  They are nice a bright with color!!

Now its your turn to play along with us.

We have a great prize pack for you.

We have two prizes to offer this month, the first is our sponsor prize. This winner will be chosen randomly from all of the entries in the challenge! The sponsor for April is:

 IndigoBlu

Indigo Blue

Random Winners will win these two stamp sets!

Giant Peony

Peony Posey

Our second winner is our Design Winner. This winner is chosen by our DT, who all vote for their favorite design from all of the entries. This winner will have their winning project published in Craft Stamper Magazine, they will have a GDT slot for an upcoming challenge, and will also feature in their very own Winners Profile blog post!

Now if that isn’t a reason to play along I’m not sure what is!!

I can’t wait to see what you come up with.

Supplies used:

Crazy Birds Archival Jet Black Big Bold HappyPicked RaspberryMustard SeedFun FoamDistress Ink Evergreen Bough

Thank you so much for stopping by!

~Kymona


Crazy Birds…

Hello everyone!!  I’m here today with the Less is More challenge.  Its One Layer Week and the subject should include an Animal.

Less-Is-More-HeaderI’ve been playing along with Kathy’s 30 days of coloring challenge and I finally got my hands on Tim Holtz Crazy Birds stamp set and had to color them in.

Take a look at my card:

Happy Your My Friend

Don’t you just love these birds??  When I first saw these birds, I wasn’t a fan but then I saw all the amazing things everyone was creating with them.  So I decided that I need to get this set and I made the best choice ever.

I used my new Zig Kuretake Gansai Tambi watercolor set.  Can I just say these are so yummy!!  Totally cream.

The stamped sentiment is from Simon Says Stamp Flowers On My Mind stamp set.

All I did was take my time and watercolor each image and letting it dry.

So what do you think?  Let me know. I think they are so cute, LOL!!!

Supplies used:

Crazy Birds tambi36_largeSSS Flowers on my MindCanson Watercolor Paper Onyx Versafine Ink

Thank you for stopping by!

~Kymona

CASology 130 – Friend

Hello everyone!!  I’m here today with the new CASology Challenge!

I have to admit, the cue card this week had me stumped for a minute.  I wasn’t sure what to create or even were to begin.  Its not that the word was hard because it wasn’t, I just didn’t now what to do.

You see, for this challenge I love thinking out of the box.  I always look in my dictionary for another meaning of the word.  For this cue, it was hard to get an alternative meaning.  So, I decided to go back to the basics and just play with the my  stamps with no deep meaning behind it!!

Here is the Cue Card:

Week 130 - FriendSo you see what I mean.  When you see the word “Friend”, you know what it means hands down.  How do you interpret that word?

Here is what I came up with:

Friends ForeverI went back the basics here!  I stamped and colored.  I searched my stamps for a stamp set that would either represented a friendship or the word friend.

I came across Lawn Fawn’s Feathered Friends stamp set.  The light bulb went off, how perfect is this set.

My card is simple as simple can be. This is how I created it:

1. I cut my white cardstock to an A2 size card (4.25 x 5.50) scored at 5.50.

2. I stamped all of the images from the stamp set on the front of my card.

3. I used Copic markers to color my image: R22, R24, Y11, Y13, YR68, E35, E37.

4. I added some Clear Wink of Stella to the hearts.

5. That was it!  My card shows the friendship between the two birds.  What could be better then that!!

Don’t forget to check out what my fellow DT members have created.

Design-Team

Our Guest Designer: Ren

Now its your turn!!  I can’t wait to see what you come up with. Our wonderful sponsor this week is DeNami Design. You don’t to miss this one!

I’m also linking this card to the Less is More Challenge.

Less-Is-More-Header

I’m also linking this card to Uniko Studio Challenge#17 Love and Friendship

BlogHeader2

Supplies used:

Feathered Friends Memento Black InkCopic MarkersclassiccrestsolarwhtieWink of Stella clear

Thanks for stopping by!!

~Kymona

Multicolor Leaf Stamping

Hello everyone!!  I’m here again with  the CS Take It Make It Design Team for our October Challenge!!!

This month’s theme is Multicoloured Stamping!!!  This is my inspiration card!!  My first card can be found here.

Hello Friend

For these multicolored leafs, I used the same baby wipe technique.

I added a couple of different re-inkers to the baby wipe and stamped the image onto it, then onto my card panel.

I remove my mask, stamped my sentiment in the center of those leaves and added dash lines.

For added interest, I added rhinestones and some sequins to my card panel.

Nothing to it.  I hope this card inspires you to come an play along with us.

What do you think?  Will you give this technique a try?  You should!!  The prize for this challenge is amazing.

10703880_10152678925127052_3108539186482425597_n

Our sponsor for this challenge is Paperbabe Stamps!

Kim Costello carries a line of Clear Photopolymer Stamps, Red Rubber Cling with image indexing and Digital Stamps!

Take a look at what you could win if you participate:

10704002_10152678926097052_9133813654321475389_n

You will receive the tree hug set, the cumulus background set and a character stamp of your choice!!  Wonderful!!!!

Bonus:

The Winner will get Published in Craft Stamper Magazine!!

Yes, the winner entry will appear in the UK’s number one stamping magazine!!

And

The Challenge winner will be offered a Guest Designer spot for an upcoming challenge!!

How cool is that!!!

How could you past up a change to win this awesome prize pack:

Loads of Paperbabe stamps, Publication and a Guest Design Team spot!!!!

Now its your turn!!  Don’t miss out on this fun challenge and amazing prizes!!

Supplies used:

classiccrestsolarwhtieFeathered Friends Lawn Fawn Sequin

Thanks for stopping by!

~Kymona

Jamaican Butterfly…..

Hello everyone!!  I’m here with Muse Challenge #84.  This week Muse was Therese Calvird and I have to say her card is ABSOLUTELY Beautiful!

Take a look at Therese’s card:

Butterfly Triangles

When I say it I was taken back.  Her butterfly was so pretty and I love how she broke it up.

I still can’t figure how she did it.  It looks like embossing paste but how did she stamp on that.  Then I thought she stamped the image and then use her die cut to cut the panel.  That made more sense but still I was intrigued.

So I decided to to give this card a try.

On August 8th, 2014 I posted a picture of a Jamaican butterfly that I fell in love with on Instragram, wishing all Jamaican’s Happy Independence Day.  I also mentioned that that butterfly would be my next butterfly card inspiration.

Here is the picture of the butterfly:

201-314-PRODUCT-200Photo credit

Here is my card:

Jamaican Butterfly

Here is the card flat:

Jamaican Butterfly closeup

So how did I create this card?  Here you go:

1. I stamped Papertrey Ink Life is Beautiful large butterfly in Memento Tuxedo Black Ink on my Neenah Solar White card panel.

2. I colored the butterfly with Copic markers G28 and Y13.

3.  I used Papertrey Ink Stripes Horizontal Cover Plate and cut the card panel.

4. I used Papertrey Ink Wet Paint to stamp my sentiment on one of the horizontal die cuts.

5. I carefully placed the strip back in place but lifting some of them with foam adhesive.

6. I had a couple of Lawn Fawn Scripty Hello die cut already so I adhered two together for thickness.  I use glue and added it to the front of my card.

7. I added Clear Wink of Stella to the butterfly and the hello.

8. I added Pretty Pink Posh Clear Sequins and Stampin’ Up! Rhinestones to the card to spice it up.

So what do you think?  Did my card pass this Muse test?

Please let me know!

Supplies used:

Life is Beautiful Stamp Set Memento Black InkclassiccrestsolarwhtieCopic MarkersStripes Horizontal Cover Plate3M Mounting TapeScripty Hello Wet Paint Wink of Stella clearPretty Pink Posh clear Basic Rhinestones Jewel Accents