CS Take It Make It: Take a Stamp Challenge Inspiration Photo

Second Post for today
If your looking for the YNS Sketch and Color Challenge, click here

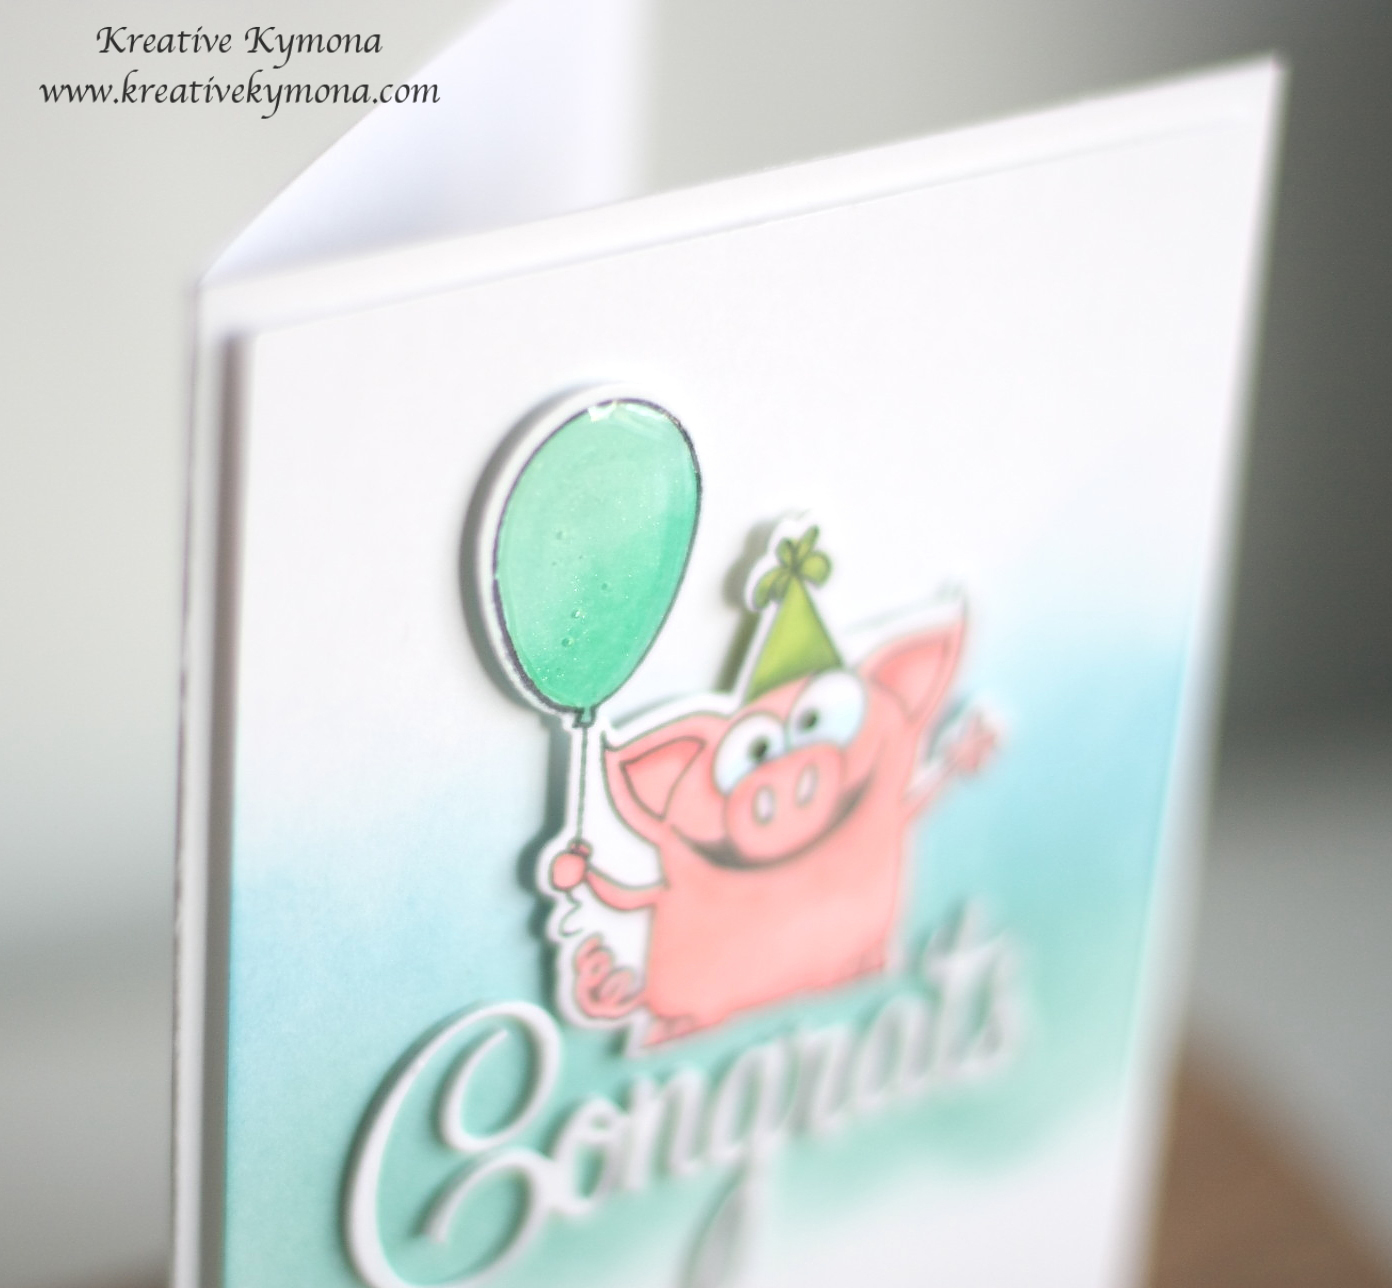
Hello everyone!!  I’m here today with CS Take It Make It Design Team for our CS Take It Make It: Take a Stamp Challenge Inspiration Photo.

Once again this month’s theme is Take a Stamp!!  That means take any stamp and create something, anything goes!! Now if that isn’t easy, I’m not sure what is!!

Take a look at my card:

Hello baby

Isn’t this happy hippo the cutest!! This stamp is from a new company to me called Uchi’s Design!! They are a clear stamps and craft company based in Florida.

I first met Luciana at CHA January 2016 and loved the stamp sets and dies.  We found each other on Instagram and was able to get my hands on this adorable set.

I created yet again an nice clean and simple card.  Here’s how:

  1. I used an A2 card size, 4.25 by 5.50 scored by 5.50.
  2. I stamped the hippo image from Uchi’s Design Happy Hippo stamp set using the Mini Misti and My Favorite Favorite Things Hybrid Ink since I’m going to use Copic Marker to color it.
  3. I used Copic Marker C1, C3, C5 for the hippo and BG11, BG13, BG15 for the balloon.
  4. I used Concord & 9th Sophisticated Script stamp set to stamp the sentiment.
  5. I used Ranger Glossy Accents to give the balloon some dimension.

Nice and easy, right?  What do you think?

Prizes:

We have two prizes to offer this month, the first is our sponsor prize. This winner will be chosen randomly from all of the entries in the challenge! The sponsor for May is: Designs By Georgina!

Designs by Georgina

Prizes by Georginia

Prize: 3 Stamps Sets and 3 New Release Stencils

Our second winner is our Design Winner. This winner is chosen by our DT, who all vote for their favorite design from all of the entries. This winner will have their winning project published in Craft Stamper Magazine, they will have a GDT slot for an upcoming challenge, and will also feature in their very own Winners Profile blog post!

Now if that isn’t a reason to play along I’m not sure what is!!

I can’t wait to see what you come up with.

Supplies used:

Happy Hippo Sophisticated Script  Mini Misti  MFT Hybrid Black Ink

Thank you so much for stopping by!

~Kymona

CASology 158 – Precious

Hello everyone!!  It’s CASology Tuesday!!  We are back with another Cue Card for you!!!

This week’s cue card is super simple!!

Week 158 - Precious


Take a look at my card:

Hello (CAS)

When I thought of the word “precious” I thought of cute and cuddly.  I went straight for WPlus9 Bubble Talk.  I’ve had this set since its release but have never used it!  So why not use it today!

Creating this card was easy.  Here’s how:

I used My Favorite Things Blueprints 14 to cut two pieces of cardstock to form my card base.  I scored the back piece of cardstock a half and inch from the top to create a crease for the card to open. I adhered the two pieces of cardstock with adhesive.

I stamped the elephant and balloon with My Favorite Things Hybrid Ink.  I colored both with Copic markers: R29, C3, C5, O.  I used the ) Copic to create the texture on my baby elephant.  After coloring the balloon, I stamped the sentiment and the small hearts with the same ink.

Super doper easy.

Now its your turn!! I can’t wait to see what you come up with!

For more inspiration, check out my fellow Design Team members blog for more awesome work.

Design-Team


Thanks for stopping by!

~Kymona

CS Take It Make It: Take a Technique Inspiration Photo

Hello everyone!  I’m here today with CS Take It Make It Design Team for our CS Take It Make It: Take a Technique Challenge Inspiration Photo!!!

This month’s theme is Take a Technique: Embossing!!This means using texture paste or embossing paste on your project or using a technique such as embossing, either embossing powder or embossing folders. Anything that gives your project a “touchy-feely” style!!

Take a look at my card:

You lift me up (TIMI)

I am so tickled about this card!  That little giraffe from Wplus9 Party Animal Stamp Set is the cutest little thing I’ve seen lately.

I original colored this image for Kathy’s 30 day coloring challenge this past Wednesday.

IMG_3462

IMG_3465


I colored this image while on the train to work.  Coloring everyday had made my commute to work that much easier!!

When I was done, I was happy about the giraffe, but not with the balloon.  I used my Derwent Intense Watercolor Pencils with a water brush.  I wasn’t happy with the water brush.  So, when I arrived home I used a small paint brush for a smoother effect.

Totally love how that turned out.

To create the rest of the card:

I embossed my card base with Stampin’ Up! Decorative Dots Textured Embossing Folder.

I fussy cut my giraffe and balloon and adhered the entire piece using 3M foam tape.

I used my Misti to stamp my sentiment that came from the stamp set with My Favorite Things Hybrid Black Ink.

Nice and easy!!

Now its your turn to play along with us.

We have a great prize pack for you.

We have two prizes to offer this month, the first is our sponsor prize. This winner will be chosen randomly from all of the entries in the challenge! The sponsor for June is:

Rubber Dance

Rubber Dance Store

Random Winners will win a voucher worth £20!

Winners amount

Our second winner is our Design Winner. This winner is chosen by our DT, who all vote for their favorite design from all of the entries. This winner will have their winning project published in Craft Stamper Magazine, they will have a GDT slot for an upcoming challenge, and will also feature in their very own Winners Profile blog post!

Now if that isn’t a reason to play along I’m not sure what is!!

I can’t wait to see what you come up with.

Supplies used:

wplus9 party animal Intense watercolor pencils Decorative Dots Embossing FolderMisti MFT Hybrid Black Ink3M Double Coated Foam Tape

Thanks for stopping by!

~Kymona


Craft Stamper Blog Hop

Blog Hop Logo

Hello everyone!!   Welcome to Craft Stamper Magazines very first Take it, Make It blog hop!

If you have landed here from Jolande blog then you’re in the right place!

A list of all the blog hop links can be found HERE.

The January challenge is called ‘Take A Stamp’, and is really simple…just use a stamp somewhere in your art!

Take a look at the project I am sharing today (the pictures do not do it justice):

Congrats front

How cool is this little guy!! I had so much fun coloring this little pig from Simon Say Stamps Birthday Farm Animals.  Thanks Kay Miller for the inspiration for this card!!

Lets take a closer look at that balloon:

Congrats balloon

Look at that glossy balloon!!  It adds so much to the card.

Lets take a closer look at the die cut “Congrats” from Penny Black’s Creative Dies – Hooray.

Congrats closeup

This card was super easy to create.  I’m going to tell you how.

1. I cut my card base to an A2 size card (4.25 x 5.50) scored at 4.25.

2. I used Distress Inks Evergreen Bough and Salty Ocean to blend the colors across the center of the card.

3. I stamped my party pig with Memento Tuxedo Black Ink because I was using Copic Markers to color in pig.

Copics used: Pig (R20, R22); Pig eyes (BG00); Pig Mouth ( W5, W7); Balloon (BG11, BG34); Party Hat (YG03, YG17, YG67)

4. I added glossy accents to the balloon.

5. I die cut the Congrats 3 times and stacked them on top of each other with  Tombow Multipurpose Adhesive to give the word some dimension, then adhered the word to the center of my card.

6. I added foam adhesive to the back of my pig and balloon and adhered it right above my die cut sentiment.

7. I attached my card panel with foam adhesive and that was it!!

Soooo, what do you think?  Now its your turn!!

The main challenge this month has a HUGE prize up for grabs, all you need to do is enter a project into the challenge to earn your place in the random draw!

As well as the main prize, we are also offering blog hop prizes too….

You can win this fabulous mixed media substrate pack:

Mixed Media prize pack

We have:
MDF collage frame (22cm x 22cm)
2 x Greyboard squares (6″ x6″)
Chunky Box Canvas (5″ x 5″)
MDF plaque (8″ x 6″ x 6mm)
Wooden cube (5cm)
Wooden candlestick (to be used as a stand for the cube, or anything else!) (7.6cm)
Papier Mache House (6cm x 8 cm x 5cm)
Papier Mache Heart (10.5cm)


To win, simply leave a comment on this (or any of the other blog hop) post. When the challenge ends, we will randomly draw a name from the comments left! There is one prize on offer for EACH blog post….so 12 chances to win (13 if you count the HUGE prize for the challenge winner!)

The lucky winners from each blog will not only win a mixed media substrate pack, they will win a piece of original art from the blog author! So, the lucky winner chosen from the comments left here will win the project I have shared above! Winners from the other blogs along the hop will receive the original art shared there too…how cool is that?!

So, leave your comment here, and then hop along to the next blog, the fabulously talented: Linda

Once you’re all done with the hop, don’t forget to enter the main challenge! All the details can be found HERE!

Have fun! I can’t wait to see what you come up with!!

Supplies used:

Birthday Farm Animals51-029_sentimentDistress Ink Evergreen BoughDistress Ink Salty OceanMemento Black InkCopic Markersglossy accents

Thanks for stopping by!!!

~Kymona

Do You See Spots and Dots?

Hello everyone! I’m here today playing along with Simon Says Stamp Wednesday Challenge.

wed-newchallenge-headerThis week the challenge is SPOTS AND DOTS!

This was a fun challenge to play with.  At first I wondered what in the world to do.  I wasn’t sure want to make that has spots and dots.

I pondered for a while.

Take a look at my card:

HB spots and dots

I looked at my stash, then remembered I needed to make a birthday card for someone special this coming Saturday so I decided to use my Simon Says Stamp Balloon dies.

Once I made that decision, I looked on Pinterest for some inspiration.  I immediately saw balloons with spots.  So I knew I would create spots on my balloon.

To do that, I use my Simon Says Stamp Medium Dots Stencil and Wendy Vecchi Embossing Paste to create my white spots on my balloon.

To create my spots, I used my Stampin’ Up! Perfect Polka Dots Textured Impressions Embossing Folder.

I added some Stampin’ Up! White Bakers Twine to bottom of my ballon and tied a bow.

For my sentiment, I wanted to add a pop of color so I decided on red, that surely would pop, lol.  I used Simon Says Stamp Happy Birthday Die Cut to create my sentiment.

So what do you think?

Let me know. I would love to hear from you.

Supplies used:

SSS Medium DotsSSS Balloons Craft DiesEmbossing PastePerfect Polka Dots Textured Impressions Embossing FolderHappy Birthday die cutclassiccrestsolarwhtieSSS Lipstick Red CardstockSSS Soft Navy Blue CSWhite Baker's TwineStampin' TrimmerBig Shot Die-Cut MachineTombow Power Adhesive Glue Tabs

Thank you for stopping by!

~Kymona