Stencil Girl Guest Designing

Hello everyone!!!   I’m Guest Designing for StencilGirl today.

stencil girl blog

I’ve been a member of the StencilGirl Club for a year now and boy can I tell you I love all of the stencils that are sent to me each month.  Stencils allow me to really let go and play with paint all day long with no care in the world.  I just play and whatever my hands do, I just go with it!!  LOL!!

I created 7 projects for my post today.

Here’s a sneak peak:

Stop on by StencilGirl blog to see the projects in full and the tutorial!!

I hope to see you there.

Thanks for stopping by!


Life Is A Story…

Hello everyone!!  I’m here today playing with the Muse Challenge #81.  Today’s Muse is Marion Vagg and her card is absolutely gorgeous.

Take a look at her card:

IMG_3336.CR2Marion Vagg

When I saw this card, my mouth dropped.  I love the colors, the glitter, the butterfly just amazing.

I knew what I wanted to create.  I wanted my card to be similar but different.

I’m also playing along with CAS-UAL FRIDAYS Challenge Tic Tac Toe

cfc134

Chevrons, Black and Sequins is my Tic Tac Toe.

Take a look at my card:

Life is a Story

Can you tell how my card is different from Marion?

1. My butterfly is cut out of my stencil card panel.

2. The glitter is on my butterfly wings and not on the rest of the card.

3.  I decided to use only two colors but when blended it created a third color.

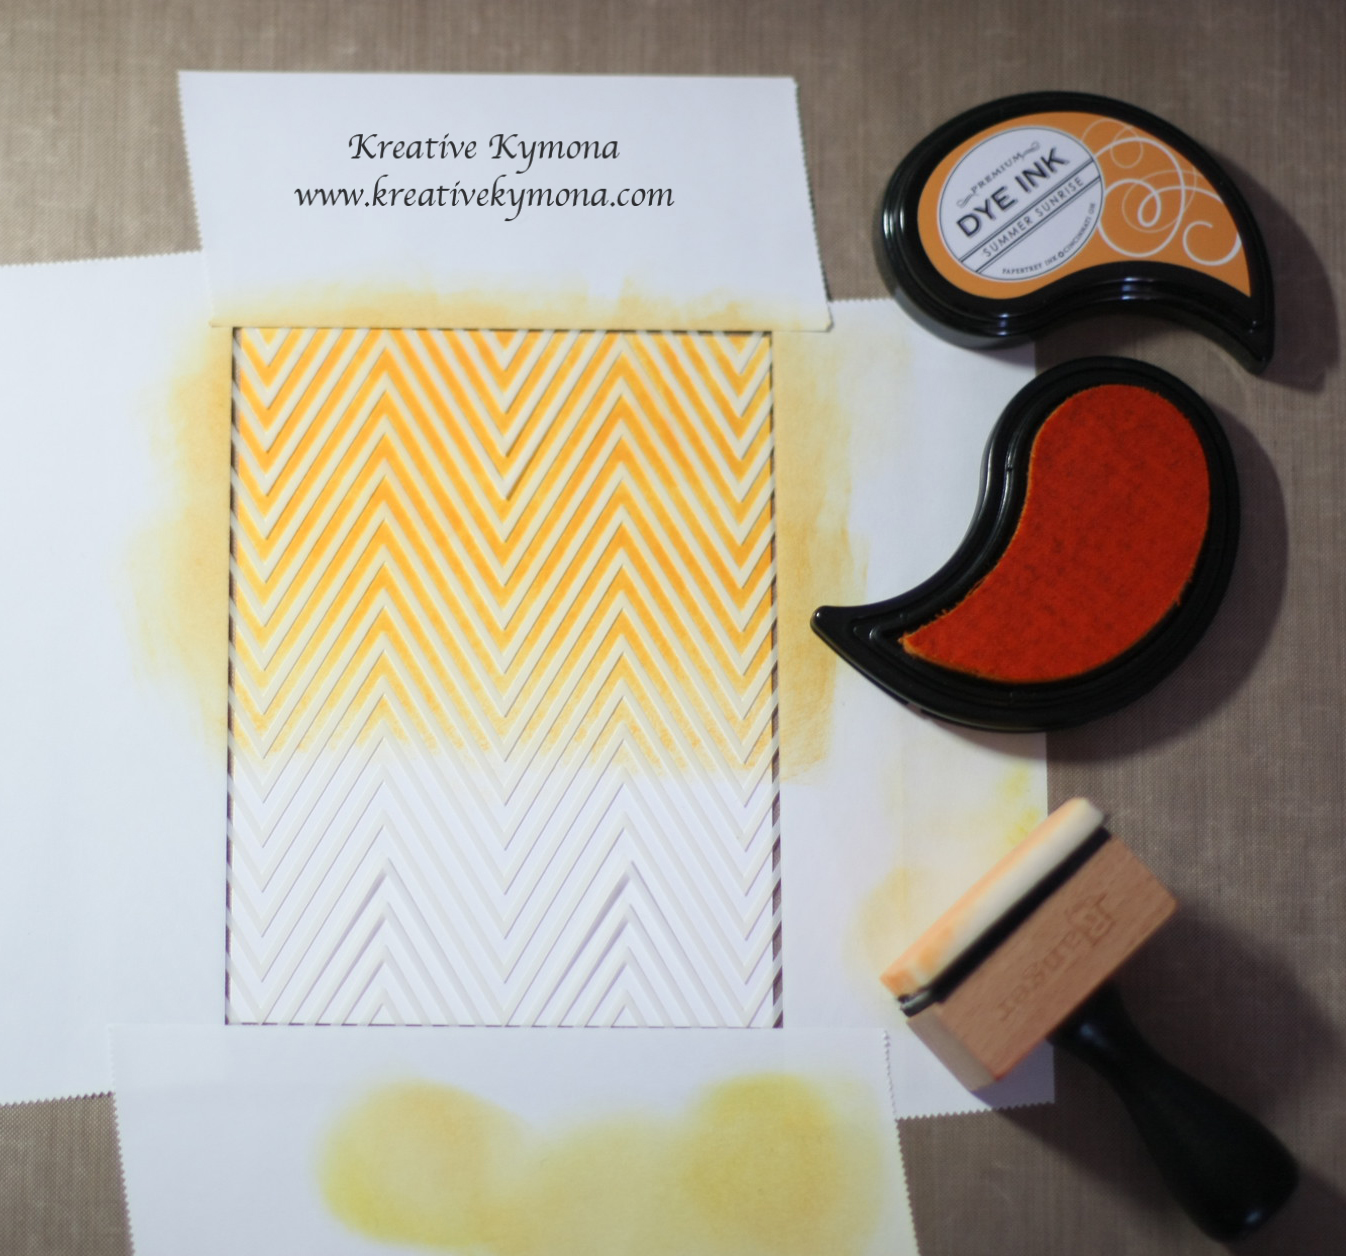
This is how I created this card:

1.  My card base is an A2 size card, 4.25 x 5.50 and my card panel measures 4 x 5.25.

     Semi Completed Stencil   Completed Stencil

2. I used Simon Says Stamp Zig Zag Stencil and Papertrey Ink Summer Sunrise and Hawaiian Shores Ink to create my stenciled panel.

This stencil is so delicate that you can’t rub the ink onto the stencil, you have to pounce it on the the stencil as to not break the stencil.

Life is a Story Sideview

3. I used my Memory Box Asti Butterfly Wings to partial die cut the butterfly wings out of my stenciled piece.

4. I used Papertrey Ink’s Building Block Sentiment Stamp Set to stamp “Life Is A Story” on a piece of black card stock.

5. I used Stampin’ Up! Bitty Banners Framelits to cut out a banner out of my sentiment.

6. I used foam adhesive to add my banner to the front of my stenciled panel.

Life is a Story close up

Life is a Story glitter wings

7. I added Clear Wink of Stella to the butterfly wings for some sparkle and Doodlebug Beetle Black Sprinkles in the center of the butterfly wings.

That’s my card for today.  What do you think?

This just in:

A friend of mines notified me today that a good friend of hers daughter past away this weekend.  The little girl whose name is Katy was only 6 years old.  She was dealing with a bad heart.  I can’t image how her parents are feeling.  I’m a mom of 2 and they are my life-line. 

I’m going to send this card to her parents and brother, with hopes of lifting their spirits.  Life is a story and they have one to tell.  For me the butterfly symbolizes hope and that Katy is in a better place, no more pain or surgeries.  Please keep them in your prayers and if you want to send them a card too let me know!

Supplies used:

Zig Zag StencilPTI Summer Sunrise InkHawaiian ShoresBlending toolMemory Box Asti Butterfly Wings3M Mounting TapeDoodlebug Beetle Black Sprinklesclassiccrestsolarwhtie

Thanks for stopping by!

~Kymona

Do You See Spots and Dots?

Hello everyone! I’m here today playing along with Simon Says Stamp Wednesday Challenge.

wed-newchallenge-headerThis week the challenge is SPOTS AND DOTS!

This was a fun challenge to play with.  At first I wondered what in the world to do.  I wasn’t sure want to make that has spots and dots.

I pondered for a while.

Take a look at my card:

HB spots and dots

I looked at my stash, then remembered I needed to make a birthday card for someone special this coming Saturday so I decided to use my Simon Says Stamp Balloon dies.

Once I made that decision, I looked on Pinterest for some inspiration.  I immediately saw balloons with spots.  So I knew I would create spots on my balloon.

To do that, I use my Simon Says Stamp Medium Dots Stencil and Wendy Vecchi Embossing Paste to create my white spots on my balloon.

To create my spots, I used my Stampin’ Up! Perfect Polka Dots Textured Impressions Embossing Folder.

I added some Stampin’ Up! White Bakers Twine to bottom of my ballon and tied a bow.

For my sentiment, I wanted to add a pop of color so I decided on red, that surely would pop, lol.  I used Simon Says Stamp Happy Birthday Die Cut to create my sentiment.

So what do you think?

Let me know. I would love to hear from you.

Supplies used:

SSS Medium DotsSSS Balloons Craft DiesEmbossing PastePerfect Polka Dots Textured Impressions Embossing FolderHappy Birthday die cutclassiccrestsolarwhtieSSS Lipstick Red CardstockSSS Soft Navy Blue CSWhite Baker's TwineStampin' TrimmerBig Shot Die-Cut MachineTombow Power Adhesive Glue Tabs

Thank you for stopping by!

~Kymona

Fresh and Fun Stenciling..

Hello everyone! It’s Father’s Day!!  Happy Father’s Day to all of the dads out there and to the moms who do both job.  I’m one of those moms who play both roles.  So my kids take me out both days to celebrate, I love it!!

In any case , I’m here today playing along with Simon Says Stamp Wednesday’s Challenge. Their theme is Stencil It.

I used a Heidi Swapp stencil and Stampin’ Up!’s new in colors to create my card.

Take a look:

Way To Go

I love how the three colors I used blended together.  I’m really excited about Stampin’ Up!’s new in colors.  They are really great colors to work with.

You will see much more of these colors.

Supplies used:

Blackberry Bliss InkLost Lagoon InkHello Honey InkLost Lagoon CSWhisper WhiteBravoDarice SequinsFuse Fast AdhesivePostage Stamp Edge Frames

I also used a Heidi Swapp stencil but I don’t think its available any longer.  I don’t even know the name. If I find it online I will update this post.

So, what do you think?

~Kymona

Watercolor Background: How Playful!!

I can’t believe my Watercolor for Card Makers class is coming to an end.  This Friday is the last day to submit all of our homework.  I have so much left to do.

It was truly an amazing class!  I learned a lot about water-coloring.  I was granted the opportunity to try different types of watercolors mediums (watercolor pencils and crayons, transparent water colors, opaque watercolors, kids watercolor, shimmer watercolors).

I’m hoping to make at least one water-coloring card a week.  This will allow me to spend more time with my daughter who also loves water-coloring.

Today’s watercolor technique was taught by Tim Holtz himself.  Truly fun and amazing.  He taught us how to make amazing backgrounds using “watercolor stamping or monoprint” using a stencil.

I had so much fun creating my card, that I made two cards..  I’m also submitting this card into the Papertrey Ink’s Make it Monday #165: Artsy Watercolor Backgrounds Challenge.  Betsy showed us how to create watercolor backgrounds using our current stamps.  I’m excited!!

Happy Watercolor

So, what do you think of this card?  It looks so delicious to me.  The colors are so vibrant.  My flower was punched from a watercolor background that I created.  I thought that bought more balance to the card.

Hello Friend

For my second card, I wet the outer edge of the flower to create the watercolor effect surrendering each individual flower.  That gives each flower a beautiful soft and subtle effect.

I love how both of my cards turned out.  I am going to try to create a couple more cards with this fun effect!!

Please let me know what you think.

Supplies used:

Canson Watercolor PaperWet PaintOopsie Daisy DieOopsie Daisy Stamp SetHarlequin StencilDistress Inks Kit 1Hawaiian ShoresPTI Summer Sunrise InkTim Holtz Watercolor CardstockStampin' TrimmerSnail AdhesiveOnyx VersafineBig Shot Die-Cut MachineStampin' DimensionalsBasic Rhinestones Jewel AccentsLarge Rhinestone Basic JewelsDaffodil Delight CSBasic Black CSWe R Memory Keepers Corner Chomper


~Kymona

Gelatos Stenciling

I’m back again for the 4th time with another stenciling card for Virginia’s View Challenge #2 on Stenciling.  I’m trying to get this card in before the challenge closes and that is in 1 hour in 10 minutes.

I used Faber-Castell Mix & Match Gelatos Tropical Colors and embossing paste to create my last card.  I had a lot of fun using the Gelatos.  This was my first time using them and it was easy.  It didn’t take long for the Gelatos to mix with the embossing paste to create the beautiful color on my card.

Take a look:

Love this

Pewter embossing powder is my favorite embossing powder.  It gives such a great silver look on this vellum.

Please leave a comment and let me know what you think.

Supplies used:

classiccrestsolarwhtieLoveThisCupcake Partywhitepastepalette knifeHS00828doilypewter powderWhite VellumTombow Multi-Purpose Adhesivegelatos


You’re Pretty Amazing

I’m back again with another stencil card for Virginia’s View Challenge #2. I’m having so much fun stenciling that I couldn’t help myself so I made another card.  For this card, I used three different inks and my Kelly Purkey Teardrop stencil.  It took no time, as a matter of fact I made two cards with two different sentiments but the one I’m posting today, the sentiment was a better fit.

Take a look:

You're Pretty Amazing

This one layer card is sooooo “fiery”.  I just love it.

Please leave me a comment below letting me know what you think.

Supplies used:

classiccrestsolarwhtieHero Arts Butter BarHero Arts Orange Soda InkWorn Lipstick InkpadBlending toolteardropPost-it Full Adhesive RollSSS Stripe GreetingsMemento Tuxedo Black


This Is How We Do It

I have to say stenciling is my favorite technique.  Once I started yesterday I couldn’t stop.  So I created another card to enter into Virginia’s View Challenge and Less is More Challenge.

Virginia’s View Challenge: Stencils

Less is More Challenge: A Touch of Turquoise

The create I create has both elements.  I use Simon Says Stamp Medium Dots Stencil and Tumble Glass Distress Ink and Stampin’ Up Tempting Turquoise embossing power.

I left a lot of white space but elegantly add a bit of color.  I love how the card came out.

Take a look:

This Is How We Do It

All I did was stencil the right corner of the mask layer, embossed my image on the vellum tag and adhere all of it together.  Simple and easy.

Please let me know what you think.  I would really appreciate your feedback.

Supplies:

SSS Medium Dots StencilBasic Rhinestones Jewel Accents 119246White Baker's Twine 124262

Tempting Turquoise Embossing Powder 122950Stampin' Dimensionals 104430Ultra Thick White CS 120White Vellum

Tombow Power Adhesive Glue TabsBlending toolHeat ToolBasic Rhinestones Jewel Accents

Scalloped Tag Topper PunchStampin' TrimmerPost-It Full Adhesive RollWe R Memory Keepers Corner Chomper


Embossing BuddyGood Times


Signature


Virginia’s View Challenge #2 Stencil + Hand Stamped Sentiments #183

I’m back again with two more challenges.  I love all of these challenges.  They allow me to put my creative hat 0n more often.  I’m having a lot of fun.

Today’s challenges are Virginia’s View Challenge #2 Stencil and Hand Stamped Sentiment.  Yes, stenciling with Gumball Green, Crushed Curry and Coastal Cabana.  I love working with stencils since my Online Card Class.

When I got home today, I had a couple of boxes of craft stuff waiting for me.  My “Make a Wish” stamp set from Mama Elephant and my “Hexagon Hive Thinlits Die” from Stampin Up were amongst my new stuff.  I knew I wanted to use both of these products.

Take a look:

Hex stencil

I used my blending tool and added each of my colors in a circular motion to make sure to completely cover my stencil.  Take a look at my finished card.

Make a Wish rounded corners

After lifting the stencil, I added my sentiment and the stars to the one layer card.  I love the way my card came out.  The actually stencil, came out just a nice.  I will add that to another card and share it with you.

Please let me know what you think, I would love to hear what you think of my card.

Supplies used:

Mama Elephant  MAKE A WISH

Mama Elephant
MAKE A WISH

Hexagon Hive Thinlits Die 132965

Hexagon Hive Thinlits Die 132965

Coastal Cabana 131175

Coastal Cabana
131175

Crushed Curry Ink 131173

Crushed Curry Ink
131173

Gumball Green 126861

Gumball Green
126861

Onyx Versafine Pigment Ink Pad

Onyx Versafine Pigment Ink Pad

Post-it Full Adhesive Roll

Post-it Full Adhesive Roll

Simon Says Stamp Ultra Thick White CS 120

Simon Says Stamp Ultra Thick White CS 120

Ranger Mini Round Blending Tool

Ranger Mini Round Blending Tool