Top Dog Dies – Just for you

Hello everyone!!  Its Top Dog Die Wednesday!!  I’m here with a die technique that I learned in my new Online Card Class called Stretch Your Dies!!

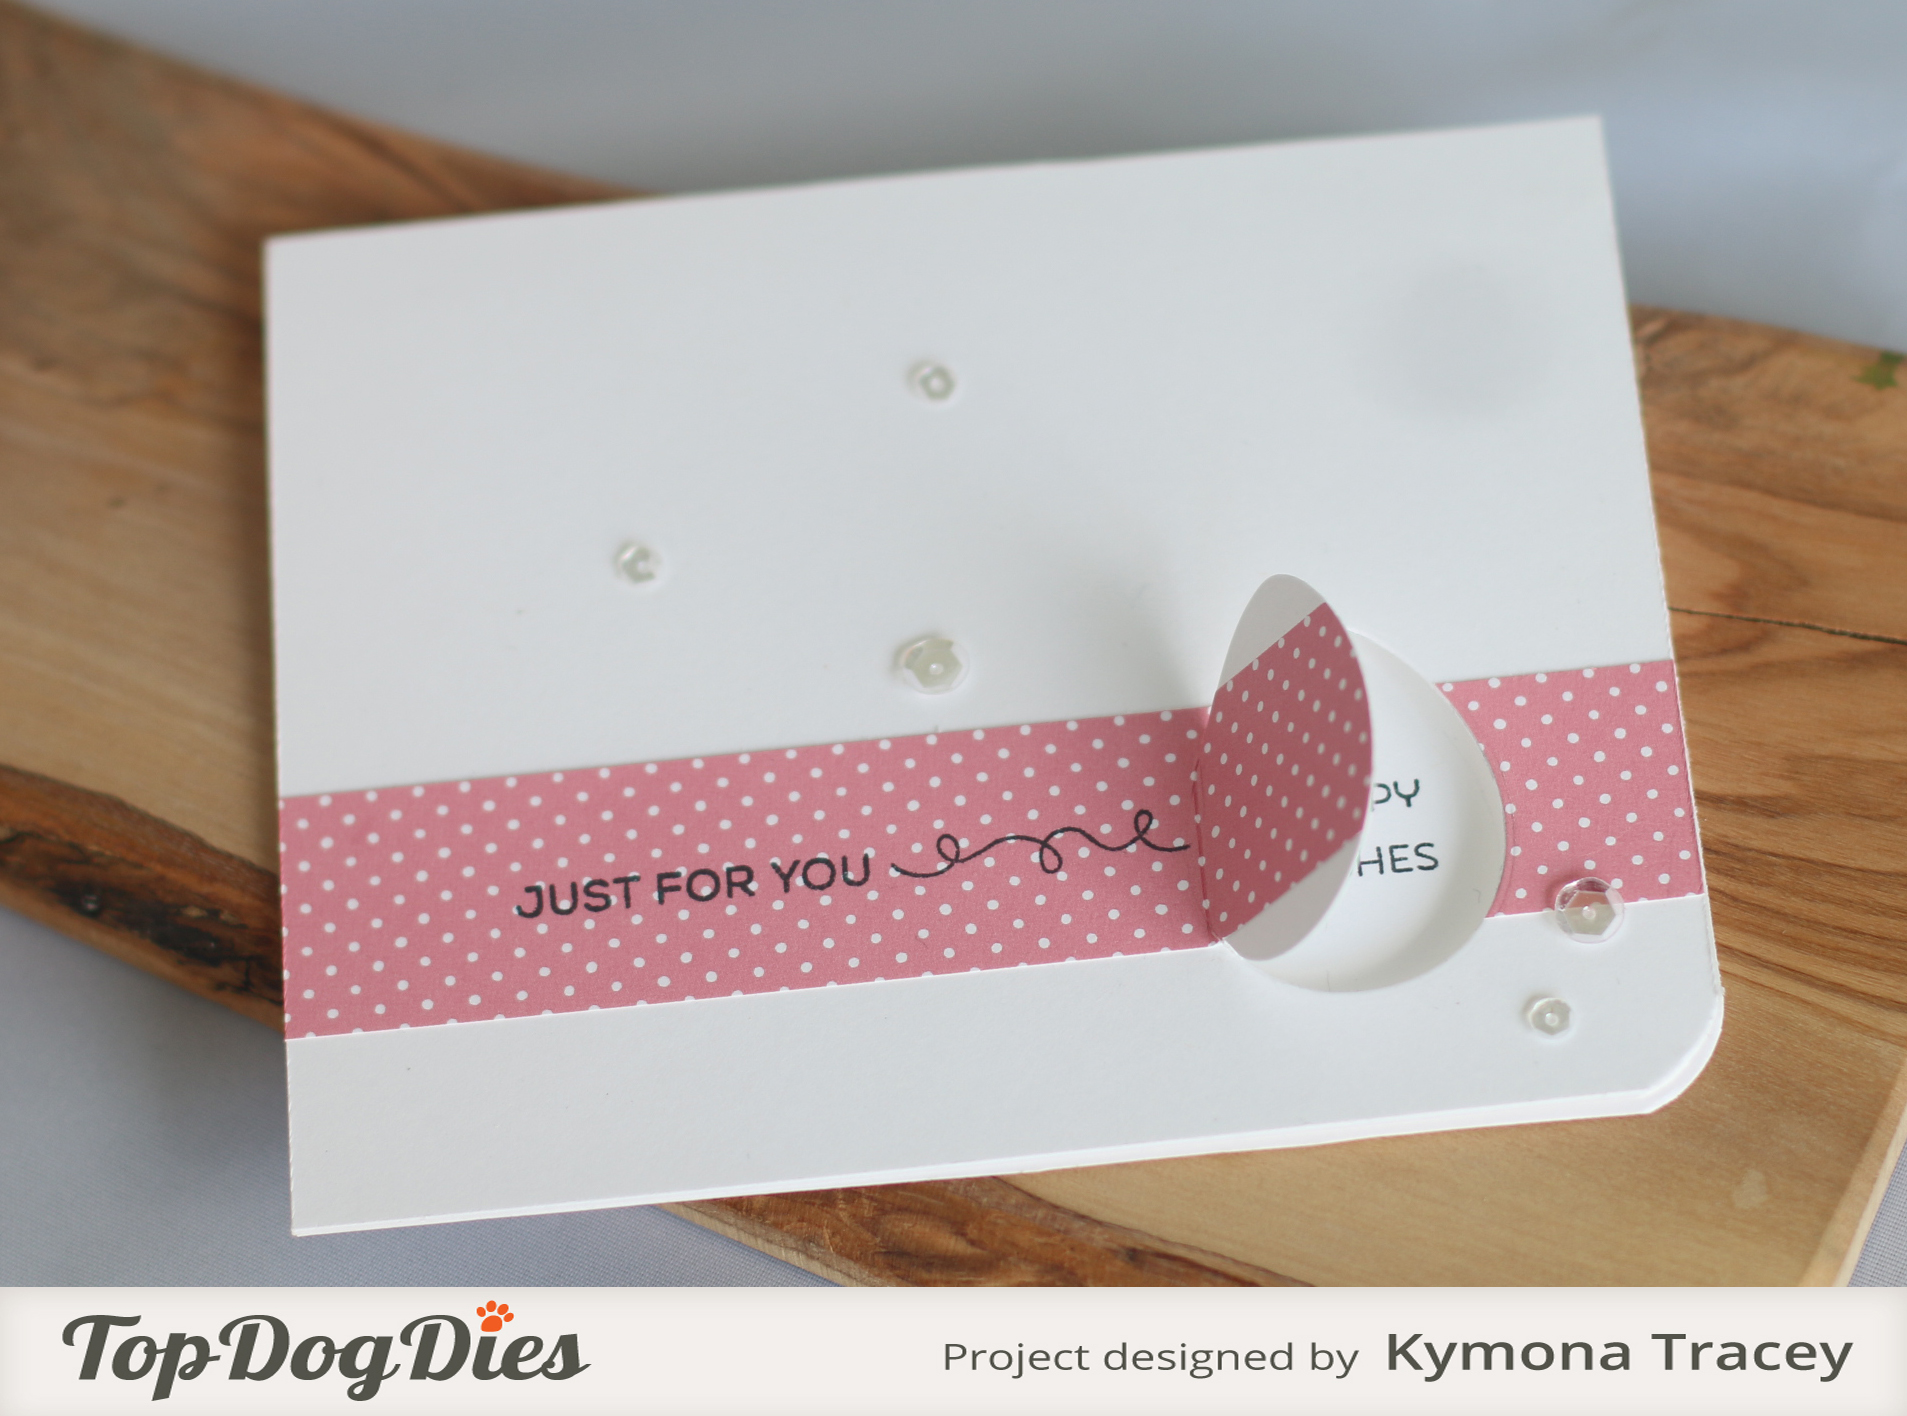
Carissa Wiley taught us how to create a window card using a die-cut opening!!  I was super excited when I saw that technique.

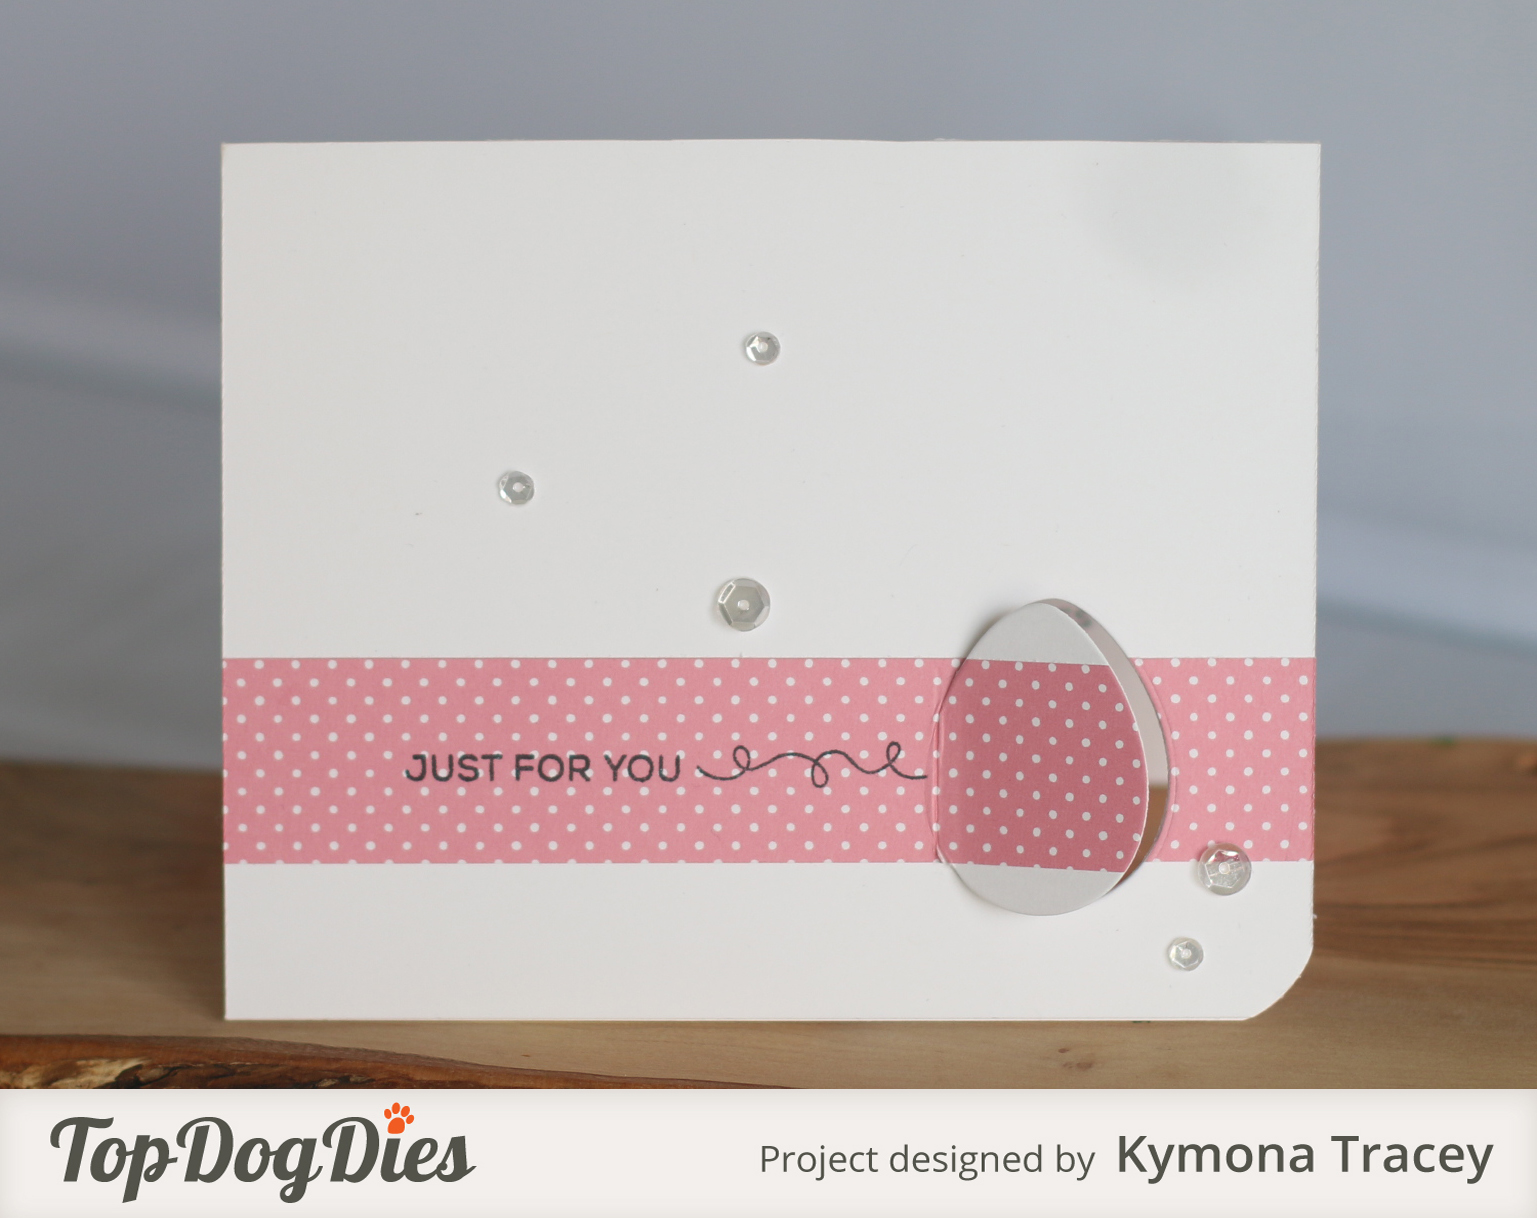
I went with Top Dog Dies Decorated Eggs Die Set to create my card today!

TC095-DTake a look at my card:

Just for you (TDD)

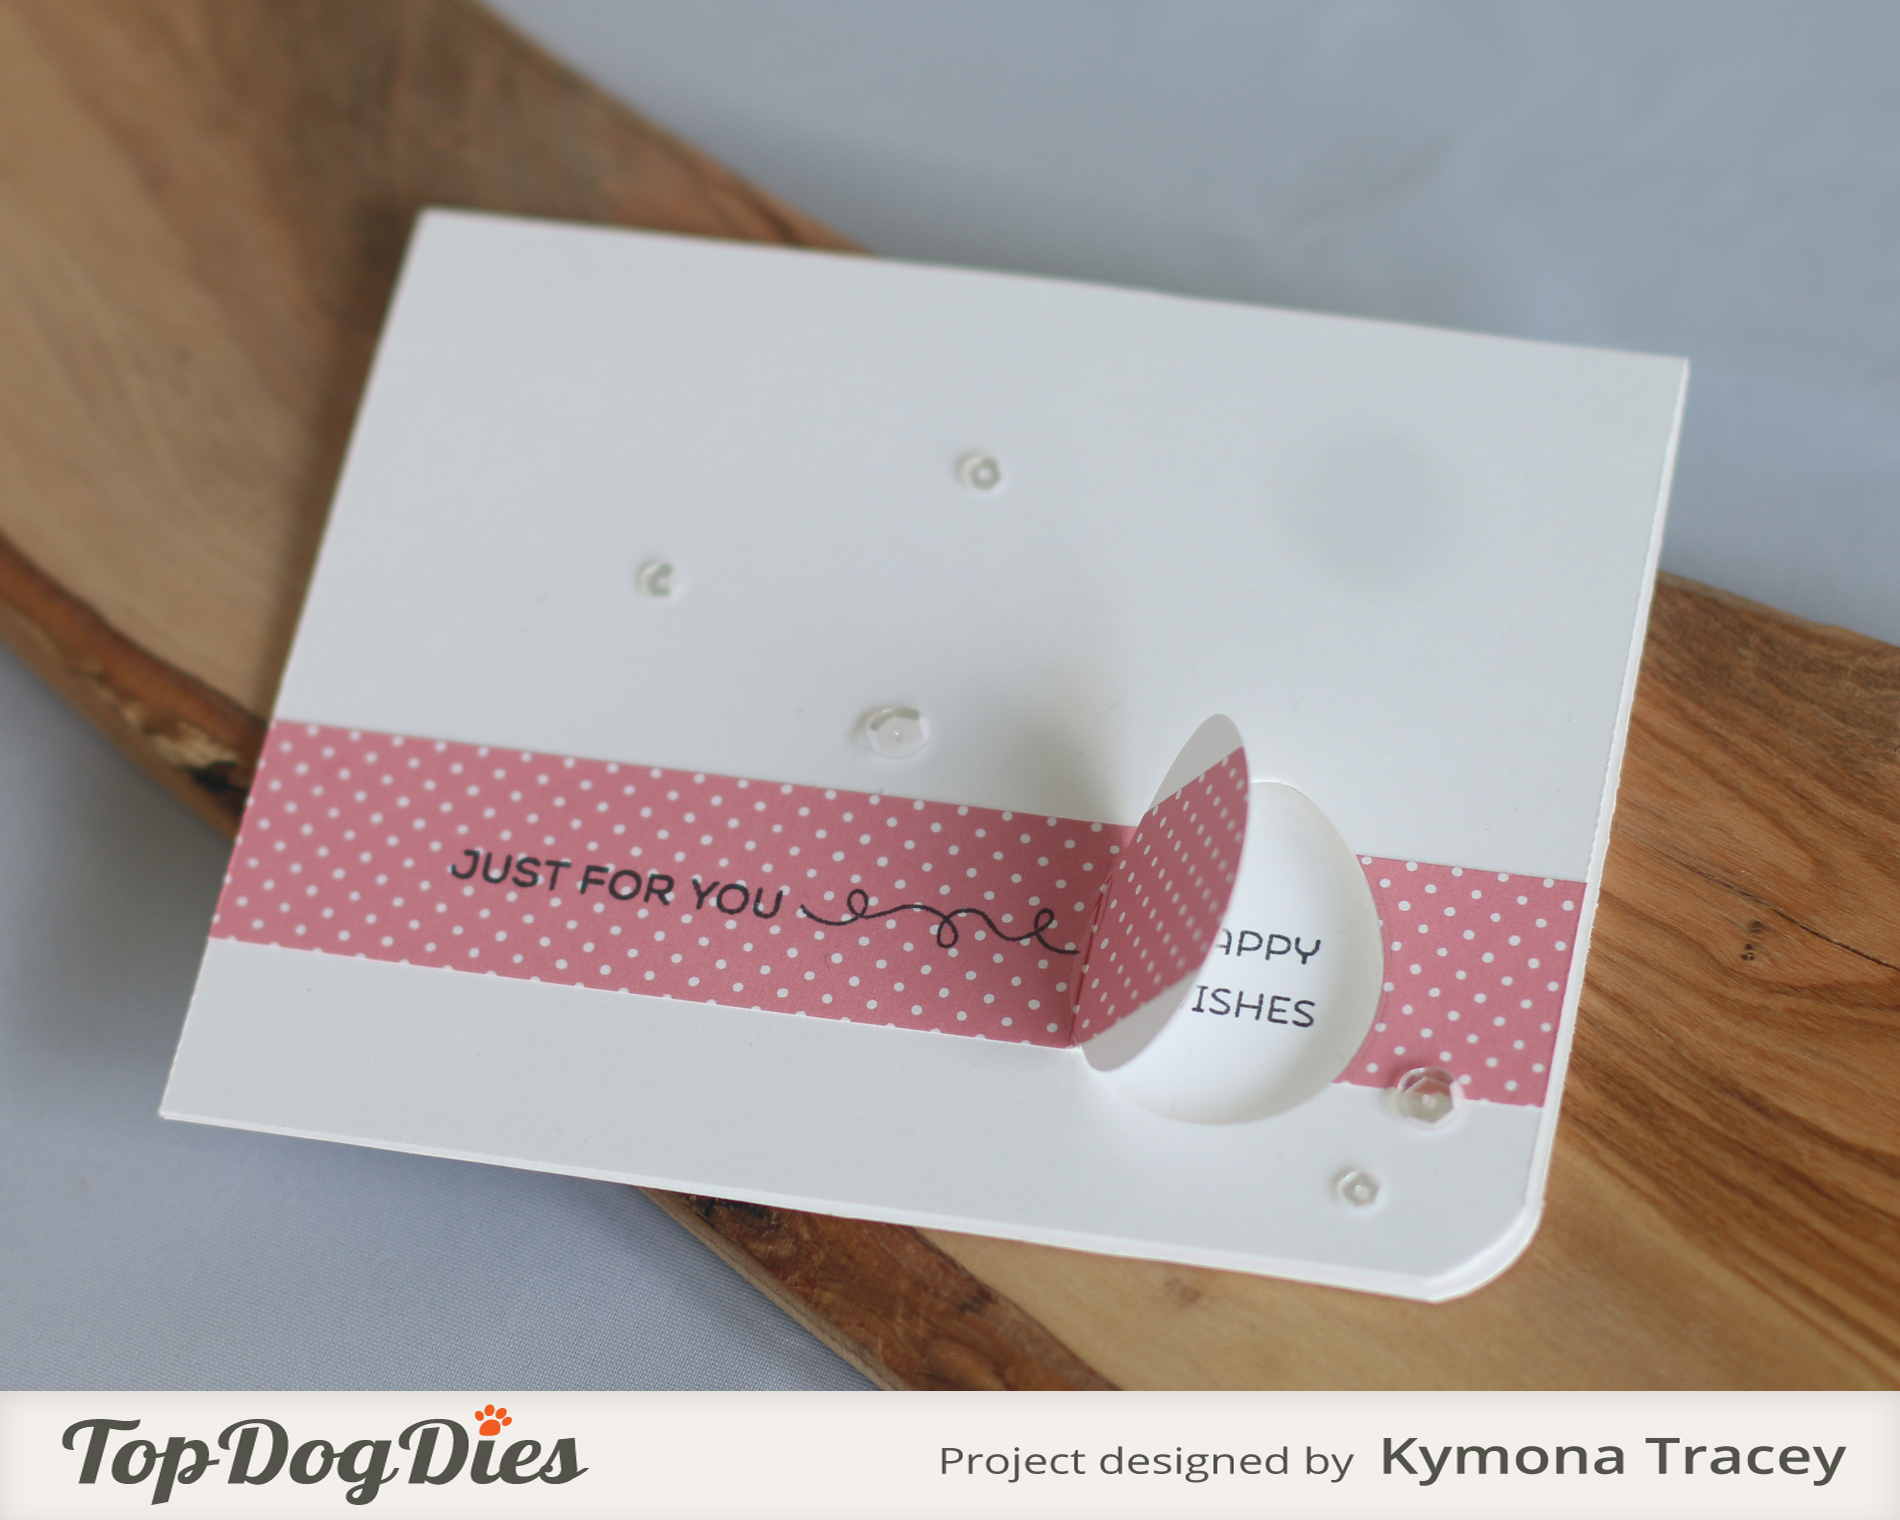
How cute is that!!  I used the solid egg die to create that window.

Take a closer look:

Just for you 4 (TDD)

I partial die cut on that egg so that the egg would be a door to my sentiment inside the card.

Here is how I created this card:

1. I cute a strip of Lawn Fawn Let’s Polka, Mon Amie patten paper and adhered it to the front of my card front.

2. I placed the die to the right side of the card front.

That’s when I remembered I wasn’t going to be able to partial die cut the egg because my cutting plate was too big and my card could fold or the die cut would go through the whole card.

So I cute my card in half.  Once I’m done cutting my die I will adhere the card panel to the front of a new card front to stay with a one layer card.

3. Before attaching the card panel to my card front, I die cut the egg on my card front so that the card panel matches the card base.

4. I used Papertry Ink  Swoosh Stamp set to stamp my sentiment inside the egg and Technique Tuesday Smile Borders to stamp my sentiment on the strip of pattern paper using Memento Tuexdo Black Ink.

5. I added Pretty Pink Posh Sparkling Clear 4mm sequins  and 6mm sequins to added interest.

Just for you 2 (TDD)

Just for you 3 (TDD)

So what do you think?  Are you fascinated as much as I was.  Never thought to use my dies in this manner.  This is why I love learning!!

Supplies used:

LetsPolkaMonAmiePetitePaperPack Swoosh Smile Borders Pretty Pink Posh Sequins 4mm Pretty Pink Posh 6mm Sequins Memento Black Ink

Thank you for stopping by!!

~Kymona

Holiday Card Workshop Day 4

Hello everyone!!  I’m here with my homework from Day 4 from my Online Card Class Holiday Card Workshop.  I’m so happy I’m able to complete some of my homework.  There are times when I don’t get to finish all my assignments, so to be able to get them done this time around is great for me.

Day 4 lessons focused on One-Layer Cards.

Our instructors today were:

1. Jennifer McGuire with a Window Card

2. Laura Bassen with Create a Scene

3. Julie Ebersole with Simple Masking

Now on to my cards.  Lets start with:

1. Jennifer taught us a double partial die cutting trick.  I really love this technique and will be using it on more of my cards.

Here is my card:

Snowman

Yes, this card has two separate die cuts.  Can you believe that?  I know, neat isn’t it.

Lets look at the inside of the card:

Snowman InsideI heat embossed my sentiment, cut a circle stencil and inked my circle with distress inks.  I add clear wink of stella to the circle.  I colored a piece of white cardstock with the same Copic marker I used on the snowman’s buttons.  I punch a heart and adhered it to the circle.

I loved the card so much I made another.  Take a look at my second card:

Santa Die cut

Isn’t this Santa just the cutest you’ve seen.  I really like my coloring of this Santa.  I’m not to fond of the background but it will do.

In fact the snowman should have this background and the Santa should have the other background.

Take a look at the inside of the card:

Santa Inside

I think I put to much glitter on this circle.  What do you think?

Now on to the next card:

2. Julie taught us how to mask off an area and stamp in that area to create a silhouette.

I’m not sold on my card but I tried, take a look:

Joy

Julie used die cut of a deer with antlers, her cards look so much better.  I have to give this technique another try.

Julie created another card that I will try to do tomorrow.  I also have to work on the card Laura taught us.

I will be back tomorrow with those cards.  Stay tuned!!

Supplies used:

Snowman and Santa Card:

Winter FriendsCopic MarkersSalty Ocean Distress InkTumble Glass Distress InkCircles Framelits DieItty Bitty Accents Punch PackWink of Stella clearclassiccrestsolarwhtie


Joy Card:

Scripty Joy Mistletoe Lawn Trimmings Hero Arts Unicorn Pigment InkSSS Khaki cardstockconfetti

So what do you think?

Thanks for stopping by!

~Kymona


The Joy is in the Journey

Hello everyone!!  I’m here today with Papertrey Ink’s Make it Monday #171: Pop Up Die Cuts, AAA Cards Game #10 Watercolor techniques and Virginia’s View Challenge #5

I’m so excited about this weeks challenges because they combine my two favorite things.  Water-coloring and my all time favorite die, Life is Beautiful Butterfly die.

AAAcardGame10

Yayyyyy, I get to use Watercolors for this challenge!!

MIM 171 Pop Up Die Cuts

Besty Veldman showed everyone how to use our dies to create partial cuts!!

V. V. Challenge #5 (2)

Die Cut, perfect!

Take a look at my card:

Joy in the Journey3

Joy in the Jouney4

I created a card like this in the past, when I was taking my Online Card Class on Water-coloring.  It was fun so I decided to do it again with different colors, die, and sentiment.  You can see my original card here.

To create the watercolor dots, I used a new pencil eraser to transfer the ink from the pad to the paper.

Then I die cut the butterfly over the dots.  I only placed the cutting plates over the wing section of the butterfly.  That way the body of the butterfly will stay in tack.

I stamped the sentiment and added some heart enamel dots.

Can you say pretty!!!  I can!!!  Creating this card was very easy and everyone should try water-coloring and partial die cutting.

So what do you think?  Please leave a comment letting me know if you like my card creation today.

Supplies use:

Life is Beautiful DieAqua MistPTI Summer Sunrise InkSIGHTSEEINGCN Enamel heartsOnyx Versafine InkTiconderoga pencilclassiccrestsolarwhtieStampin' TrimmerFuse Fast Adhesive

Thank you for stopping by and visiting me!

~Kymona