TAWS July Guest Designer

Second Post for today

If your looking for the Your Next Stamp Blog Hop, click here

Edited to add more photos

Hello everyone!!  I’m here today Guest Designing for The Alley Way Stamps (TAWS)!!  I’m excited about this opportunity!!

Take a look at my card:

You're a lifesaver (TAWS)

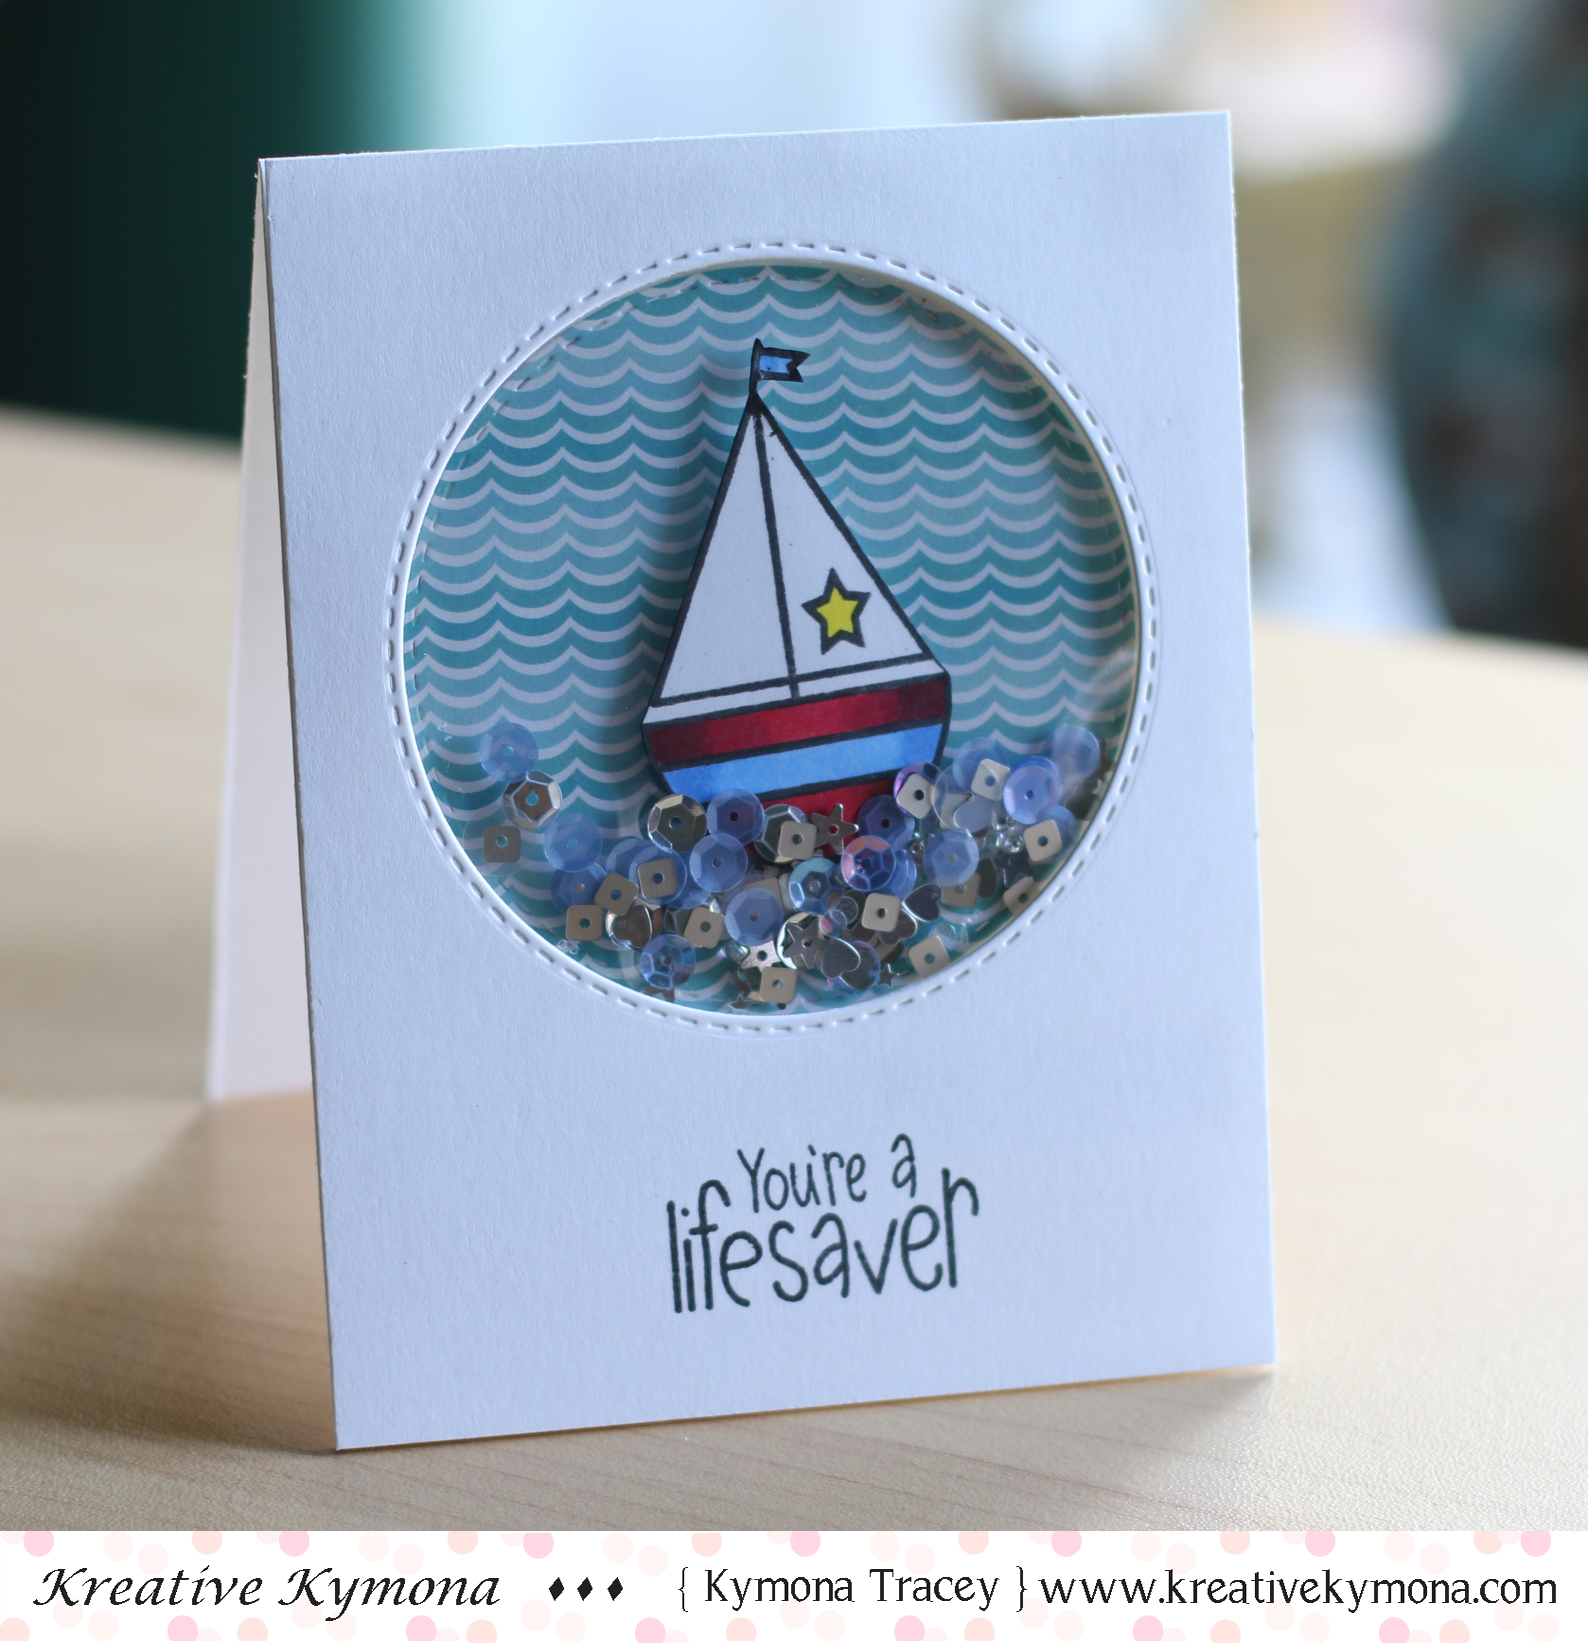
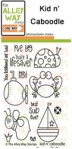
I used The Alley Way Kids n’ Caboodle Stamp Set to create this shaker card!!  I had a ton of fun working with this stamp set.

kidncaboodle

All of the images in this stamp set are cute and chunky!!  Great for coloring!

When I saw the sailboat, I knew I need to make a shaker card.  I also knew I wanted the boat to be in the shaker pocket with the sequin, riding the waves!!  LOL!

Here is how I created this card:

1. I cut my card base to an A2 size card, 4.25 x 5.50.

2. I cut my card panel to the same size.

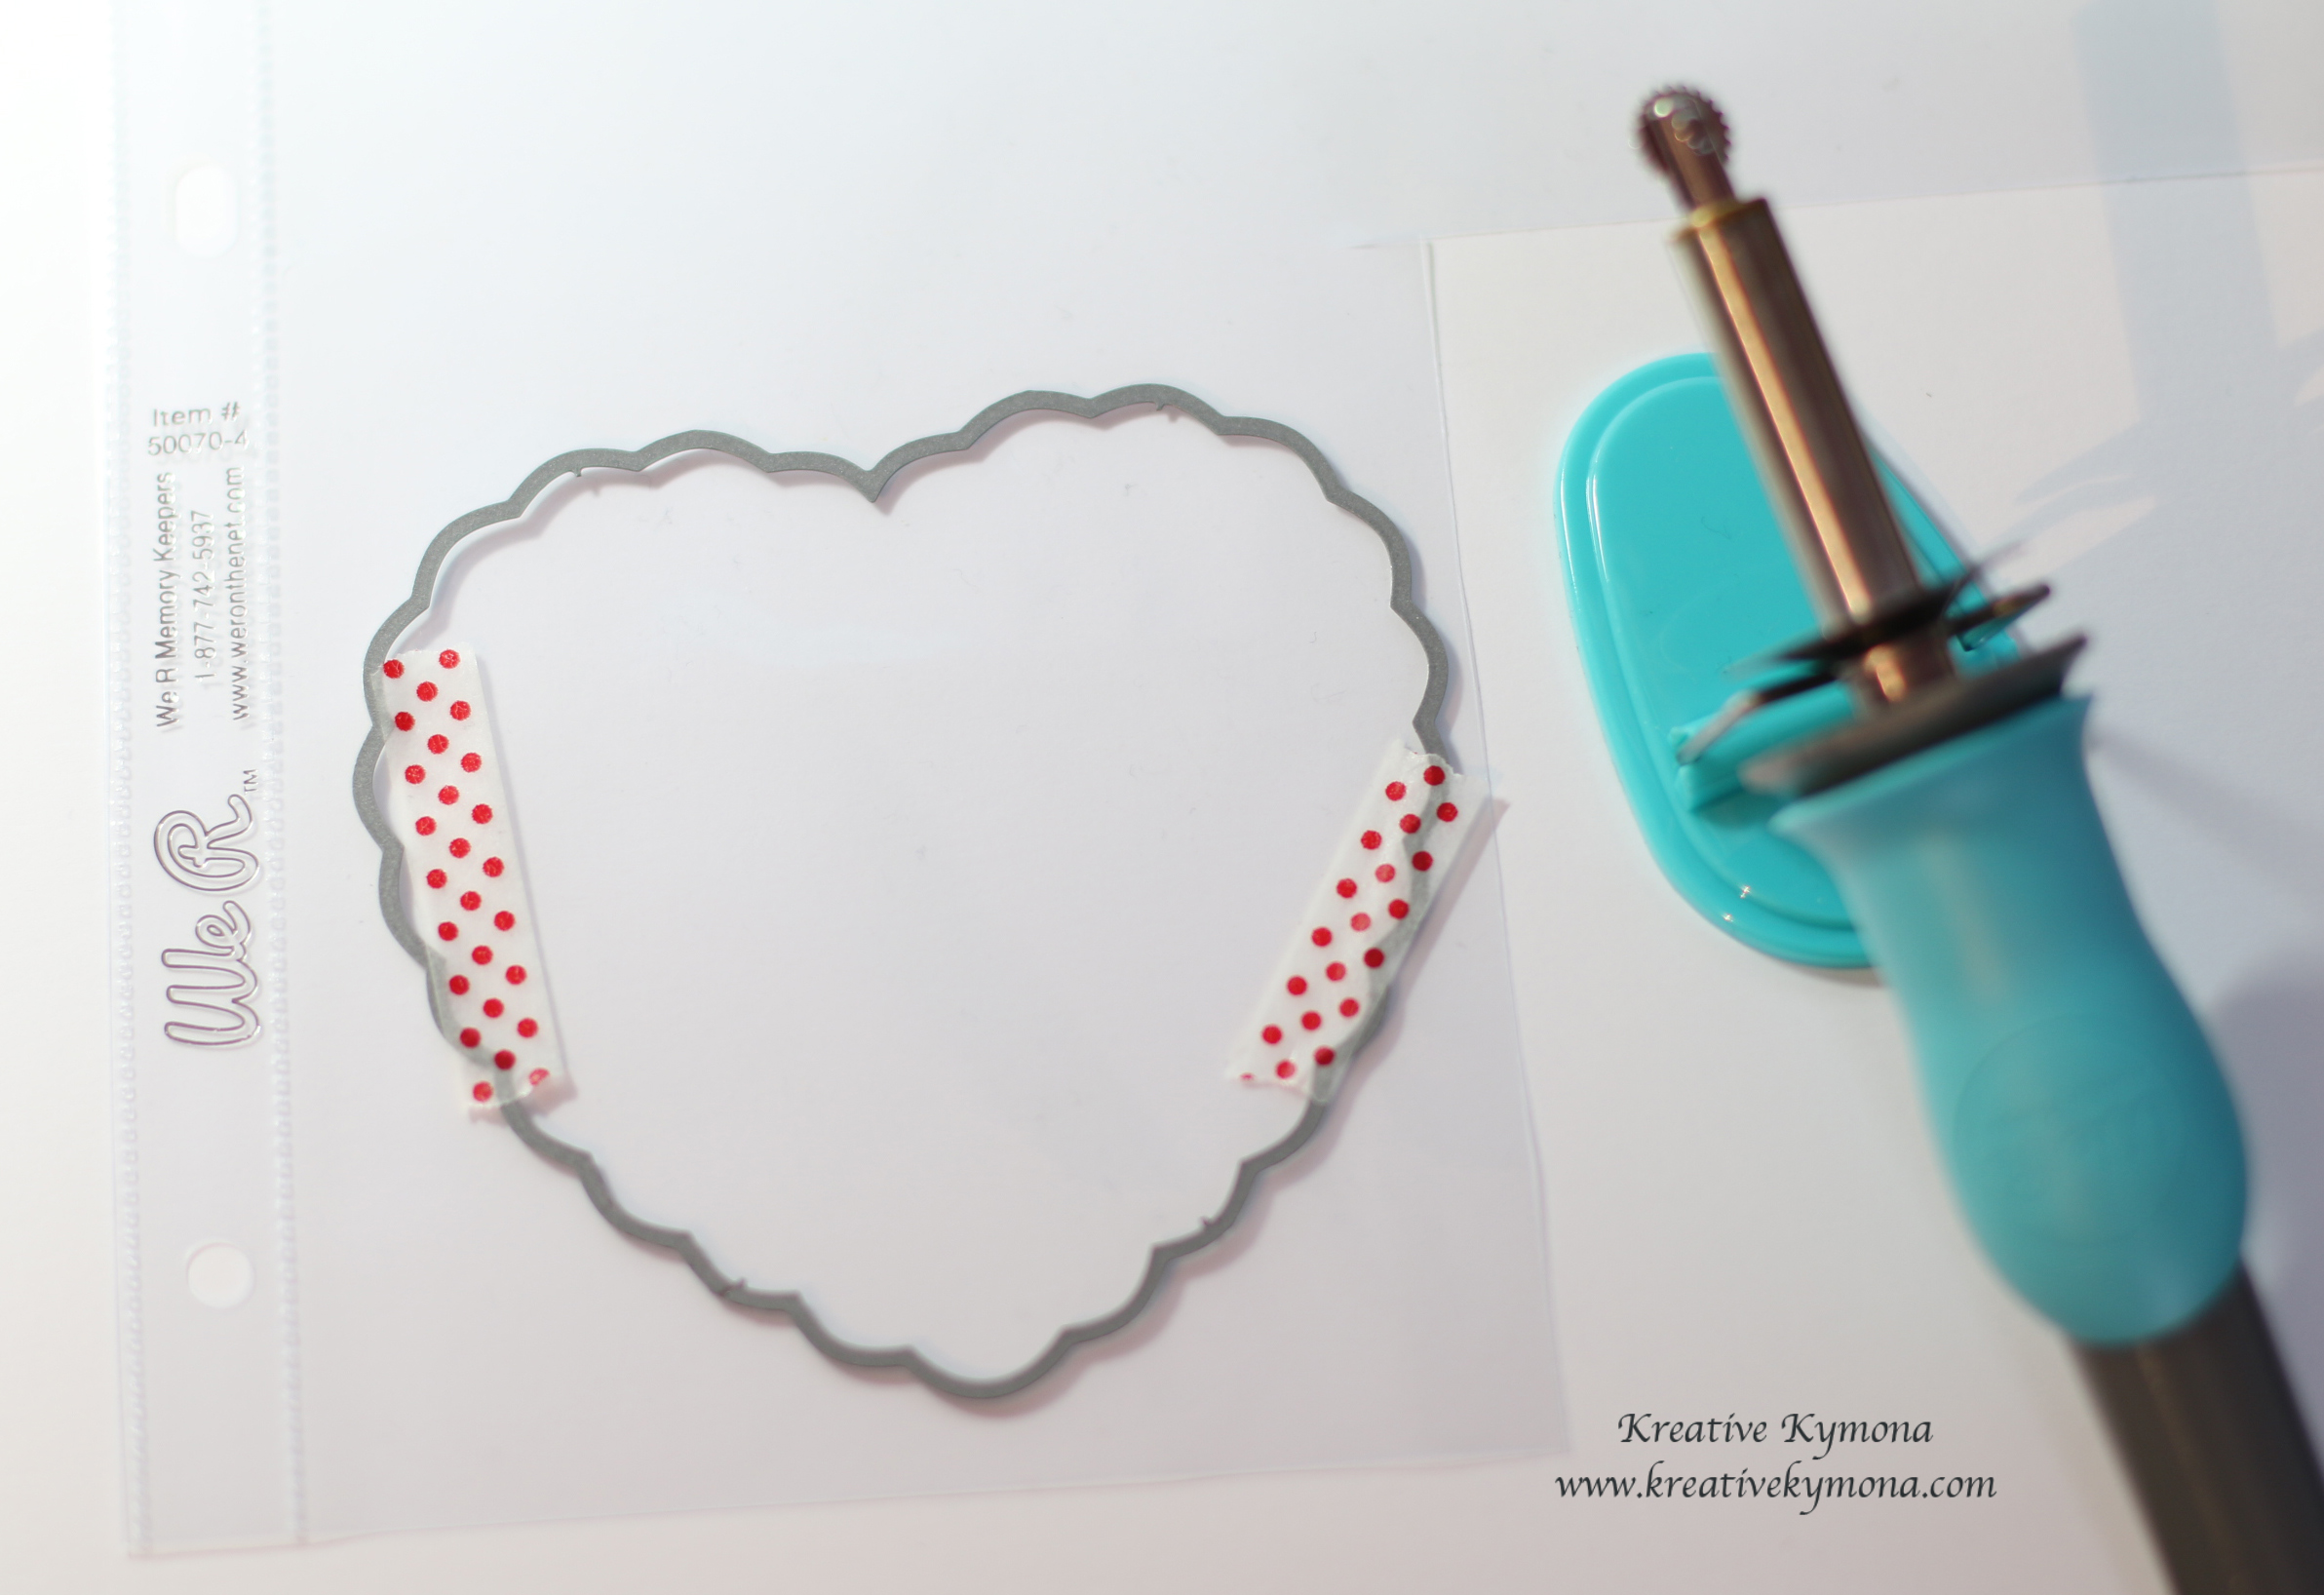
3. I used Simon Says Stamp Circle Stitched Circle Dies to cut the window in card panel.  I used the same stitched circle die to cut a circle out of a piece of pattern paper.

4. I used the panel as a guide to adhere the pattern circle to my card base.

5. I colored my sailboat with Copic Markers: R35, R37, R89, B24, B32,Y06 then cut it out.

Sailboat inside (TAWS)

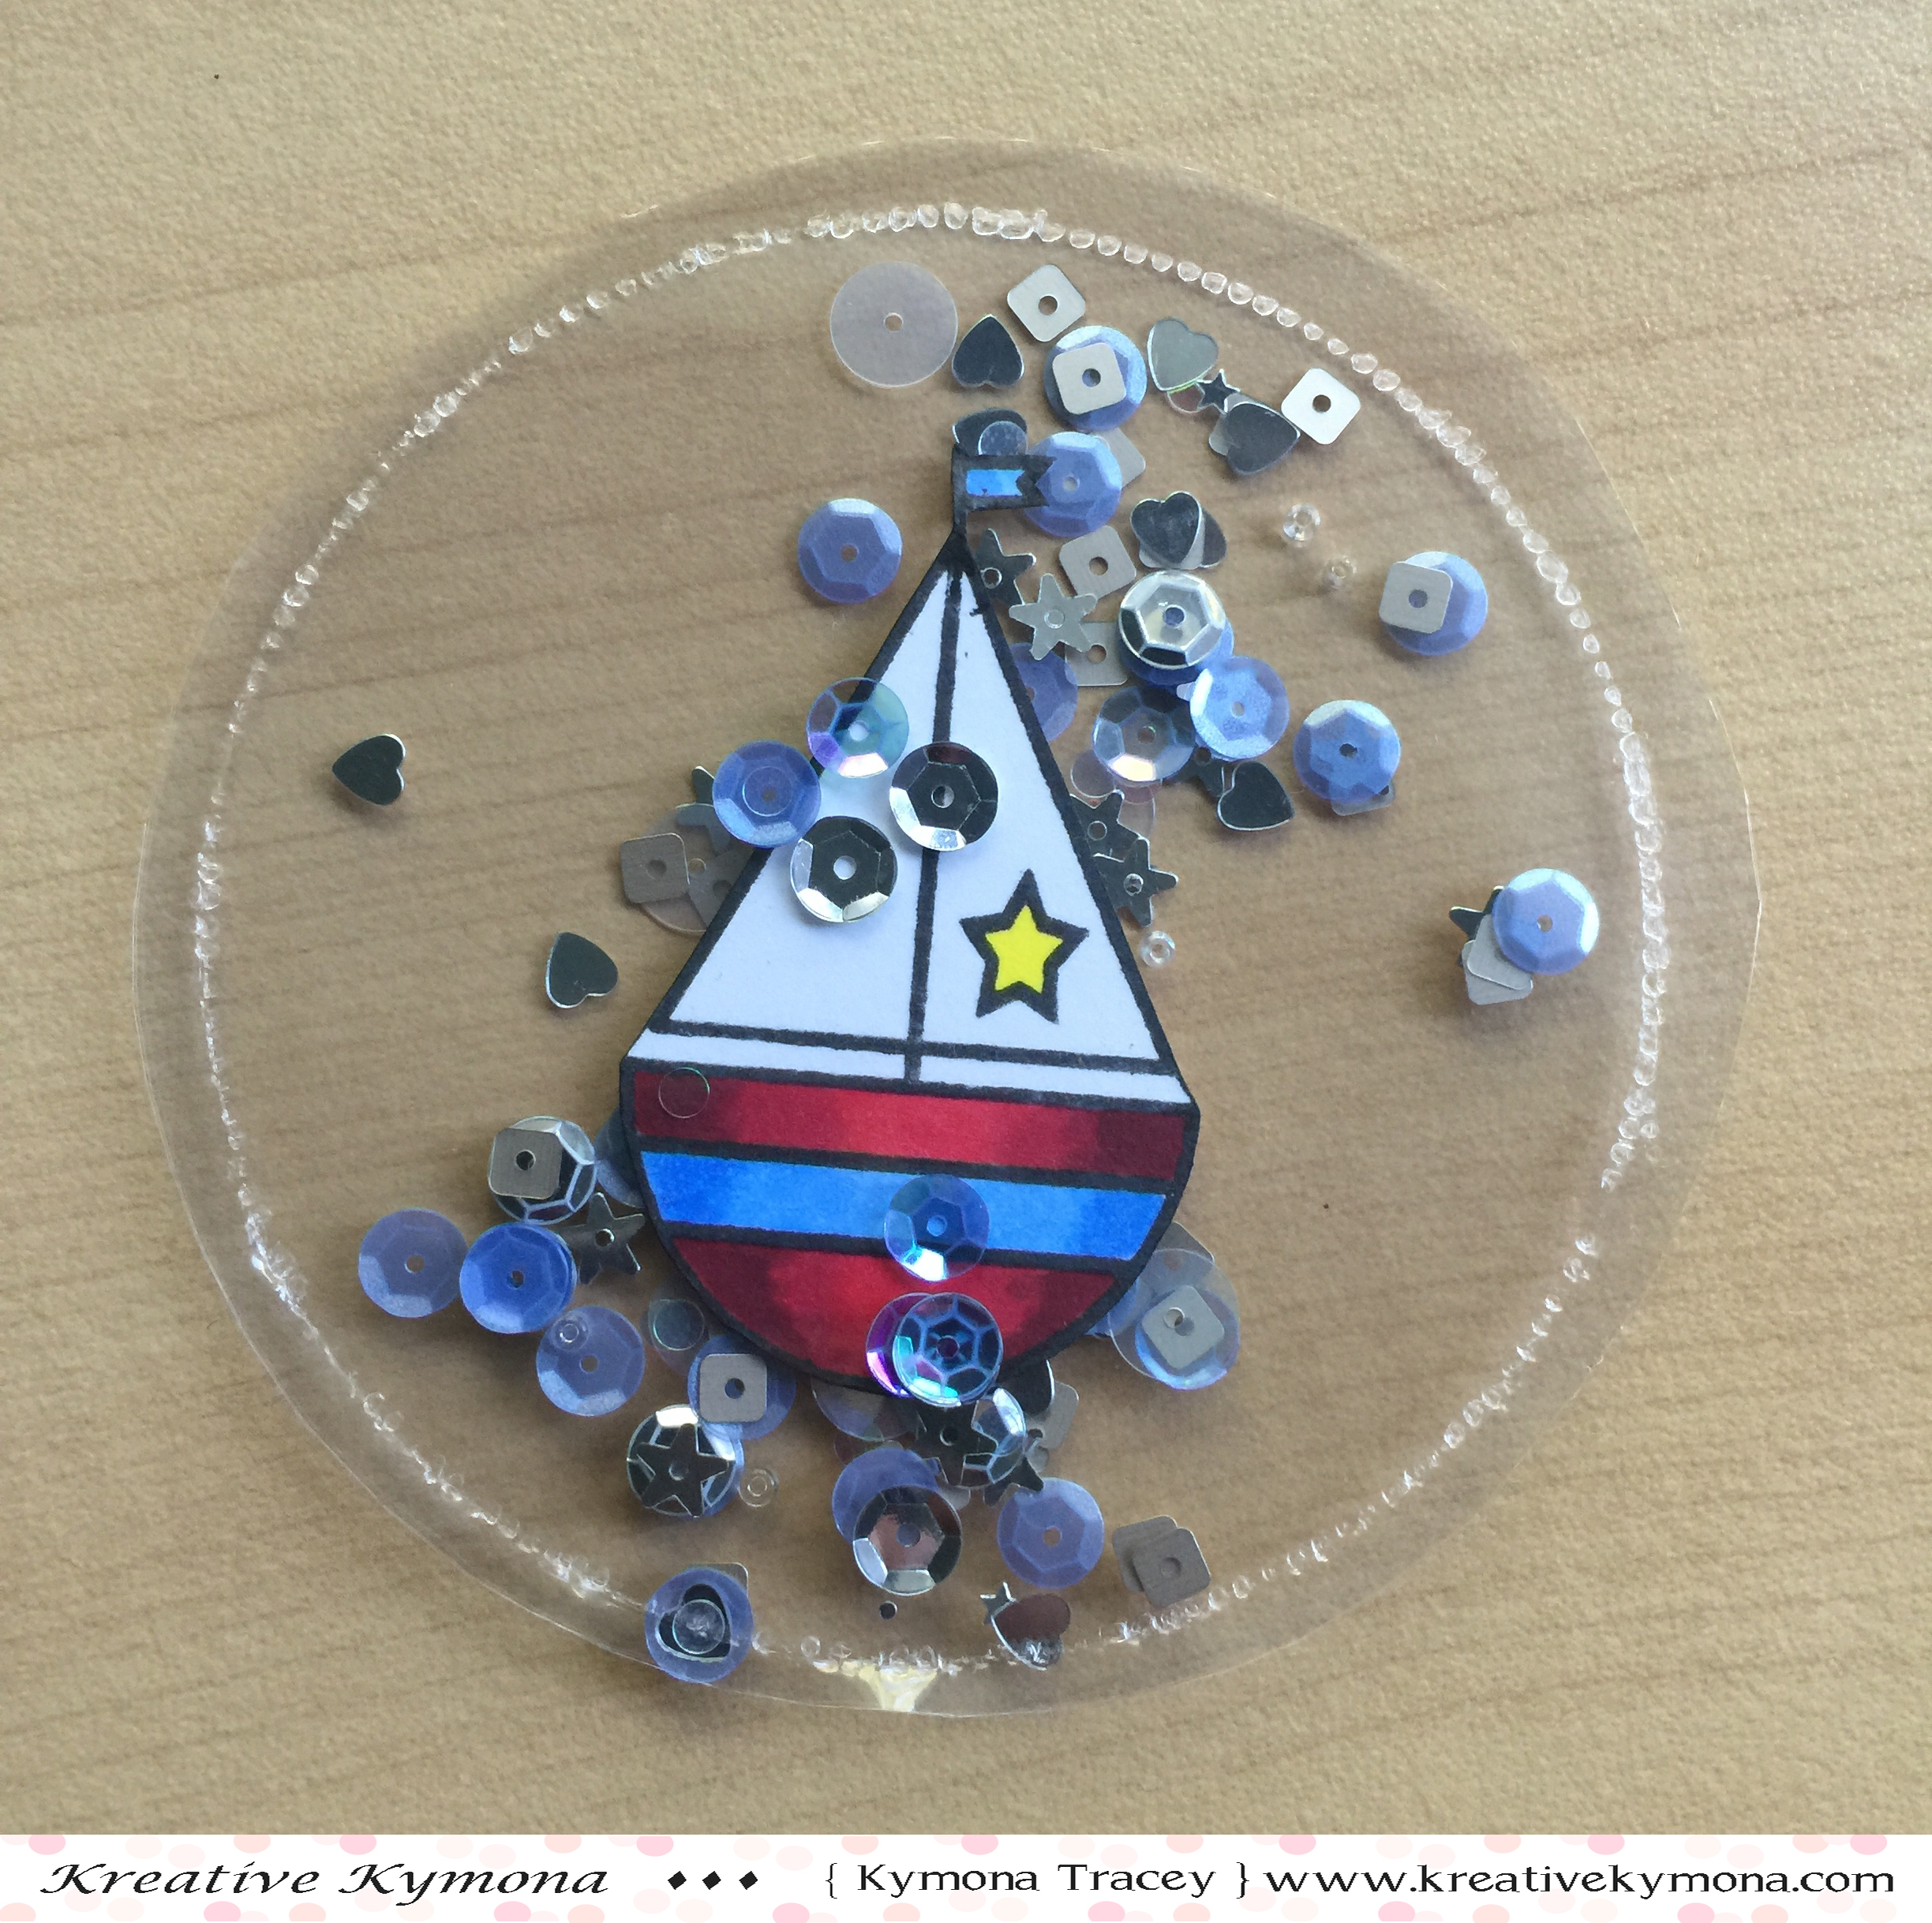
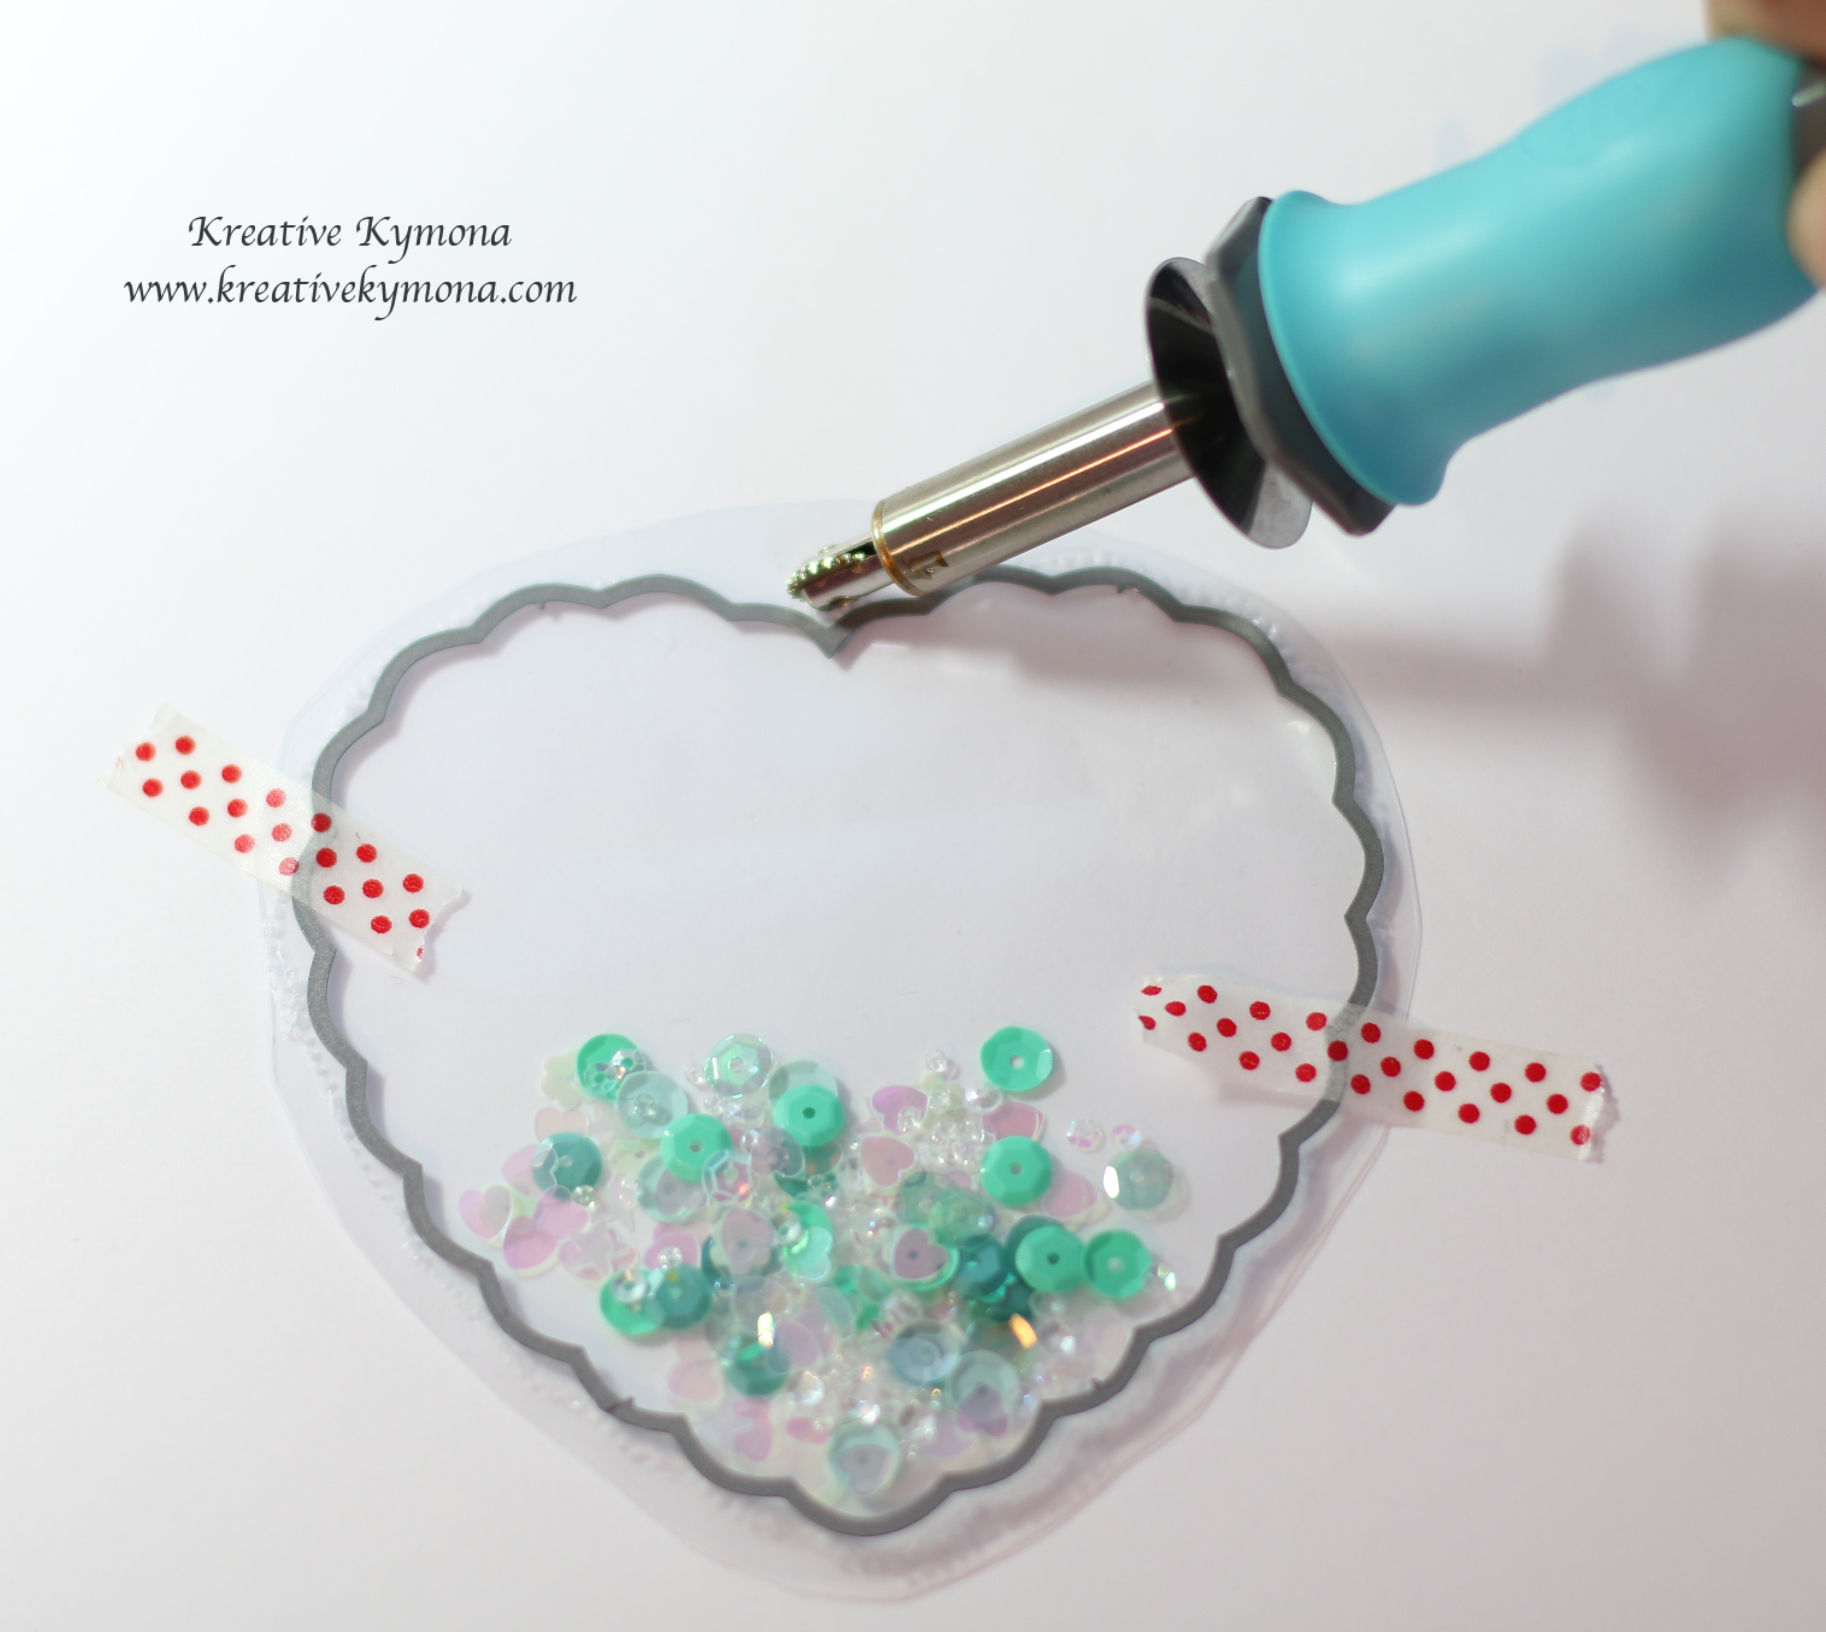
6. I used my We R Memory Keepers Fuse Tool to create my shaker pocket.  I added my Lucy Adams Blue Topaz Sequin and my colored sailboat in the pocket before sealing it up.

If your unsure how to use the fuse tool to create a shaker pocket, check out this post.

7. I stamped my sentiment from the stamp set in My Favorite Things Hybrid Ink.

8. Once the pocket was sealed, I adhered it to the back of the card panel and added foam adhesive.

Sailboat pieces (TAWS)

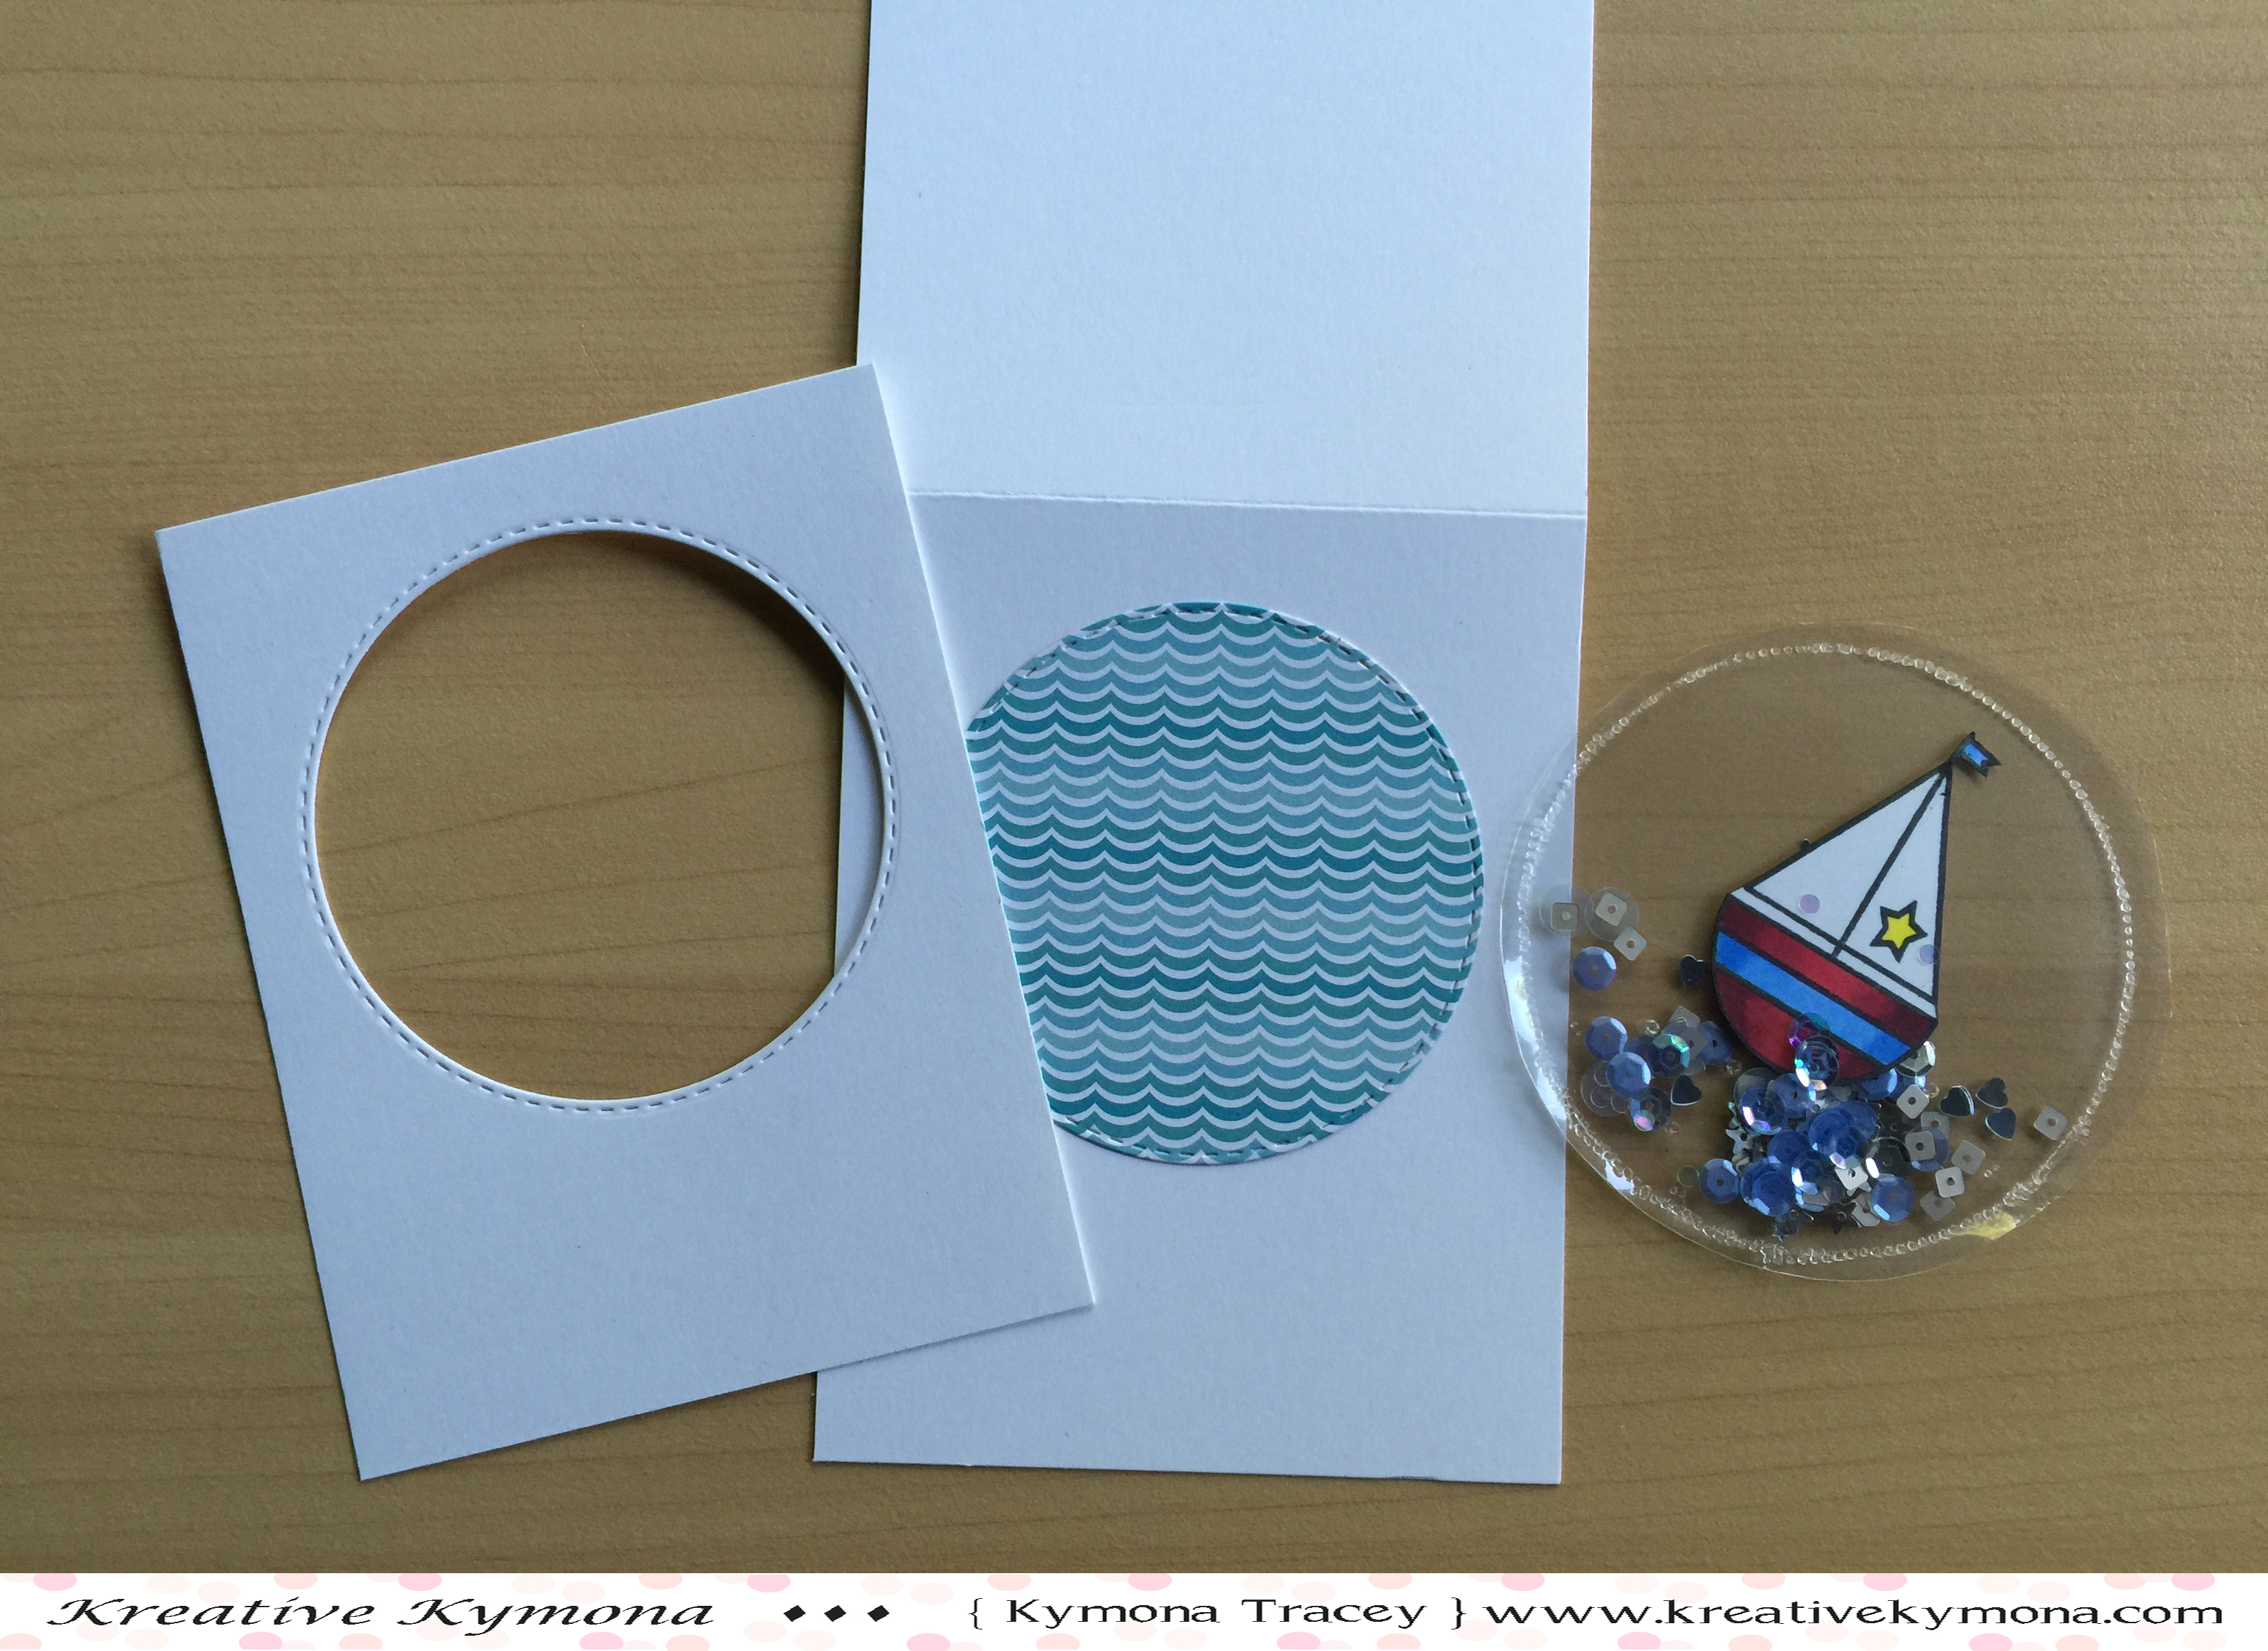
9. I added the panel to the card base and I was done!!!

When you shake the card the boat moves along with the sequin.  It’s super cute.

So what do you think? Please leave a comment below.

I hope I’ve inspired you to check out The Alley Way Stamps Store if you haven’t already!!

Supplies used:


kidncaboodle Stitiched Circlefuse bundleBlue Topaz Sequin MFT Hybrid Black Ink

Thank you so much for stopping by!!

~Kymona


Time To Shake!!

dtbh_bloggraphic

Shake, Shake, Shake That Card! It’s blog hop time again at Top Dog Dies. We have a whole lotta shaking going on this time for our blog hop. Shaker Cards! They are always a fun card to receive and make.

To add extra fun to our blog hop…we are offering up a prize! Three winners will receive the New Top Dog Dies Hot Air Balloon Die Set. For your chance to win, enter your email address below by 5/20/15. Winners will be posted on the Top Dog Dies blog after 5/20/15.

Here’s how it works…
Visit each blog on the hop in order. Each Design Team member has created a special shaker card using dies from Top Dog Dies. Visit each blog, check out the shaker projects and leave your comments. I’ve listed all of the participants below for your convenience. Don’t forget to enter to win.

So lets get start!!!

If you arrived from the fabulous Marcia Dehn-Nix then your on the right path.  If you didn’t please start at the talented Piali Biswas blog as to not miss any of the blogs and your chance to win our awesome prize.

Take a look at my card:

Hello There Shaker

I love making shaker cards but in the past they use to be so cumbersome with the foam tape and all.  Now that I have the We R Memory Tool Fuse, making shaker cards are a breeze!!  No bulk and no foam tape.

Thank you Jennifer McGuire for this amazing tip!!

You want to know how I created this?

Here you go:

1. I trimmed my card panel slightly smaller then my card base.

2. I used Top Dog Dies Heart Doily Die to cut a heart in the center of my card panel.

3. I used the negative and saved the heart shape for another card.

4. To create my shaker pocket, I used the heart die and placed it on my plastic window sheet.

heart fuse 1

5. I used the fuse tool and traced around the outside of the die to seal the plastic together, leaving a small portion open to add the sequin.

heart fuse 2

6. I add Lucy Adams Phosphorescence sequin from Lucy’s Card Little Things Collection to my shaker pocket.

heart fuse 4

7. I lined up the heart die with the shaker pocket and used the fuse to close up the hole in my shaker pocket.

heart fuse 5

8. I trimmed off the excess plastic around the heart.

9. I die cut my Studio Calico pattern paper, which is the NYC skyline, with the same heart die and adhered it the card base.

10. I used Mama Elephant Good Times Stamp Set to stamp my sentiment with My Favorite Things Hybrid Ink.

12. I adhered the shaker pocket to the back of the card panel with adhesive.

13. I wanted the card panel to lift off of the card base so I added Stampin’ Up! Dimensionals and adhered the card panel the card base.

Super easy to create!!  This has to be my all time favorite card to make now that its so easy.

Now on to talented Nicki Sheck for her fun shaker card!!

Just in case you missed someone or need to start over, I’ve listed my fellow design team members blog for your convenience.

Piali Biswas
Natalie Dever
Marcia Dehn-Nix
Kymona Tracey ← You’re here
Nicki Sheck
Jeanne Jachna
Vickie Zimmer
Kelly Griglione

Now all I need you to do is fill out the form below for your chance to win.  Super easy and exciting.

Fill out my onlineform.

I’m also linking my card up to Virginia’s View Challenge.

Layers and Dimensions

Supplies use:

fuse bundleTDD Heart Doily DiePhosphorescence  May Card Kit Good TimesMFT Hybrid Black Ink

Happy Hopping and Shaking!

Thanks for stopping by!

~Kymona

CASology 144 – Flight

Hello everyone!!  It’s CASology Tuesday!!  We are back again with another Cue Card for you!!  The weeks are flying by so fast.  This is the last week in April and still no sign of Spring.

I hope May brings a lot of sunshine.

Week 144 - FlightThis week’s cue card was super easy for me!!  I know which stamp set I wanted to use as soon as I saw the word flight.

I went super clean and simple on this card.  Take a look:

Take Flight

I used Simon Says Stamp Quite The Pear Stamp Set to stamp my paper plane.

I used Copic Markers C4 and C6 to color my paper plane.

I stamped the dash line from the bottom of my card to the paper plane using Simon Says Stamp

The dash line gives the paper plane some motion.

I stamped my sentiment using Technique Tuesday Take Flight Stamp Set using My Favorite Thanks Hybrid Ink.

I rounded the right hand bottom corner with my We R Memories Corner Chomper.

I decided at the last minute to add one rhinestone to the sentiment for a nice finishing touch.

So what do you think?  Now its your turn to give this cue card a try.

For more inspiration, check out my fellow Design Team members blog for more awesome work.

Design-Team

Gillian Ross (taking a break)

Hazel Hodgkins

Jen Wills

Joyce Mehrberg

Judy Marino

Kimberly Wiener

Kymona Tracey ←Me

May Park

Melissa Chipperfield

Tracey McNeely

Our Guest Designer this week:

Melissa

Our Sponsor this week is Serendipity Stamps.

Supplies used:

SSS Quite a PairCopic Marker C4Copic Marker C6Technique Tuesday Take FlightMFT Hybrid Black InkWe R Memory Keepers Corner ChomperBasic Rhinestones Jewel Accents

Thank you so much for stopping by!!

~Kymona

Top Dog Dies – Warm and Cozy

Hello everyone!!  Its Top Dog Die Wednesday!!  I’m here today showcasing Top Dog Dies Coffee Die Set.

TC096-DThis die set is super cute and what I love about it is, coffee and tea drinkers can use it.  Personally I’m not a coffee drinker so tea is a much better option for me.

Today’s technique is super clean and simple, just the way I like it.

Take a look at my card:

Warm and Cozy (TDD)

I told you, super clean and simple.

I went with the white on white tea cup because I wanted the Audrey Blue heart to pop.

Here is how I created this card:

1. I started with an A2 size (4.25 x 5.50, scored at 4.25) card base.

2. I die cut the coffee cup, band and lid out of white cardstock.

3. I die cut the heart out of Simon Says Stamp Audrey Blue cardstock.  I put the cup together with Tombow Extreme Adhesive.

4. I stamped the sentiment from Mama Elephant Cup of Wishes stamp set using My Favorite Things Hydrid Ink and Simon Says Stamp Audrey Blue Ink.

5. I adhered the cup using foam adhesive.

6. I rounded the corner using We R Memory Keepers Corner Chomper.

See nice, clean and simple.   You can make a set of these cards for a coffee/tea lover.  Awesome gift set.

So what do you think? Let me know below. I would love to hear from you.

Supplies used:

SSS Audrey Blue CSCUP_OF_WISHES MFT Hybrid Black InkAudrey Blue InkTombow Xtreme

We R Memory Keepers Corner Chomper

Thanks for stopping by!

~Kymona

So Suzy Stamps Happy Birthday Blog Hop

Happy Birthday So Suzy

Holy cow!  Can you believe it is out FIRST birthday?!  Yep, last year, on April 20th, Suzy opened her online shop and things have been rolling from there!  In that year, she has seen her first customer (Courtney Schloss), her first Design Team, and first brick and mortar shop along with a bunch of new friends!

If you arrived from So Suzy Stamps blog, then you are on the right track.  If this is your first stop, then head on over to So Suzy Stamps blog so that you don’t miss out on your chance to win our awesome prizes.

To help celebrate So Suzy Stamps Birthday, I created this card using one of her first sentiment stamps release last year.

Happiness is

Take a look at the card I created for this hop:

(Wow, can you believe I took this photo at 1:46am.  In totally darkness. Thanks to my new Foldio.  I will do a separate blog post about it.)

I wanted my card to be super clean and simple.  I choose to stamp two roses because we are looking forward to year number two!!

I stamped my roses with My Favorite Things Hybrid Ink Pad.

Then I used Copic Marker YR02, YR04, YR07 to color my roses.

On the inside of my card I used Simon Says Stamp Sending and Wishing Stamp set to add the sentiment using the same ink.

Super simple, elegant and pretty!!  Happy Birthday So Suzy Stamps!!  I wish you many more!!

Now on to our super fun day!

Suzy wanted to do something fun for the day and her wonderful Design Team came up with a bunch of ideas and a scavenger hunt was one of them!  Before we get to the Scavenger Hunt, let’s go over some of the other fun things we have in store for you today!

  • Scavenger Hunt on So Suzy Stamps Website – $10 Gift Certificate – 5 Winners
  • Blog Hop on…So Suzy Stamps Blog – $10 Gift Certificate  – Drawing (1 winner)
  • Instagram Photo Bomb – $10 Gift Certificate – Drawing (1 winner) – Be sure and use #SoSuzy1stBday
  • Facebook Birthday Party – $10 Gift Certificate – Drawing (1 winner)
  • Participate in all of the festivities – $25 Gift Certificate – Drawing (1 winner)
  • 20% off everything in the store – No coupon required

Lots of fun, huh?!

As far as the Scavenger Hunt goes…all you need to do is answer the questions, including the bonus question and submit it via the contact form.  Please number your answers so they coincide with the question number.

Out of all the entries, there will be 5 winners.  The winners will need to have ALL the questions correct, they must have their answers NUMBERED and all entries will need to be submitted no later than 11:59pm MST on April 20th.

All answers can be found by perusing through the website and by checking out the Blog Hop! We have already had a couple of practice runs and people were able to find them.

The winners will be announced on April 22nd via our Blog.

So what are you waiting for, don’t walk run and play along with us.  Next up is the talented Jenny. What till you see what she has in store for you!!

Blog Hop Participants

So Suzy Stamps

Kymona ←Me

Jenny

Jennifer

Kim

Martha

Monica

Justine

 I’m also linking my card up to AAA Cards: #37 It’s Springtime

Game37

Supplies used:

Rose Circle Flower Copic YR04 COPIC YR07 Copic YRo2 MFT Hybrid Black Ink Sending and Wishing

Thank you so much for stopping by!

~Kymona

Maximize Your Top Dog Dies!

Hello everyone!!  I’m on the Top Dog Dies Blog today with another card that I created using one of my new dies.

Did you see that awesome release yesterday?  Top Dog Dies released 10 new dies and they are really to “die” for!!  Just in case you missed it you can find it here.

They are giving away all of the dies to one lucky winner!!  That is $122.00 worth of great dies!! You don’t want to miss that.

Today I’m here to show you how to maximize your dies.  I used the new Top Dog Dies Typewriter Uppercase Die!

How many time do we use a die for it’s intended purpose but throw the negative piece away?  Well not today.  I’m going to show you how to use that negative piece on your project.

(I saw a card with this technique and I knew I need to give it a try.  I wish I knew whose card it was but if anyone knows please let me know.)

Now take a look at my card:

Your So Nice

To see how I created this card, head on over to the Top Dog Dies Blog for the full photo tutorial!!

Supplies used:

LID Seriosly Awesome Stamps halloween sprinkles TC091-DWild HoneyPicked Raspberry InkclassiccrestsolarwhtieWe R Memory Keepers Corner Chomper

Thanks for stopping by!

~Kymona


CASology 135 – Mini

Second Post

If your looking for the Top Dog Dies Blog Hop post, click here

Hello everyone!!  Its CASology Tuesday!!  We are back again with another Cue Card for you!!

Week 135 - Mini

I have to say, I thought long and hard about this word “Mini”.  My first thoughts were to do something with Mini Mouse on it. Then I realized I do not have any Mini Mouse stamps, papers or embellishments so I had to scratch that idea.

Then I thought to myself, what is mini?  What do I have in my stash that is mini?  Then it hit me.

A couple weeks back, I bought a stamp set from my Instagram friend,  Vanessa who is the owner of V’s Sweet Ideas!

The set is called Coffee Break and all of the images are mini!!  Super perfect for this challenge.

Check it out:

Coffee_20Break_400w

Aren’t these the cutest “mini” images! I decided to make a couple of cards using the images from this set.

Take a look:

I used my Prisma Color Pencils for the first time and Gamsol to color in all of my images! I love the creaminess of these pencils.

Mini (CAS)

I stamped the image in the center for an added touch, LOL.  I stamped another sentiment from the set and a red heart under the iPad.  I used a gold pencil for this iPad.

I love you latte

I used a brown and teal color pencils for this coffee mug!  I stamped the sentiment and a red heart.

Mini 2 (CAS)

This card is my favorite!!  I love to read, if there is one thing you should know about me, I LOVE to read.  So when I saw this book image I was drawn in. I love how the pages of this book looks vintage.  It looks as if this book was really loved by its owners!!  I stamped my sentiment underneath with a red heart.

Mini (all)

Don’t you just love all of these miniature images!!  To top it off, my card stock was cut to a “mini” size as well!!

I hope my card has inspired you to play along with us and this amazing challenge.  So, now its your turn, so go and create something Mini! I can’t wait to see what you come up with.

For more inspiration, check out my fellow Design Team members blog for more awesome work.

Design-Team

Gillian Ross

Hazel Hodgkins

Jen Wills

Joyce Mehrberg

Judy Marino

Kimberly Wiener

Kymona Tracey ←Me

May Park

Melissa Chipperfield

Tracey McNeely

Our Guest Designer this week:

Ksenija

Our Sponsor this week is Uniko Studo. They are celebrating their 3rd birthday release!

Supplies used:

classiccrestsolarwhtieCoffee_20Break_400w Prisma Colored Pencilspure poppyGamsol

Thanks for stopping by!!

~Kymona

CASology 134 – Monochrome and Giveaway

Hello everyone!!  It’s CASology Tuesday and you know what that means!!

We have a new Cue Card for you! This week the cue card is Monochrome.

Week 134 - Monochrome

What is Monochrome?  I wasn’t sure so I had to look it up in the dictionary.

According to Wikipedia, the free encyclopedia:

Monochrome describes paintings, drawings, design, or photographs in one color or shades of one color. A monochromatic object or image has colors in shades of limited colors or hues. Images using only shades of grey (with or without black and/or white) are called grayscale or black-and-white.

Interesting, right – but I still wasn’t sure what I could do that would be CAS.  So, I took to Pinterest for a visual.

Take a look at what I found:

e4c8ae26a3465341edf7558407620810

721808a98336f6954f5ff80e226ac73c

Ralph Lauren Spring 2008

When I saw this dress, I knew exactly what I wanted to create.

Take a look at my card:

Confidence is

Happiness Is

How fabulous are these cards!!  Women love dressing up and getting their hair done.  Our vote of confidence rises when we look and feel pretty.

Key word “feel”, that goes with our “Confidence”!!  Once we are confident within ourselves, nothing can stop or make us feel less then.  So when we put on these pretty black dress and nice shoes, we shine double time.

So do you want to know where to find these awesome stamps?

They are from So Suzy Stamps!!  The owner and I met on Instagram (I love Instagram)!!  She wanted to know about some of the embellishments I was using on my cards.  So we got to talking, (more like stalking, LOL) and I found her store all before 9 in the morning!

The “Confidence is Sexy” stamp was the first thing I saw and was hook from there.  I order two of these stamps, one for me and another for my friend in Switzerland.  Then I found out that sentiment went with these pretty black dress and knew they needed to be displayed.

The Wedding Dress and the Black Slinky Dress are perfect for this challenge.

So Suzy Stamps are manufactured in the USA, are made with the traditional red rubber, the foam is indexed and every single stamp tells a story, has a meaning and are all oh So Suzy!!

Guess what???  Suzy was gracious enough to allow me to do a giveaway!!!  Yayyy!!!

I’m giving away the Black Slinky Dress stamp to a random winner who leaves me a comment below letting me know what gives you confidence!

So, now its your turn, so go and create something Monochrome!!!  I can’t wait to see what you come up with.

For more inspiration, check out my fellow Design Team members blog for more awesome work.

Design-Team

Gillian Ross

Hazel Hodgkins

Jen Wills

Joyce Mehrberg

Judy Marino

Kimberly Wiener

Kymona Tracey ←Me

May Park

Melissa Chipperfield

Tracey McNeely

Our Guest Designer this week:

Maria

Our Sponsor this week is STAMPlorations.  They have amazing stamp sets!!

Supplies used:

Black Slinky DressConfidenceWedding DressHappiness isclassiccrestsolarwhtie

Thanks for stopping by!!

~Kymona

CAS Merry Christmas…

Hello everyone!!  I’m here today with the DoubleClick Skittles 8th Challenge.  The theme is Polka Dot or Circles!!  How fun is that?

I decided to create a nice clean and simple card for this challenge.  When I thought about circles I wanted to have more then one.

Take a look:

Merry Christmas

How many circles have you counted on this card.  Amazing right!!  There are 3 circles in this card. Plus the polka dot background!!!

The big circle, the smaller circle and the Ginch Green Skittles are on this card.

To create this card:

1. My card base is 4.25 x 5.50 scored at 5.50.  My Lawn Fawn Snow Day patten paper which is from the Simon Says Stamp 2014 November Card Kit  was cut to 4.25 x 5.50 and adhered to the inside of the card.

2. I cut the circles out with Stampin’ Up! Circles Framelits.  I used the third and fifth dies.  I cut out the card stock and the acetate.

3. I cut out two of the smaller circles and I also cut out the edged of the bigger circle to cover up the adhesive on acetate in the back.

4. I adhered the acetate down with Tombow Multi-Liquid glue.

5. I adhered the smaller circles down with Stampin’ Up! Fuse Fast adhesive.

6. I cut a 3/4 inch banner, rounded the corner, flagged the end and stamped the sentiment from Simon Says Stamp Be Joyful stamp set which is included in there 2014 November Card Kit.

7. I add one Ginch Green Skittles to keep my card nice, clean and simple.  That green skittle gives the card a really nice pop of color on the front of the card.

So what do you think?  Now its your turn!  Please head on over to DoubleClick Connections to play along with us.

Dates: October 29th, 2014 – November 11, 2014

Challenge: Polka dots or Circles

You don’t have to have skittles to participate!

I hope to see you there!!

Supplies used:

SSS November Card Kit Circles Framelits DieTombow Multi-Purpose AdhesiveFuse Fast Adhesive SSS Be JoyfulGinch Green Skittles

Thank you so much for stopping by!

~Kymona

Are You Enjoying Your Journey?

Hello everyone!  I’m here today with CAS(E) this sketch #85.  This week’s sketch is from N@Ali.  I love this sketch, its clean and simple.


CTS_85

Take a look at my card:

Enjoy the Journey 2

I love how this card turned out.  It has the CAS factors.  One focal point, one sentiment, little embellishments and a lot of white space!

I used my brand new Life’s Journey stamp set and Super Geotag die from Simon Says Stamp’s new release called This Is The Life.

I love this new set.  Life really is journey that we are on and we have no clue were we will end up.  There are times when we set our path and something happens that take of off that path.  Its up to you to get back on path no matter how hard it might, but we MUST enjoy the journey or it will not be worth it.

So what do you think?  Please let me know by leaving a comment below.

Supplies used:

Lifes JourneyclassiccrestsolarwhtieNeenah Desert Storm CSMME Enamel DotsStampin' Trimmer3M Mounting Tape