Altenew Die and Sticker Scrapbook Layout

Second Post for Today
If your looking for the Craft Fantastic post, click here

Hello everyone!!  I’m up on Altenew Scrapbook Blog show you how to use Altenew Scripty Words Die 2 and Altenew’s Puffy Stickers Sheets to create an Altenew Die and Sticker Scrapbook Layout.

Let’s Take a Look:

Scripty Words Die 2

To see how I created these pocket page cards with a complete tutorial head on over to Altenew’s Scrapbook Blog.

Supplies used:

(Thank you so much for stopping by. Compensated affiliate links used at no cost to you.  All products were personally purchased.  This post was not paid or sponsored. )

   scrapbook collection kit

Thank you so much for stopping by!!

Using A Die Cut To Create A CAS Card – a2z Scrapbooking Challenge

Second Post for today
If your looking for So Suzy Stamps post, click here

Hello everyone!!  I’m here today with a new a2z Scrapbooking Challenge. Its all about Clean and Simple and I have a super fun technique for you: using a die cut to create a CAS card!

Yup, you can use your dies to create CAS cards.  Go figure!!

Take a look at the card I created:

Grateful

Creating this was pretty simple.

  1. Take Hero Arts Paper Layering Large Lotus and die cut the white cardstock panel.
  2. Use Hero Arts Handwritten Grateful and stamp the sentiment in the top left hand corner.
  3. Adhere a scrap piece of watercolor paper with Plus adhesive behind the flower so that color shine through. watercolor panel
  4. Trim 1/2″ of the white cardstock so that the black cardstock base will show on the left side of the card.
  5. Adhere the white card panel on top of the black cardstock using Plus adhesive.
  6. To finish the card off add some Hero Arts Gems in the center of the flower and around the sentiment.

Here is a closer look at that die cut:

flower close up

What do you think?

I hope you love what you see and that it inspires you to join us this month. You have the entire month to create a new project and enter it into our challenge. By entering you will have a chance to win a $25 Gift Certificate to the a2z Scrapbooking Store. Winner will be announced on the 7th of June.  Good Luck!

If you would like to purchase any Hero Arts products please head on over to the store and use the coupon code KYMONA15 to get 15% off your purchase.

Supplies used:

HA Large Lotus die HA Grateful   Recollections White Heavyweight Recollections Black Heavyweight

Confections The Classics InksPrima Watercolor paper 6x6.jpg

Thank you for stopping by!!

Kymona

So Suzy Stamps August 2015 Challenge

Hello everyone!! I’m here with So Suzy Stamps and our August Challenge!!

  Perfect for our new challenge this month which is Under the Sea!!

Under the Sea

Check out my card:

Happiness is (SoSS)

 Isn’t that little octopus the cutest you’ve seen!!  I must tell you I colored him a couple of times with different mediums until I settled on this guy.  I colored him with my Copic Markers and Wink of Stella!!

I fussy cut him out and adhered him to my cut out Stitched Party Banners from Lawn Fawn.  I used all of the dies in that set to create my card.  I added some orange bakers twine between the big banner and the small banner.

To finish the card off, I added Your Next Stamp Crystal Clear Gumdrops.

So what do you thing?  Please let me know below!!

Check out my fellow design team members!!  You will not want to miss it..

I hope you join in our challenge this month.

Supplies used:

Octopus Stitched Party Banners Tangerine Lawn Trimmings Copic Markers Wink of Stella clearclear gumdrops small

Thanks for stopping by!

~Kymona

YNS Sketch and Color Challenge #18

Hello everyone!!!  I’m here today with Your Next Stamp (YNS) and the Sketch and Color Challenge #18!!

Each challenge has a sketch and a color combo to choose from.

Take a look at the sketch:

YNSSketch18

Take a look at the color combo:

YNS Color Challenge 18

I choose to go with the sketch! Take a look at my card:

 Hello (YNS)

YNS Supplies: Waddles Rainbow Fun, Waddles Rainbow Fun Die Set, Whatnot Sentiment Five, Plant Some Kindness

Other Supplies: Simple Stories So Fancy Pattern Paper, Lucy Adams Cherry Blossom Sequin, Glossy AccentsCopic Markers, Circle Die, Neenah Solar White Cardstock

I cut all of my pieces of papers according to the sketch.  Instead of using an actually circle I decided to create a shaker window in the shape of a circle.

I use my fuse tool to create the shaker packet and adhered it to the front panel of the card.  I adhered all of the pieces together to create this cute and fun card.

I used Copic Markers: C1, C3, RV17 to color my penguins.

So are you ready for the new challenge?

You have until July 23rd at midnight EST to play along and submit your project on the YNS Blog post.  One random participant will win a $15 gift certificate to the Your Next Stamp Store.  If YNS stamps or dies are the focal point then the winner receives and additional $5 gift certificate fro a total of $20.  The winner will be announced on the YNS Blog the Sunday after the challenge closes.

Supplies used:

Waddles Rainbow FunWhatnot Sentiments FivePlant Some KindnessSo Fancy paper Cherry Blossom Sequinglossy accents Waddles Rainbow Fun DiesCopic Markersclassiccrestsolarwhtie

Thanks for coming back!!

~Kymona

Waffle Flower Crafts – Photo Inspiration

Hello everyone!!  I’m here with our new Waffle Flower Crafts Photo Inspiration Challenge!!!

This is our eighth challenge for 2015 and the weather has finally warmed up for us up her in the Northeast!  Much better then two weeks ago!!

This weeks photo is pretty and super springy (is that a word?).

Take a look:

Photo Inspiration May 11

Perfect colors for a Mother’s Day brunch!  Wait, for all of you who are mothers and mothers-to-be, Happy Mother’s Day!!  Its a day late, but better late then never!!

For this challenge, I decided to use the colors instead of the picture for inspiration.

Take a look at my card:

Congrats

I’m playing with a couple of new dies from the last release.  Did I tell you I love all of the stamps and dies that were released.  All of them are totally amazing.  If you haven’t seen them, you must head on over to Waffle Flower Craft Store and check them out.

I decide to go with an all black background so that those pretty colors can shine through.

I inked my cardstock with Distress Ink Mustard Seed and Spiced Marmalade then cut it with Waffle Flower Craft Doily Circle Die.

I adhered the die cut off to the side of the card front with adhesive and cut off the excess.

Then I used the Congrats Die Cut and cut it 4 times to have a stacked sentiment.

Super easy!  The doily is so pretty once its cut out.  Its a must have.

So what do you think?  Please let me know.

Now its your turn!! I can’t wait to see what you come up with.

I’m linking my card up to Virginia’s View Challenge.

Layers and Dimensions

Supplies used:

Doily Circle Die Congrats Die Mustard SeedSpiced Marmalade

Thank you for stopping by!

~Kymona


Get Sketchy Challenge

Hello everyone!!  First let me say thank you to all of you for your well wishes for my dad.  We have a long way to go but day by day, we are getting there.  Please continue to pray for him.

While he slept last night, I had a chance to play with some of my craft stuff.  The week before he took sick, I received a lot of WPlus9 goodies that I haven’t had a chance to play with.  So I decided to play along with their Get Sketchy With Joni #1 Challenge.

JoniSketch1Take a look at my card:

You are my sunshine

Oh man did I have fun creating this card.  I knew I had to be fast because my dad is dead set on going back to work.  He use to work nights so when 11pm comes he jumps up to go to work so we have to be prepared to stop him.

So, I need to make a card that didn’t require all of my time.  So I decided to make a shaker card and use my We R Memory Keepers Fuse!!

I bought my Fuse some months back from HSN when they had the bundle for a great price.

I’m not sure why I bought it, maybe the price was right but in any case, I’m glad I bought it.

So last night, I opened the package an started to play.

Take a look:

Fuse at work

Jennifer McGuire used her fuse to create a shaker card and I knew I wanted to give it a try.  Check out my circle that was created using one of the photo sleeves that came with my fuse.

I used my circle die as a guide to fuse the plastic together.

Check out my shaker pocket after I add my Star Shine sequin from Lucy’s Card Little Things Collection.

IMG_2829

OMG, super easy and fun.  Now I know what I can create as my dad sleeps.  I will have to create some more.

For the rest of my card:

1. I used Studio Calico’s May Card Kit pattern paper to create the rest of my card.

2. I cut the pattern paper using Wplus9 Sunshine Layers Die to create my card panels.

3. My tag was created using Pretty Pink Posh Stitched Duo 3 Die and Simon Says Stamp Stitched Circle.

4. I used the 3rd biggest circle die to cut a circle in the tag and the gray pattern paper.

5. I added my shaker pouch in between the tags die and the gray pattern paper with Tombow Extreme adhesive.

6. I die cut the Sunshine sentiment out the pink pattern paper 4 times and adhered them together with Tombow Multipurpose adhesive.

7. I stamped the sentiment from WPlus9 Sending Sunshine right above the Sunshine die cut in My Favorite Things Hybrid Ink.

8. I added Doodlebug Design Birthday Girl Sprinkles to my card front to finish my card off.

Take another look:

You are my sunshine2

I love how this card turned out and I finished in time before my father woke up!!  Yayyyy!

It felt good to craft again.

So what do you think? I love how this card turned out turned out.

Let me know what you think below.

I’m also linking my card up to Virginia’s View Challenge.

Layers and Dimensions

Supplies use:

fuse bundleStar Shine May Card Kit Sunshine DieStitched Duo 3 Die Stitiched CircleTombow XtremeTombow Multi-Purpose AdhesiveDoodlebug Sprinkles Birthday Girl

Thank you so much for stopping by!

~Kymona

Thanks So Much!

Hello everyone!! I’m here today with Papertrey Ink Make It Monday Challenge.

This week Lexi showed us how to create a white on white die cut card with a pop of color.  Totally love this idea.

Take a look at my card:

Thanks so much

Isn’t this apple die cut the cutest!!  I love their new Apple Die with the Apple Mini Stamp Set.

I simple die cut the apples and then die cut the thanks with Simon Says Stamp Schoolhouse cardstock.

After die cutting the “thanks”, I carefully cut the sentiment away from the apple.  I adhered the thanks and the apple outline with Tombow Multipurpose Glue.

I stamped the sentiment with My Favorite Things Hybrid Black Licorice Ink.

I adhered my apple to the card base with foam tape.

Super easy and totally fun.  I love these stamp and die set.  I can’t wait to play again.

I took another photo with a different background, playing around with my new Foldio in the middle of the night.

Thanks so much 3

So what do you think?  Let me know below.

I’m also linking this card to Simon Says Stamp Wednesday Challenge: Clean and and Simple

wednesdayblog-logo

Supplies used:

PTI Apple Mini Stamp Set PTI Apple Die SSS schoolhouse redMFT Hybrid Black Ink Tombow Multi-Purpose Adhesive

Thanks for stopping by!

~Kymona

Smile…

If your looking for the Waffle Flower Craft Challenge-Photo Inspiration click here.


Hello everyone!!  I’m here today with CAS(E) this sketch!

It’s been a while since I played along so when I saw Michelle’s sketch, I knew I wanted to play along.

CTS_105

Isn’t this a pretty sketch!  I ordered some Penny Black stuff and I knew I wanted to use the flower from their Sunny Hello stamp set.  I was just worried it wouldn’t arrive in time but IT DID!!  Yayyyy!!  I love when USPS delivers on time.

(By the way, the stamp set is on sale at Joann’s for $9.59, can’t bet that.)

Lets take a look at my card:

smile

This photo doesn’t do that flower justice!  That flower really shimmers.  I used Perfect Pearls to color that flower.

Take a closer look:

Smile close up

Take a look at that shimmer! This was my first attempt at working with Perfect Pearls.  I totally love it!  Its so pretty.

I created a video showing you how I used the perfect pearls to color that flower.

Wasn’t that cool.  I love watching that.

Here is how I created my card:

1. I cut my card base from black cardstock into an A2 size (4.25 x 5.50) scored at 5.50

2. I cut my white card base to 4 x 5.25.

3. I stamped the large flower from Penny Black’s Sunny Hello stamp set using Versamark onto my white cardstock.

4. I used Rangers Perfect Pearl Sunflower Sparkle to add color to that flower.  I used a clean brush and pounced the powder onto the flower.  No spreading with the brush for fear that it will smear.

(The perfect pearl is on sale too at Joann’s for 1.79. Great deal)

5. Once the entire image was covered.  I taped the extra off and then use my brush to wipe the excess powder around on the card to give a little shimmer to the card panel.

6. I die cut Smile 3 times from Penny Black Creative Dies-Hooray.  I attached all of the die cuts with Tombow Multipurpose Adhesive. I attached the die cut to the front of my card panel.

7. I added Simon Says Stamp Sparkle and Shine Sequin and Pretty Pink Posh 4mm and 6mm sequin using glossy accents.

8. I attached my card panel with Tombow Xtreme Adhesive.

That’s it!!  I love how elegant this card turned out.

What do you think?  Let me know.

I’m linking up to the NBUS Challenge.

NBUS

I’m also linking up to Simon Says Stamp Wednesday Challenge.

wednesdayblog-logo

I’m also linking up to Stempelkuche Anything Goes Challenge.

Stempelkuche blog badge

Supplies used:

clear_00-000_pkgVersaMark51-029_sentimentTombow Multi-Purpose AdhesiveSSS Sparkle and Shine sequin

Pretty Pink Posh Sequins 4mm Pretty Pink Posh 6mm Sequins glossy accentsTombow Xtreme

Thanks for stopping by!

~Kymona

Waffle Flower Challenge – Photo Inspiration

Hello everyone!!  Happy New Year to all of you (just in case this is your first time visiting me).

I’m so excited today!!!  This is my first post as a Waffle Flower Crafts Design Team Member!!!

So I have to admit something to all of you.  I planned this post two weeks ago because for the new year I want my post to be scheduled and ready to go out. So I did everything I needed to do.  I hit schedule and I thought I was set.  Until I went back to preview it and I realized I couldn’t find it.  I started to panic.  I couldn’t find the post.  Something told me to have my brother check his email and there it was.  I thought I was going to cry.  I sent the post out, but it wasn’t in my feed.  That’s because I didn’t change the year from 2014 to 2015 so it was under my archive but everyone who gets emails from me received the post, even the Twitter world.

I was so scared that I messed things up. I pulled the post and changed the date and I deleted it from Twitter.  I emailed Tessa and she assured me that everything will be ok.  So those of you who get emails from this blog, received a sneak peak already.

So with that said:

I’m working really hard to make this year one of the best years ever.  Thanks for coming on this journey with me.

So without farther ado, lets get started.

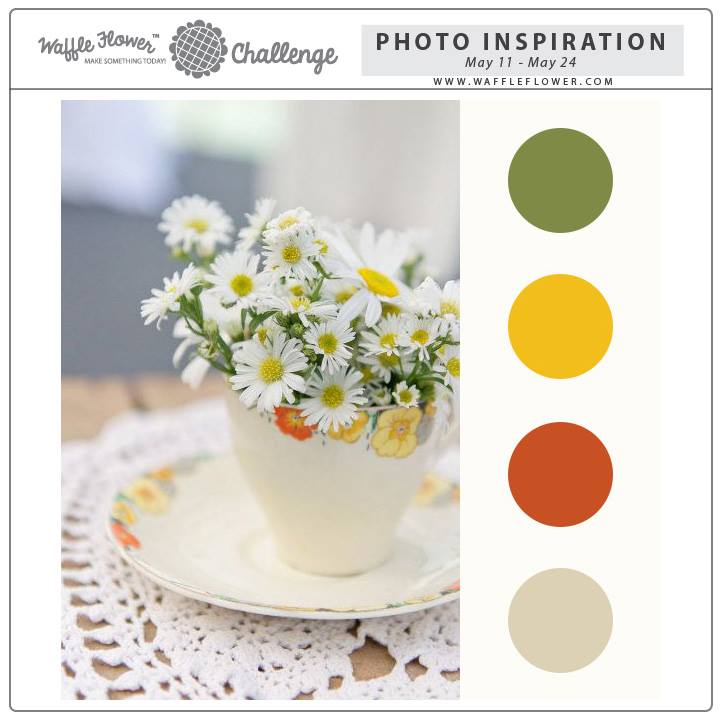
Our first challenge for the year is Photo Inspiration Challenge.  Take a look at the colors below.

WF Challenge Jan 12Aren’t these colors pretty together.  It give off a very warm feeling.  It makes me want an cup of hot chocolate to drink while I create.

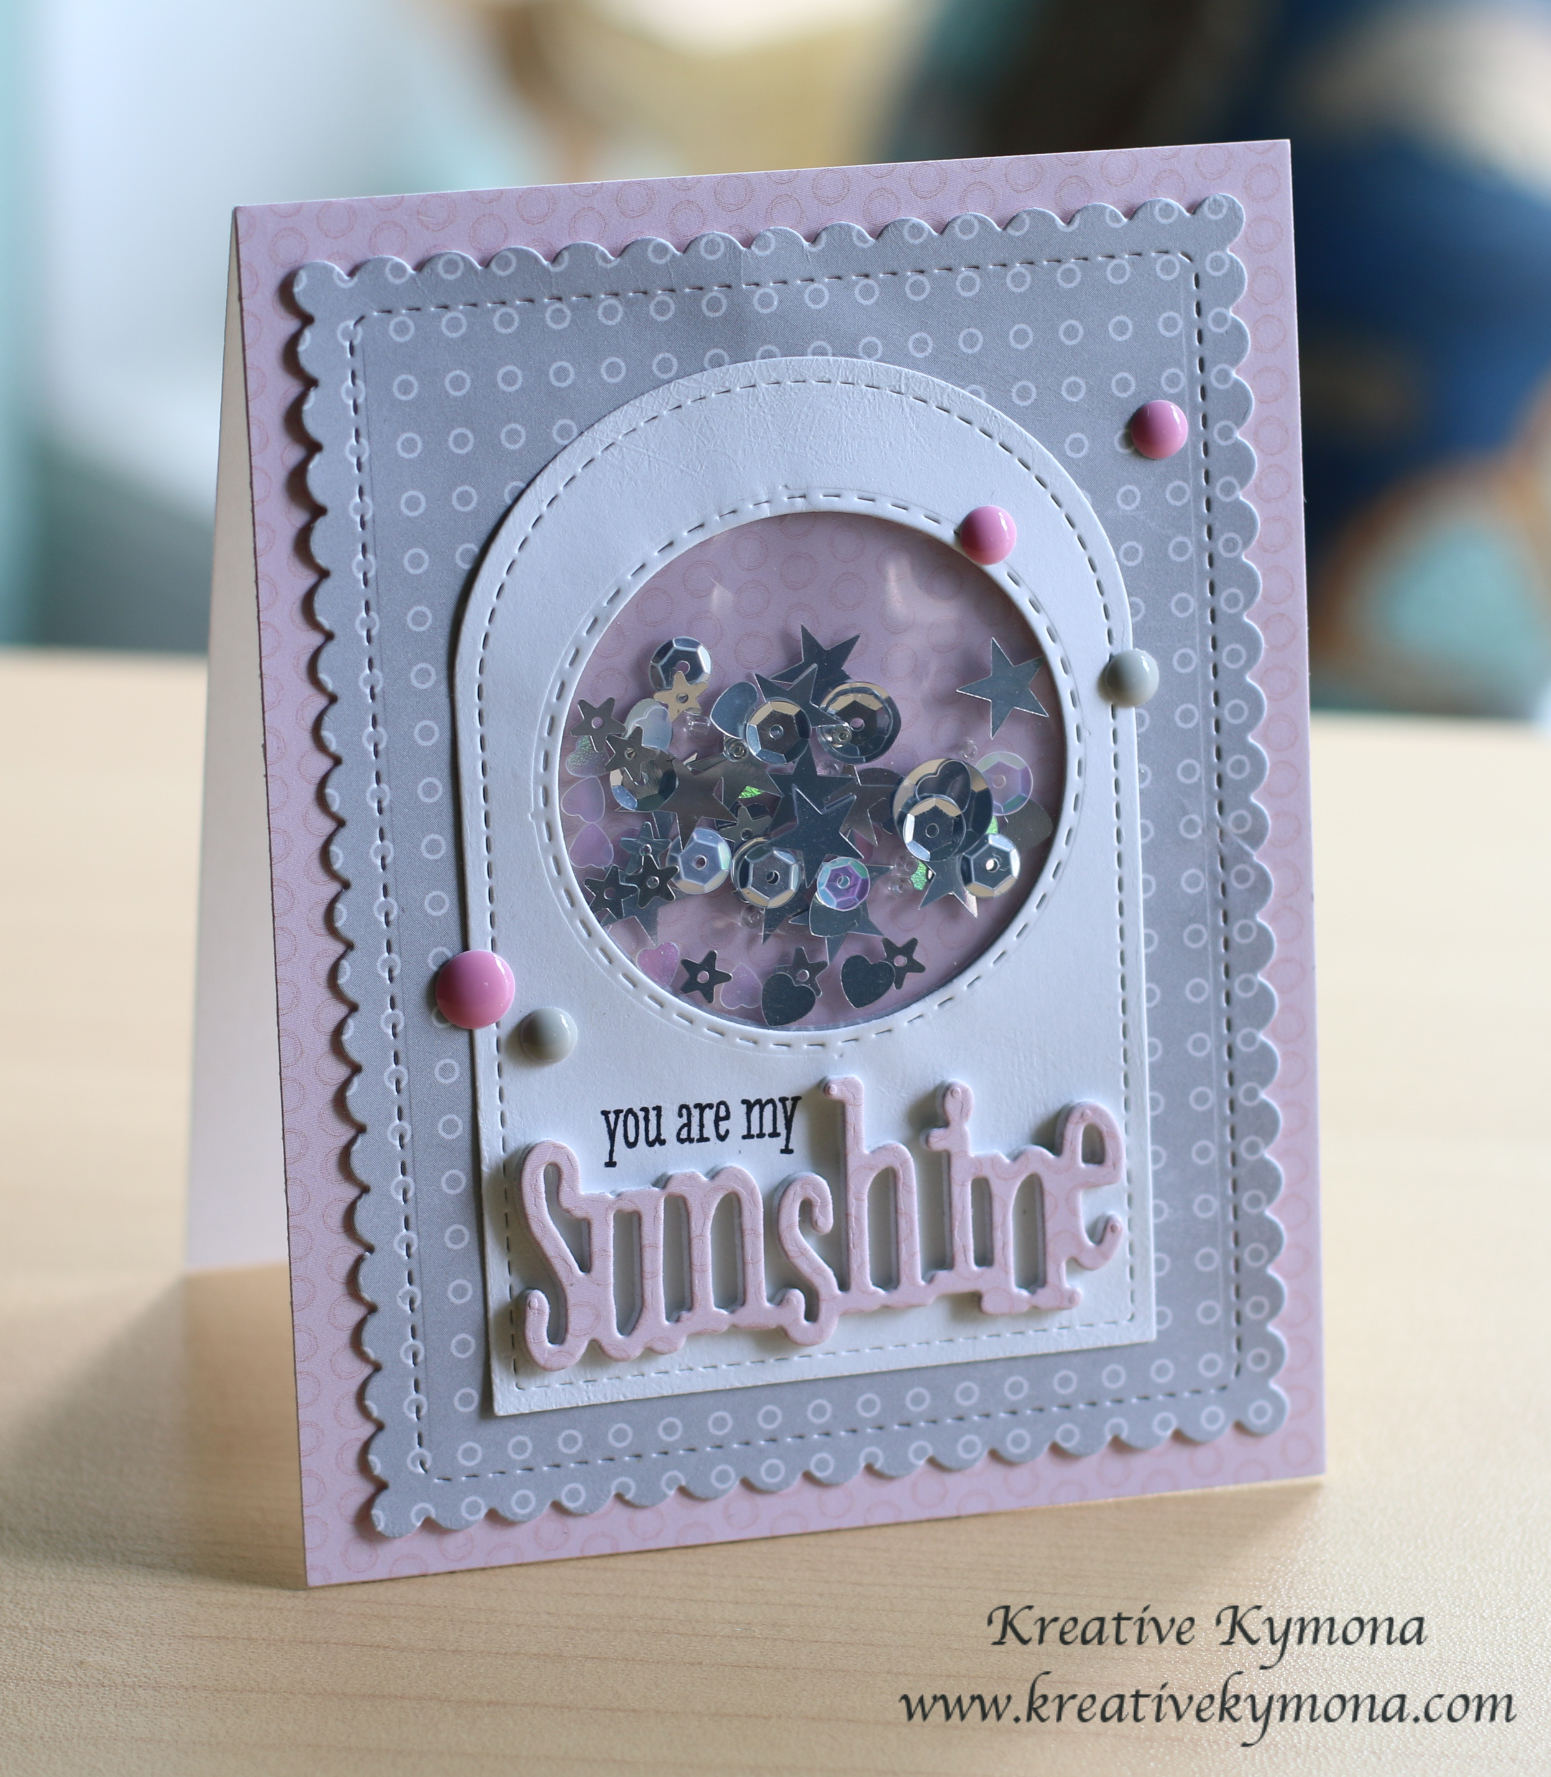
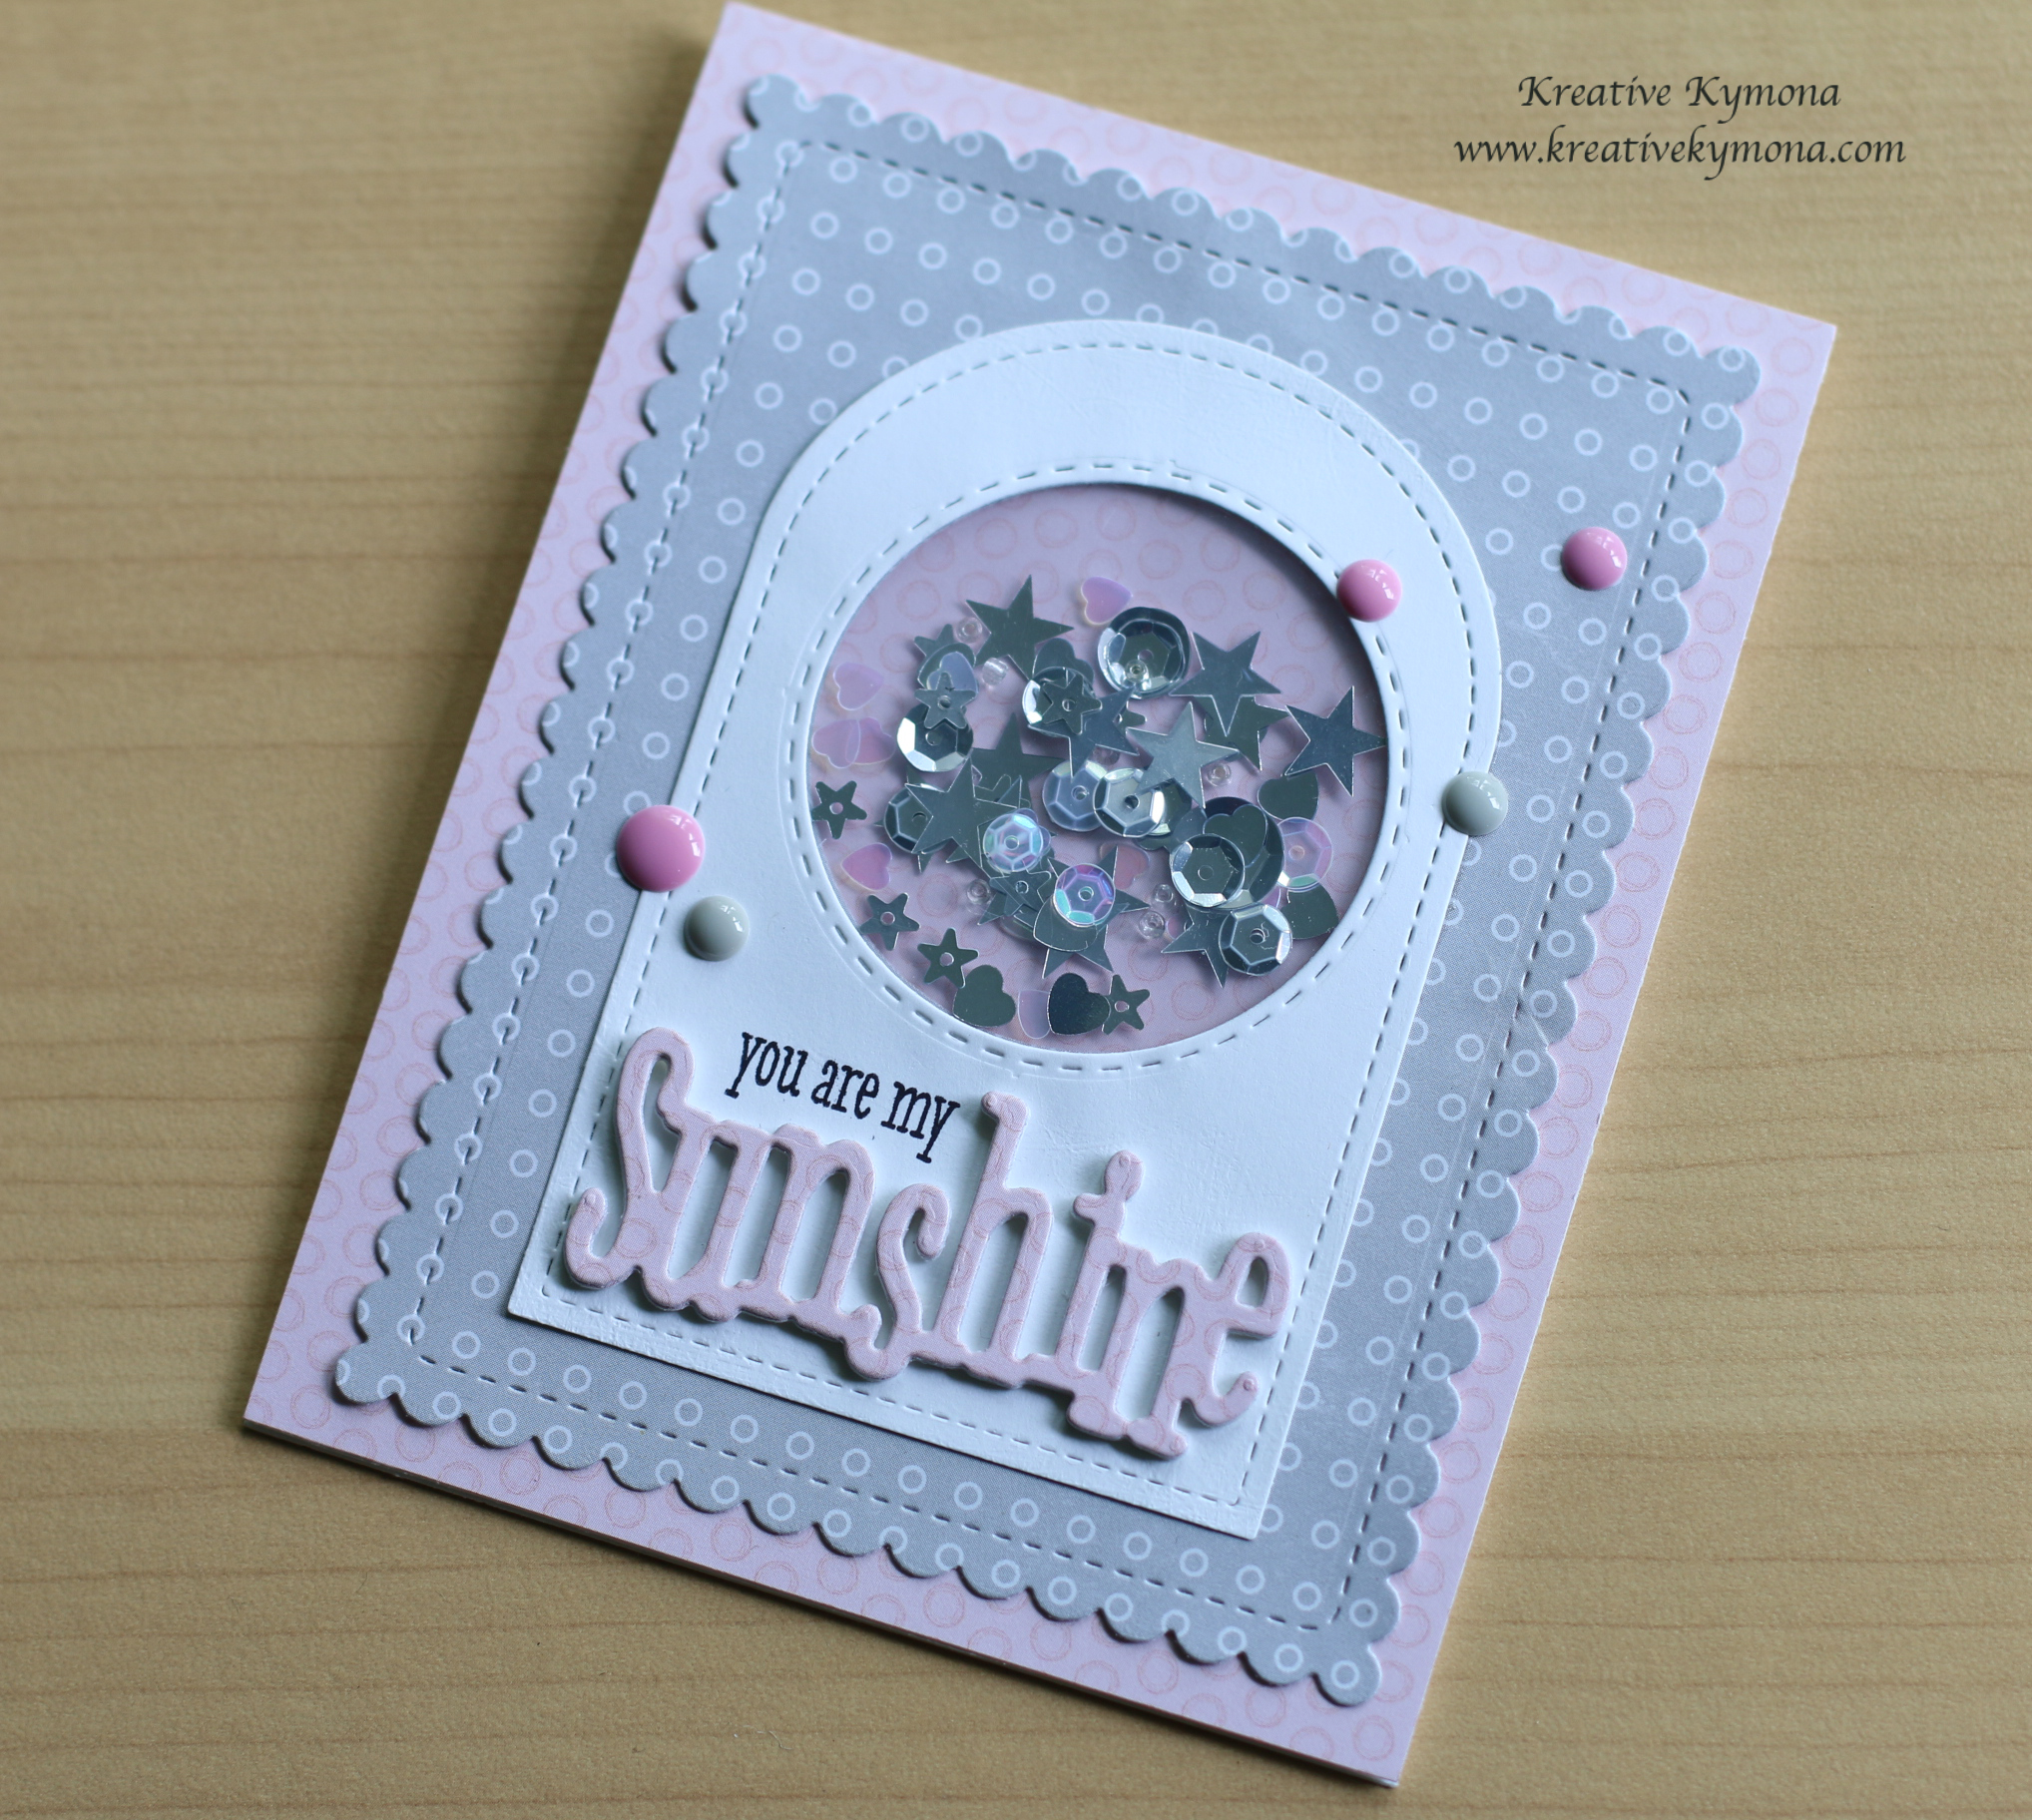
So now that you’ve had a chance to see the colors for yourself and how they look in a room, take a look at my card:

Hi, Thank you

What do you think?  I really love how my card turned out.  I have to admit,  I’ve never made a card using a photo for inspiration before.

I looked at this picture for a couple of days before I sat to create.  I thought long and hard about what I wanted to create.  Once I figured out what stamp set and die I wanted to use, I shopped my paper stash for the colors.

I was worried because I didn’t remember seeing all of these colors in my stash.  Once I found them, I knew I was ready to create.

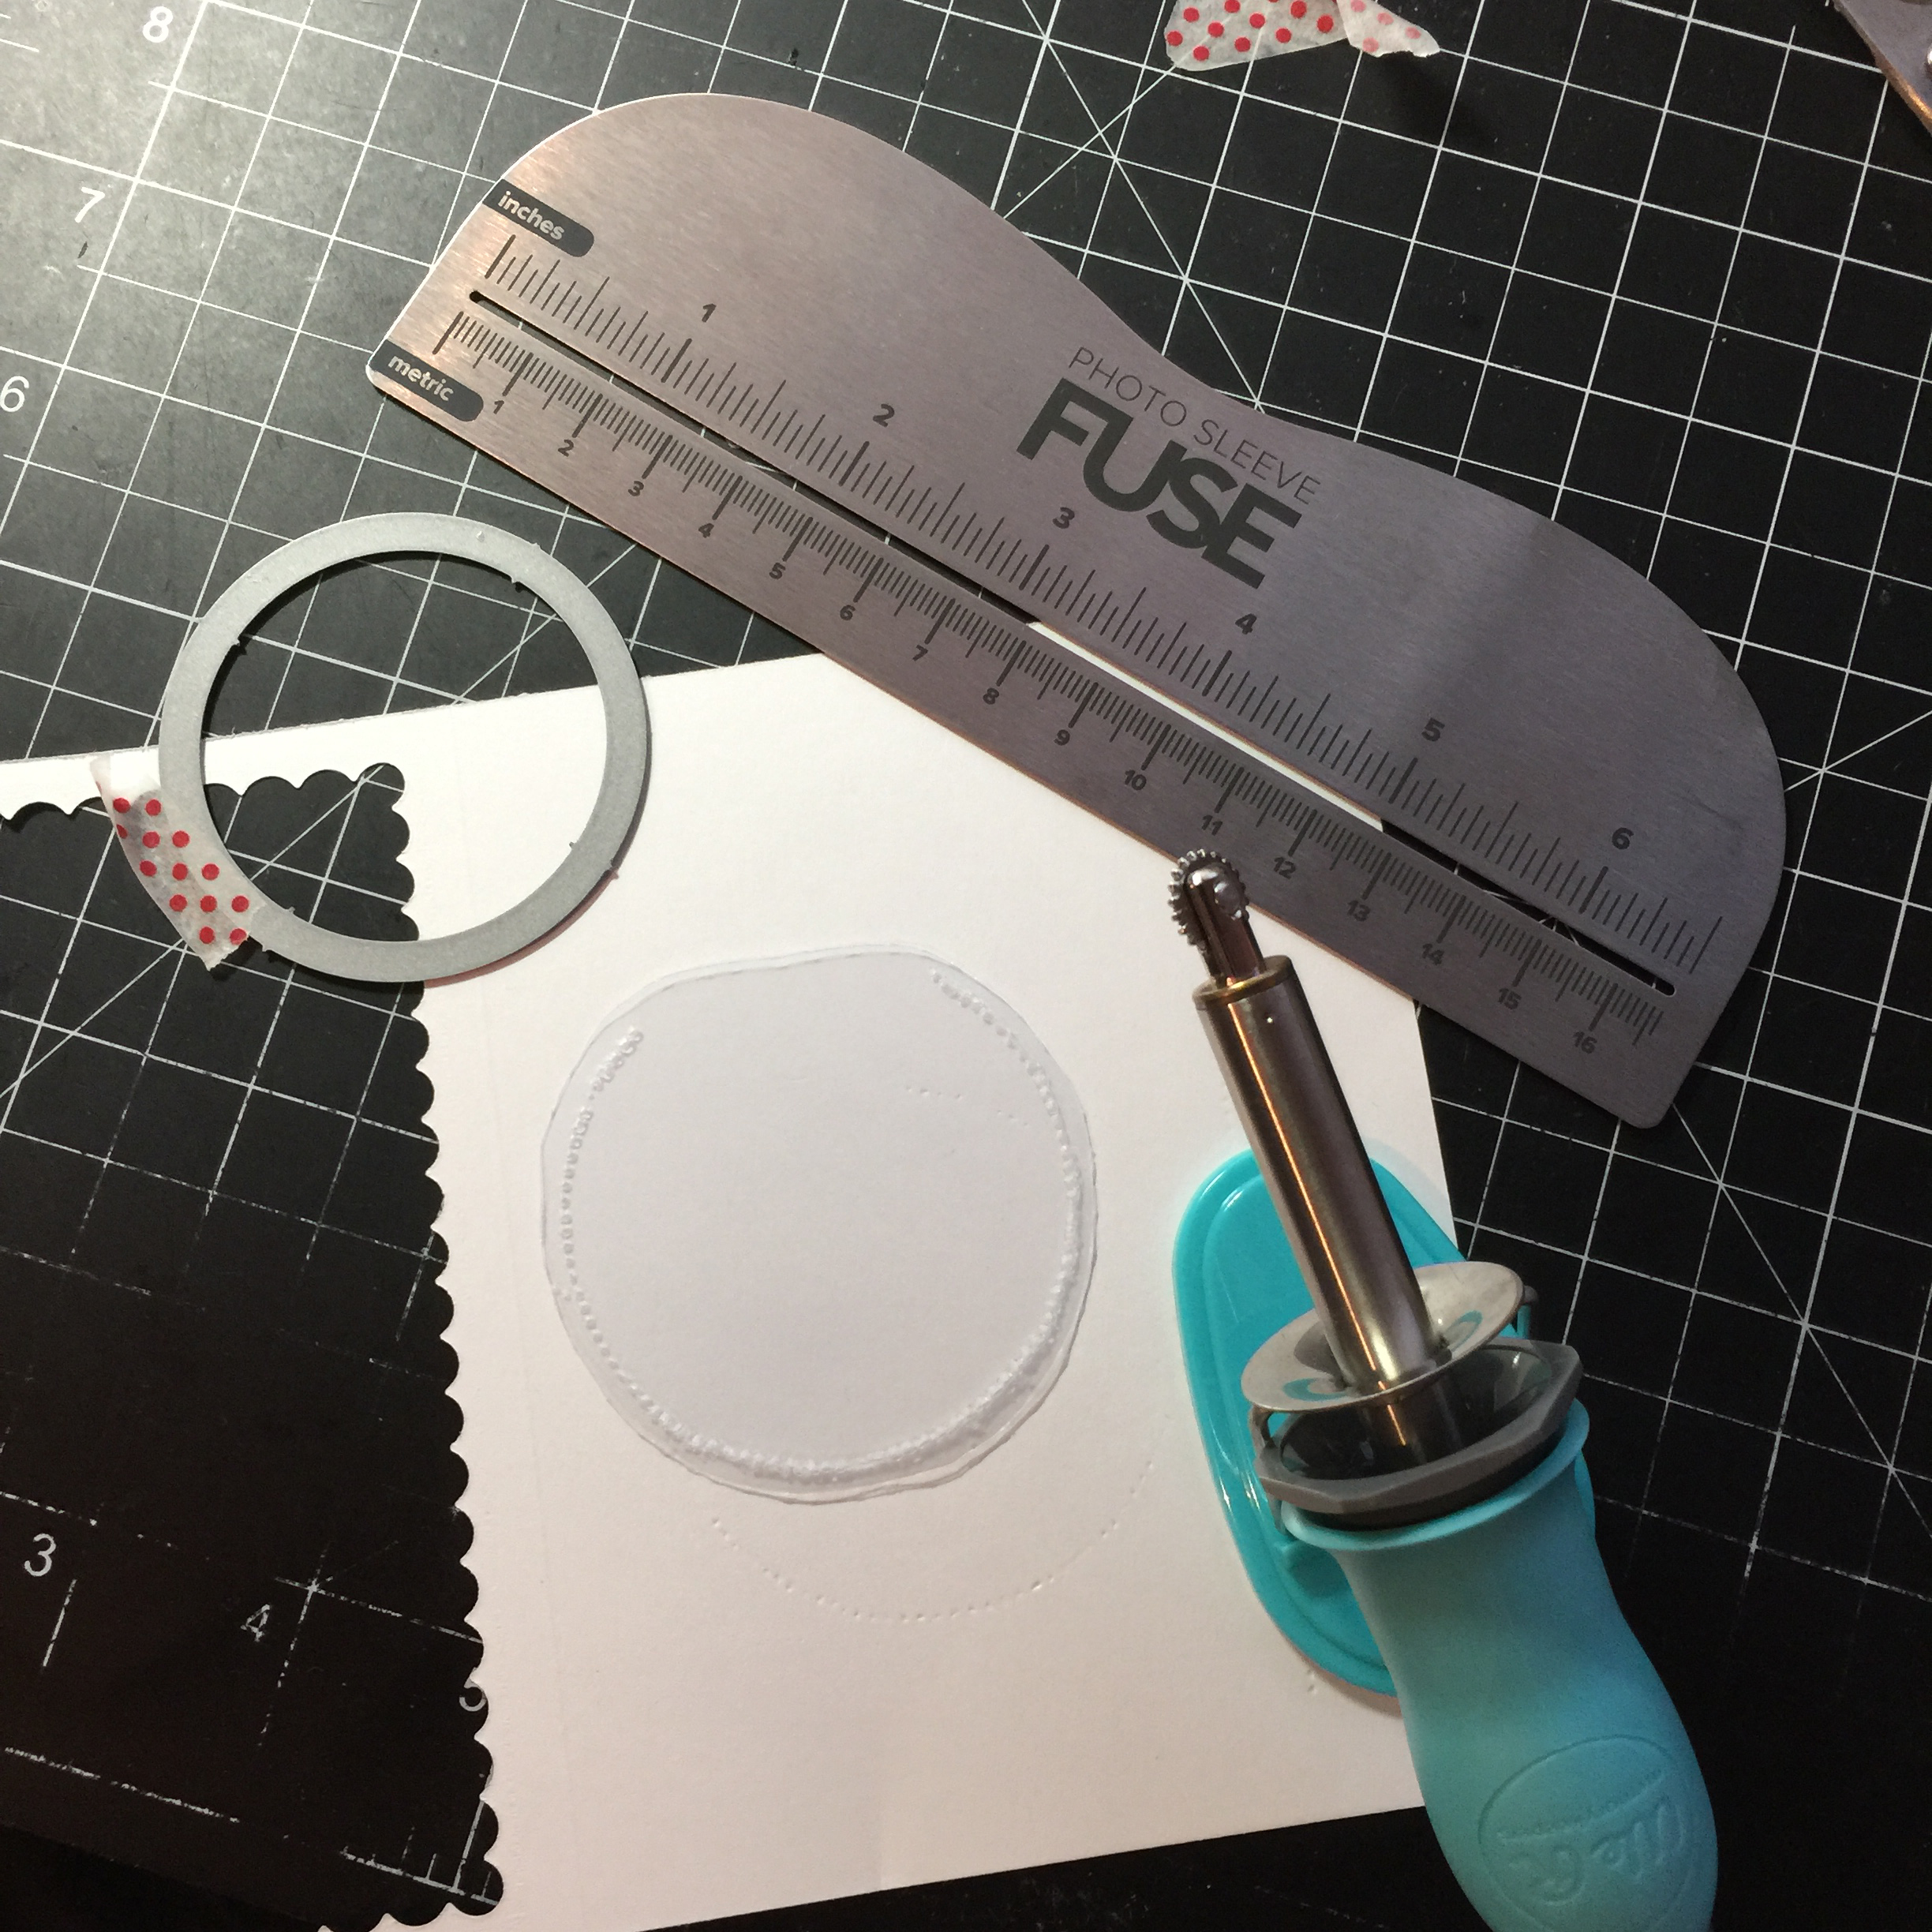
So here is how I did it:

1. I created my A2 size (5.50 x 4.25) card base using Stampin’ Up! Rose Red cardstock.

2. I embossed the front of the card base using Stampin’ Up! Polka Dot embossing folder.

3. I cut a small piece of Simon Says Stamp Soft Navy and Dark Chocolate cardstock then embossed it with Stampin’ Up! Perfect Polka Dot Embossing Folder.

4.  I attached the two pieces, one on top of the other, with tape.  Then I used Waffle Flower Crafts Flower Circles Die Set and cut a stitch circle out of the Stampin’ Up! Lost Lagoon cardstock.

5. I stamped the “thank you” sentiment from Waffle Flowers Crafts 100% Love Stamp Set with Stampin’ Up! Rose Red Ink.

6. I attached the stitched circle die cut to the stamped thank you sentiment piece.

7. I stamped the “hi” sentiment from Waffle Flower Craft 100% Love Stamp Set with Stampin’ Up! Lost Lagoon Ink.

8. I attached the hi sentiment to the front of the circle with foam adhesive.

9. I attached some Pretty Pink Posh 4mm and 6mm sparkling clear sequin randomly on my card front.

Wala!!  My card is complete.  Easy as 1-2-3!

So what do you think?  Did I meet the photos expectations?  Let me know.  I would love to hear from you!!

I hope my card gives you some inspiration to participate in the Photo Challenge. It runs for two weeks, starting today, January 12th and ending January 25th.

Now its your turn to play along.

Some of the fine details are:

  • Use at least one Waffle Flower Crafts product on each entry. List the product name in your blog.
  • Enter as many times as you want. Post the graphic above with your blog post.
  • Combine up to 3 other challenges if you want.
  • A Quick Tip: If you share your projects on social media sites, hashtag #waffleflowercrafts and/or #waffleflowerchallenge,  this will allow your projects to be seen by more people!

You will fine the rules within each challenge post for future reference.

Supplies used:

100 Love Stamp Set Waffle Flower Flower Circles Die Tiny Word Bubble Die Soft Navy BlueSSS Dark Chocolate csRose Red CSLost Lagoon CSLost Lagoon InkRose Red InkPretty Pink Posh Sequins 4mmPretty Pink Posh 6mm Sequins 3M Mounting TapePerfect Polka Dots Textured Impressions Embossing FolderPolka Dot Embossing Folder

Thank you so much for stopping by!!

~Kymona

Seriously, You Rock!!

Hello everyone!  I’m here today playing along with Simon Says Stamp Flickr group!  This is the second time, I’m playing along.  Flickr is new to me, so it takes me some time to remember my password, then to upload and figure out how to get my photos in the groups feed.  I’m will get this down pack very soon!!

In any case, the challenge runs for two week and this week’s challenge #7 is all about stencils. I love working with stencils!  They are so easy and versatile to use.

Take a look at my card:

Seriously You Rock

What do you think? I wanted my background to have an ombre effect.  Did I achieve that?

I also wanted some of the distress inks to move around the card so I sprayed a little bit of water over the card front but I was unable to achieve the effect I was looking for.  I didn’t use watercolor paper so the water just warped my paper.  You can see that in the orange section of my card.

Here’s how I created this card:

1. I cut my card base to an A2 size card (4.25 x 5.50) out of Neenah Solar White cardstock.

2. I used Simon Says Stamp Flower Pattern Stencil and Ranger Distress Mustard Seek and Spiced Marmalade.

3. I sprinkled some water over the front of the card to get some of the ink to move but the water just created a warped look on the card.  I should have used watercolor paper.

4. I die cut Lil’ inker design Seriously die twice out of Simon Says Stamp Black cardstock.

5. I adhered the two die cuts using Tombow Multipurpose Glue for added dimension.

6. I used Lil’ inker design Seriously Awesome stamp set to stamp my sentiment under the die cut and the small heart.

7. I added Pretty Pink Posh 4mm and 6mm Clear Sparkling Clear Sequin.

That’s my card for today!!  What do you think?  Let me know below in the comment section.

Supplies used:

classiccrestsolarwhtieSSS Flower Pattern StencilMini Distress inkLID Seriously Word Die SSS Black CardstockTombow Multi-Purpose AdhesiveLID Seriosly Awesome StampsPretty Pink Posh 6mm Sequins Pretty Pink Posh Sequins 4mm

Thank you for stopping by!

~Kymona