{Clean and Simple} CASology 216 – Frame

Hello everyone!!  It’s CASology Tuesday!!  We are back with another Clean and Simple Cue Card just for you!!

This week’s cue card:

week-216-frame

Take a look at my card:

hello-fall-cas

What a fun cue card!!  There are so many ways to interpret this cue card.  I wanted to take the word for what it was.

I used My Favorite Things Rectangle Peek-a-Boo Window to dry emboss the frame on the front of the card using Spellbinders Embossing Mat with the Big Shot.

Then I stamped the pumpkin and sentiment from the new Right At Home Grateful Heart stamp set in the center of the frame using Clearsnap Colorbox Archival Wick ink.

After that, I watercolored the the pumpkin with Distress Ink Carved Pumpkin and Mowed Lawn.

I added a little bit of splatter for interest.

Lets take a closer look:


Nice and easy.

Are you inspired to play along?  Please let me know below!

For more inspiration, check out my fellow Design Team members blog for more awesome work.

DT Badge

Our sponsor this week is STAMPlorations!

Supplies Used:
Rect peek a boo rectangle window dierah-grateful-heart


Thank you so much for stopping by!!

~Kymona

a2z Scrapbooking March 2016 Challenge

Second Post for the day
If your looking for So Suzy Stamps March Challenge, click here

Hello everyone!!  I’m here with a2z Scrapbooking today with our March Challenge!!!

Our new challenge is all about Embossing!!!!!

Check out the card I created for this challenge:

Congrats (a2z)

Can you see the embossed triangle pattern?  I love how this turned out.

Here is how I created this card:

  1. I used Prima Watercolor Confections to create the watercolor background.
  2. Then I used Hero Arts Triangle Background and embossed the watercolor panel.
  3. After that, I trimmed the watercolor panel down, then I used Hero Arts Congrats Stamp and Cut and cut out the sentiment out of the panel.
  4. I die cut the sentiment out of some white card stock and glued them together.
  5. Then I adhered the watercolor panel to the card base.
  6. After that, I glued the sentiment together, then I inlayed them back into the panel.
  7. I added three black pearls for an added touch.

What do you think?

I hope you love what you see and that it inspires you to join us this month. You have the entire month to create a new project and enter it into our challenge. By entering you will have a chance to win a $25 Gift Certificate to the a2z Scrapbooking Store. Winner will be announced on the 7th of April.  Good Luck!

If you would like to purchase any Hero Arts products please head on over to the store and use the coupon code KYMONA15 to get 15% off your purchase.

Supplies used:

Prima Watercolor Confection HA Triangle Background Congrats stamp and cutNeutral mixed pearlsPrima Watercolor paper 6x6.jpg


Thank you for stopping by!!

Kymona

a2z Scrapbooking May Challenge

Third Post for today

If your looking for So Suzy Stamps April Release, click here

If your looking for the CS Take It Make It post, click here

Hello everyone!!  I’m here with a2z Scrapbooking today with our May Challenge!!!  The theme is Anything Goes!!

Our new challenge is super duper easy this month!!  Our challenge this month is Anything Goes!!  Use any Hero Arts product to create anything that fits your fancy.  This will be fun and interesting.  The possibilities are endless.

Check out the card I created for this challenge:

Thanks for being my friend

Oh boy, I love how this card turned out!!!

Here is how I created this card:

1. I used Neenah Desert Storm cardstock and cut it to an A2 size card, 8.50 by 5.50 scored at 4.25.

2. I used Stampin’ Up! Decorative Dots Embossing Folder and embossed the card front.

3. I cut two pieces of pattern paper from Create a Smile Feel Good Paper Pack and layered them uneven on my card base.

4. I stamped my cat and dog from Hero Arts Playful Animals stamp set using My Favorite Things Hybrid Black Ink onto a white piece of cardstock.

5. I colored both images using Copic markers: Y35, Y38, C3, C6

6. I stamp the sentiment using Hero Arts Friends stamp set.

7. I attached the white cardstock to my pattern paper using regular adhesive.

8. I added some Stampin’ Up! Brights Candy Dots, Basic Hodgepodge Clips and Whisper White Bakers Twine.

Super easy and fun.

Amazing isn’t it!! I hope you love what you see and that it inspires you to join us this month. You have the entire month to create a new project and enter it into our challenge. By entering you will have a chance to win a $25 Gift Certificate to the a2z Scrapbooking Store. Winner will be announced on the 7th of May.  Good Luck!

The Playful Animals stamp set can be found at the a2z Scrapbooking Store. If you would like to purchase any of the supplies I used please head on over to the store and use the coupon code KYMONA15 to get 15% off your purchase.

Supplies used:

playful animals Decorative Dots Embossing Folder Feel Good Paper Pack Copic Markers Brights Candy DotsBasics Hodgepodge Clips Whisper White Baker's TwineNeenah Desert Storm CS

One more thing before I go, did you know that we are on Twitter, Instagram and Facebook?. If you haven’t done so already, please follow us on these different social media outlets!! You don’t want to miss out on any fun promotions!!

I’m also linking my card up to Virginia’s View Challenge.

Layers and Dimensions

Thanks for stopping by!!

Kymona

Waffle Flower Crafts – Photo Inspiration

Hello everyone!!  I’m here with our new Waffle Flower Crafts Photo Inspiration Challenge!!

This is our sixth challenge for 2015.  I can’t believe we are in April already!!

1507057_10206178018309803_1268318448649792502_n

Isn’t this butterfly’s colors pretty! I love it.  This photo reminded me of nature and the fall.  So that is what I went back to.

Take a look at my card:

Thankful For You (WFC)

The colors in the picture reminded me of Lawn Fawn’s Sweater Weather colors.  So I went straight to that paper pack for this card.

To create this card:

It’s pretty straight forward.

1. I dry embossed the front of my card panel with Stampin’ Up! Decorative Dots Textured Embossing Folder.

2. I used Simon Says Stamp Stitched Slopes and Hills  Die to cut Lawn Fawn Sweater Weather patten paper to a half circle.

3. I attached Lawn Fawn Trimming to the front of the pattern paper and then adhered the panel to the top of the card base.

4. I stamped my sentiment using Waffle Flower Crafts Holiday Labels – Give Thanks Set with My Favorite Things Black Licorice Hybrid Ink.

5. I added Your Next Stamp Black Gumdrops to tie in the black from the sentiment.

There you have it!! Not hard at all.

So what do you think? Please let me now. Now its your turn!! I can’t wait to see what you come up with!!

I also linking this card to Virginia’s View Challenge #14: Layers and Dimensions.

Layers and Dimensions

Supplies used:

Sweater Weather Petite Paper Pack Orchid Lawn Trimmings LF Cranberry Ink Pad Decorative Dots Embossing Folder Stitched Slopes and HillsHoliday Label1 Die MFT Hybrid Black Ink black gumdrops small

Thanks for stopping by!

~Kymona

Happy Birthday Surprise!!!

Suzanne's Birthday


Hello everyone!  I’m excited about this blog post today.  Today is Suzanne’s Birthday!!  Who is Suzanne, better know as Suzy,  you asked?  Well let me tell you!

She is the owner of So Suzy Stamps and she has no idea that her Design Team is throwing her a Surprise Birthday Blog Hop.

This is the first stop on this hop!!  I’ve listed all of the participants at the end of this post just in case you miss a stop!  Each of the design team members created a birthday card for Suzy to show how much we really appreciate her.

What is a blog hop without some prizes!!  We are giving away a $15 So Suzy Stamps Gift Certificate and a free one month subscription to El Atelier de Stampartpapel to 2 lucky winners who leaves a comment on each of the blogs for a chance to win by February 22nd, 2015 by 11:59pm.   The winners will be chosen at random and announced on Monday, February 23rd at 12noon on the So Suzy Stamps Blog.  The winners will have 2 weeks to claim their prize.

Now onto the card I created for our fearless and super fun leader:

Happy Birthday Suzy

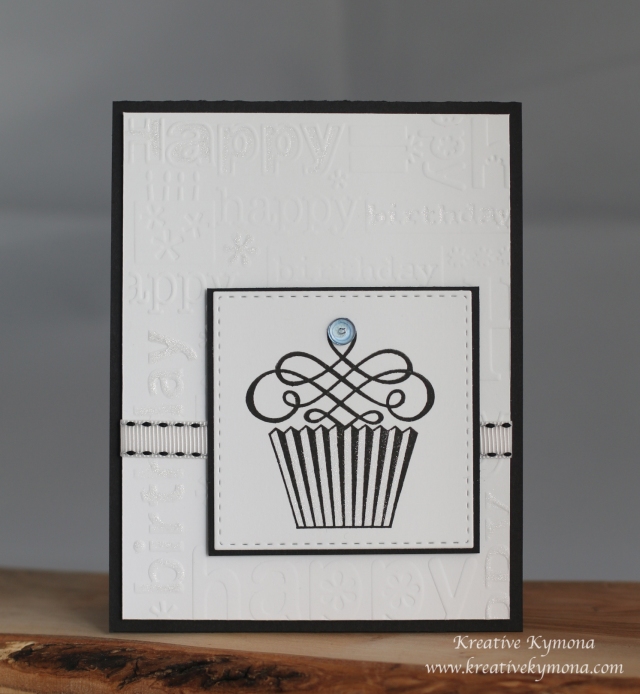
I went with black and white because I love this elegant look.  This picture doesn’t do this card justice.  The Wink of Stella pops on some parts to the card that isn’t captured in the photo.

This is how I created this card:

I cut my black card base to an A2 size card (4.25 x 5.50).  My card panel is cut to 4 x 5.25.

I embossed my card panel with the Happy Birthday Cuttlebug Embossing Folder. I adhered the embossed panel with foam tape.

I used Simon Says Stamp Stitched Squares to cut my small white panel.  Then I used that panel as a guide to cut my smaller black panel.

I stamped the Swirl So Suzy Stamp Medium Cupcake with black ink.  I added a Denim DoubleClick Skittle as the topper.

I added a random strip of ribbon to my card front.  I attached the smaller panels on top of that ribbon.

I added Wink of Stella to random places on my card.

Easy Peasy!!  I hope Suzy loves this card that I made just for her.

So what do you think?  Will she like this card?

Now on to the wonderful and talented Jenny Johnson to see what she has in store for you.

Here is the complete list of party participants:

Kymona Tracey

Jenny Johnson

Steph Ackerman

Jennifer Loftfield

Sharon Smith

Kim Rippere

Martha Lucia Gomez

Monica Taylor

Justine Hovey

So Suzy Blog

Before I go, Suzy has an awesome promotion going on today!!

If you place an order today, February 20th, you will receive 20% off all FUTURE online orders for LIFE!!  It’s the gift that keeps on giving!!

Now you can’t beat that!!  Don’t walk, run and get your famous stamps!!

Supplies used:

Medium Swirl Cupcake Denim Skittles SSS Stitched Square DieWink of Stella clear

Thanks for stopping by!

~Kymona

Clean & Simple 3 Card Class – Day 9 Textural Effects

In today’s class we learned a couple of different techniques that had textural effects.  The first one was Dry Embossing.  I’ve seen this technique before but haven’t really played around with it until now.  My card features a variation on selective dry embossing that leaves a portion of the design flat, while the remainder is embossed.

I was so excited about starting this technique, but quickly became discouraged because the embossing wasn’t coming out clean and crisped.  I tried at least five times before giving up.  Take a look at what I mean.

Textual Effect Mistake

When you look at the above picture you can see where the embossed image fades out and it isn’t suppose to.  The embossed image shouldn’t fade, it should only be in the area you actually want the embossed image.  So, I turned to my fellow classmates and teachers for some suggestions on what I’m doing wrong.  After trying again, I finally got it right.  Take a look.

Thank You textual effect

You can see exactly where I wanted the embossed dots and where I wanted a clean clear circle with no dots.  That’s dry embossing.  I’m so glad I was able to get this technique down pack.

What do you think?

Supplies used:

Classic Crest Solar White CS

Classic Crest Solar White CS

Perfect Polka Dots 117335

Perfect Polka Dots
117335

Big Shot Die-Cut Machine 113439

Big Shot Die-Cut Machine
113439


Tim Holtz  Embossing Diffusers

Tim Holtz
Embossing Diffusers

Another Thank You 133454

Another Thank You
133454

Strawberry Slush 131178

Strawberry Slush
131178


Coastal Cabana 131175

Coastal Cabana
131175

Wink of Stella Clear Glitter

Wink of Stella Clear Glitter


Signature