YNS March Feature Day

Hello everyone!!!  I’ here today with another YNS creation to inspire you and a chance to win a stamp set of your choice!!

On the 22nd of every month, YNS Design Team creates more samples featuring YNS products and shares them with all of you!!

The super duper awesome part of it all besides our awesome samples, you could win a stamp set of your choice!!  Now how super cool is that!!

Scroll to the bottom to find out how!!

This month we are focusing on “Think Spring”!!  The DT created projects with Spring on our minds.

Now take a look at the card I created to inspire you:

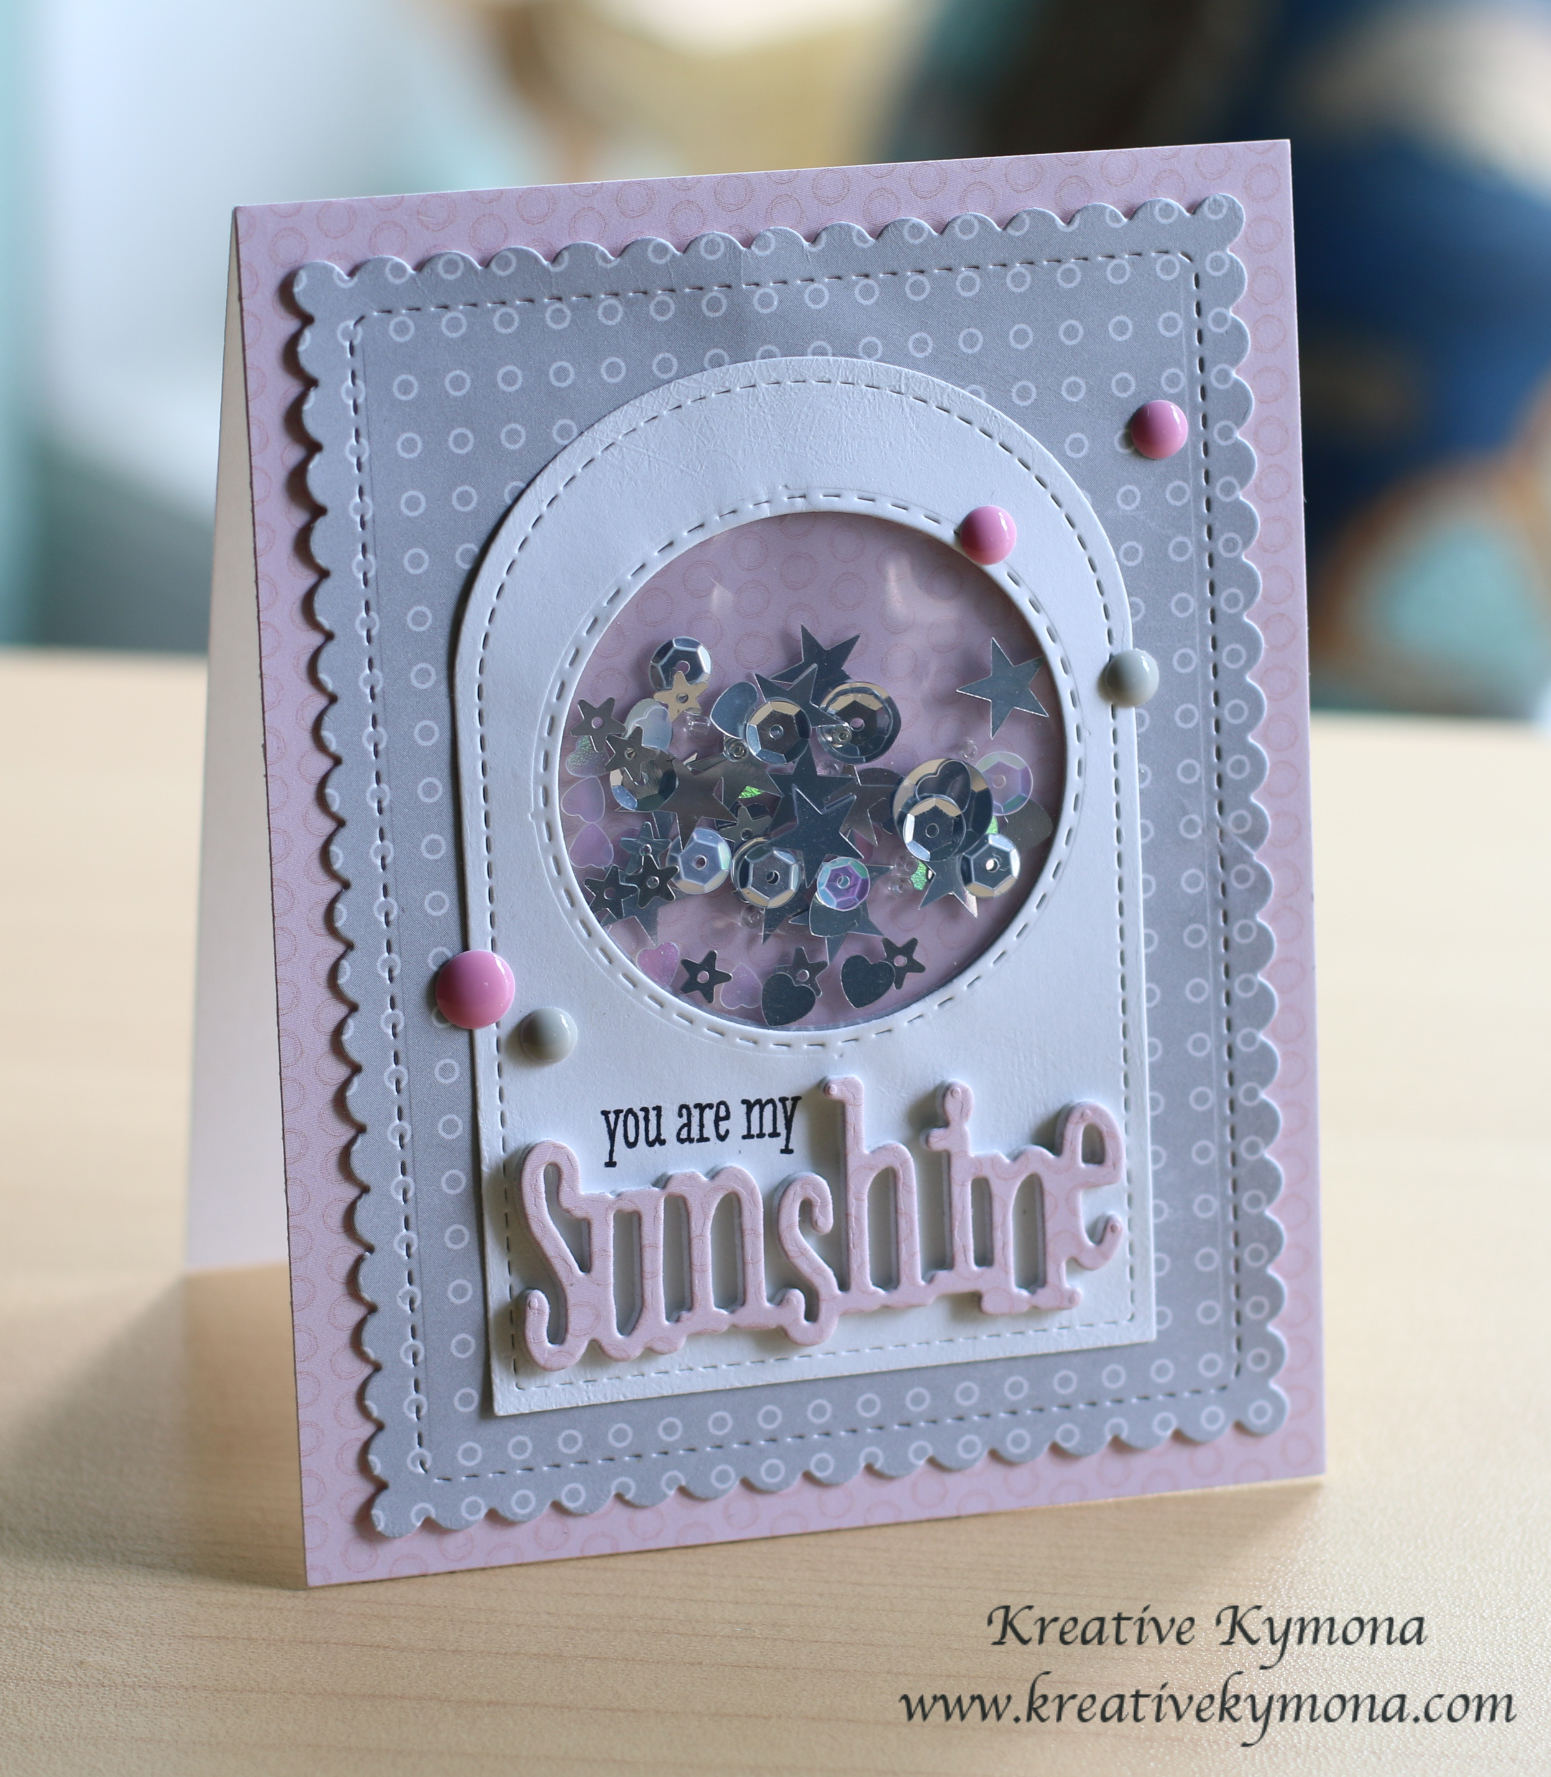
Creating this card was fun. Yayyy, I was able to create another shaker card this month.   What do you think?  Let me know below.

Now on to that prize!!

DTDare2candy-547x232

All you have to do is leave a comment on the YNS blog by March 24th for a chance to WIN a YNS stamp set of your choice!!  Super simple and easy!!  You will get to see my fellow DT’s projects as well.

So head on over, you don’t want to miss this one!!

Thanks for stopping by!!

Kymona

Get Sketchy Challenge

Hello everyone!!  First let me say thank you to all of you for your well wishes for my dad.  We have a long way to go but day by day, we are getting there.  Please continue to pray for him.

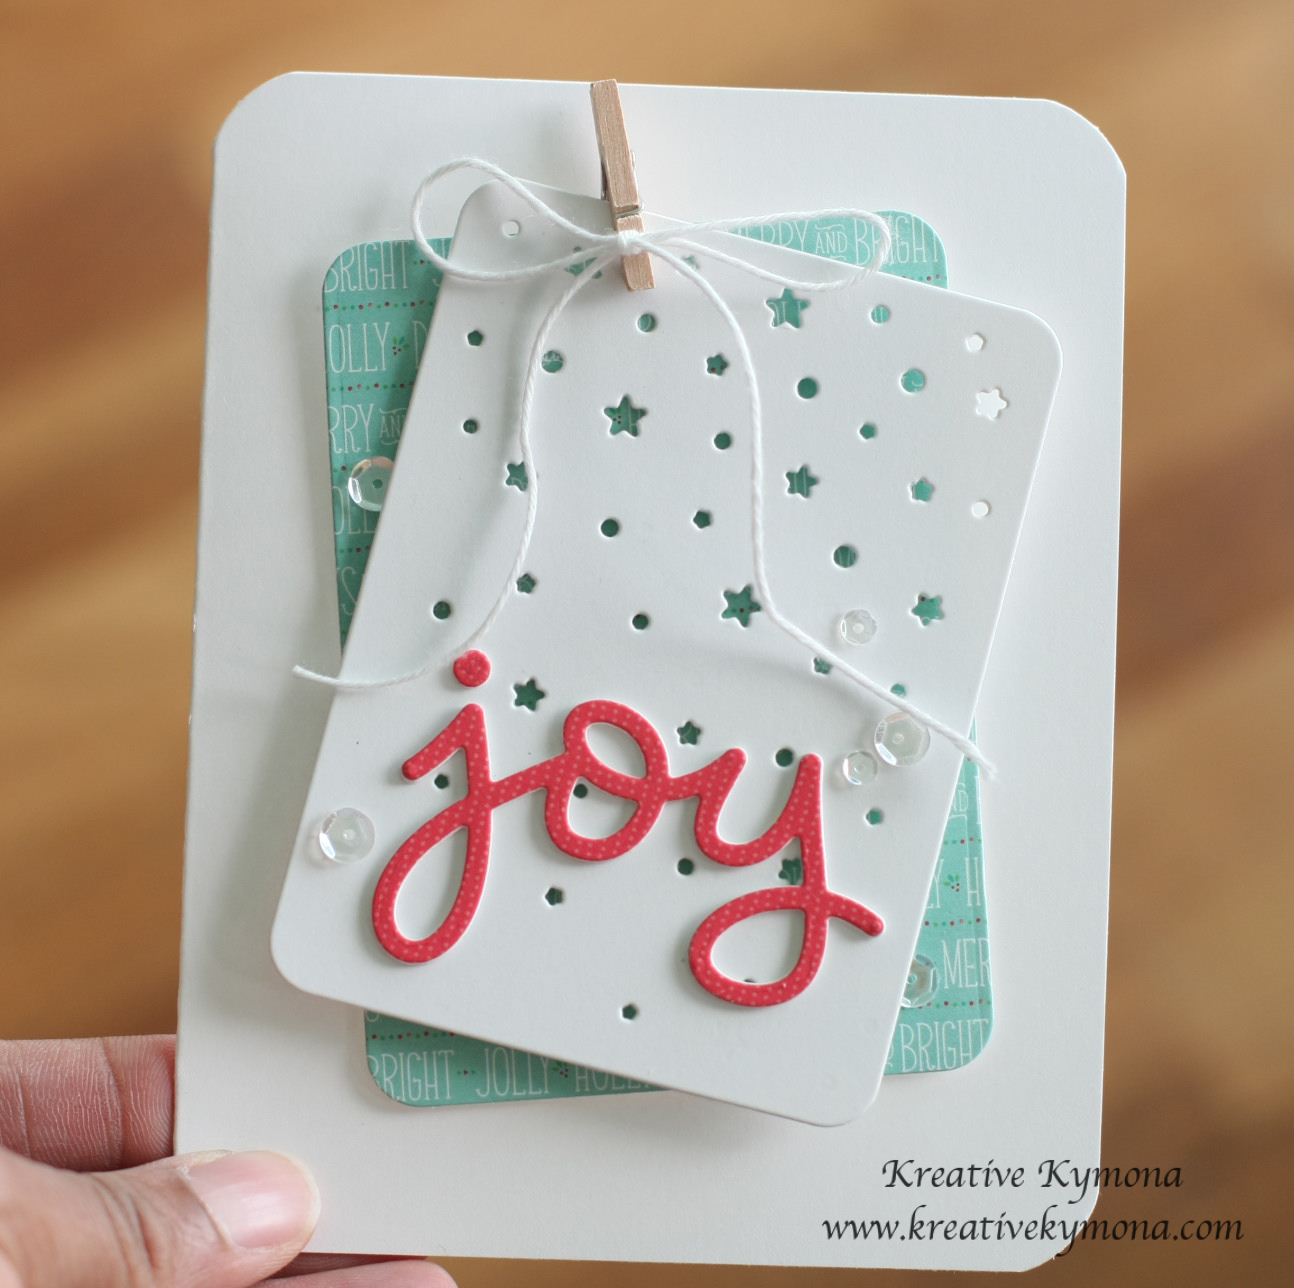
While he slept last night, I had a chance to play with some of my craft stuff.  The week before he took sick, I received a lot of WPlus9 goodies that I haven’t had a chance to play with.  So I decided to play along with their Get Sketchy With Joni #1 Challenge.

JoniSketch1Take a look at my card:

You are my sunshine

Oh man did I have fun creating this card.  I knew I had to be fast because my dad is dead set on going back to work.  He use to work nights so when 11pm comes he jumps up to go to work so we have to be prepared to stop him.

So, I need to make a card that didn’t require all of my time.  So I decided to make a shaker card and use my We R Memory Keepers Fuse!!

I bought my Fuse some months back from HSN when they had the bundle for a great price.

I’m not sure why I bought it, maybe the price was right but in any case, I’m glad I bought it.

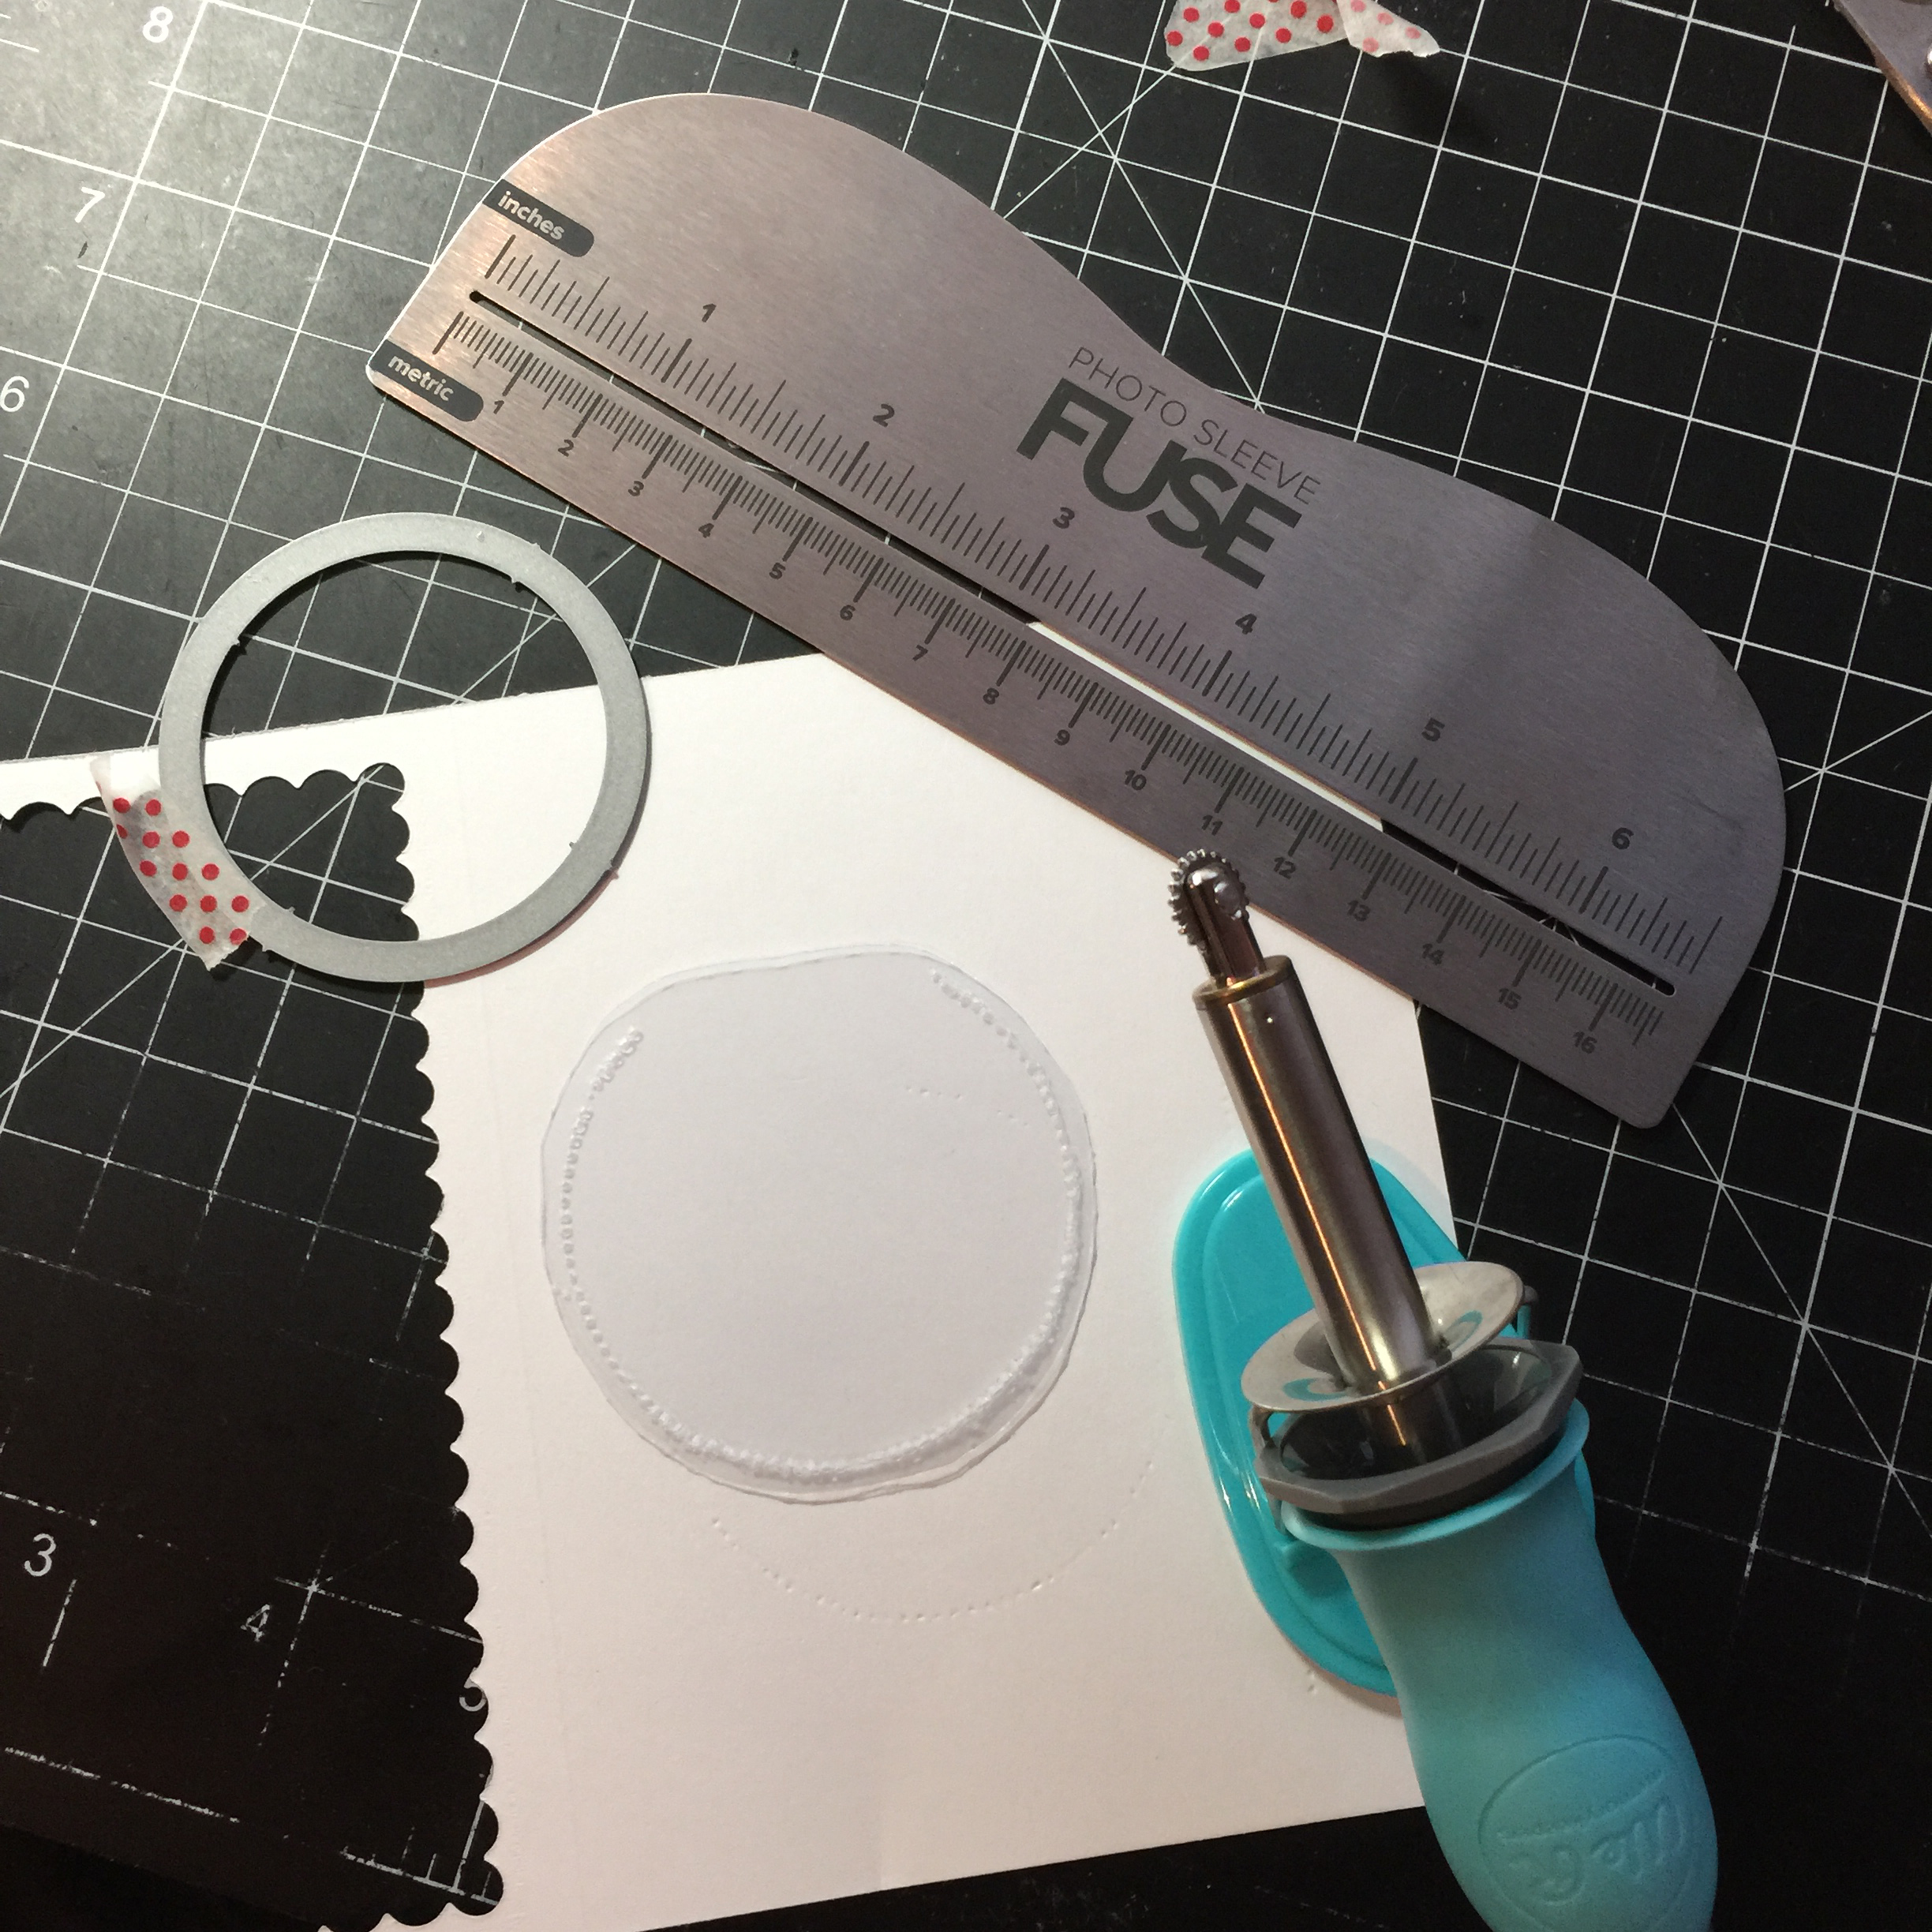
So last night, I opened the package an started to play.

Take a look:

Fuse at work

Jennifer McGuire used her fuse to create a shaker card and I knew I wanted to give it a try.  Check out my circle that was created using one of the photo sleeves that came with my fuse.

I used my circle die as a guide to fuse the plastic together.

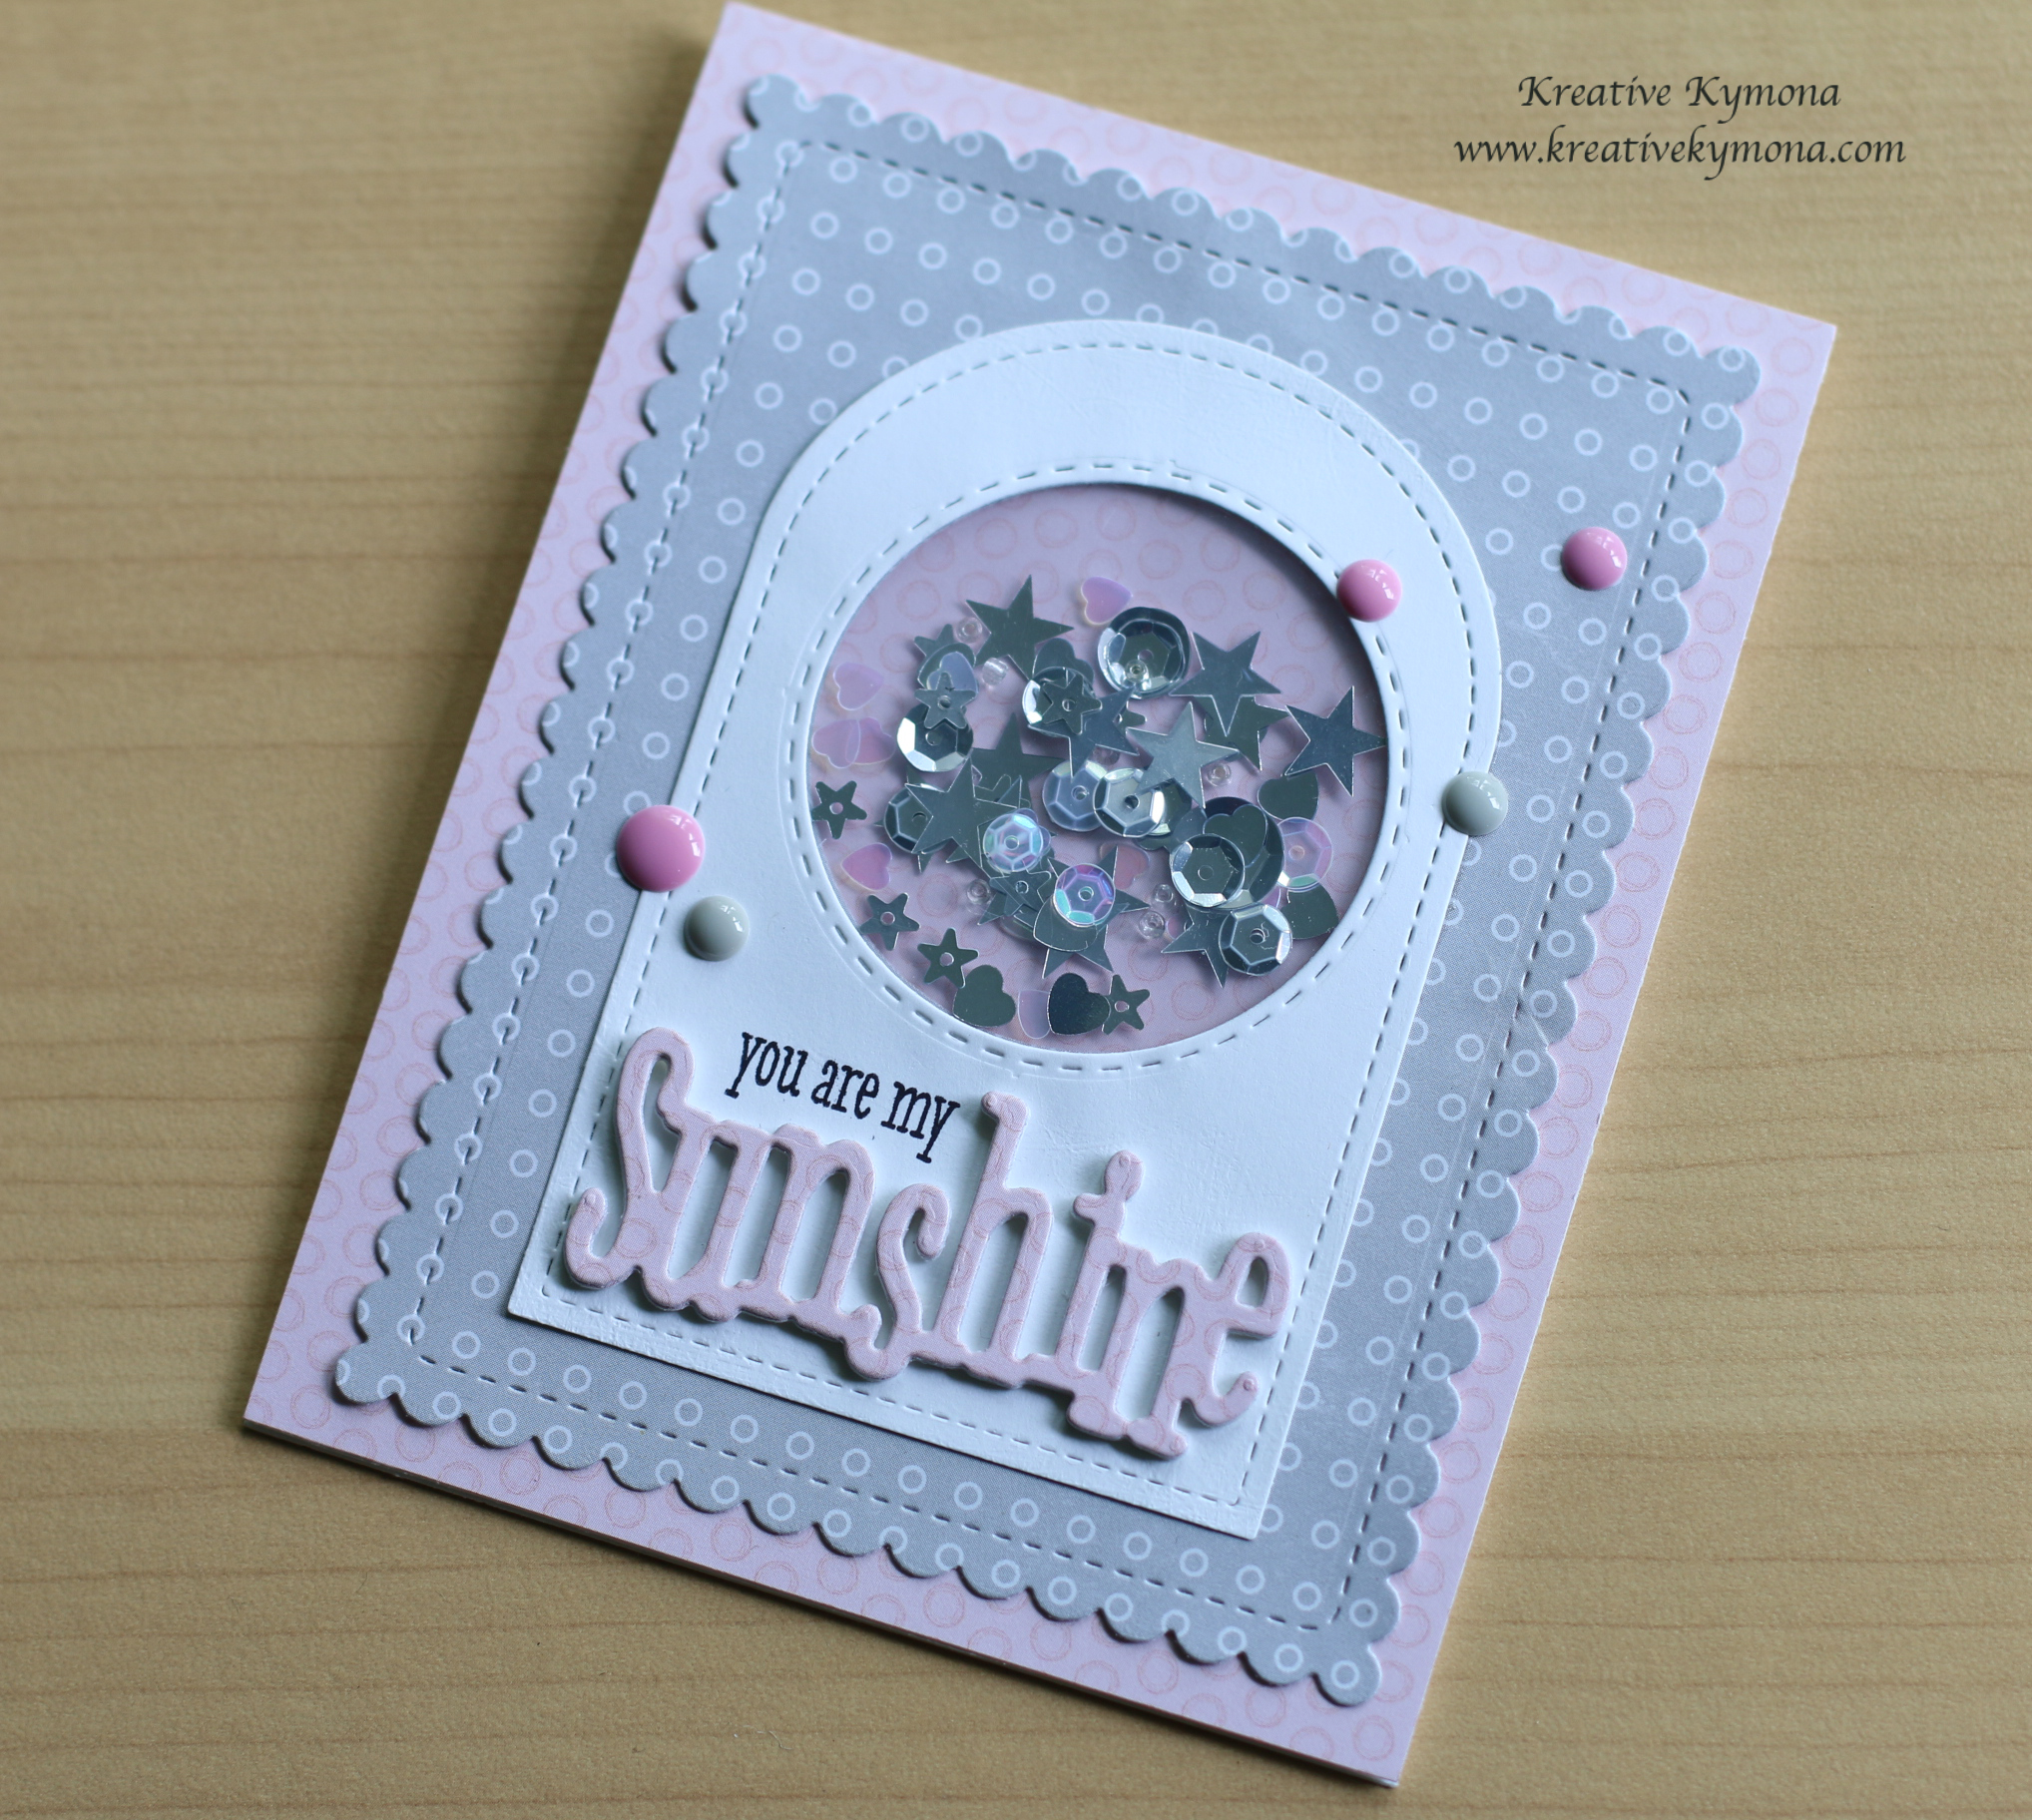
Check out my shaker pocket after I add my Star Shine sequin from Lucy’s Card Little Things Collection.

IMG_2829

OMG, super easy and fun.  Now I know what I can create as my dad sleeps.  I will have to create some more.

For the rest of my card:

1. I used Studio Calico’s May Card Kit pattern paper to create the rest of my card.

2. I cut the pattern paper using Wplus9 Sunshine Layers Die to create my card panels.

3. My tag was created using Pretty Pink Posh Stitched Duo 3 Die and Simon Says Stamp Stitched Circle.

4. I used the 3rd biggest circle die to cut a circle in the tag and the gray pattern paper.

5. I added my shaker pouch in between the tags die and the gray pattern paper with Tombow Extreme adhesive.

6. I die cut the Sunshine sentiment out the pink pattern paper 4 times and adhered them together with Tombow Multipurpose adhesive.

7. I stamped the sentiment from WPlus9 Sending Sunshine right above the Sunshine die cut in My Favorite Things Hybrid Ink.

8. I added Doodlebug Design Birthday Girl Sprinkles to my card front to finish my card off.

Take another look:

You are my sunshine2

I love how this card turned out and I finished in time before my father woke up!!  Yayyyy!

It felt good to craft again.

So what do you think? I love how this card turned out turned out.

Let me know what you think below.

I’m also linking my card up to Virginia’s View Challenge.

Layers and Dimensions

Supplies use:

fuse bundleStar Shine May Card Kit Sunshine DieStitched Duo 3 Die Stitiched CircleTombow XtremeTombow Multi-Purpose AdhesiveDoodlebug Sprinkles Birthday Girl

Thank you so much for stopping by!

~Kymona

Waffle Flower Challenge

Hello everyone!!  I’m here today with Waffle Flower Crafts New Photo Challenge!!  The colors for this challenge are so pretty.  I was in awe when I say the colors.  They are so deep and very rich!

Photo challenge

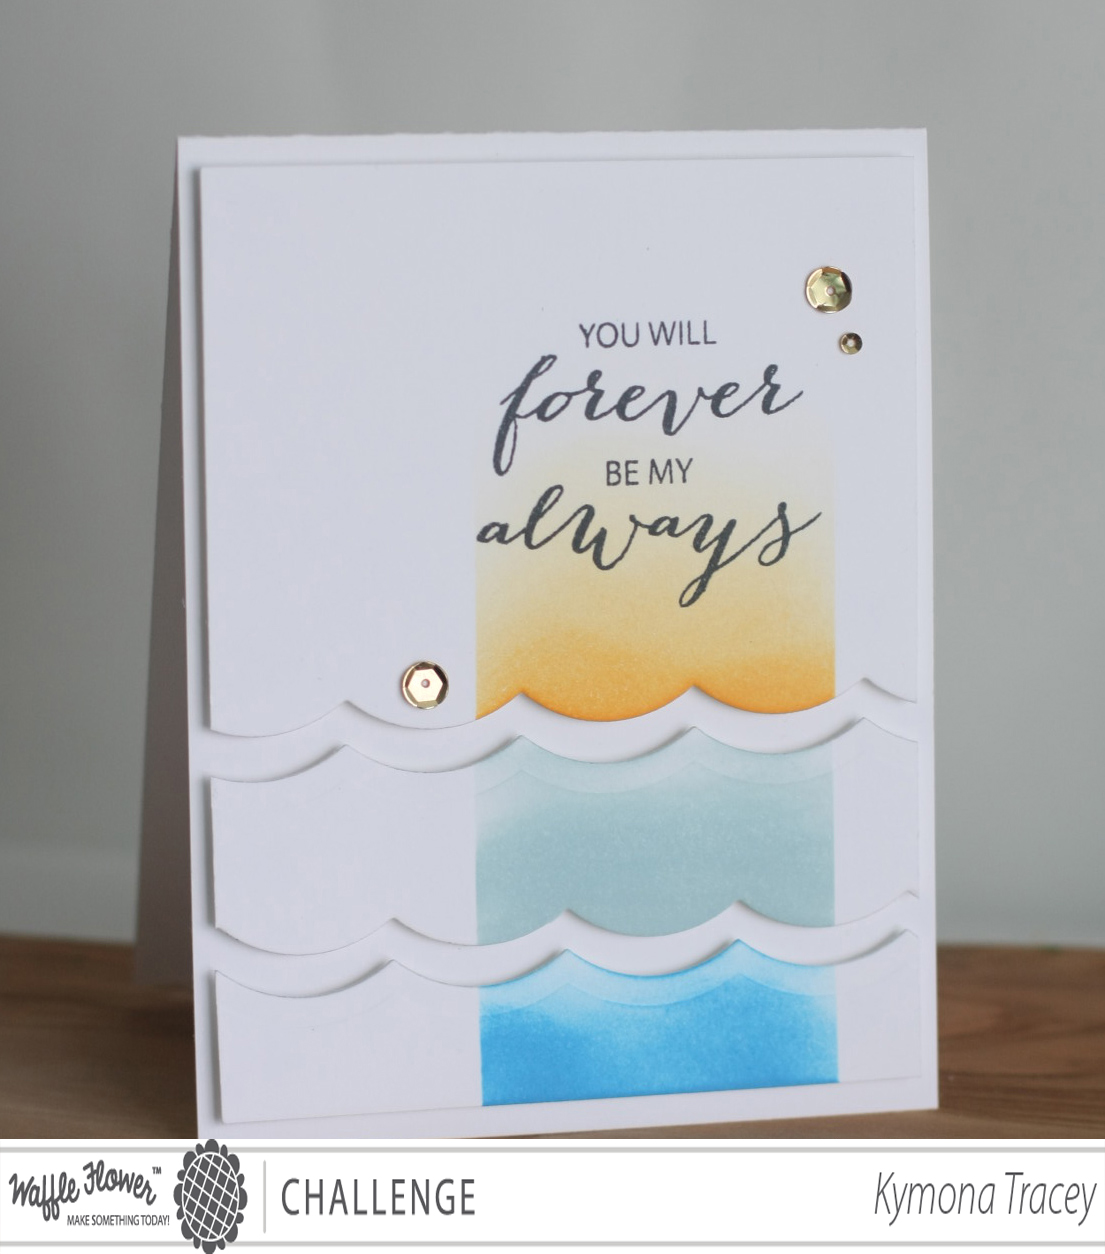
I thought long and hard about what I wanted to create using these colors.  It had to be meaningful because the colors called for it.  So I decided that I wanted to use the new DT Mix Stamp Set.

The sentiment ” You Will Forever Be My Always”, has a deep sentimental meaning in the corners of my heart.  I have a small story for you, you might need a tissue. So get ready.

A couple of years ago before my daughter was born, her father and I use to listen to the radio in the car all the time.  There was one song that use to come on all the time.  It was a country song by a women I didn’t recognized.

At first we didn’t realize that song played each and every time we were in the car together.  One evening he picked me up from work and the song was on and I asked him if he knew what the name of the song was or who sang the song.  We loved the song but didn’t know the name of it.  So right there and then, I called that radio station to find out who sang the song and the name.

The DJ said it was Forever And For Always by Shania Twain.  He asked me if I wanted to hear it and I said yes, and dedicated it to Ray!  That song became our song.  He always said we will be together “forever and for always”,  because “we just fit”.

December 25, 2005 we found out that we were going to have a baby, on December 28, 2005 he died from cardiovascular disease.  He never did get chance to see our daughter who is going to 9 this year, but he did keep his promise.  He is with me through her “Forever and for Always”!

So I made my card in memory of him!

Take a look:

You Will Forever Be My Always1

Thanks Tessa for creating that sentiment just for me!  I love how this card turn out. Its a CAS card with a lot of sophistication.

I learned this Border Gap Die-Cutting and Masking technique from the Online Card Class Clean and Simple 4.

This card was easy to create.

Just use a border die and cut my front panel into three pieces.

Then I used masking tape to cover up the different “waves” so that ink doesn’t transfer onto them while I’m blending.

Once the blending is done, I stamped my sentiment at the top and added some gold sequin to highlight the sentiment.

I added foam tape to the back of the panel and adhered it to the card front.

Once you know what to do, its a breeze to recreate this card again.

So what do you thing of my card?  Now you know a little bit more about me. So what do you thing?

I’m going to live you with the video of the song so you can listen the words of the song.

Supplies used:

Basic RGB PTI Summer Sunrise InkSalty Ocean Distress InkDistress Ink Broken ChinaSSS Sparkle and Shine sequin Large Scallop Die

Thank you for stopping by!

~Kymona

Waffle Flower Photo Inspiration Challenge

Hello everyone!!  I’m here today with Waffle Flower’s 2nd Photo Inspiration Challenge!!

What did you thing of the first challenge?  Those colors were a challenge but not to challenging to some of you!  I love seeing all of the entries.

Are you ready to see our new challenge?  Yayyy, here you go:

Photo Inspiration January 26

Here is my take on this challenge:

Perfect Bloom

Sooo, what do you think?  I totally love this new Planted Stamp Set and the Perfect Word Die from Waffle Flower.

If you know the stamp set, that third potted plant was created using the plant from the first stamp!  Ingenious, is what I say, LOL!!

Here is how I created this card:

1. I cut my Simon Says Stamp Fog cardstock to an A2 (4.25 x 5.50) size card.

2. I stamped the first and second potted plant using Memento Tuxedo Black ink because I wanted to color the images using my Copic markers.

3. I used my Copic markers to color in each plant and pot.  I used the same colors in the photo.

4. For the third potted plant, I stamped the empty post first.

5. Then I created a mask for that pot, so that I could stamp the plant inside.  Then I colored the image.

6. I die cut the word Perfect out of Simon Says Stamp School House Red cardstock 4 times..

7. I stacked them on top of each other so that the die could have some dimension. I adhered the die to the front of my card.

8. I stamped the word “Bloom ” underneath the die cut.

9. I added some Pretty Pink Posh sequins to the card and that was it.

Super easy card to create. This card allowed me to practice my Copic coloring.

Come on and join us!! Now I can’t wait to see what you come up with.

Supplies Used:

Basic RGB Word-Die-Perfect Memento Black InkCopic MarkersSSS Fog cardstockSSS schoolhouse red

Thank you for stopping by!

Kymona

More White Stamping

Hello everyone!!  I’m here again with CS Take It Make It Design Team for our December Challenge!

Once again, the theme is White Stamping.  That could be white ink, white paint or white embossing stamped image.

I decided to go with white ink and a dauber for a Bokeh effect!!

Take a look at my card:

Sending Happy Mail Bokeh

I love this affect, thanks Dawn Woleslagle for the tutorial!!

Here’s how I created this card:

1. I added Alizarin Crimson Hue and Cadmium Yellow Hue watercolor paint to my water-socked Carson XL Watercolor Paper.

2. I stamped my sentiment using Mama Elephant Happy Everything in the center of my watercolor piece.

3. I created my own circle stencil out of acetate.

4. I used the stencil to stamp various size circles with my ink dauber and Hero Arts Unicorn Pigment Ink.

5. The bigger circles were stamped lighter then the smaller circles. I overlapped the circles to create this effect.

6. I trimmed my watercolor panel down and adhered it to the front of my card base using foam adhesive.

7. I added Pretty Pink Posh 4mm and 6 mm Sparkling Clear sequins.

Easy Peasy! What do you think? Let me know.

Now its your turn!!

You can stamp away to your hearts desire, using white ink, gesso or white paint. You can even stamp an image and then emboss with white embossing powder if you want to too!!

To be clear, you CAN stamp in other colors too, but we need to see some parts of your project have clearly been stamped in white!

We are delighted to be sponsored this month by Rubber Dance!

header

Rubber Dance carry an amazing range of wonderful stamps, you really need to check them out if you haven’t already!

The prize this month is a voucher to spend in the shop…..

voucher

PLUS:The Design Team will have a look at all your gorgeous work, and choose their Top Three….. and the overall Winner will get published in Craft Stamper magazine! Yes, the winning entry will appear in the UK’s number one stamping magazine! AND: The Challenge winner will be offered a Guest Designer spot for an upcoming challenge!

So, £20 worth of rubber stamps, publication AND a guest DT slot? What are you waiting for?!

I can’t wait to see what you come up with.


Supplies used:

HAPPY_EVERYTHING_large Hero Arts Unicorn Pigment Ink3M Mounting TapePretty Pink Posh Sequins 4mm Pretty Pink Posh 6mm Sequins Canson Watercolor Paper Winsor And Newton Cotman Water Color Paint

Thank you so much for stopping by!!

~Kymona

Seriously, You Rock!!

Hello everyone!  I’m here today playing along with Simon Says Stamp Flickr group!  This is the second time, I’m playing along.  Flickr is new to me, so it takes me some time to remember my password, then to upload and figure out how to get my photos in the groups feed.  I’m will get this down pack very soon!!

In any case, the challenge runs for two week and this week’s challenge #7 is all about stencils. I love working with stencils!  They are so easy and versatile to use.

Take a look at my card:

Seriously You Rock

What do you think? I wanted my background to have an ombre effect.  Did I achieve that?

I also wanted some of the distress inks to move around the card so I sprayed a little bit of water over the card front but I was unable to achieve the effect I was looking for.  I didn’t use watercolor paper so the water just warped my paper.  You can see that in the orange section of my card.

Here’s how I created this card:

1. I cut my card base to an A2 size card (4.25 x 5.50) out of Neenah Solar White cardstock.

2. I used Simon Says Stamp Flower Pattern Stencil and Ranger Distress Mustard Seek and Spiced Marmalade.

3. I sprinkled some water over the front of the card to get some of the ink to move but the water just created a warped look on the card.  I should have used watercolor paper.

4. I die cut Lil’ inker design Seriously die twice out of Simon Says Stamp Black cardstock.

5. I adhered the two die cuts using Tombow Multipurpose Glue for added dimension.

6. I used Lil’ inker design Seriously Awesome stamp set to stamp my sentiment under the die cut and the small heart.

7. I added Pretty Pink Posh 4mm and 6mm Clear Sparkling Clear Sequin.

That’s my card for today!!  What do you think?  Let me know below in the comment section.

Supplies used:

classiccrestsolarwhtieSSS Flower Pattern StencilMini Distress inkLID Seriously Word Die SSS Black CardstockTombow Multi-Purpose AdhesiveLID Seriosly Awesome StampsPretty Pink Posh 6mm Sequins Pretty Pink Posh Sequins 4mm

Thank you for stopping by!

~Kymona

Farewell Paper Crafts and Scrapbooking Magazine Blog Hop

papercraftshop1

Hello everyone!!  I’m here today to say farewell and thank you to Paper Crafts and Scrapbooking Magazine.  You should be arriving from the talented Samantha Mann’s blog.  If this is your first stop you’ll want to begin at the talented Jennifer McGuire’s blog so that you don’t miss out on any of the fun, fabulous creations we are sharing today.

Saying goodbye, is never easy, especially when its your foundation that’s moving.  A couple of weeks ago, an announcement was made that Paper Crafts and Scrapbooking would be closing their doors.  This decision hit the crafting community really hard.  This magazine has been around to provide guidance and inspiration.  Without them, what will we do?

My first subscription to the magazine was back in 2000, when I started crafting for my son’s teachers and family members.  The hard copy was amazing.  Tons of inspiration on each page.

I love learning about different techniques and what supplies I needed to buy.   I regret not submitting any of my projects for publication.  I use to say next time.  My mom used to say don’t put off what you can do today for tomorrow.  Those words are so powerful now, because I will never have the opportunity to do it now.

So I’m here to send my warmest thank you for such an awesome publication.

Take a look at the card I created for this hop:

Thank you and farewall

I went with clean and simple with a white on white look with a pop of color.

So what do you think?  I really love how the ink is coming from the top left and spilling down to the thanks die cut.  I chose blue because that’s how I feel but this card is far from sad.

I just want to say THANK YOU to Paper Craft and Scrapbooking Magazine, and all of the people who worked to bring us a fantastic magazine.  THANK YOU, for feeding my addiction to craft making.  You will be truly missed.  What are we suppose to do without?

The next person on this hop is Jess Moyer!! You will love what she has in store for you.

Before you go, check out this video Bethany Stellpflug put together.


Just in case you wanted to see who was on this blog hop click the button below.

Supplies used:

classiccrestsolarwhtieSSS Audrey Blue CSAudrey Blue InkLF Scripty Thanks Pretty Pink Posh 6mm SequinsPretty Pink Posh Sequins 4mm Mini Ink Blending Tool

Thank you for stopping by!

~Kymona


No Stamping: Joy

Second Post of the Day

The a2z Scrapbooking Blog post is here

Hello everyone!  I’m here today playing along with a couple blog challenges.  I hardly get to play at times so when I do, I get super excited.

Today I’m here with the Muse Challenge #95.  The Muse this week is Caroline.

Take a look at Caroline’s card:

WPlus9WoodlandGrey Nov14 1

I’m also here with Simon Says Stamp Wednesday Challenge: Anything Goes.

wed-newchallenge-header


I’m also here with Simply Create Too SNOW, SNOW, SNOW or All White Challenge #75.

1 - SC2  GROUP BADGE

Take a look at my card:

Joy with clothespin

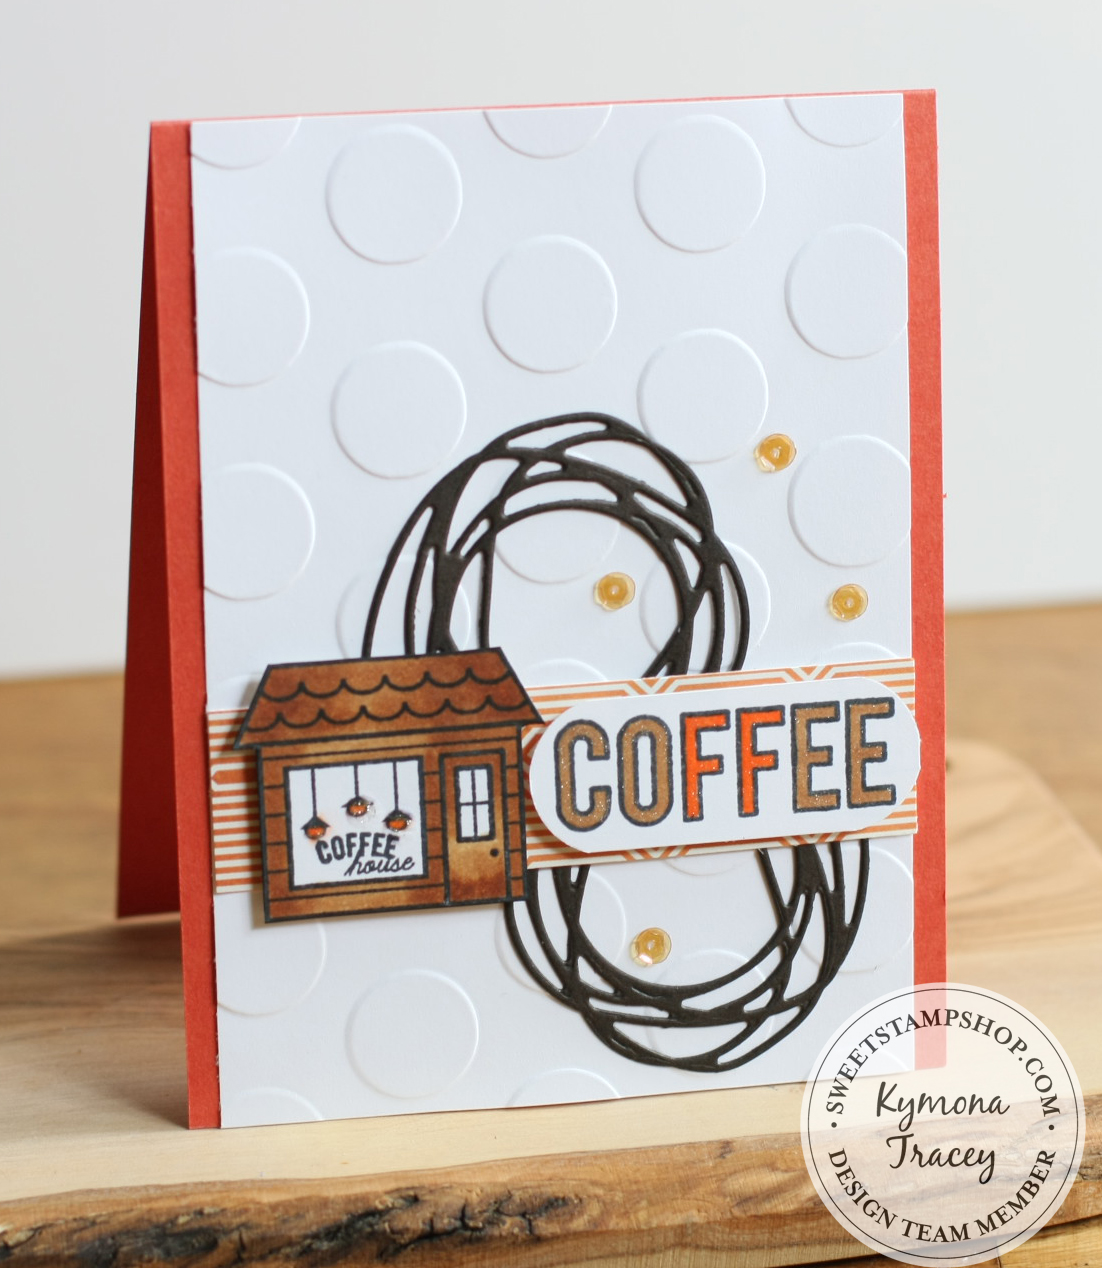
I just love how my card turned out.  I saw the fabulous Laura Bassen create a card like this and I knew I had to give it a try. I love the simplicity in the design.  So I gather all of my supplies and pulled this card off.

Creating this card was easy because everything was die cut!

I love how the pop of red from Lawn Fawn’s Joy die stand out on Papertrey Ink’s Journal Card 5 Die and matches the hint of red on the pattern paper.

I used Technique Tuesday’s Story Card Die to cut Lawn Fawn’s Snow Day patten paper.

I added Pretty Pink Posh 4mm Sparkling Clear Sequins and 6mm Sparkling Clear Sequins.

I tied Stampin’ Up! Whisper White Bakers Twine on the Stampin’ Up! clothespin.

Easy and no stamping.

So, what do you think?  Please let me know below.  I would love to hear from you.

Supplies used:

PTI Journal Card 5 dieScripty Joy Technique Tuesday Die Story CardLawn Fawn Snow Day PaperClothespinsWhisper White Baker's TwinePretty Pink Posh 6mm Sequins Pretty Pink Posh Sequins 4mm

Thanks for stopping by!

~Kymona

Multicolor Leaf Stamping

Hello everyone!!  I’m here again with  the CS Take It Make It Design Team for our October Challenge!!!

This month’s theme is Multicoloured Stamping!!!  This is my inspiration card!!  My first card can be found here.

Hello Friend

For these multicolored leafs, I used the same baby wipe technique.

I added a couple of different re-inkers to the baby wipe and stamped the image onto it, then onto my card panel.

I remove my mask, stamped my sentiment in the center of those leaves and added dash lines.

For added interest, I added rhinestones and some sequins to my card panel.

Nothing to it.  I hope this card inspires you to come an play along with us.

What do you think?  Will you give this technique a try?  You should!!  The prize for this challenge is amazing.

10703880_10152678925127052_3108539186482425597_n

Our sponsor for this challenge is Paperbabe Stamps!

Kim Costello carries a line of Clear Photopolymer Stamps, Red Rubber Cling with image indexing and Digital Stamps!

Take a look at what you could win if you participate:

10704002_10152678926097052_9133813654321475389_n

You will receive the tree hug set, the cumulus background set and a character stamp of your choice!!  Wonderful!!!!

Bonus:

The Winner will get Published in Craft Stamper Magazine!!

Yes, the winner entry will appear in the UK’s number one stamping magazine!!

And

The Challenge winner will be offered a Guest Designer spot for an upcoming challenge!!

How cool is that!!!

How could you past up a change to win this awesome prize pack:

Loads of Paperbabe stamps, Publication and a Guest Design Team spot!!!!

Now its your turn!!  Don’t miss out on this fun challenge and amazing prizes!!

Supplies used:

classiccrestsolarwhtieFeathered Friends Lawn Fawn Sequin

Thanks for stopping by!

~Kymona

National Coffee Day!!!

CoffeeLoversBloghopLogo-1024x682Hello everyone! I’m here today joining our friend Chaitali from Cuts, Crops and Creativity and her Coffee themed Blog Hop today.

We are celebrating National Coffee Day!!!  Prior to this hop, I had no clue there was an actual day for coffee.  How cute!!

Here is my card for today’s hop:

National Coffee Day

To create my card I used Sweet Stamp Shop Coffee Town Stamp Set.

Who doesn’t like a nice coffee house to spend some times with friends.  Here in NY, we have so many of those places in and around the city.

I have to admit I’m not a coffee drinker.  I am a (tea) lover.  Please do not yell at me but I just am.  So, to really get in the mood, I asked my mom, who loves her coffee a couple of questions about her obsession with her coffee mug in the morning.

1. When did you start drinking coffee?

I started drinking coffee a couple of years ago.  I’m not sure why it started but once I tried it I was hooked.

2. What is favorite brand?

My favorite brand, that is hard.  I really like McDonald’s coffee.  They really know how to make it right.  If I have to make it myself I like Starbucks Colombia Medium coffee.

3. What is the most amazing coffee that you had? Remember where and when?

LOL, I was at a dinner party with some friends in Jamaica, WI and we were served Blue Mountain coffee and it was to die for. That was about two years ago, which was the last time I was there.

4. If I don’t drink my needed coffee, I will…?

If I don’t drink my needed coffee, I will have a headache early in the morning.

Thanks mom, for accommodating me today.

So today’s blog hop comes with a bunch of giveaways today.  You don’t want to miss out on this fun event.  Check out all of the hop sponsors and prize packages.

CoffeeLoversBloghopSponsors1

To be eligible to win a prize, you have to link your post to the list anytime during the day up to 11:59pm PST.

It would be great if you could visit at least 3 other hoppers and comment on their post.

Have fun and make sure you have a mug of coffee beside you when you are hopping!!

To participate please do so here!

Before I go, I wanted to also share my Mug swap that I’m sending off to my surprise receiver!

Mug Swap

I hope she loves all of the coffee in this package!

Thanks for stopping by!

~Kymona