YNS Sketch and Color Challenge #37

I’m here today with Your Next Stamp (YNS) and the Sketch and Color Challenge #37!!

Each challenge has a sketch and a color combo to choose from.

Take a look at the color combo:

YNScolor-37

Take a look at the sketch:

YNSSketch37

Take a look at my project:

Thank you canvas (YNS)

YNS Supplies: Scribble Fun Set One

Other Supplies: Make Market Decor White Canvas, Recollection Color Splash Watercolor Crayons, Versafine Onyx Black Ink

What do you think?  Did I follow the color photos? Let me know below.

So are you ready for the new challenge?

You have until April 28th, 2016 at midnight EST to play along and submit your project on the YNS Blog post.  One random participant will win a $15 gift certificate to the Your Next Stamp Store.  If YNS stamps or dies are the focal point then the winner receives and additional $5 gift certificate f0r a total of $20.  The winner will be announced on the YNS Blog the Sunday after the challenge closes.

I hope to see your projects!!

Supplies listed above!

Thank you so much for stopping by!

~Kymona

Working with Prima Rub-Ons and Deco Foil

Third Post for today
If your looking for the A Clean and Simple Mother’s Day Embroidery Apron, click here
If your looking for the 5 Minute Teacher Appreciation Gift – YNS, click here

Hello everyone!!  I’m here today with a special feature that will show you how to work with Prima Rub-ons and Deco Foil.

I usually run this feature on Instagram and decided that I need to share these feature here as well.  FullSizeRender (68)

Did You Know Series!

I’m back again this week with the same product that I talked about last month.

It’s the @primamarketinginc Christina Adolph Adhesive Rub-Ons! I can’t get enough of these rub-ons!! You can do so much with them.

1. I showed you how to use foil with them last month and this past Saturday.
2. Yesterday, I show you how to use them with embossing powder.
3. Today, I’m going to show you what they look like on top of a watercolor panel using all of the goodies you see above!

The shine is amazing!!  No stamping required!! These cards were done in 6 mins tops. The watercolor was heat set.

Here are some closeups:

image1 (10)

image2 (3)
Note: you have to rub just a little bit harder since the watercolor paper has some tooth!

I created a video to show you how I used the rub-ons with foil to create the purple card above.

Any questions?  Let me know below!!

Supplies used:

Confections The Classics InksPrima Watercolor paper 6x6.jpg DandelionDeco foil

Thank you for stopping by!

~Kymona

A Clean and Simple Mother’s Day Embroidery Apron

Second Post for today
If your looking for 5 Minute Teacher’s Appreciation Day Gifts, click here

Hello everyone!!  I’m up on ClearSnap’s blog today sharing how to create a clean and simple Mother’s Day Embroidery Apron!!

I have to admit, I’ve never done embroidery before so this was all new to me but I absolutely loved it.  I started off small so that it was manageable but I am hoping to create something more elaborate soon.

Here is what we are working with today:

Supplies need KTracey copy

Take a look at what I created:

Finished Mother Day Aron KTracey copy

I love this!!  I know my mother will too!!

For the full photo tutorial and all of the supplies head on over to the Clearsnap blog.

Please me know what you think!!

Thanks for stopping by!

~Kymona


5 Minute Teacher Appreciation Gifts – YNS

Hello everyone!! This week Your Next Stamp Design Team is show you how to create Teachers Appreciation Gifts for any teachers in your life.  May 3rd is Teacher Appreciation Day this year and I’m going to show you how to make a 5 minute Teacher Appreciation Gift.

Take a look at the gifts I created:

Teachers gifts (YNS)

I think these little boxes are the cutes thing.  They are even easier to create.

Here’s how:

  1. Use Stampin’ UP! Baker’s Box Thinlits Die to cut out two pieces out of Neenah Desert Storm card stock.
  2. Assembly the box according to the score lines.
  3. For box 1: Cut out 2×2 square pieces of pattern paper and adhere it to the four panels of the box.
  4. For box 2: Cut 13inches of ribbon and wrap it around the box, adhering it at the bottom of the box.
  5. For both boxes: Stamp the sentiment from Learning is Fun and the sentiment from Spectacular Teacher onto black card stock.  Sprinkle with white embossing powder and heat set.
  6. Die cut each tag out and adhere them to the box using foam tape.
  7. Close Box 1 by string ribbon through the holes.

Nice and easy.  What do you think? What are you creating for the teachers in your life?  Please let me know below.

Supplies:

Baker's Box Neenah Desert Storm CS Learning is Fun Spectacular Teacher Recollections Black Heavyweight67f65-white2bembossing2bpowder

Thanks for stopping by!

~Kymona

{Clean and Simple} CASology 193 – Pink

Second Post for today
If your looking for the Right At Home Blog Hop, click here

Hello everyone!!  It’s CASology Tuesday!!  We are back with another Clean and Simple Cue Card just for you!!

This week’s cue card is:

Week 193 - PINK

Take a look at my card:

Be Strong (CAS)

When I saw the cue card, I knew I wanted to combine the rub-ons with the color pink.

This is just one of the cards in my series called the Be Series!! Sometimes all we need is a pretty strong sentiment to get us though our day.

Creating this card was more then easy and it to me less then 4 minutes!

Check out my supplies:

Be Strong supplies (CAS)

Here is how I created this card:

  1. Cut your white card base to 4.25 x 5.50, scored at 5.50.
  2. Cut out the sentiment you want to use from Prima Loved Words Rub-Ons.
  3.  Place the sentiment on the card front where you want them to be and rub.
  4. Remove the transparent sheet.
  5. Spring Wow! Fluorescent Magenta Embossing Powder over the sentiment and heat set it.

Done!! When I say easy, that might be an understatement.  This was amazing easy.

Check out the rest of  my cards:

Be Serious (CAS)

Do you know someone who would love a card like this?  Let me know, I will send one right on over.

What do you think?  I can’t wait to see what you come up with!

For more inspiration, check out my fellow Design Team members blog for more awesome work.

DT Badge

Supplies used:

Prima Loved WordsRecollections White Heavyweight

Thank you so much for stopping by!

~Kymona

Right At Home April Release Blog Hop

Hello everyone!!  I’m excited to be here with you today to sharing an amazing project created for the Right At Home April Release Blog Hop!!  This is the design team fourth blog hop and we are delight to full you with inspiration.

april-release-graphic

This month all four of the stamp sets are perfect!!  I used Right at Home Stamps Birdhouse and the Color In Sentiments stamp sets for this release.

If you arrived here from Yuki blog, you are on the right path!!  If you arrived on your own, you will want to start from the beginning, the Right At Home blog as to not miss out on any of the fun.

Take a look at card 1:

I'm always here (RAH)

I used my Canon ScanNCut to cut out the stamped images.  Once they were cut out I colored them with the Tombow Recycled Colored Pencil.

The card base is Neenah Desert Storm card stock and the card panel is Simon Says Stamp Woodgrain cardstock.

I adhered the pieces to the card panel after stamping the sentiment with Versafine Onyx Ink.

I added RAH Marigold Flower Sequins, Daffodil Flower and Hydrangea Flower Sequins to the card front to finish it off.

What do you think?

Take a look at card 2:

Pop of color (RAH)

For this card, I used the Right at Home Stamps Color In Sentiments stamp.

The card panel was cut using Simon Says Stamp Postage Stamp Edge Frame Dies.

I stamped the sentiment on the white card panel using My Favorite Things Hybrid Ink.

I used the Tombow Recycled Colored Pencils to color the image in.

I added Your Next Stamp Give Thanks for Sparkly Gumdrops above and below the sentiment.

Nice and easy.

Giveaway time!!

Make sure to leave a comment on all of the DT’s blog to be entered into the giveaway. Giveaway will close in a week so make sure to hop along today!!

Here is the list of all of my talented teammates blog, just in case you get lost along the way:

Right At Home

Amy K

Yuki

Kymona ← you are here

Holly

Amy T

Supplies:

Brother Scan and Cut2Recycled Color Pencils SSS Woodgrain CS Neenah Desert Storm CS birdhouseRAH Marigold Sequin RAH Daffodil Flower Hydrangea Flower Recollections Black HeavyweightRecollections White Heavyweightcolor-in-sentimentsPostage Stamp Edge Frames

Thank you so much for stopping by!

~Kymona

The Ton Spring 2016 Blog Hop

Second Post for today
If your looking for CS Take It Make It Inspiration Post, click here

Hello everyone!!  I’m super excited today.  I was asked to participate in The Ton’s Spring 2016 Release Blog Hop!!!  Yayyyyyy!!

Screen Shot 2016-04-05 at 7.04.16 AM

I was totally siked when Effie reached out to me and asked if I would like to hop along with her team.  I jumped at the opportunity to work with her fabulous team.

Enough about my excitement, lets get started on this hop!! If you arrived here from the talented Eunji blog then you are on the right track.  If you arrived here on your own, you will want to start at the beginning, The Ton blog, as to not miss any of the amazing projects!

I’ve created two cards for this awesome hop.

Card Number One:

Happy Birthday (ton outside)

When I first saw this Bokeh Burs Star stamp set, I fell in love.  Such a pretty stamp set with so many things that you can do with it.

I knew it would look super pretty embossed with some distress inks blended on top.

Here is how this card was created:

  1. Stamp the image using Versamark ink in the center of the Recollection White Heavyweight cardstock.
  2. Apply Hero Arts White Embossing Powder on top of the stamp image and heat set. This will resist the ink that will be added on top.
  3. Lay your card flat on your table and start applying your first distress ink Mustard Seed.  Tap off before you apply your first coating of ink.
  4. Then blend the next color, Spiced Marmalade, to create a pretty blend between the two colors.
  5. Next blend the last color, Festive Berries, to create a contrast between the other colors.  Together all three of them are amazing.
  6. Make sure you cover all of the white embossing powder with the distress ink so that everything pops.
  7. Now you can stamp the sentiment in the center of the star using Versafine Ink for a clear, crisp impression.
  8. To finish the front of the card off, add several Pretty Pink Posh Sparkling Clear Sequin randomly.

I hardly ever stamp the inside of my cards.  I decided that this card would totally rock, with a sentiment on the inside.

Happy Birthday (ton inside)

Use Versafine ink again to stamp the sentiment for a crisp, clear impression.

What do you think?  Isn’t this set fabulous!! I think so!!

Card Number Two:

hello (ton)

Isn’t this just fabulous!!  This stamp set is called Brushed Hello.  I love everything about this card.  From the background to the “HELLO” sentiment. Everything about this card screams BOLD!!!  I love it.

Here is how to create this card:

  1. Tape down the Clarity Stencil to the cardstock so that it lays flush over the paper.
  2. Select two-three colors to blend.  The colors used above Fossilized Amber, Cracked Pistachio, Mermaid Lagoon.
  3. Use the Clarity Stencil Brushes to blend the colors over the stencil.
  4. Check out the video below on how I achieved that look. Its a 5 minute video from start to finish in real time.

  1. Trim the blended cardstock down to the desired size.
  2. Stamp the Hello sentiment from the Brushed Hello stamp set using Versafine Black Ink. Then stamp another sentiment if you like.
  3. Add rhinestones to finish the card front off.
  4. Adhere the card front to your cardbase using Tombow Stamp Runner Adhesive. 

Finished!!  What do you think?  I love both cards using both of these stamp sets.  Such a great way to bring in Spring!!

Let me know what you think below!!  I would love to hear from you.

Your next stop on this hop is the super talented Mayline!!  You will want to see what she has come up with.

Giveaway!!

What is a blog hop without giveaway!!! In order to qualify for one of the three $25 gift codes to The Ton’s online store, you must leave a comment on each stop on the blog hop.  The comment period will close on Wednesday, April 13th at 11:59pm EST.  Winners will be chosen randomly from the comments left on all of the blogs.

Just in case you get lost along the way, here is the lineup:

The Ton
Ruby Naz
Lisa Harrolle
Jessica Frost-Ballas
Virginia Lu
Keeway Tsao
Amy Tsuruta
Emily Midgett
Laura Sterckx
Vera Yates
Laurel Beard
Enuji Jung
Kymona Tracey ← you are here
Mayline Jung

You will not be disappointed!!  Have fun hopping!!

Supplies:


  Bokeh Bur Star Hero Arts Clear Embossing PowderRecollections White Heavyweight Pretty Pink Posh 6mm Sequins IMG_6249 Stamp Runner Dot AdhesiveRecollections Black HeavyweightClarity BrushesClarity Stencil Leafy Swirl

Thanks for stopping by!

~Kymona

CS Take It Make It: Take a Technique Inspiration

Hello everyone!! I’m here with CS Take It Make It: Take a Technique Challenge Inspiration for April.

Our theme is Take a Technique: Spring Flower!!

For this month’s challenge the technique we would like you to stamp a flower anywhere on your project, or even real ones!!  Cover your art with flower embellishments, or make a flower shaped creation.  Go crazy (or minimal if that’s your thing!) with the florals…and don’t forget to include stamping somewhere too!!

This should be super fun to see what you come up with.

Take a look at my card:Just Because (CSMITI)

Aren’t these flowers so pretty.  I would love to see these on my table everyday.

Here is how I created this card:

  1. Cut the white card base to an A2 size, 4.25 by 5.50 scored at 5.50.
  2. Use a scorer and randomly score lines on the card front.  I learned this technique from Laurie Make It Monday video over on the Papertrey Ink Blog.
  3. Then stamp the flower image and sentiment from Technique Tuesday Budding Poppies stamp set where you want it on the card front. Use a Misti Stamping Tool for accurate stamping.
  4. Color the flowers using Copic markers R35, R39, and R89 for great red color blending.

Nice, simple and elegant.

So what do you think? I love how this card turned out.

We have two prizes to offer this month, the first is our sponsor prize. This winner will be chosen randomly from all of the entries in the challenge! The sponsor for April: Traplet!

TraplietPrize:  All Six Kate Crane Art Journaling DVD’s

Our second winner is our Design Winner. This winner is chosen by our DT, who all vote for their favorite design from all of the entries. This winner will have their winning project published in Craft Stamper Magazine, they will have a GDT slot for an upcoming challenge, and will also feature in their very own Winners Profile blog post!

Now if that isn’t a reason to play along I’m not sure what is!!

I can’t wait to see what you come up with.

Supplies used:

Recollections White HeavyweightStampin' TrimmerCopic 89copic-marker-coral-pink-r35Mini Misti MISTI Laser

How to Blend Colors for the Sparkle and Shine Challenge

Fourth post for today
If your looking for Your Next Stamp Sketch and Color Challenge, click here
If your looking for CS Take It Make It Challenge, click here
If your looking for a2z Scrapbooking Challenge, click here

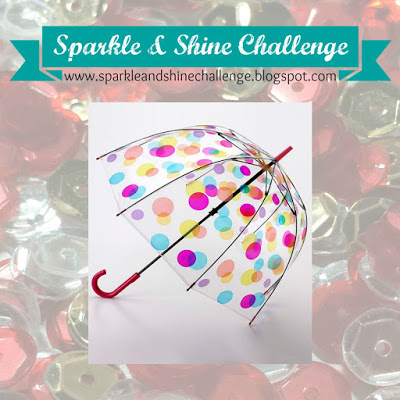
Hello everyone!!  I’m here today with the Sparkle and Shine Challenge!!!  How exciting is this!!! 

Since its the first of the month, its time for our new challenge!!!

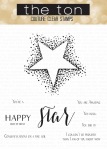
Here is the inspiration photo that guided us this time around:

April 1_2016

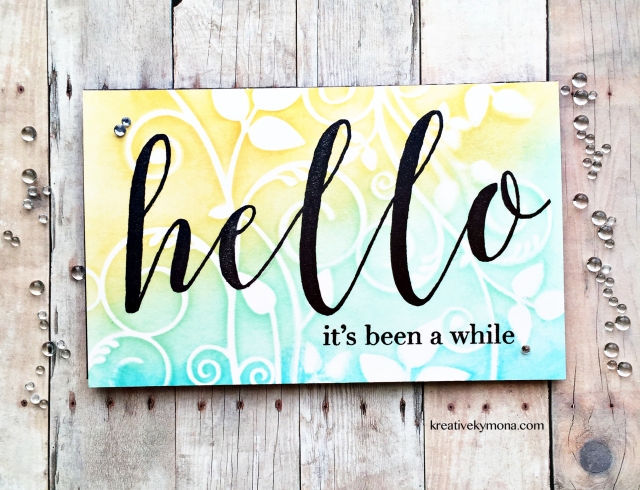
Now take a look at my card:

Enjoy (S&S)

I love how this card turned out.  These colors are awesome together.

Here is how I blended these colors to created this card:

I gathered all of my supplies. I used the Distress Ink Kits 13 and Kit 14, My Favorite Things Stencil Circle Burst, Ink Blending Tool, Recollection White Heavyweight Cardstock, Simon Says Stamp Painted Enjoy, Clear Wink of Stella, Stampin’ Up! Rhinestones and Tombow Mono Liquid Glue.

ink blending 6

Then I started inking in the middle with the Distress Ink Abandon Coral.

ink blending 2

Next in line was Distress Ink Fossilized Amber. I took my time and tried to blend the colors with ease.

ink blending 3

After that, was Distress Ink Cracked Pistachio. Always moving in a circular motion.

ink blending 4

Moving right along, up next is Distress Ink Mermaid Lagoon.

Ink blending 7

Now its time for the big reveal.

ink blending 6

Super cool effect!

Then I used Simon Says Stamp Painted Enjoy Die and cut out 4 enjoy’s.  I glued them together and adhered it to the front of the card.

I added Clear Wink of Stella to the sentiment and finished the card off with a couple of Stampin’ Up! rhinestones.

enoy close up (S&S)

Nice and easy!! Perfect blending of colors.

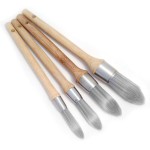
Wait before I go, I was asked to show this same effect using the Clarity Brushes.

clarity bursh blending

I posted my comparison on Instagram a couple of weeks ago when I created this card.  You can find it here on Instagram.

What do you think?

Now its your turn to give this challenge a try!! I can’t wait to see what you come up with!!

Our sponsor for this challenge is Create a Smile Stamps!!

Create A Smile Badge

The winner of this challenge will receive a $25 gift card to their online store and will be asked to be our Guest Designer for the next month.

Supplies used:

Mini Ink Blending ToolRecollections White Heavyweightcircle burst stencil painted enjoyWink of Stella clear Basic Rhinestones Jewel AccentsTombow Multi-Purpose AdhesiveDistress Ink Mini 13  Distress Ink Mini 14Clarity Brushes

Thank you for stopping by!

~Kymona