L-E-T-T-E-R…….

Second Post for today!!

Hello everyone!!  I’m here today with CASology Week 110 and their Cue Card word is LETTER.

Week 110 - Letter

I have to say when I sat down to create I had to think really hard on what I wanted to create.  All of the ideas that came to mind someone already bet me to the punch.

I felt stuck.  So, I took out a stamp set I’ve never used and one piece of color card stock and decided that I had to come up with something using these two items.

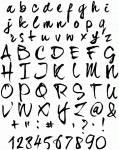
I choose Papertrey Ink Wet Paint Alphabet and Stampin’ Up! Basic Black cardstock.

I ponder over what in the world I make that represented a letter.  I thought about having all of the letter be my background but the word is singular so that wouldn’t work.

Then a light bulb went off and I came up with this:

Letter

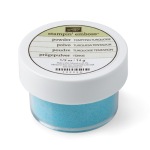
I decided to spell out the word L-E-T-T-E-R and emboss it with Stampin’ Up! Tempting Turquoise Embossing Powder (which happens to be on sale for next to nothing, let me know if you need it).

I added a Stampin’ Up! Rhinestone and my card is done.

Nothing much to it but I like it.

What do you think?  Let me know below.

Thanks for stopping by.

~Kymona

Supplies used:

Wet Paint AlphabetBasic BlackTempting Turquoise Embossing PowderBasic Rhinestones Jewel Accents

Hello….

Hello everyone!!  I’m here with CAS(E) this sketch #84. I only have 8 hours to post this card.

CTS_Sketch84

I created a one layer card. I wanted to keep it very simple.

Take a look at my card:

Hello(Sorry about the photo, no natural lighting it is 1:26 in the am)

Edited to include this better photo at 6:30am

Hello2

My card is pretty clean and simple.  I used there Stampin’ Up! colors to create my card, crisp cantaloupe, pistachio pudding and basic black.

The sentiment is from Stampin’ Up! Hi There stamp set.

The scallops are from Papertrey Ink’s Ombre Builders stamp set.

1. I masked 1inch of space at the top of the card using the post-it tape.

2. I stamped my image 1/8 from the top and bottom of the post-it tape.

3. I removed the tape and added my sentiment.

4. I added rhinestones and WALA my card is done!!

What do you think? Please lave a message.

Crisp CantaloupePistachio PuddingBasic Black InkHi ThereOmbre BuildersPost-It Full Adhesive RollBasic Rhinestones Jewel AccentsStampin' Trimmer

Thank you for stopping by.

~Kymona


You Make My Heart GLOW!!

Second Post for the day!

Hello everyone!  I’m back again with CASology Week 103.  The Cue Card is “Glow”!  Yes, glow.  What can I do?  I wasn’t sure what I wanted to do so I turn to Pinterest for some inspiration.

As I browsed Pinterest the common theme was glow-in-the-dark.  So, I asked myself how can I get my card to glow in the dark.  I did some research and I found some glow-in-the-dark paint.  Thank you Martha Stewart!!

Now in order to get the full effect of my card the lighting in the picture at a minimum. I was trying to take the picture in complete darkness but my camera wouldn’t take the photo, so I did the best I could.

Take a look at my card:

You make my heart glow

I added glow-in-the-dark paint to the wood heart and let it sit under the light for a couple of hours.  When you turn off the light the heart really glows.  My kids thought it was the coolest thing.

Since my camera wouldn’t take the picture in the dark, I turned on a small light in my hallway to the left of my room where the card was located. I set the camera to automatic and it took a couple of minutes to actually take and when it finally snapped this is what I got.  I love the glow of the heart from the camera but I really love the glow on the desk from the heart and the the sentiment.

So what do you think?

Supplies used:

Basic Black CSLF509_QuinnsCapitalABCs_f86c5882-6c10-4eb4-9f69-15d889e19a86_1024x1024 Frost Whiteglow in the dark paint

The wood heart is from AC Moore craft store.

So, what do you think?

Thanks for stopping by!

~Kymona

Watercolor Love You

Hello everyone!  I’m back again with AAA Cards Game #10 Watercolor techniques and Virginia’s View Challenge #5.

AAAcardGame10

V. V. Challenge #5 (2)

Take a look at my card:

Watercolor Love you

I used Simon Says Stamp Mosaic Heart Stencil and Distress Inks Pack 1 to create my beautiful heart on watercolor paper.

Watercolor Love You close up

I used Simon Says Stamp Big You die to cut out 4 “you” dies out of basic black cardstock and stacked them together to add dimension.

I choose to use black cardstock so that the “you” would pop against the bright watercolor heart. I used clear foam tape to adhere the “you’ to my card.  I love this tape because you will never see the tape behind your project.  Thank you Jennifer McGuire for that one.

I love how it turned out.  I went to my brother and asked him to tell me what the card said and he nailed it on the first try.

So, I’m confident you will see that my card says I Love You!

Let me know what you think.  I would love to get feedback.

Supplies used:

Basic Black CSSSS Mosaic Heart StencilDistress Inks Kit 1SSS Big You DieTombow Power Adhesive Glue TabsCanson Watercolor PaperStampin' Trimmer

Thanks for stopping by!!

~Kymona

Freshly Made Sketches 129

I’m back again today with another card for another challenge.  This challenge is from Freshly Made Sketches.  I’m happy to being playing along.

I made this card using some of the Stampin’ Up! products from the Sale-A-Bration catalog that ends on the 31st of March, which is this Monday.  I have to say that I really love the colors in this card.  Pool party and black are a great combination.

Take a look at my card:

Smitten With You

I used the Sweet Sorbet DSP and the Decorative Dots Embossing Folder from the Sale-A-Bration catalog.  Both items you can get for free if you place an order of $50 or more in my online store.  I love them both.

Please tell me what you think.

Supplies used:

Classic Crest Solar White CS

Classic Crest Solar White CS

Pool Party Classic Ink 126982

Pool Party Classic Ink
126982

Pool Party 122924

Pool Party
122924

Basic Black CS 121045

Basic Black CS
121045


Ovals Collection Framelits Die 129381

Ovals Collection Framelits Die 129381

Stampin' Dimensionals 104430

Stampin’ Dimensionals
104430

Snail Adhesive 104332

Snail Adhesive
104332

Memento Tuxedo Black

Memento Tuxedo Black


ME Smitten

ME Smitten

Decorative Dots Embossing Folder

Decorative Dots Embossing Folder

Sweet Sorbet DSP

Sweet Sorbet DSP

Textured Boutique Embossing Machine 132657

Textured Boutique Embossing Machine
132657


Hello Sunshine

Today’s card was inspired by a picture I saw in a magazine this morning.  I didn’t get to take a picture of the layout so I’m going totally off of memory.  I used the new Hello Sunshine stamp set and pattern paper from Lawn Fawn to create this card.

Take a look:

Hello Sunshine

Supplies Used:

Hello Sunshine Stamp Set

Hello Sunshine Stamp Set

Hello Sunshine Petite Paper Pack

Hello Sunshine Petite Paper Pack

Whisper White CS 100730

Whisper White CS
100730


Basic Black Classic Ink 126980

Basic Black Classic Ink
126980

Basic Rhinestones Jewel Accents 119246

Basic Rhinestones Jewel Accents 119246

Stampin' Trimmer 126889

Stampin’ Trimmer
126889


Signature

Sweet Sorbet Card

Hello everyone! Today’s card goes in line with my post earlier.  I wanted to show you another card using the supplies in the Sale-A-Bration Catalog.

I saw this card at leadership and new that I want to create it myself.  The Decorative Dots Textured Impressions Embossing Folder is my favorite embossing folder thus far.  Take a look at my latest creation.

Sweet Sorbet Cards


Supplies used:

Crumb Cake 120953

Crumb Cake
120953

Basic Black CS 121045

Basic Black CS
121045

Textured Boutique Embossing Machine 132657

Textured Boutique Embossing Machine
132657


1-3/4 Circle Punch 119850

1-3/4 Circle Punch
119850


I also used the:

Decorative Dots Textured Impressions Embossing Folder (133520)

Sweet Sorbet DSP (133521)

Sweet Sorbet Accessory Pack (133522)

When you send $50, you can get one of these items for free!!  Yes, for free!

Let me know what you think about my cards today?

Signature

I Love Owls!!!!

OMG, I’m so excited about my new 3-D project.  I saw this project at my upline Yvette Sanchez’s meeting two weeks ago and feel in love with it; that I had to make one for myself and you!  Please do not get to excite, wait yes, get super excited.  So here you go:

Owl Gift Box

Tell me this isn’t the cutest Owl you ever saw.  I know that’s what I said.  Paper-crafting is such a wonderful craft.  Look how I transformed a kraft box into a cute, lovable owl with paper, candy and no stamping.  My make and take class at work will learn how to make these in two weeks.

This box can be given out as teacher gifts, students gift, gift for individuals that do not celebrate Halloween traditional or just because it’s so cute! This would put a smile on anyone’s face.  I’m selling these at the craft fair this weekend.

Supplies:

Cardstock: Basic Black (121045), Crumb Cake (120953), and Pumpkin Pie (105117)

Accessories: Decorative Window Gift Box (132146), Scallop Oval Punch (119856), 2-3/8 Scallop Circle Punch (118874), 1-3/8 Circle Punch (119860), Blossom Punch (125603) and Googly Eyes


Freshly Made Sketch #103

I’m excited once again.  Today’s card was inspired by the Freshly Made Sketches 103.  A group of creative individuals design different sketch for card makers to try.  I’ve always wanted to participate so I did today.

  FMS Final 103-001

Here is a photo of my Freshly Made Sketch 103.  I hope you enjoy it.

FMS103

Supplies used for this card:

Cardstock: Basic Black (121045) and Pumpkin Pie (105117)

Ink: VersaMark (102283)

Stamp Set: Halloween Bash (130580)

Accessories: Witches’ Brew Designer Washi Tape (132156), Snail Adhesive (104332), Stampin’ Emboss Power White (109132), Heat Tool (129053), Embossing Buddy (103083), Corner Round Punch (Retired), Brads