Right At Home March Release Blog Hop

Hello everyone!!  I’m excited to be here with you today to sharing an amazing project created for the Right At Home March Release Blog Hop!!  This is the design team third blog hop and we are delight to full you with inspiration.

march-release-cover-photo

The new Abstract Florals and Script Greeting stamp sets are so much fun to play with.  I have to admit the Abstract Floral stamp set is totally out of my comfort zone.  I can’t figure out which inks to use to build the flowers.  Play with this set, has helped me a lot.

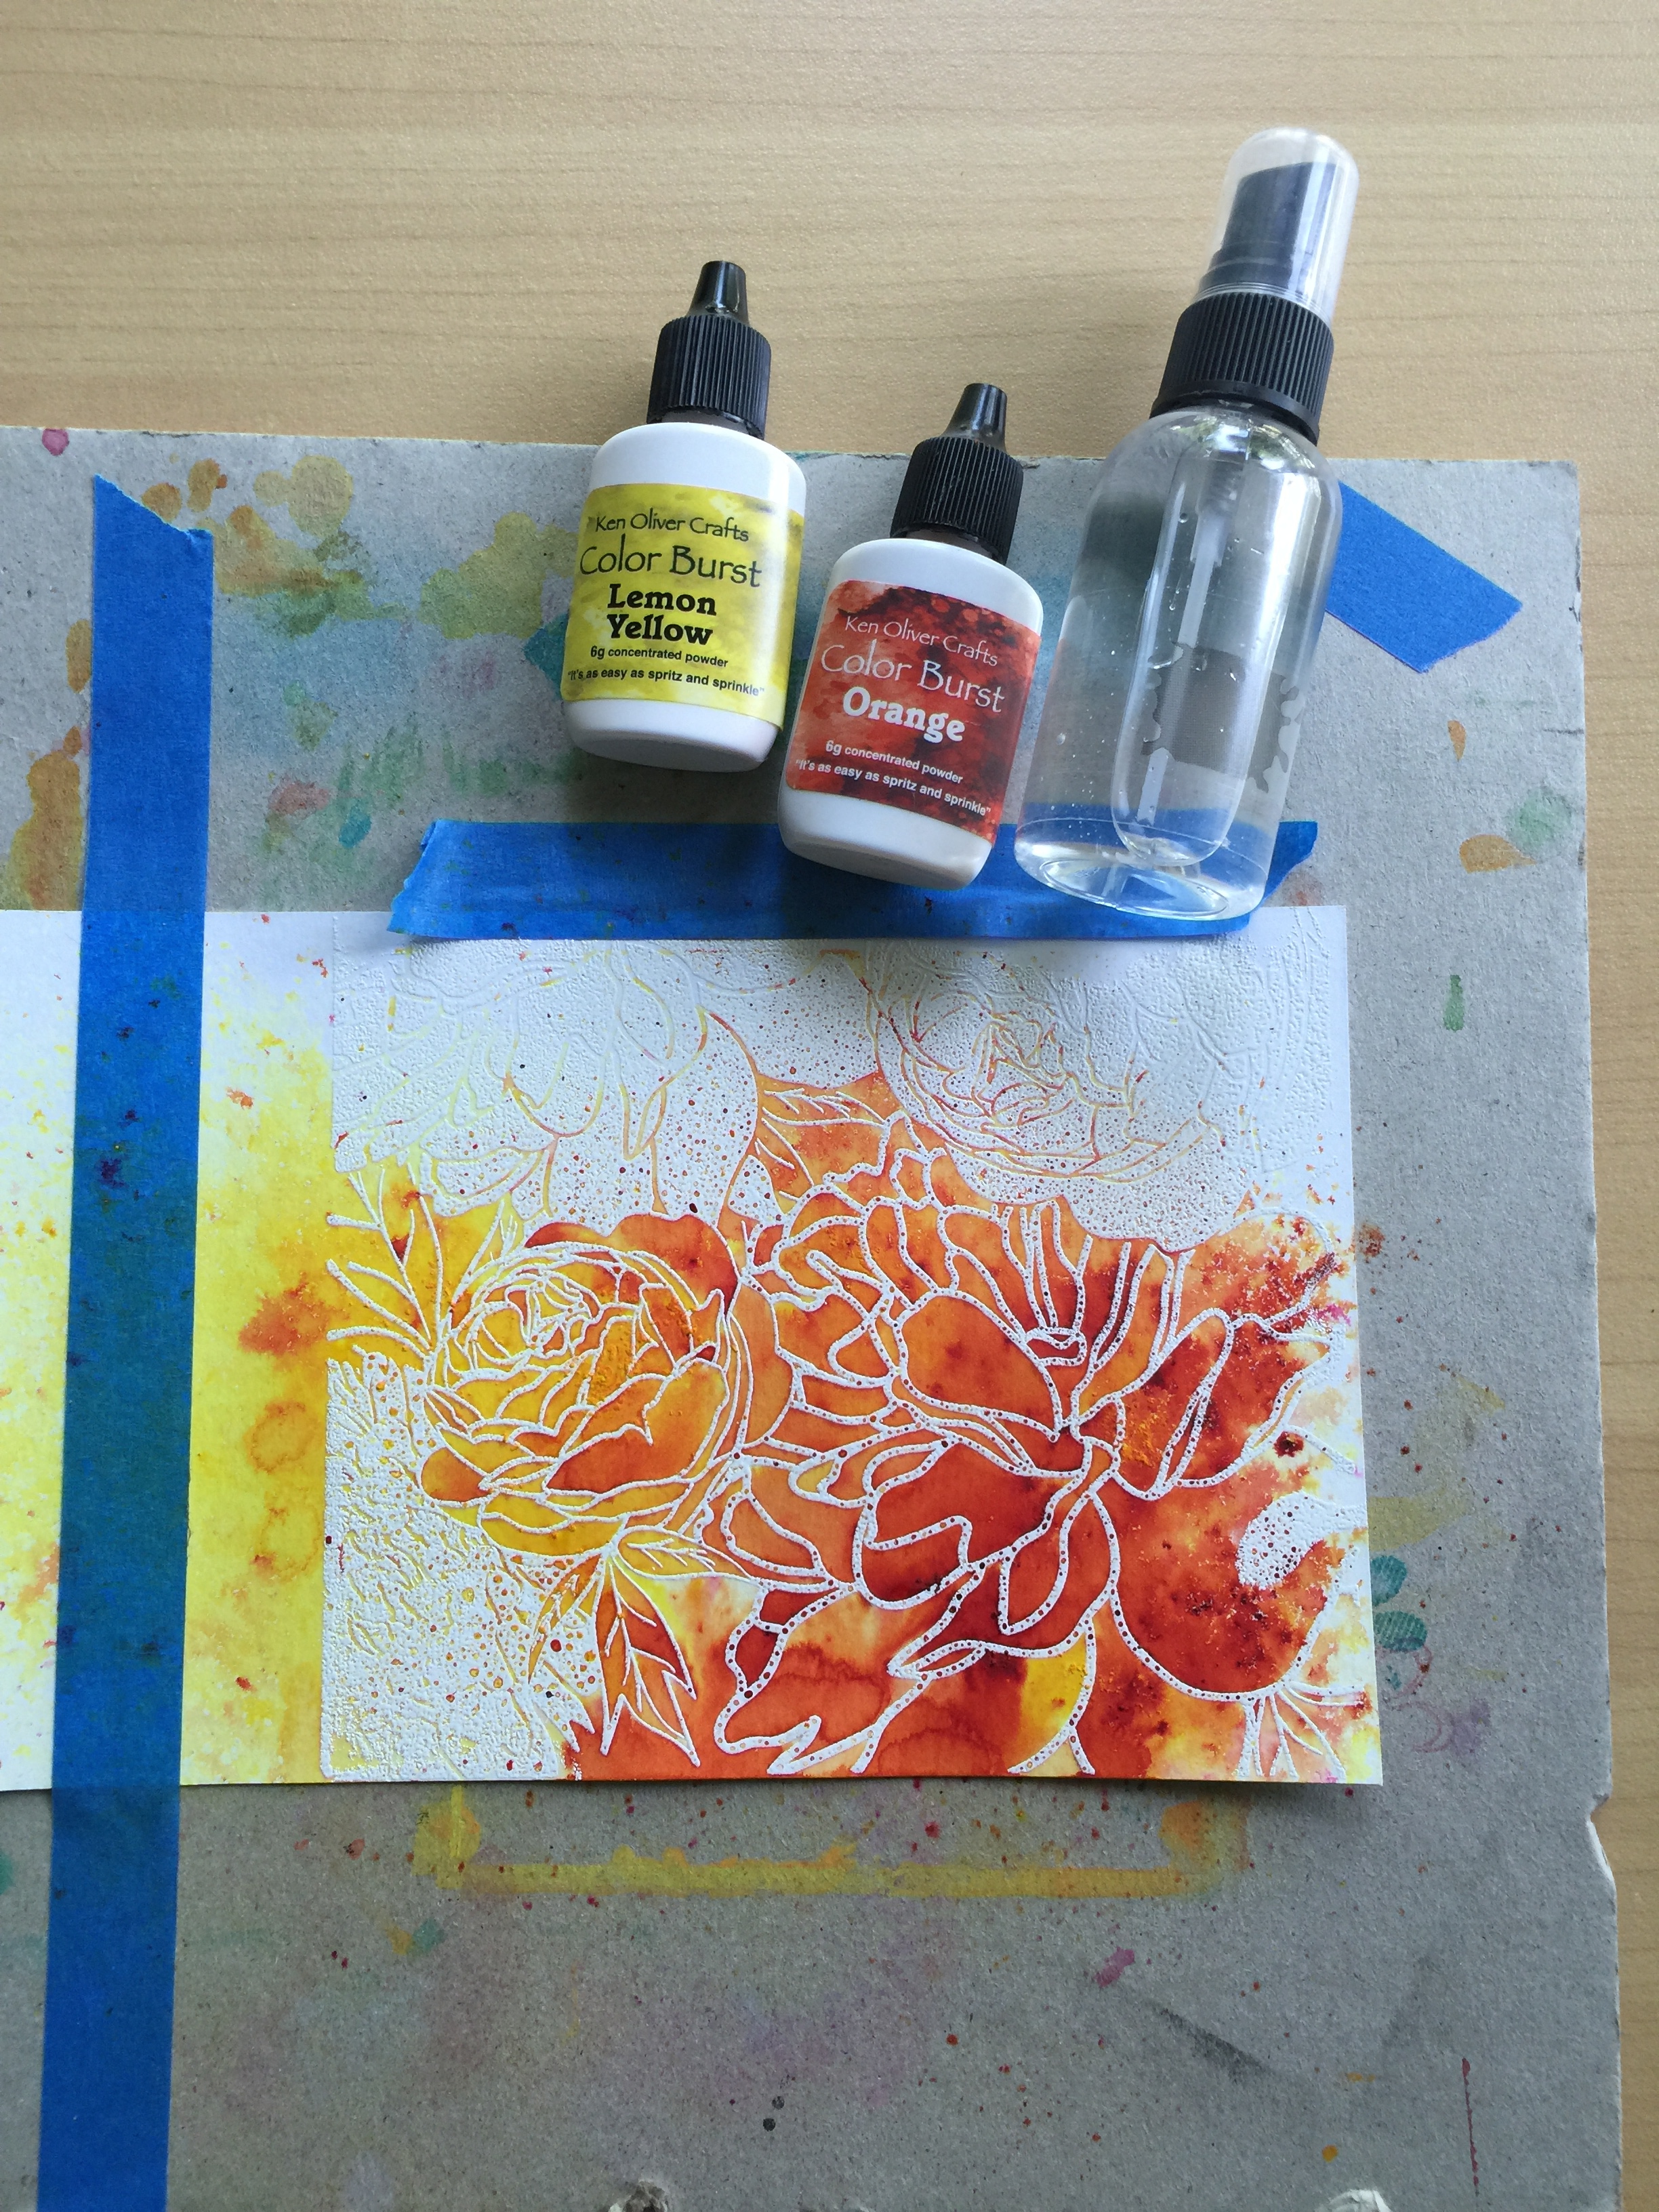
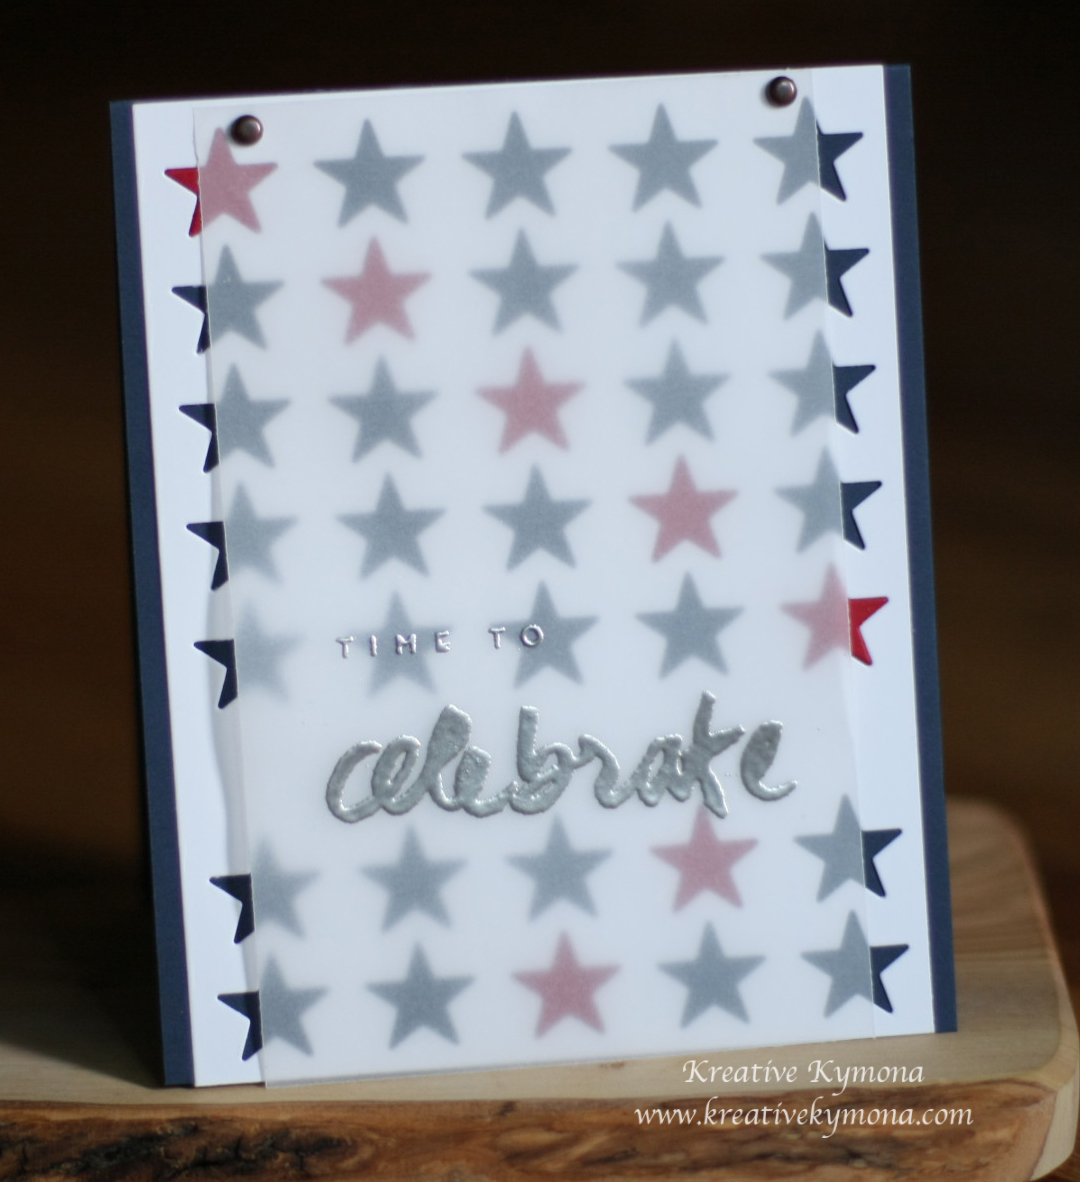
Take a look at my cards:

Hello (RAH)

I love how my flowers turned out. I shied away from building my flowers this go round but you will see that later this month.

Here’s how I created these cards:

  1. Both cards are an A2 size cards, 4.25 by 5.50 scored at 5.50.
  2. I used the Mini Misti to stamp the flowers, stem and sentiment all at one time using My Favorite Things Hybrid Ink.  It saved me time on the second card as well, since everything was in the right place.
  3. After the flowers were stamped, I used Tombow Recycled Color Pencils to color them in.
  4. Once the flowers were all colored, I took Tombow Mono Sand Eraser and give the tip of the flowers some highlights.
  5. I added some YNS Give Thanks for Sparkle and Candy Land Glittered Gumdrops and round the top corners to finish the cards off.

I’m going to make a couple more of these cards so that I can include them in the happymail packages that I send to my giveaway winners.

Your next stop on this awesome hop is Yuki’s blog! She is amazing!!

What’s a hop without a giveaway!! One lucky person who hops along and leaves a comment on each blog will win the Scripty Greeting stamp set.

So what do you think? Let me know below.

Supplies used:

abstract-florals-sqscript-greetings-sqMini Misti  Tombow Recycled Colored Pencils  Tombow Sand EraserMFT Hybrid Black Ink Give Thanks for Sparkle Gumdrops  Candy Land GD  Recollections White HeavyweightNeenah Desert Storm CS

Thank you for stopping by!!

~Kymona

CS Take It Make It: Take a Stamp Challenge

Hello everyone!  I’m here today with CS Take It Make It Design Team for our CS Take It Make It: Take a Stamp Challenge for the month of July.

This month’s theme is Take a Stamp!!  That means take any stamp and create something, anything goes!! Now if that isn’t easy, I’m not sure what is!!

Take a look at my card:

Amazing (TIMI)

I am totally siked!!  My niece said “Auntie that is amazing”, when I was finished with this card.  That is why the sentiment is amazing.  I love this card so much.  The colors are so pretty.

Here is how I created this card:

1. I used Versamark Ink and covered this awesome new stamp that I picked from The Ton!  Its a fairly new stamp company and this stamp is totally awesome. Its called Peony Garden Stamp!

IMG_3872

2. I placed my watercolor paper on top of the stamp and rub the ink onto the paper.

3. I added Hero Arts White Embossing Powder on top of the stamped image.  Then I heat set the embossing powder.

4. Then I added some of Ken Oliver Crafts Color Burst in Orange and Lemon Yellow.  I love this watercolor powder. Its so vibrant and super easy to use.

IMG_3873


5. I cleaned up my water color piece with a damp napkin and trimmed it to fit on an standard size A2 size card (4.25 x 5.50).

6. I didn’t want my sentiment to cover up my watercolor flower so I stamped The Ton’s Friggin Fabulous Stamp Set on Dura-lar Acetate with Versamark Ink and heat set the white embossing powered.

IMG_3883


I have to say I was amazed that I didn’t melt the acetate or my finger! I didn’t prep my acetate with powder before I stamp it so that is why you see so many specs.  I’m ok with it.

7. I added this sentiment piece to my card front with Tombow Multipurpose Liquid Adhesive.

Pretty neat right!!  Now its your turn to play along with us.

We have two prizes to offer this month, the first is our sponsor prize. This winner will be chosen randomly from all of the entries in the challenge! The sponsor for July is: Art Journey

CS TIMIHere are the prizes this month:

4 Plates!!

Sorry I don’t have an image but if you visit the store you will see the most amazing stamp sets!!

Our second winner is our Design Winner. This winner is chosen by our DT, who all vote for their favorite design from all of the entries. This winner will have their winning project published in Craft Stamper Magazine, they will have a GDT slot for an upcoming challenge, and will also feature in their very own Winners Profile blog post!

Now if that isn’t a reason to play along I’m not sure what is!!

I can’t wait to see what you come up with.

I’m entering this card into Virginia’s View Challenge #16.

100% stamped

Supplies used:

TT Peony GardenVersamarkHero Arts Clear Embossing PowderColor Burst Lemon YellowColor Burst OrangeFriggin Fabulous Tombow Multi-Purpose AdhesiveAcetate


Thanks for stopping by!

~Kymona

Waffle Flower Crafts – Photo Inspiration

Hello everyone!! I’m here with our new Waffle Flower Crafts Photo Inspiration Challenge!!!

This is our tenth challenge for 2015 and this happens to be my favorite photo to date.

Take a look:

Waffle Flower Craft

Look at how vibrant those colors are!

Take a look at my photo:

Hello (WFC)Oh man, I couldn’t help myself with this card.  I love those ombre colors in the photo above that I had to recreate the same look with one of the colors.

Here’s how I created this card:

1. My card base is cut to an A2 size card (4.25 x 5.50 scored at 5.50).

2. I cut the card panel to 2.25 x 5.50

3. I used Distress Ink Salty Ocean to create my ombre look.  I started with the full strength of the ink to the paper.  Then I tapped off on the side before added the color to the paper.  Then I lightly add color to the bottom of the paper.

4. I place my panel into my Misti and stamped a flower from Waffle Flower Crafts Flower Circles Stamp Set with Versamark Ink.

5. I added Hero Arts White Embossing Powder and heat set it.

6. I used the same stamp set to stamp my sentiment with My Favorite Things Hybrid Black Ink.

7. I pop my card panel up with fun foam and I added Pretty Pink Posh Winter Snow Mix sequin randomly.

Super cool!!  I love how this card turned out.

So what do you think? Please let me know.

Now its your turn!! I can’t wait to see what you come up with.

I’m also linking this card up to Virginia’s View Challenge #15.

V. V. Challenge #15

Supplies used:

Flower Circles Stamp Set Versamark67f65-white2bembossing2bpowder Misti MFT Hybrid Black Ink Winter Snow Mix Sequins Distress Ink Salty Ocean

Thank you for stopping by!!

~Kymona

Top Dog Dies: Love Letters

If your looking for the DoubleClick Skittles Challenge, click here.

If your looking for the Waffle Flower Craft Announcement, click here.


Hello everyone!!  I’m here today with Top Dog Dies for the first time as a Design Team member!! Yayyy!!!

Have you check this store out yet?  If not, you must!  They carry all sorts of amazing dies.

Check out my card:

Love you (dt)

I just love how this card turned out.  I used Top Dog Dies Vintage Alphabet Die to spell out the word love for a super cool valentine’s day card.

Lets take a couple more looks at my card:

Creative Shot Love 2

Aren’t these letter the cutest!!  I love the fancy look of each letter.

Creative Shot Love 1

I was going to leave just the letters on the card but at the last minute decided to add a stamped you for more interest.

I’m so glad I made that decision.

Here is how I created this card:

1. I cut my card base from Simon Says Stamp Schoolhouse Red cardstock to an A4 (4.25 x 5.50) size card scored at 4.25.

2. I cut my Neenah Solar White cardstock panel to 4 x 5.25.

3. I attached the white panel to the red card base with some regular adhesive.

4. I cut a 1.5 “strip of the red cardstock and then cut 1.5 squares.

5. I used my corner chomper to round two of the corners.

6. I die cut my letters out of the white cardstock and adhered them to the red square.

7. I adhered the squares to the front of my card panel.

8. I stamp the you sentiment from Mama Elephant Cross My Heart Stamp set using Memento Tuxedo Black ink.

That’s it!!  Very easy card to create again and again using different words.

I would love to see what you come up with using this die set!!

Before I go, Top Dog Dies has a Little B Giveaway going one right now.  One lucky Winner will receive $113 in Little B Crafting Products.

littleb_promo_150106

You have 3 chances to win.  Enter by January 25, 2015!! Check out Little B Dies here.

I’m playing along with Simon Says Stamp: Something New.

wednesdayblog-logo

I’m playing along with the NBUS Challenge.

NBUS

Supplies used:

TDD Vintage Alphabet DieSSS schoolhouse redclassiccrestsolarwhtieWe R Memory Keepers Corner ChomperCROSS MY HEART Memento Black Ink

Thanks for stopping by!

~Kymona


Warm Holiday Wishes Tag

Hello everyone!!  I’m here today playing with Tag You’re It!!  This is my first time playing with them.  I’m happy I found them.  I recently started making tags and I love them.  They are super fun to make.

TYIC_12

The TYIC Designer for his challenge is Tracey McNeely and her tag is fabulous!!

When I looked at her tag, I thought of pops of color.  So I decided that I wanted to have a pop of color on my tag too.

Take a look at my card:

Warm Holiday Wishes

I love that pop of that Cable Car Red Wow embossing powder on my gloves.

Warm Holiday Wishes sideview

Not along is it a tag, but it doubles as a card too!!  So you can write your message inside instead of the back.

This is how I created my tag:

I cut two tags out of Bazzill Marshmallow cardstock using Reverse Confetti Tag Me, Too.

I used Simon Says Stamp Big Holiday Wishes stamp set to stamp my snowflakes with Versamark ink.  Then I embossed them with Hero Arts White Embossing Power.

I stamped my sentiment using Versafine Onyx Black Ink.

I stamped the mitten string with Versafine Onyx Black ink around the hole in the tag.

I stamped my mittens using Versamark ink and embossed with Cable Car Red Wow Emobossing Powder.

I fussy cut the mittens out and adhered them with foam adhesive. I added Clear Wink of Stella on my mittens for a sparkly shine.

I attached my second tag to the back of the first tag with adhesive to create a tag that opens.

I strung Stampin’ Up! Retired Whisper White Sweater Ribbon to finish off my tag.

Nice and easy.  So what do you think?


Supplies:

Cable Card Red embossing powderTagMeToo1 Bazzill Marshmallow CS Big Holiday WishesVersaMarkHero Arts White Embossing PowderOnyx Versafine Ink3M Mounting TapeWhite Sweater RibbonWink of Stella clear

Thank you for stopping by!

~Kymona

White Stamping

Hello everyone!!  I’m here today with CS Take It Make It Design Team for our December Challenge!

This month’s theme is White Stamping!!  That could be white ink, white paint or white embossed stamped image.  This technique is so pretty when its complete.

I saw Kristina Werner create a card that had white embossing and I knew I had to give it a try.

So take a look at my card:

Happy Holidays White Stamping

Isn’t this such a pretty technique!  That white embossing on the blue is so pretty.  That pop of red stands out.

Here is how I created my card:

1. I cut my Simon Says Stamp Audrey Blue cardstock on an angle and adhered it to my Neenah Solar 110lb White cardstock using foam adhesive.

2. I used Simon Says Stamp Presents and Ornaments to stamp my snowflakes and bows using Versamark ink.

3. I sprinkled Hero Arts Embossing Powder on my stamped images and heat set it.

4. I added versamark ink to the edge of the a Audrey blue cardstock, added white embossing powder and heat set it for added embossed dimension.

5. I stamped my sentiment using Simon Says Stamp Be Joyful stamp set with Simon Says Stamp Audrey Blue Ink.

6. I used my Copic marker R29 and colored a piece of white cardstock and die cut a heart using the smallest heart from Lawn Fawn Hearts Cuts.

7. I added Clear Wink of Stella to the heart and adhered the heart with foam adhesive.

8. I added Stampin’ Up! Rhinestones to the center of all of my snowflakes.

Easy Peasy!  What do you think? Let me know.

Now its your turn!!

You can stamp away to your hearts desire, using white ink, gesso or white paint.  You can even stamp an image and then emboss with white embossing powder if you want to too!!

To be clear, you CAN stamp in other colors too, but we need to see some parts of your project have clearly been stamped in white!

We are delighted to be sponsored this month by Rubber Dance!

header

Rubber Dance carry an amazing range of wonderful stamps, you really need to check them out if you haven’t already!

The prize this month is a voucher to spend in the shop…..

voucher

PLUS:The Design Team will have a look at all your gorgeous work, and choose their Top Three….. and the overall Winner will get published in Craft Stamper magazine! Yes, the winning entry will appear in the UK’s number one stamping magazine! AND: The Challenge winner will be offered a Guest Designer spot for an upcoming challenge!

So, £20 worth of rubber stamps, publication AND a guest DT slot? What are you waiting for?!

I can’t wait to see what you come up with.


Supplies used:

SSS Presents and ornamentsVersaMarkHero Arts White Embossing PowderclassiccrestsolarwhtieSSS Be JoyfulAudrey Blue InkHearts Lawn Cuts Wink of Stella clear3M Mounting TapeBasic Rhinestones Jewel Accents

Thanks for stopping by!

~Kymona

Thankful Thanksgiving….

Hello everyone!!  I’m here today with a2z Scrapbooking and our November Challenge which is Anything Goes!

I decided to go with a Thanksgiving theme.

Thanksgiving is that day where we gather with family and friends to show how grateful we are to them. Big dinners are cook, tables are set and everyone is waiting for the turkey!!

My family is the most important part of who I am. I am grateful for each and everyone of them. I have two children, five brothers and sister, my mom and day, 5 nieces and nephews and so many aunts, uncles and my grandparents. When we get together we have a blast.

Before we have dinner, we gather together, hold hands and go around the room and say what we are thankful for this year. I love doing that because our lives are so busy sometimes we forget to tell each other that we are grateful for them. Once the last person speaks, my grandmother says a prayer and then we sit and eat together as a family.

This year, I wanted to do something extra. I wanted to give my brother and sister something to take with them.

So I create a couple of Thanksgiving tags that have a special note on the back for each of my sibling.

Take a look at my tags:

Thanksgiving Tag set

To get a closer look at all of my tags, please head over to a2z Scrapbooking blog and take a look.

So what do you think? Do you think my siblings will like their tags?

All but three of the items I used for my tags can all be found at the a2z Scrapbooking Store. If you would like to purchase any of the supplies I used please head on over to the store and use the coupon code KYMONA15 to get 15% off your purchase.

I hope my tags gives you some inspiration to participate in our Current Challenge. It runs to the end of the month, which ends in two weeks. So hurry and create!

You have a chance to win a $25.00 gift card to the a2z Scrapbooking Store. Hope to see you there!

One more thing before I go, did you know that we are on Twitter, Instagram and Facebook. If you haven’t done so already, please follow us on these different social media outlets!! You don’t want to miss out on any fun promotions!!

Supplies used:

Thankful for You Hero Arts Harvest Die Cuts Diamond Gems 5mm Snow Layering Paper Copic Markers Kraft CS Large Tag Frame CutStitched Duo 1 Dies Rounded Tag Die

Kymona

Oh Happy Day

Hello everyone! I haven’t posted in the last couple of days because my camera card refused to work.  What nerve!!  We spend all of this money on these cards and they want to act funny.  Luck for me I do not reuse cards.  Once a card is full I buy another, so I have plenty on hand.  Unlucky for me I had to go through one of them and delete some photos so I can take these photos.  Yes, Oh Happy Day for me.  LOL.

Ok, on to why I’m here today.

I’m here today playing with the Muse Challenge #74.  The Muse for this week is Jennifer Wills!

Check out her card:

IMG_7562.1

I have to say, when I saw this card I was a bit intimidated.  I wasn’t sure what I wanted to do, what I can do or what I should do.  My brain was on frozen mode.  Then I thought I want to keep my card clean and simple.  Then I thought maybe I will die cut, but I knew everyone else would, so I didn’t want to do that.

I decided that I would only die cut my center piece and then add embellishments to give the card dimension.

Take a look:

Oh Happy Day side

I die cut my square then added pattern paper.

I rounded the corner, stamped my sentiment, added my twine and button.

Clean and Simple to the max.

By the way, I have been playing with my camera, trying to get brighter pictures that are sharp and crisp.  What do you think?  Any suggestions.

I used my:

Canon 40D

Shooting Mode: AV (Aperture Value)

50mm lens f/1.4

Aperture: 1.4

Shutter speed: 1/80

Exposure Compensation: +1

White Balance: Daylight (I will try Auto next time to see what results I get)

Please let me know what you think.


Supplies used:

Neenah Desert Storm CSclassiccrestsolarwhtieStudio Calico Snippets paper padWoodButtons_EtchedButterfly-360x360Bermuda Bay Bakers TwineWe R Memory Keepers Corner ChomperHello Sunshine Stamp SetStampin' Dimensionals
Thank you so much for stopping by!

~Kymona

Red, White and Blue…

Hello everyone! I’m here today with a Papertrey Ink Make it Monday #169: Vellum Overlays.  I’m so late in posting this card.  I couldn’t decide what I wanted to create for this challenge.

So, I picked the colors that I wanted to work with first.  Since July 4 is this Friday, I decided to go with red, white and blue.  Once I knew that, I saw it fitting to use PTI’s Cover Plate: Stars Die.

After figuring all of that out, I needed to see how my vellum piece would look attached to my card.  Once I added it, I realized I didn’t have a sentiment on my card.  That’s when it hit me that I should add the sentiment to the vellum and in silver for an extra pop.

Yes, that turned out neatly!

Take a look at my card:

Time to Celebrate top

Time to celebrate


I attached my vellum with two bronze brads.  I must me honest, when I decided to add brads, I knew for sure I had silver ones.  Well, I such everywhere and I could not find them.  So, I decided to us the bronze brads and I like it.

What do you think?  Don’t be afraid to let me know, good or bad.

Supplies Used:

PTI Stars DieWet Paint 3Bazzill Blueberry SourSSS Lipstick Red CardstockBazzill Marshmallow CSWhite VellumBig Shot Die-Cut MachineMagnetic PlatformStampin' TrimmerTombow Multi-Purpose Adhesive

I also used Stampin’ Up!’s Retired Pewter embossing power and brads.


Thank you so much for stopping by!

~Kymona

Hello World, How are you?

Hello everyone!  I’m in such a great mood today, I can’t stop smiling.  I’ve been working really hard at my craft and slowly by surely its paying off.  So, I’m really proud of myself.

I’m here today with a card for the Muse Challenge #69. This is my first time playing along with them so I hope I don’t disappoint them.

Cornelia was chosen to create the Guest Muse this week and her card is full of bright colors, a cool technique and FUN!

Here is her card:

Cornelia

My job is to use the Muse card as inspiration and create one of my own.

When I looked at Cornelia’s card, it reminded me of my all time favorite technique, WATER-COLORING!!!  I love how she made the colors mix with one another and the splatters across the card.

So I knew right away that I had to pull out my Koi watercolors.  I decided that I wanted to use colors I hardly use that are bright and will stand out on the black cardstock I wanted to use.

Before I painted, I scored the watercolor paper to give it added texture.

I used colors #3, 12, and 16 to create my sentiment and hearts. You can see the colors on my swatch here.

Like Cornelia’s card I wanted to create a one layer card so I decided to create an inlay card with my sentiment and hearts.  So, I die cut my sentiment and hearts from the watercolor piece.

helloswatch

After I cut out all of my pieces that I need to create my card, I realized that I wanted my card to have a stitch edge so to create that I had to use my large journal stitch die, which in turn cut off a portion of my card.  I was ok with that because I love the stitch edge. That idea came from Nichol Magouirk.

After that cut, my card was no longer a one layer card.  I put all of the piece together and here is what I came up with.

Here is my card:

Hello

I added sequin, enamel dots and rhinestones to resemble Cornelia’s paint splatters.  I choose colors that were close to my watercolor sentiment and hearts.

Sooooo, what do you think? No stamping required. I love how it came out.

Supplies used:

Canson Watercolor PaperKio WaterColorsBasic Black CSLargeStitchedJournalingCardScripty HelloHello Sunshine Mixed SequinsBrights Candy DotsBasic Rhinestones Jewel AccentsStampin' TrimmerSnail AdhesiveStampin' DimensionalsclassiccrestsolarwhtieWe R Memory Keepers Corner Chomper

Thanks for stopping by!

~Kymona