You’re Pretty Amazing

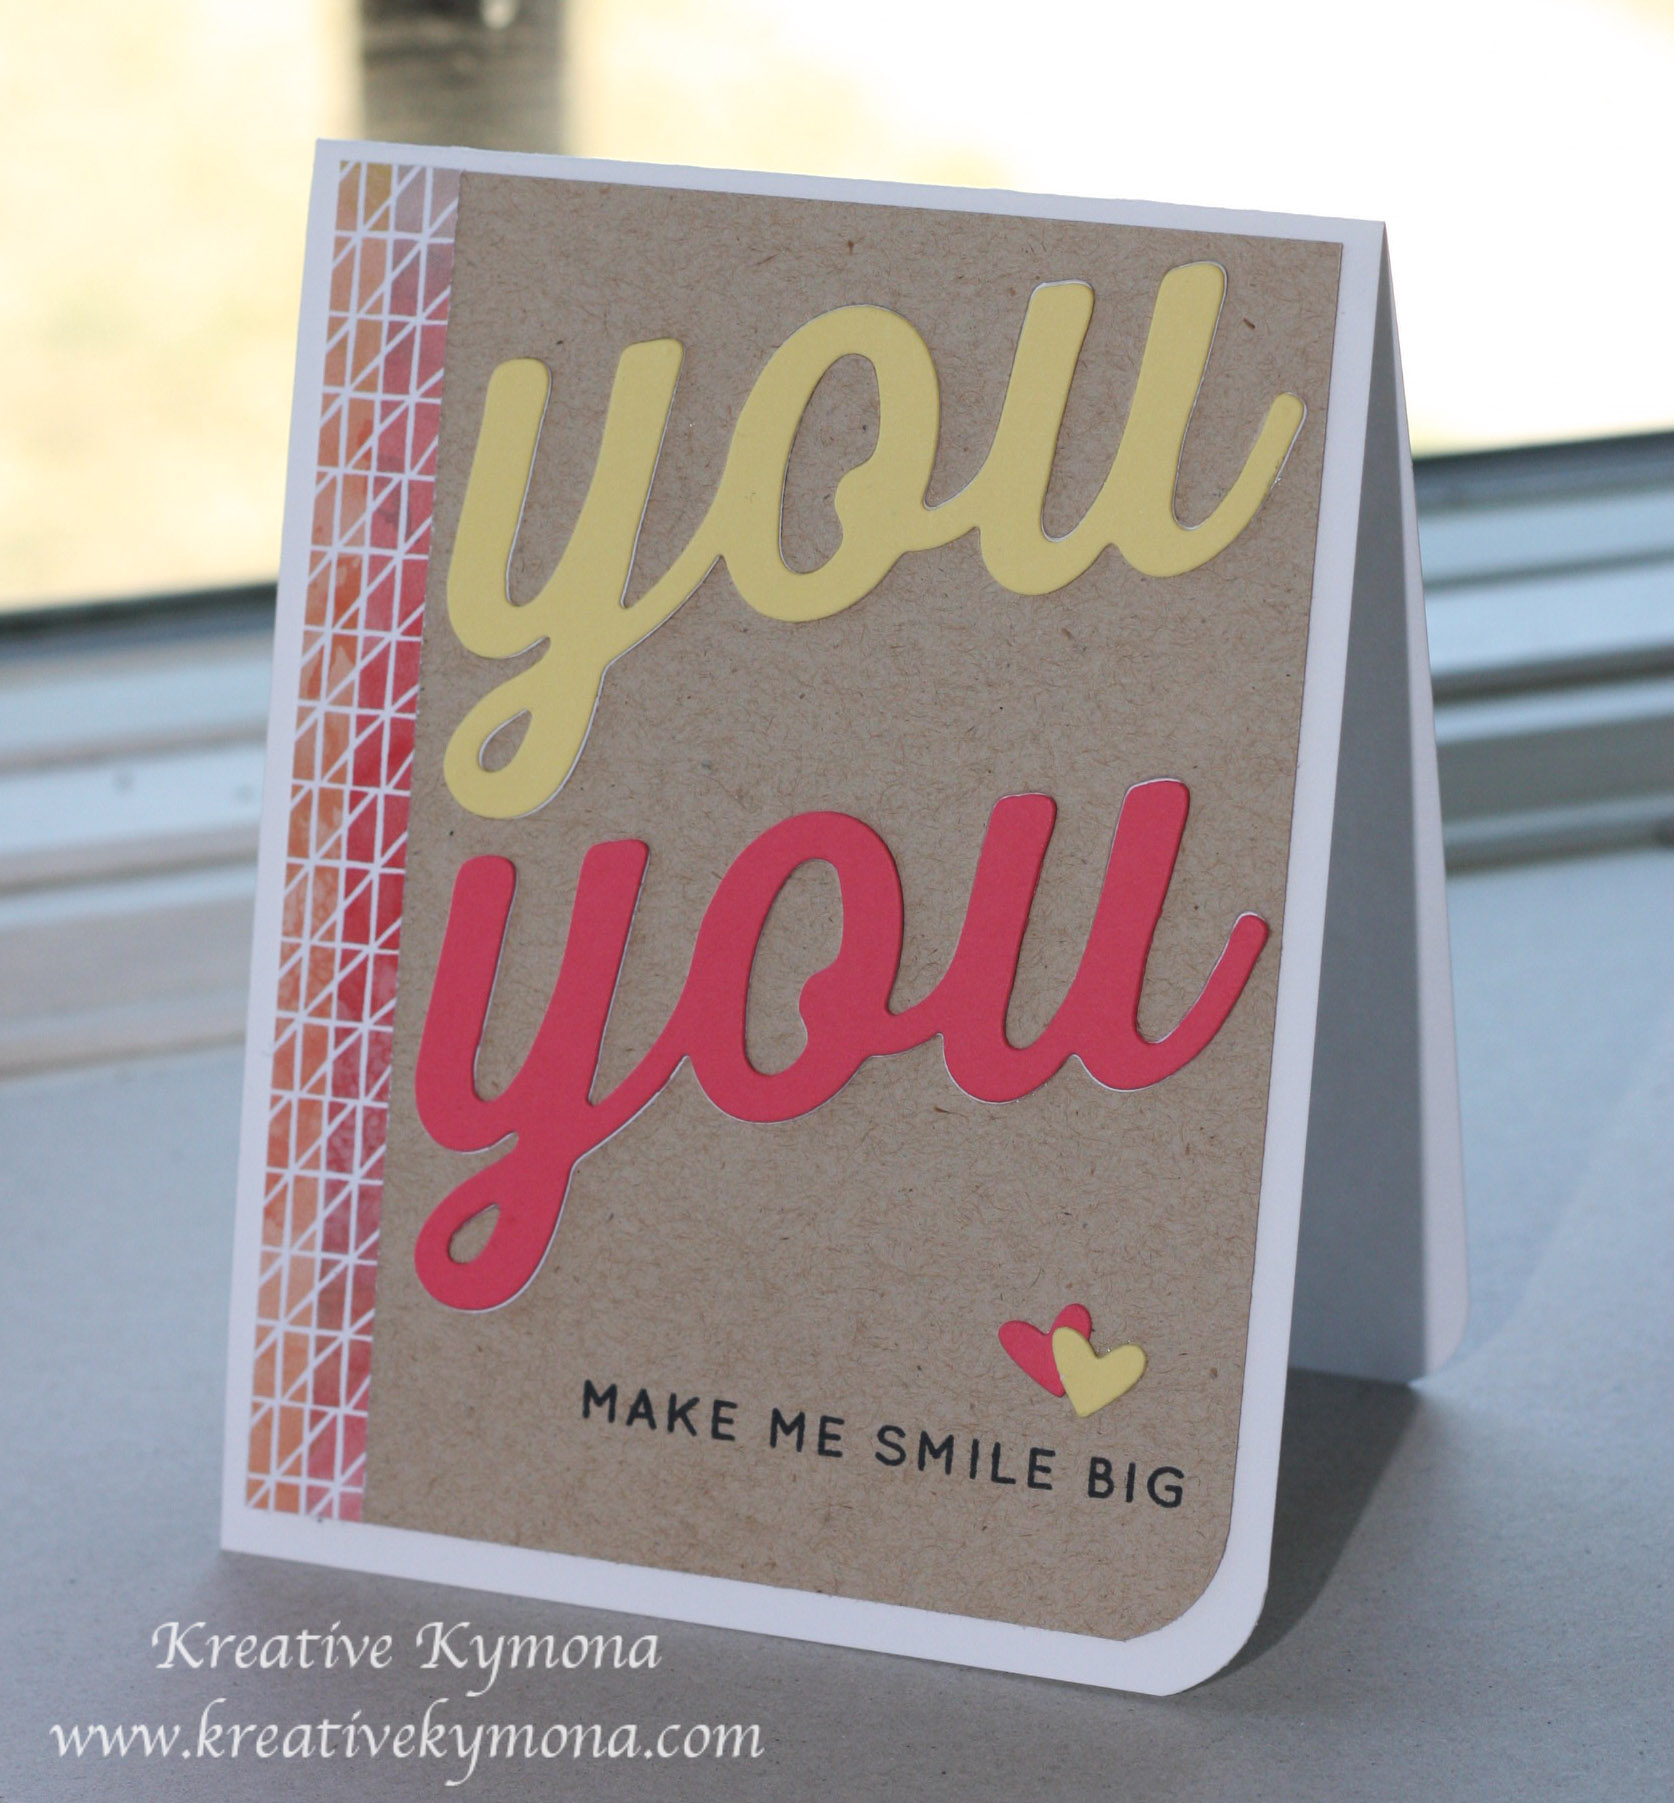
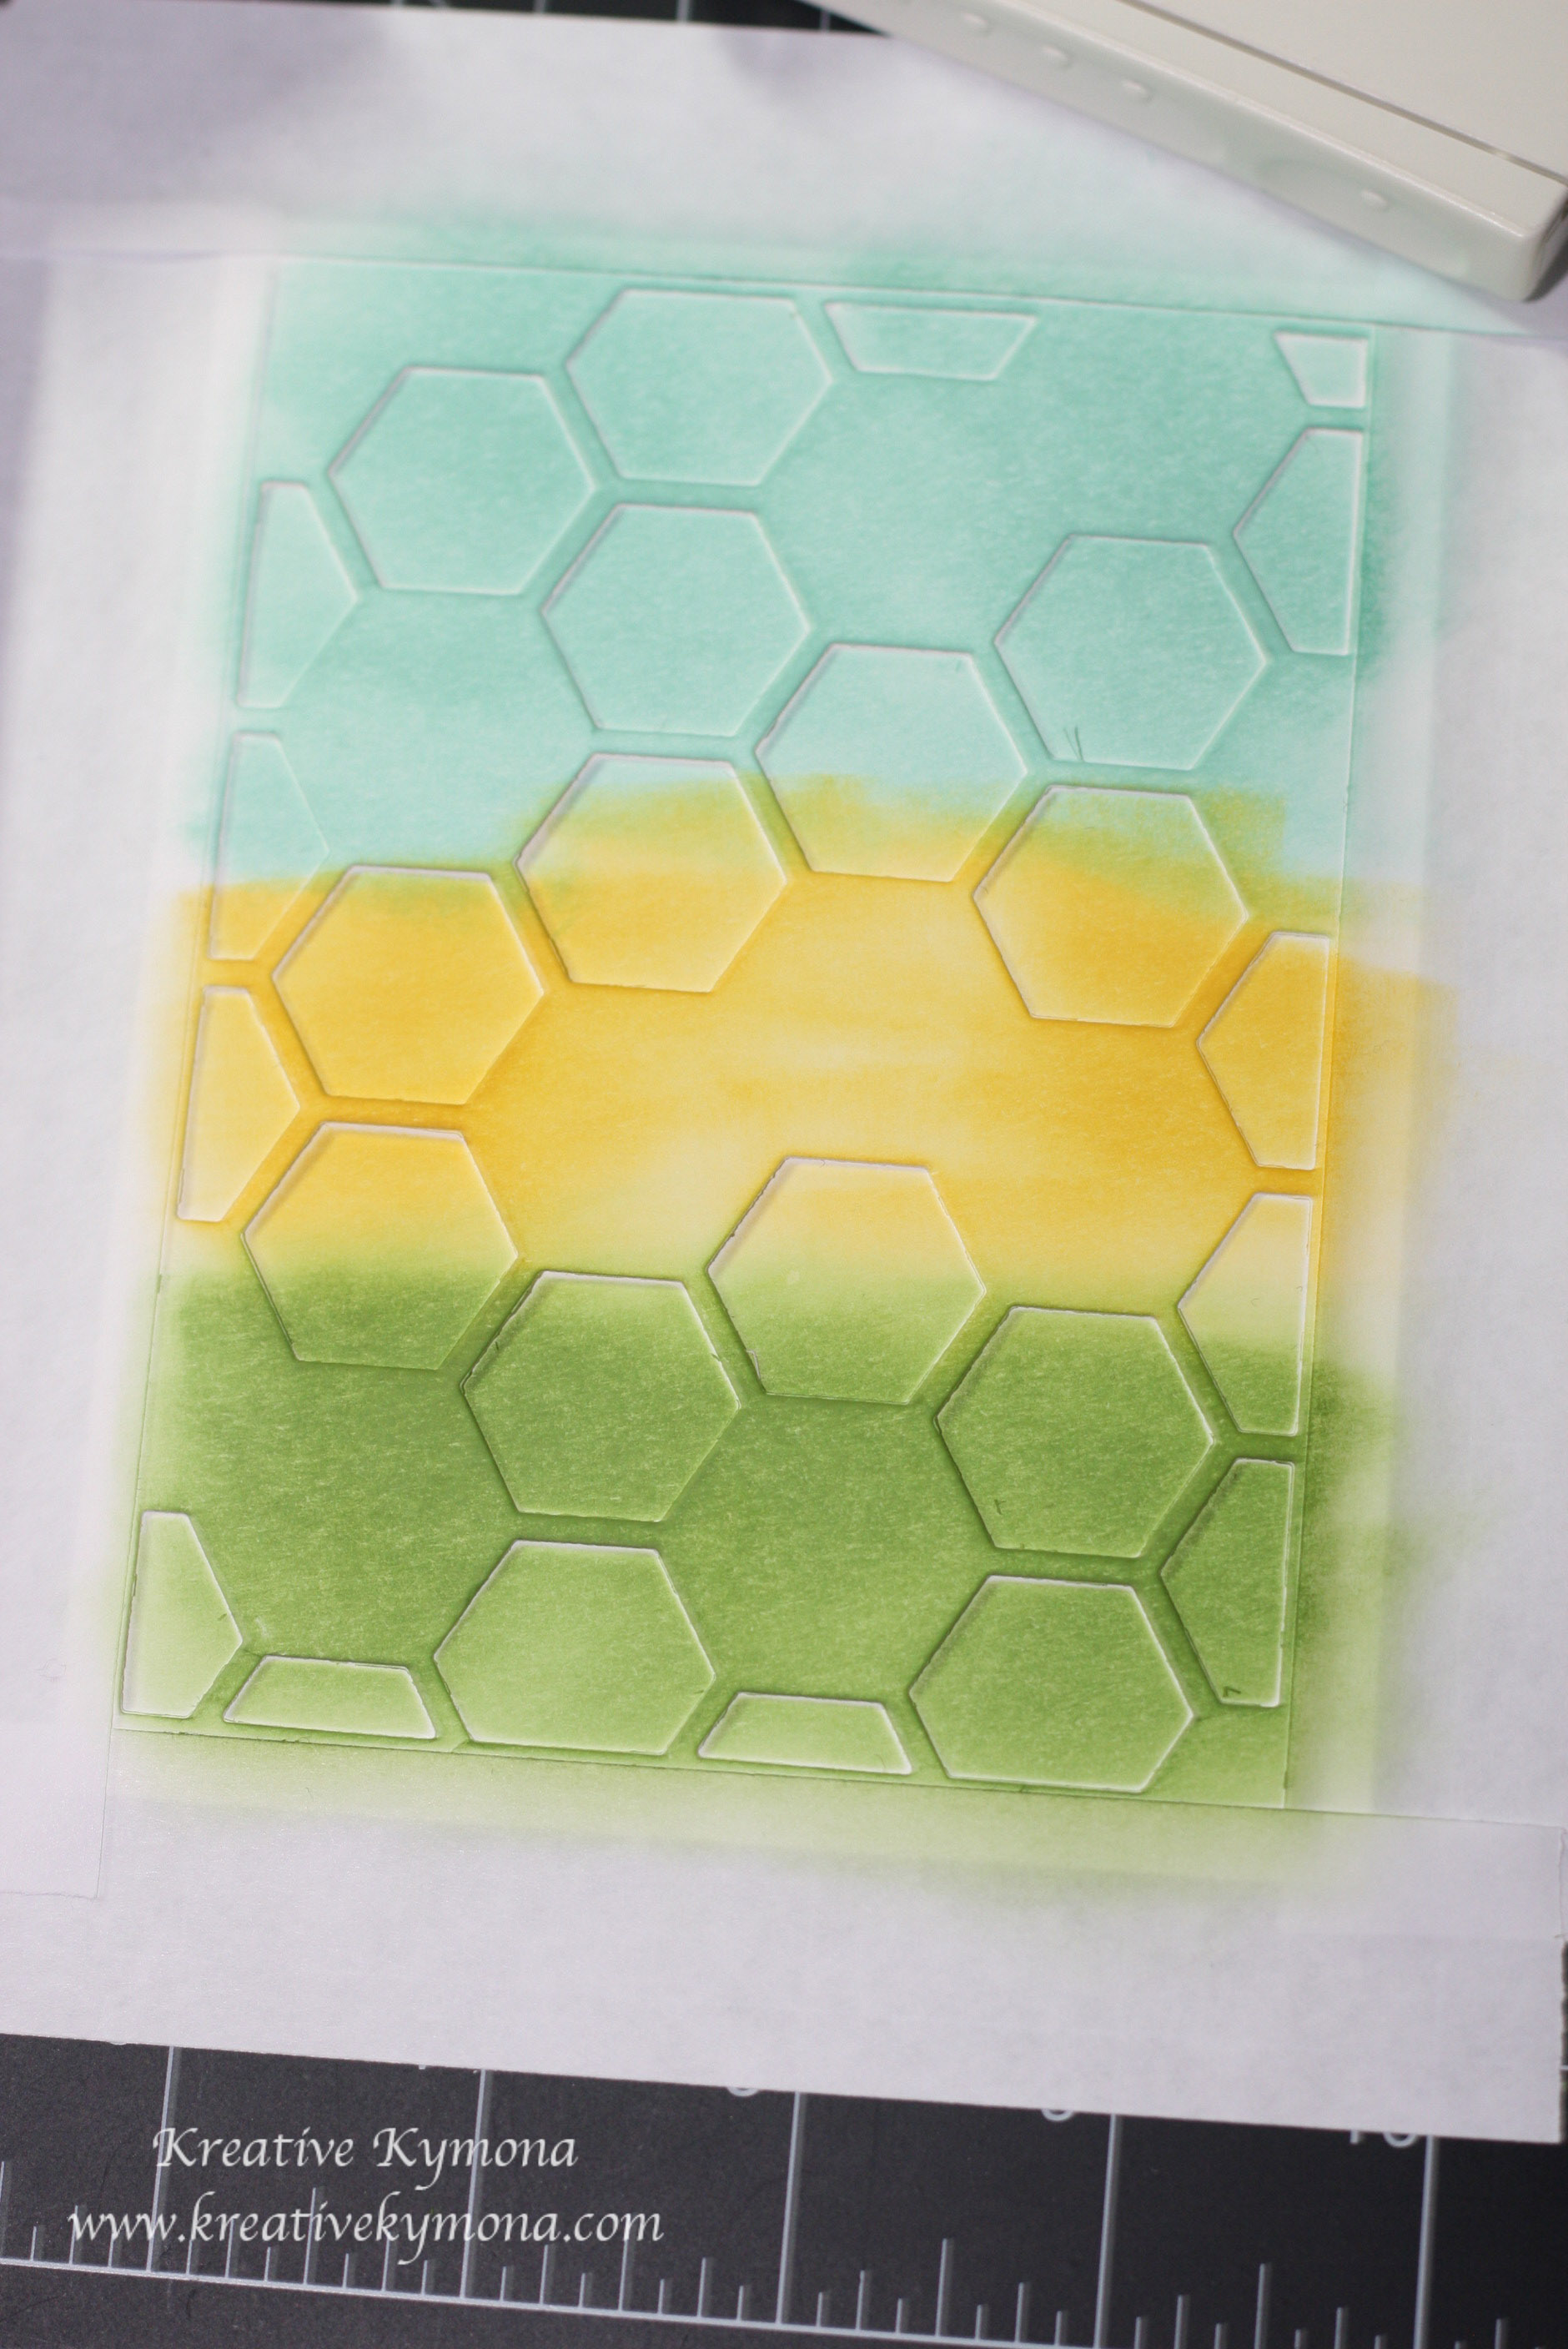
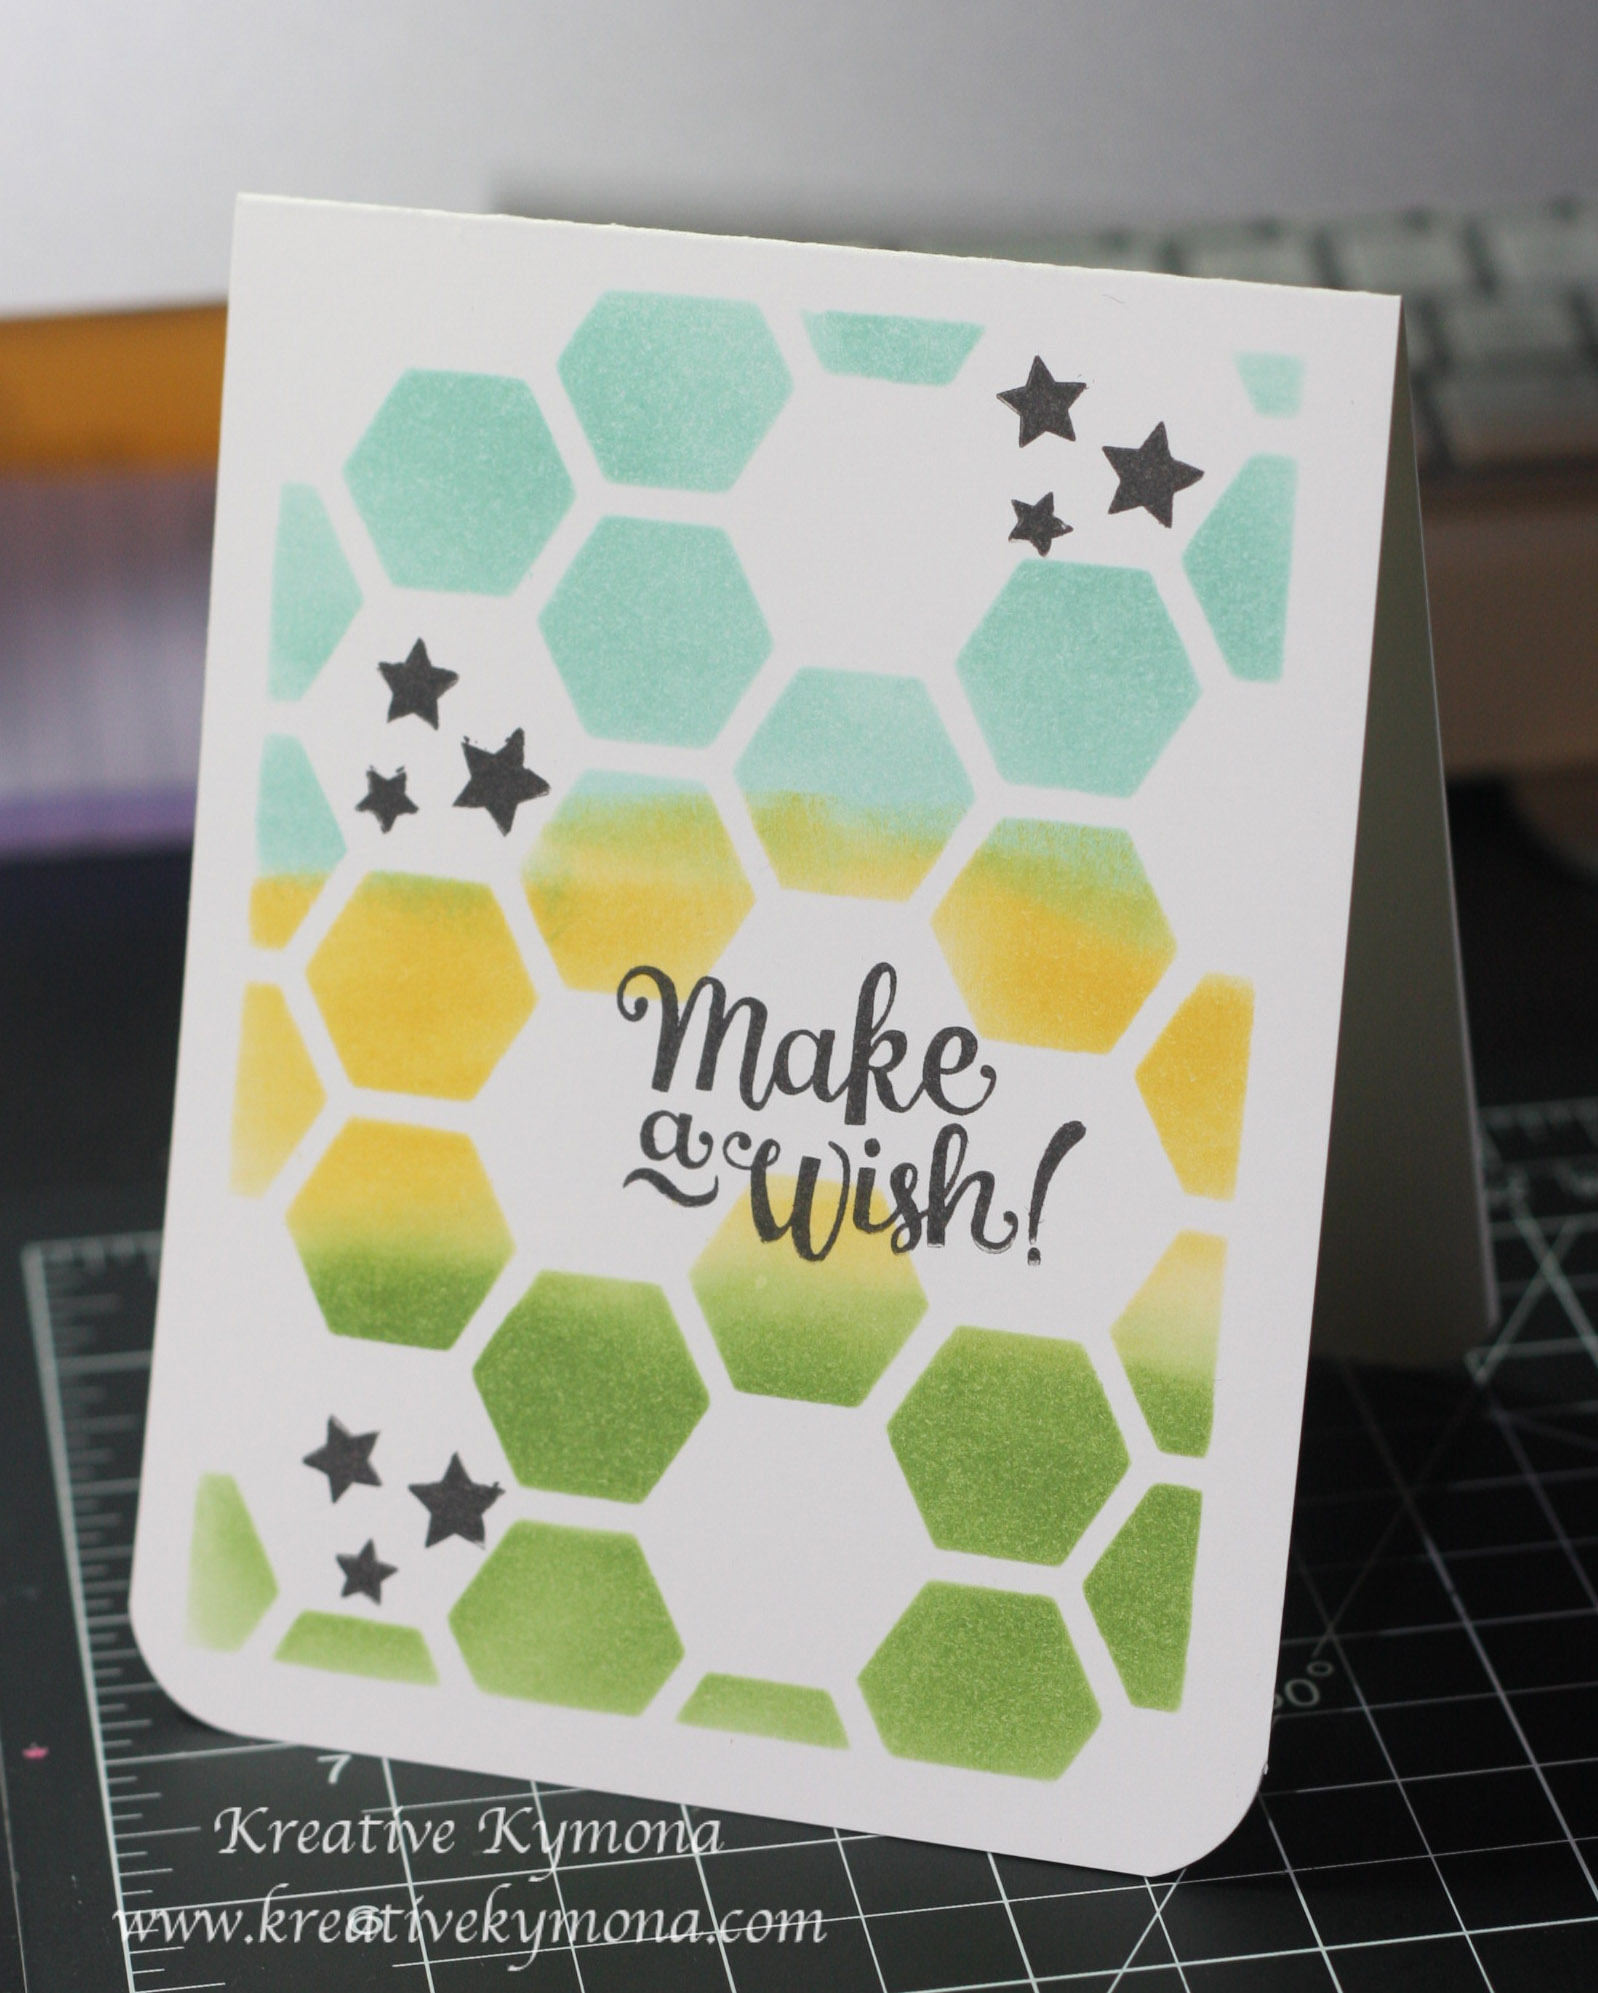
I’m back again with another stencil card for Virginia’s View Challenge #2. I’m having so much fun stenciling that I couldn’t help myself so I made another card.  For this card, I used three different inks and my Kelly Purkey Teardrop stencil.  It took no time, as a matter of fact I made two cards with two different sentiments but the one I’m posting today, the sentiment was a better fit.

Take a look:

You're Pretty Amazing

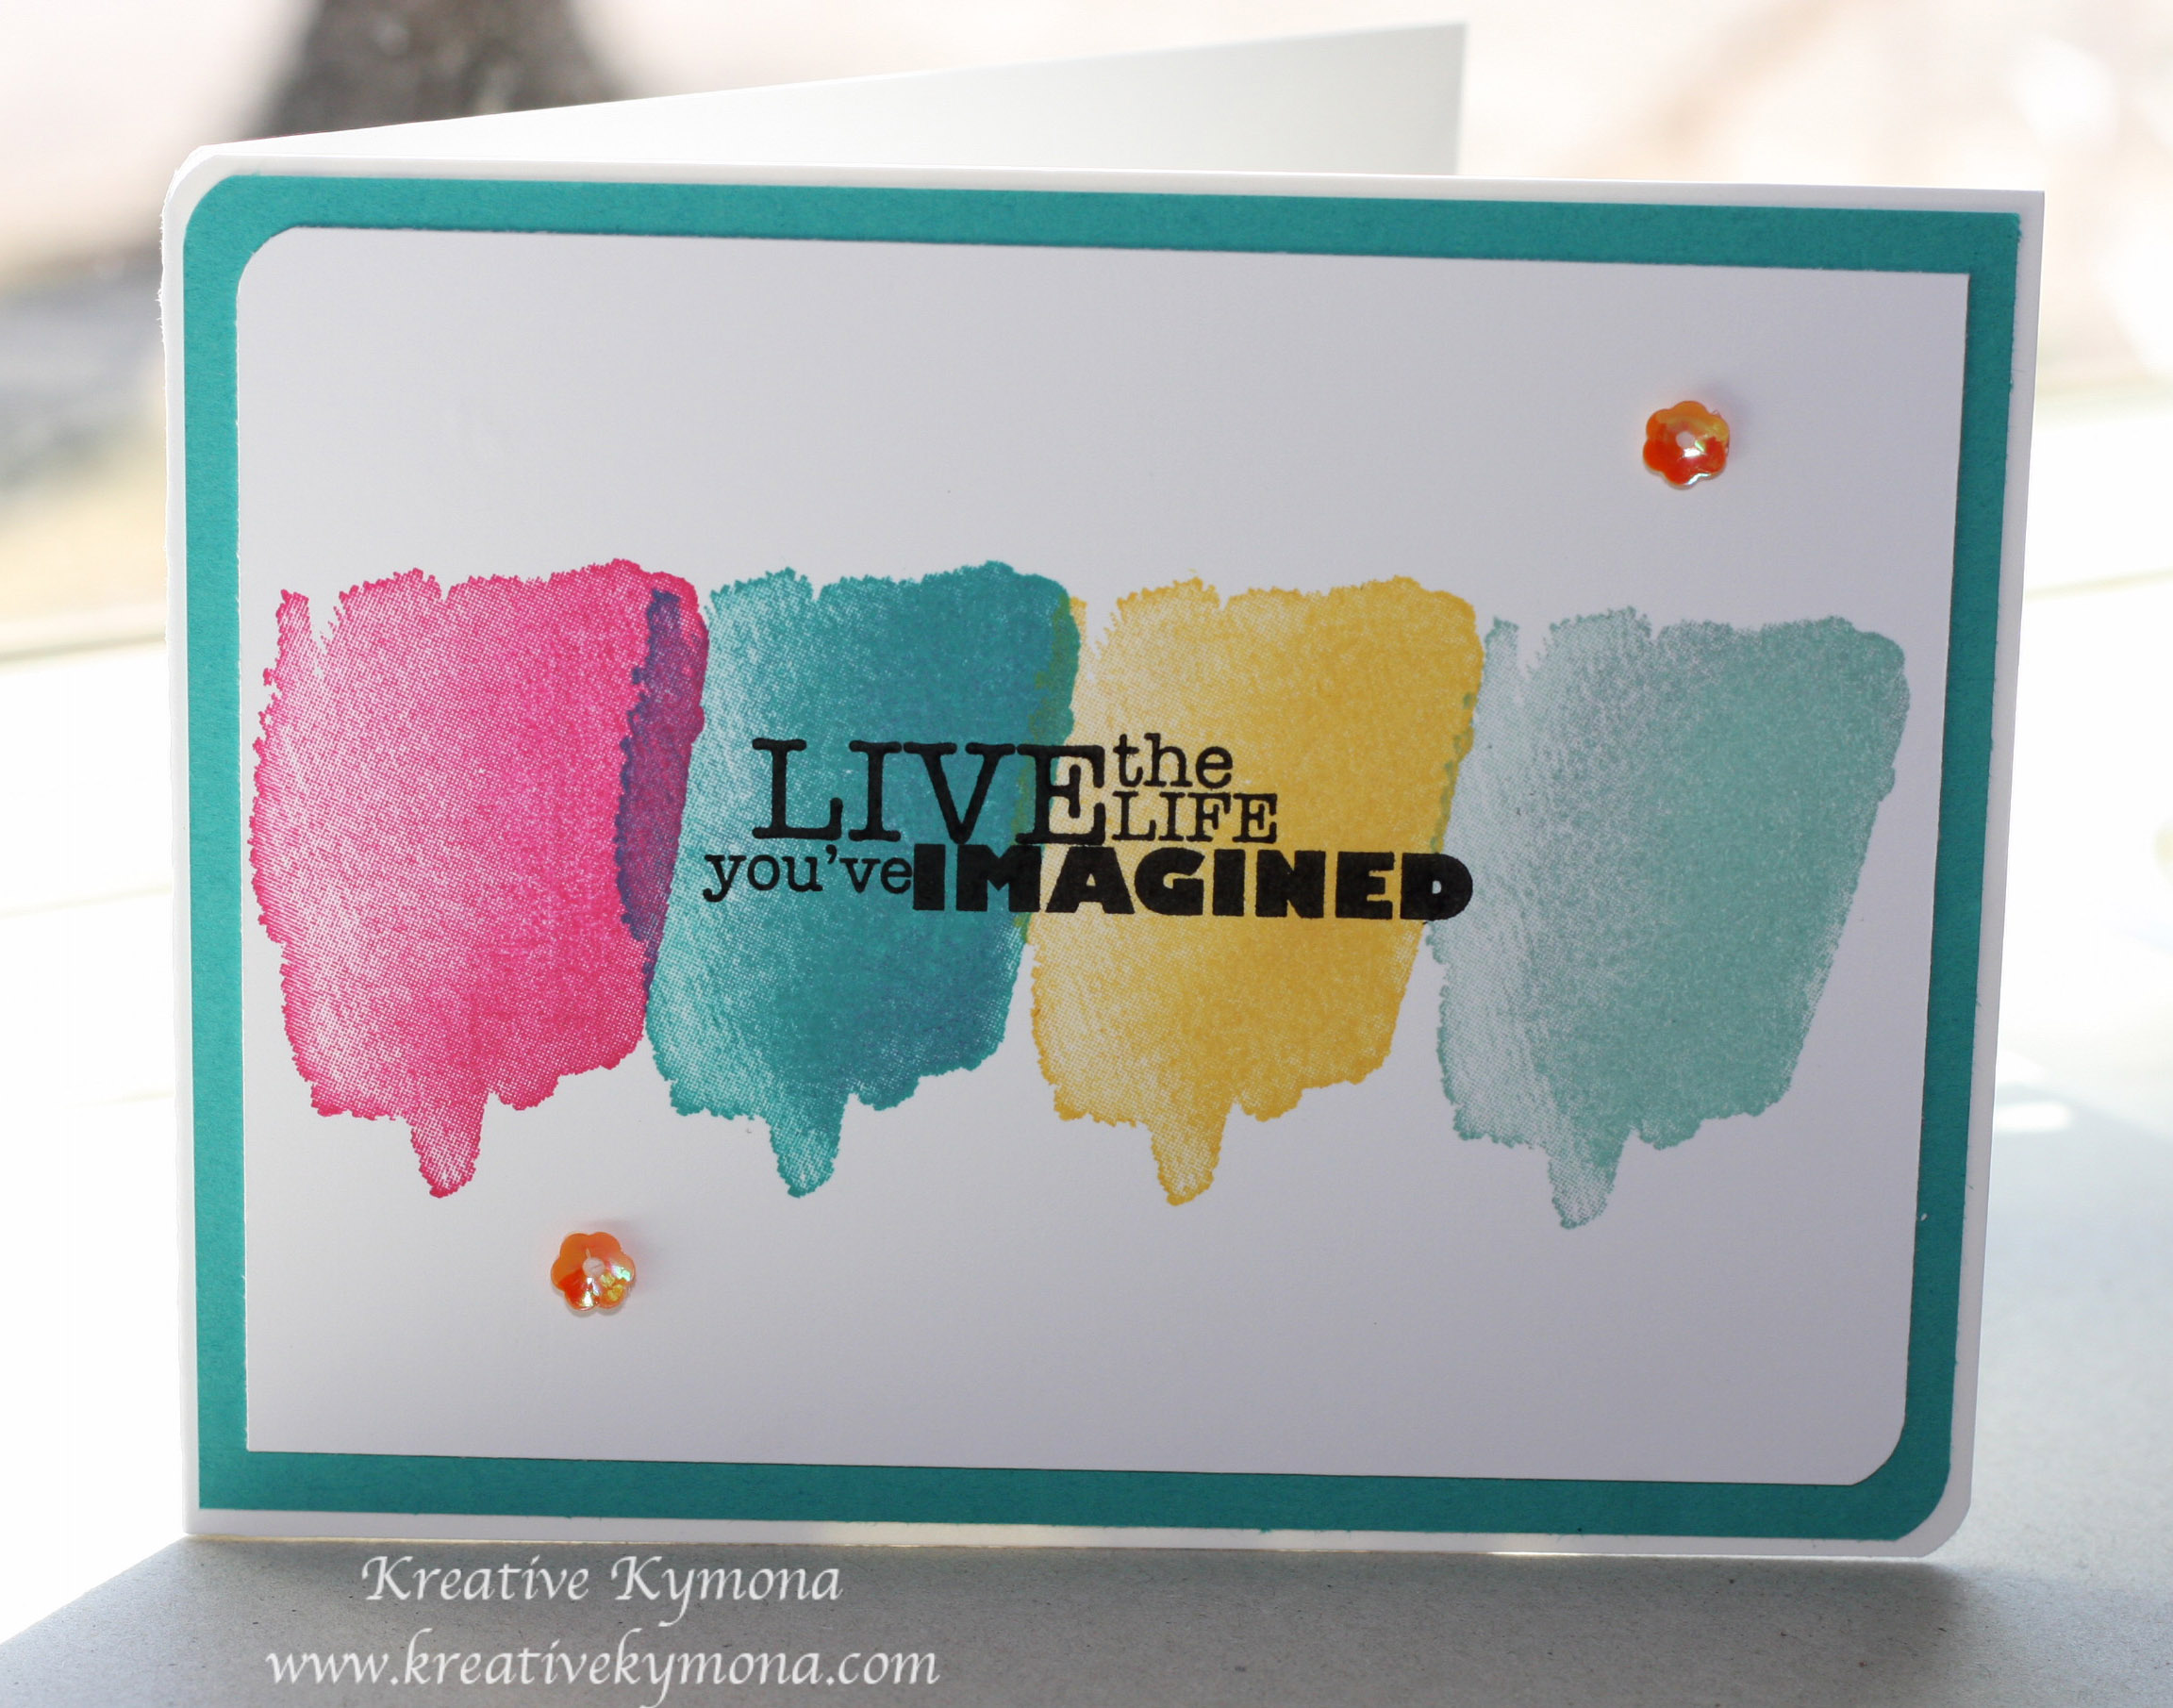
This one layer card is sooooo “fiery”.  I just love it.

Please leave me a comment below letting me know what you think.

Supplies used:

classiccrestsolarwhtieHero Arts Butter BarHero Arts Orange Soda InkWorn Lipstick InkpadBlending toolteardropPost-it Full Adhesive RollSSS Stripe GreetingsMemento Tuxedo Black


You Make Me Smile Big

I’m back again with another fun card for you.  I made this card using the Big You die from Simon Says Stamp and the Hello You stamp set.  The card stock and pattern paper came from one of SSS card kit.

Take a look:

You make me smile big

I gave the you’s some dimension by die cutting eight extra yous and stacking them together.  I love how the you’s compliment the strip of pattern paper. I added two hearts to balance out the bottom of the card.

Please let me know what you think of my card.

Supplies used:

SSS HelloYouBigYouStamp Runner Dot AdhesiveUltra Thick White CS 120Hearts Lawn CutsWe R Memory Keepers Corner Chomper

*The color card stock and pattern paper is from Simon Says Stamp Card Kit.  I’m not sure which one.

My World Is Brighter Because Of You

For today’s card, I’m using my new favorite DSP by Stampin’ Up!  It’s called Kaleidoscope DSP! I love this paper.  Its so vibrant and full of shapes and patterns.  I added a piece of ribbon and a cute button for dimension.  I rounded the corners to bring everything together.  I think it came out fabulous!

My World is Brighter Because of YOu

This card was quite easy to make.

1. The card stock measure 4-1/4 x 11 scored at 5-1/2.

2. The DSP was cut at 4-1/4 x 3-1/4.

3.  The Strawberry Slush CS measures 4-14 x 1/2.

4. I adhered the DSP to the bottom of the Neenah Solar White CS.

5. I then adhered the Strawberry Slush to to the top of the DSP.

6. I cut the Bermuda Bay triangle using the triangle punch. I also cut a 7 inch piece of basic black ribbon (retired).

7. I adhered the triangle down, then the ribbon, then the silver button that was threaded with whisper white bakers twine.

8.  I stamped the Mama Elephant Bling sentiment using the Memento Tuxedo Black Ink.

9.  I rounded all of the corners.

Easy-Pesy!!

Please leave me a comment below to let me know what you think.

Supplies used:

classiccrestsolarwhtieKaleidoscope DSPStrawberry SlushBermuda Bay CSBasic Metal ButtonsTriangle PunchBlingWhite Baker's TwineMemento Tuxedo BlackWe R Memory Keepers Corner ChomperStamp Runner Dot AdhesiveMini glue dots

Copic Certification

I’ve been missing in action for a couple of days because I’ve been in Chicago getting Copic Certified!!!  I’m so excited about this.  Like I’ve said before, I’ve been so afraid to use the markers I have because I wasn’t sure how to use them.

The class was hard but so worth it for me.  It was hard because my blending didn’t look as good as the other students sitting at my table.  So, I decided to really work really hard to get my blending down pack.  The more I practice the better I became.  I’m so proud of myself.

From now on, I am going to use my Copic markers for my coloring.  My instructor was amazing.  Big shout outs to Debbie Olson, she really helped me get going.

I’m taking another class in June in Maryland on Whimsical Hair and Faces.  I can’t wait.  Coloring hair was tough, so the more I practice the better for me.

Below are some samples of my practice cards:

IMG_7153 IMG_7155 IMG_7156

IMG_7158

IMG_7165

I am really glad I traveled so far to learn how to use my Copic markers.  It was worth the trip, time and money.  Plus Chicago was really nice too.  I stayed in Rosemont.  The Doubletree by Hilton was awesome too.  The staff was great.  I was able to do some shopping at the Outlet store which was right across the street from the hotel.

I’ll be posting another card later today.


Yayyy, I’ll be Copic Certified

I’m so excited today!!! I’m in Chicago for the next two days for my Copic Certification classes!!!!!!

Chicago Airport

Chicago Airport


Yayyyy, I’m finally going to put all of my Copic markers to good use.  I’ve been so afraid to use my markers and I’m not sure why, but that all changes today.

My Copic Markers

My Copic Markers

I will post throughout the day today about my progress.  Did I already say that I’m excited?  We’ll I am!

This Is How We Do It

I have to say stenciling is my favorite technique.  Once I started yesterday I couldn’t stop.  So I created another card to enter into Virginia’s View Challenge and Less is More Challenge.

Virginia’s View Challenge: Stencils

Less is More Challenge: A Touch of Turquoise

The create I create has both elements.  I use Simon Says Stamp Medium Dots Stencil and Tumble Glass Distress Ink and Stampin’ Up Tempting Turquoise embossing power.

I left a lot of white space but elegantly add a bit of color.  I love how the card came out.

Take a look:

This Is How We Do It

All I did was stencil the right corner of the mask layer, embossed my image on the vellum tag and adhere all of it together.  Simple and easy.

Please let me know what you think.  I would really appreciate your feedback.

Supplies:

SSS Medium Dots StencilBasic Rhinestones Jewel Accents 119246White Baker's Twine 124262

Tempting Turquoise Embossing Powder 122950Stampin' Dimensionals 104430Ultra Thick White CS 120White Vellum

Tombow Power Adhesive Glue TabsBlending toolHeat ToolBasic Rhinestones Jewel Accents

Scalloped Tag Topper PunchStampin' TrimmerPost-It Full Adhesive RollWe R Memory Keepers Corner Chomper


Embossing BuddyGood Times


Signature


Virginia’s View Challenge #2 Stencil + Hand Stamped Sentiments #183

I’m back again with two more challenges.  I love all of these challenges.  They allow me to put my creative hat 0n more often.  I’m having a lot of fun.

Today’s challenges are Virginia’s View Challenge #2 Stencil and Hand Stamped Sentiment.  Yes, stenciling with Gumball Green, Crushed Curry and Coastal Cabana.  I love working with stencils since my Online Card Class.

When I got home today, I had a couple of boxes of craft stuff waiting for me.  My “Make a Wish” stamp set from Mama Elephant and my “Hexagon Hive Thinlits Die” from Stampin Up were amongst my new stuff.  I knew I wanted to use both of these products.

Take a look:

Hex stencil

I used my blending tool and added each of my colors in a circular motion to make sure to completely cover my stencil.  Take a look at my finished card.

Make a Wish rounded corners

After lifting the stencil, I added my sentiment and the stars to the one layer card.  I love the way my card came out.  The actually stencil, came out just a nice.  I will add that to another card and share it with you.

Please let me know what you think, I would love to hear what you think of my card.

Supplies used:

Mama Elephant  MAKE A WISH

Mama Elephant
MAKE A WISH

Hexagon Hive Thinlits Die 132965

Hexagon Hive Thinlits Die 132965

Coastal Cabana 131175

Coastal Cabana
131175

Crushed Curry Ink 131173

Crushed Curry Ink
131173

Gumball Green 126861

Gumball Green
126861

Onyx Versafine Pigment Ink Pad

Onyx Versafine Pigment Ink Pad

Post-it Full Adhesive Roll

Post-it Full Adhesive Roll

Simon Says Stamp Ultra Thick White CS 120

Simon Says Stamp Ultra Thick White CS 120

Ranger Mini Round Blending Tool

Ranger Mini Round Blending Tool

Live the Life you Imagined Watercolor

I’m back again with another card with the watercolor look.  I really love this look.  I want to make more cards using the water color technique.

For this card I used different four different colors to pull of this look.  The colors I used were Stampin’ Up’s Melon Mambo, Daffodil Delight, Coastal Cabana and Bermuda Bay.

Take a look:

Life The Life You've Imagined

I rounded the corners only on two sides of the card for balance.  I added two orange sequins to give the card an additional color.

What do you think of my card.  Please leave a comment below to let me know what you think of my card.

Supplies used:

Happy Watercolor 133191

Happy Watercolor
133191

Really Good Greetings 130330

Really Good Greetings
130330

Ultra Thick White CS 120

Ultra Thick White CS 120


Coastal Cabana 131175

Coastal Cabana
131175

Melon Mambo Classic Ink 126948

Melon Mambo Classic Ink
126948

Bermuda Bay Ink 131171

Bermuda Bay Ink
131171

Daffodil Delight Ink 126944

Daffodil Delight Ink
126944


Bermuda Bay CS 131197

Bermuda Bay CS
131197

Stampin' Trimmer 126889

Stampin’ Trimmer
126889

Hello Sunshine Mixed Sequin

Hello Sunshine Mixed Sequin

Stamp Runner Dot Adhesive

Stamp Runner Dot Adhesive


Less is More Challenge – Colour Week 166

Today’s card was made for the Less is More Challenge.  The colour challenge this month is A Touch of Turquoise!

I created my card using Stampin’ Up!’s Happy Watercolor Stamp Set.  I’ve wanted to use this stamp set for awhile but haven’t had a chance to and today I decided was that day.  I love how the flower looks on the watercolor pool party stamp.

Take a look:

Watercolor Thank You

I have a secret to share with all of you.  I had to make this card three time before I got it just right.  I kept smudging the thank you sentiment.   I was so excited about making this card that I refused to let the sentiment dry before I add the mask to the front of the card.

This has taught me great patience.  I used the Versafine Onyx Black Ink and that takes a minute to dry.  Now I really know.

All in all, I love the look of my card!

Please, leave me a comment letting me know what you think of my card.

Supplies used:

Ultra Thick White CS 120

Ultra Thick White CS 120

Pool Party 122924

Pool Party
122924

Happy Watercolor 133191

Happy Watercolor
133191


Onyx Versafine Ink

Onyx Versafine Ink

Stamp Runner Dot Adhesive

Stamp Runner Dot Adhesive

Hello Sunshine Mixed Sequin

Hello Sunshine Mixed Sequin


We R Memory Keepers Corner Chomper

We R Memory Keepers Corner Chomper


Signature


SSS Wednesday Blog Challenge – Happy Birthday Card 2

I’m back with another card for Simon Says Stamp Wednesday Blog Challenge.

I’ve been watching a lot of videos on using watercolor on cards and I love how it looks.  So I decided to try the technique myself.

Take a look:

Happy Birthday Watercolor

The die cut balloon is what I used the watercolor technique on.  For my first try, I think I did an OK job.

As I look at the card, I realized that the background on the card is competing with the balloon image.  It might look better if the card base was blank, then the balloon image would really stand out on its own.  All in all, this was a learning experience for me.

Please, leave a comment letting me know what you think.

Supplies used:

Classic Crest Solar White CS

Classic Crest Solar White CS

Hero Arts Tide Pool Ink

Hero Arts Tide Pool Ink

Hero Arts Orange Soda Ink

Hero Arts Orange Soda Ink


On Point Borders

On Point Borders

Birthday Balloons

Birthday Balloons

SSS Balloons Craft Dies

SSS Balloons Craft Dies


Memento Tuxedo Black

Memento Tuxedo Black

Stampin' Dimensionals 104430

Stampin’ Dimensionals
104430


I also used a gold trim elastic cord from Stampin’ Up!’s Sale-A-Bration free kits.

Signature