RAH Stamped & Sealed Craft Box: Let’s Party!

Hello everyone!!  I’m here with Nicole and the Right At Home Design Team with an amazing project Nicole has been working hard on.

Let me introduce Right At Home’s new: Stamped & Sealed Craft Box!!Craft box

Aren’t you excited!!  I know I am!!  Do you want to see what’s in the box?

Here you go:

Stamp set, pattern paper, wink of stella, sequin

  • Right At Home Birthday Stamp Set
  • Simple Stores Let’s Party Pattern Paper
  • Clear Wink of Stella
  • Birthday Cake Sequin Mix

All of this goodness in one box, what more can you ask for!!

Take a look at a card I created to inspire you:

happy birthday card for the stamped and sealed box

For this card I used the pattern paper, stamp set and the sequin!!

This kit is so cute and versatile.  The colors are so pretty and you can use it for a feminine or masculine card.  We always need birthday cards!!

So what do you think?  Please let me know below!!

These kits are available right now in the Right At Home Store!  You don’t want to miss out on this offer. 

birthday craft box kit

I can’t wait to see what everyone creates when your boxes arrive at your door step.

Thanks for stopping by!

~Kymona

YNS February Feature Day

Hello everyone!!!  I’ here today with another YNS creation to inspire you and a chance to win a stamp set of your choice!!

On the 22nd of every month, YNS Design Team creates more samples featuring YNS products and shares them with all of you!!

The super duper awesome part of it all besides our awesome samples, you could win a stamp set of your choice!!  Now how super cool is that!!

Scroll to the bottom to find out how!!

This month we are focusing on “Coffee – Tea You and Me”!!  The DT created projects with a coffee, tea or friendship theme.

Now take a look at the card I created to inspire you:

IMG_8748

YNS Supplies: Coffee…Right Meow!, Circles Die Set, Stitching Marks Die Set, Crystal Clear Gumdrops

Other Supplies: My Favorite Things Hybrid Ink, Recollection Heavyweight Cardstock, Neenah Desert Storm Cardstock, V’s Sweet Idea Chocolate Sequin, 3M Foam Tape, We R Memory Keepers Fuse Tool

Creating this card was fun. I haven’t made a shaker card in awhile.  What do you think?  Let me know below.

Now on to that prize!!

DTDare2candy-547x232

All you have to do is leave a comment on the YNS blog by February 24th for a chance to WIN a YNS stamp set of your choice!!  Super simple and easy!!  You will get to see my fellow DT’s projects as well.

So head on over, you don’t want to miss this one!!

Thanks for stopping by!!

Kymona

Guest Designer: Sparkle and Shine Challenge Part 2

Hello everyone!! I’m back again today with the Sparkle and Shine Challenge as the Guest Designer for the month.

Here is the photo inspiration that I used to create my card:

Sparkle and Shine

Take a look at my card:

Happiest of Holiday (S&S)

I have to say I struggle with this photo inspiration this time around.  At first I played with all of the colors in the photo and my daughter said no.  The colors were to dull.  So I decided to go with just two of the colors.

I stamped My Favorite Things Santa’s Elves tree and fussy cut them out.  Then I adhered them to my card front.  After that I added some sequin as ornaments on the tree.  Then I stamped the sentiment and I was done!!

Super easy!

So what do you think?  Please let me know.

This challenge runs for two weeks. You have until December 28, 2015 at 11:55pm to enter for a chance to win a super awesome prize!!

Supplies used:

BB Santa's Elves MFT Hybrid Black Ink

Guest Designer: Sparkle and Shine Challenge

Fourth Post for the day
If your looking for the CASology Post, click here
If your looking for a2z Scrapbooking December Challenge, click here
If your looking for So Suzy Stamps Blog Hop, click here

Hello everyone!! I’m here today with the Sparkle and Shine Challenge as the Guest Designer for the month.  I’m super excited to participate in this challenge this month.  The ladies on this team are totally awesome designers.

Here is the photo inspiration that I used to create my card:

sparkle and shine. jpg

When I saw this photo, I was torn on what to create!  I saw the purple first, its my favorite color, then I spotted the snowflakes on the wall and thought how can I recreate that look and here you go.

Take a look at my card:

Joy (S&S)

I totally love how this card turned out!!  Purple is such an amazing color!  It’s vibrant and deep!!

I wanted to include the snowflakes, the colors purple and black!

Here is how I created my card:

  1. I used Distress Ink Dusty Concord and add the ink to my paper. Only on one side of the card base since the snowflakes were in the corner.
  2. Then I used Create a Smile Snowflake stencil and Wendy Vecchi Embossing paste to add some snowflakes over the purple ink blending.
  3. Then I used Lawn Fawn Joy Die to die cut 3 words out of fun foam.
  4. I adhered the sentiment to the card base using Tombow Multipurpose Glue.
  5. Then I added some Pretty Pink Posh sequin from the Create a Smile Snow Dancing kit.

So what do you think?  Please let me know.

This challenge runs for two weeks. You have until December 14, 2015 at 11:55pm to enter for a chance to win a super awesome prize!!

Supplies used:

Distress Ink Dusy ConcordTombow Multi-Purpose AdhesiveSnow Dance Kit  Scripty Joy Fun Foam Embossing Paste

Thank you so much for stopping by!!

~Kymona

CASEing Kelly Blog Hop!!

CASEing Kelly Blog Hop BannerHello everyone!!  I’m here today with a group of talented ladies who wanted to say “Thank You” to Kelly Latevola for all of her generosity and kindheartedness!! We thought a Blog Hop would be an awesome way for everyone to say good bye and send her best wishes as she parts ways with some of the amazing Design Teams she was on.

If you arrived from Kristina Beagle blog, your on the right path.  If this is your first stop, there is a complete list at the end of this post so that you could start from the beginning and not miss out on any of the fun.

The best way to send her off, would be to CASE her!!!  LOL!!  Yes, my dear teammate, Kelly, we are CASEing YOU!!

For those of you who don’t know Kelly, she has a CASEing Genius feature on her blog.  She always takes THREE cards from the designer she is CASEing, and makes ONE card inspired by those three cards.

Take a look at the three cards that I used:

DSCN0076

I love how Kelly raised the flower by added those square panels.  So pretty and dimensional.

DSCN2241

I love the colors Kelly used on these flowers.  I also love how she tried colors she wasn’t use to using.

DSCN9598

I love how Kelly’s image was placed to one side of the card.  It keeps her card CAS, which is my style of designing.

The CASE:

Be Happy (CASE)

I used the green color from card number 2 to color my leaves.  I totally love this color combo (YG01, YG03, YG17, YG67).  Thanks Kelly.  I position my images the left side of my card stock like her card 3.  I used my Brother Scan and Cut and cut out addition leaves so that I could lift some of my leaves to mimic Kelly’s raised panel on card 1!!

Take a closer look:

Be Happy close up (CASE)

I totally loved this challenge.  It was a challenging but well worth it!!  I had fun trying to come up with a card that suited my CAS style.

Thanks Kelly, for being a great teammate over on the a2z Scrapbooking blog. I love watching your periscopes as well.

What is a blog hop without some fun prizes?! Leave a comment by 11:59 pm EDT on Thursday, October 29th along each stop in the hop to increase your chances of winning a prize from one of our sponsors: a2z Scrapbooking, Altenew, Create a Smile Stamps, Dee’s Art Impressions, DJ Kard Kreations, Hero Arts, Ink Road, Lia Stampz and Simon Says Stamp,! Winners will be notified by email after October 29th.

CASEing Kelly Sponsors

Just in case your just arriving or your lost along your way here is the entire list of blog participants!!

a2z Scrapbooking

Amy Tsuruta

Ardyth Percy Robb

Brandi Hall

Char Kochensparger

Cindy Chiu

Darnell Knauss

Dawn Turley

Debra James

Deepti Malik

Donna Idlet

Elizabeth Campau

Ellen Haxelmans

Heather Ruwe

Jennifer Loftfield

Joan Bardee

Kara Vrabel

Kara-Lynne

Kathy Wade

Katie Gehring

Kristie Goulet

Kristina Beagle

Kymona Tracey

Laura Jane

Leigh Penner

Lin Brandyberry

Linda Trace

Lindsay Amrhein

Lydia Evans

Maria Sabina Raita

Marika Rahtu

Martha Lucia Gomez

Michele Cunningham

Michele Ferguson

Michelle Lupton

Michelle Williams

Monica Maier

Niki G.

Nina-Marie Trapani

Rubeena Naz

Shelly Kurth

Taunya Butler

Thordis Dogg

Vera Yates

Supplies used:

Botanical Love Copic Markers Recollections White HeavyweightBrother Scan and Cut2Lime Cordial

Thank you so much for stopping by!!

~Kymona

Top Dog Dies – Hello Fall!

hpr-newdies-090415

Hello everyone!!!  I’m here with Top Dog Dies!!  I’m here showcasing one of their new dies from their fall release!!

Lets jump right in!

Today I’m working with the Top Dog Dies Pumpkin Die Set!! It’s a super doper cute die set and the possibility are endless!!

Top Dog Dies Pumpkin Die Set

I love the stitching in these pumpkins!

Here is the card I created with this die:

Hello Fall (TDD)

Doesn’t this card make you ready for the fall?  It gives such a warm feeling to me.  Those pumpkins are just too cute!

Here is how I created this card:

  1. I used retired Stampin Up! Polka Dots Embossing Folder to emboss my Stampin’ Up! Mossy Meadow cardstock.
  2. Then I cut the stripes of Recollections White Cardstock and Stampin’ Up!Blackberry Bliss Cardstock and adhered them to my card base.
  3. Then I die cut the pumpkins out of Stampin’ Up! Tangelo Twist Cardstock and Stampin’ Up! Mossy Meadow Cardstock.
  4. I adhered the pumpkins to the card panels with foam tape.
  5. I stamped my the sentiment using Stampin’ Up! For All Things Stamp Set using Stampin’ Up! Mossy Meadow Ink.
  6. I added Lucy’s Little Things Just Peachy Sparkly Shaker Sequin for added dimension to the card panel and Clear Wink of Stella to the pumpkins.

So what do you think?  Please let me know below.

Top Dog Dies is having a sale right now, check it out! You don’t want to miss this one!

hpr-freebanner-091515

I’m playing with AAA Cards Challenge #48:

autumn

and

NBUS Challenge #5

NBUS

Supplies used:

Polka Dot Folder Blackberry Bliss CSRecollections White HeavyweightTangelo TwistMossy MeadowFor All ThingsMossy Meadow InkJust peachy Wink of Stella clear

Thanks you so much for stopping by!

~Kymona


CS Take It Make It: Take a Stamp Challenge and Coupon Code

Second Post for today
If your looking for the YNS Sketch and Color Challenge, click here

Hello everyone!  I’m here today with CS Take It Make It Design Team for our CS Take It Make It: Take a Stamp Challenge for the month of September.

This month’s theme is Take a Stamp!!  That means take any stamp and create something, anything goes!! Now if that isn’t easy, I’m not sure what is!!

Take a look at my card:

Sending Warm Wishes (TIMI)

I love how my little tree turned out!!  I love the look of all of those fall colors.  I’m a Summer girl but Fall sure is pretty too.

Here is how I created this card:

I used Lawn Fawn Small Stitch Square Stackables to die cut my stitched square panel.

I used Hero Arts Color Layering Fall Trees Stamp Set and layered stamped my leaves.  I used Lawn Fawn Freshly Cut Grass, Lobster, Fake Tan and Walnut.

I stamped my sentiment from the same stamp set and stamped it with the Walnut ink.

I added Lawn Fawn Trimming around the card panel.

I attached the card panel to an orange panel then added those panels to my card base.

I added Lucy Abrams Just Peachy and Rainforest Sparkly Shaker Sequin to the card front.

I love how this turned out!!  Now its your turn to play along with us!!!

We have two prizes to offer this month, the first is our sponsor prize. This winner will be chosen randomly from all of the entries in the challenge! The sponsor for July is: STAMPlorations!

STAMPlorations have been incredibly generous and have supplied a coupon code for Craft Stamper challenge players to take advantage of free shipping from the store! The code is: CSTAKEITMAKEIT and is good for free shipping on orders over $20 (£12.90). The coupon will work all through September, and can be combined with any other STAMPlorations coupon.

Here are the prizes this month:New plate

2 Stencils: Bold Florals and Leaf Print
2 Stamp Sets: Boxed Blooms and Bold Sentiments

Our second winner is our Design Winner. This winner is chosen by our DT, who all vote for their favorite design from all of the entries. This winner will have their winning project published in Craft Stamper Magazine, they will have a GDT slot for an upcoming challenge, and will also feature in their very own Winners Profile blog post!

Now if that isn’t a reason to play along I’m not sure what is!!

I can’t wait to see what you come up with.

Supplies used:

Hero Arts Color Layering Fall Trees Freshly Cut Grass Ink Pad Lobster Ink pad Fake Tan Ink Pad Walnut Ink Pad Just Peachy Rainforest SmallS titched Square Stackables

Thank you so much for stopping by!

~Kymona


a2z Scrapbooking September 2015 Challenge

Hello everyone!!  I’m here with a2z Scrapbooking today with our September Challenge!!!

Our new challenge is sure to please you this month!!  Our challenge this month is Shake it Up!! 

I love shaker cards!!  For those of you who follow me know that I love shaker cards because I make them all the time. You can find a full tutorial on how to create a shaker card using a fuse tool here

Check out the card I created for this challenge:

Joy to the World (a2z)

Here is how I created this card:

  1. I cut the Bo Bunny Altitude Pattern Paper to 4.25 x 5.50, which is the size of my card base.
  2. Then I used a circle die to cut a circle in the center of my patten paper.
  3. After that I used the same die and my fuse tool and created a circle pocket for my sequin.
  4. I filled the pocket up with Lucy Abrams Iridescent White Sparkly Sequin.
  5. I attached the shaker pocket to the back of the pattern paper using Plus Glue Tape.
  6. I used my Misti to line the sentiment up with the open circle on the pattern paper so that my sentiment placement is correct.
  7. I used Hero Arts Joy To The World Stamp Set to stamp my sentiment with Hero Arts Memories Black Dye Ink.
  8. Once the ink dried completely, I added foam tape tot he back of the pattern paper and attached that to the card base.

Joy to the world 1 (a2z)

Done! Finish! Complete!  Now its time to Shake, Shake, Shake!!

Amazing isn’t it!! I hope you love what you see and that it inspires you to join us this month. You have the entire month to create a new project and enter it into our challenge. By entering you will have a chance to win a $25 Gift Certificate to the a2z Scrapbooking Store. Winner will be announced on the 7th of May.  Good Luck!

The stamp sets that I used can be found at the a2z Scrapbooking Store. If you would like to purchase any of those stamp sets I used please head on over to the store and use the coupon code KYMONA15 to get 15% off your purchase.

Supplies used:

Bo Bunny Altitude Pattern Paper Iridescent White Sequin Plus Glue TapeHero Arts Memory inkMisti HA Joy To The World. jpg3M Double Coated Foam Tape We R Memory Keepers Fuse Tool

Thank you so much for stopping by!!

~Kymona

Your Next Stamp DT Dare – Shake, Shake, Shake

Hello everyone!!  I’m here today with Your Next Stamp and our DT Dare!!!

What is a DT Dare you ask? It’s a fun monthly challenge for the YNS design team to show case more fabulous projects using the new release products!!

YNS-DARE-Badge

Fun right!!

Wait there is more!!  If you leave a comment on the YNS blog post you could Win a YNS Stamp Set of your choice!!! 

Exciting right!!  It sure is for me!!

The DT Dare Challenge this month is Shake, Shake, Shake!!  The design team was asked to create a project using that has a shaker pocket.

Take a look at my card:You're so sweet

 YNS Supplies: Scrapworks Mini Sunburst Dies, Zero Calories

Other Supplies: We R Memory Keepers Fuse Tool, MFT Hybrid Black Ink, Lucy Abrams Star Shine Sequin, 3M Foam Tape

Here is how I created this card:

1. I cut my card base to a A2 size card, 4.25 x 5.50 scored at 5.50.

2. I cut the white card panel to 4.25 x 5.50 and used Your Next Stamp Scrapworks-Mini Sunburst Die Set to cut a flower in the center of the paper.

3. I used a retired Stampin’ Up! embossing folder to add dimension to the card front.

4. I stamp the sentiment and the smily faces from the Your Next Stamp Zero Calories stamp set with My Favorite Things Hybrid Black Ink.

5. I used the We R Memory Keepers Fuse Tool to create my shaker pocket.  I added Lucy Abrams Star Shine Sequin to the pocket then sealed it.

6. I added the shaker pocket to the card panel with tape adhesive.  I added foam take to the back of the panel and added it to my card base.

Whoa La!!  My card is complete!!

So tell me what you think of this challenge?  I would love to know, let me know below!

Don’t forget we have Blog Candy for you!

DTDare2candy-547x232

Just a reminder….we have a Birthday Sale!!!

2015 special bday stamp set badge

Don’t for get to take advantage of the special promo code to choose your own discount!!

sale badge 6th birthday

Supplies used:

Zero CaloriesScrapworks Mini Sunburst Diesfuse bundleMFT Hybrid Black InkStar Shine Sequins 3M Double Coated Foam Tape

Thank you so much for stopping by!!

~Kymona

Your Next Stamp Birthday Blog Hop!!!

Aug92015-hopgraphic

Hello everyone!!  Yayyy, my second blog hop featuring new products from Your Next Stamps tickles me pink!!

If you’ve been hopping along, you would have arrived from Deborah’s blog and if you’d like to start from the beginning, you can click on over to the linky at the bottom and start at Jeanie’s blog.

I’m over the top excited about this birthday blog hop and this great release!  All of the sets and dies are amazing!!  My favorite one is the Cute Alpha Stamp Set and die!  I used that set on one of my cards below.

Are you ready for my big reveal?  I made two cards to inspire you!

Take a look at my first card:

Your Paw-some (YNS)

I have to admit, I’m not a dog or cat fan.  I’m totally afraid of them but this card makes me change my mind for just a minute, LOL.  I love the how this card turned out.  I also love how this stamp set comes with so many small pieces that can be used for so many different card looks.

YNS Supplies: Phoebe with a Wagon Stamp Set and Die Set

Other Supplies: Neenah Desert Storm Cardstock, Black and White Cardstock

Take a look at my second card:

Back to school 3 (YNS)

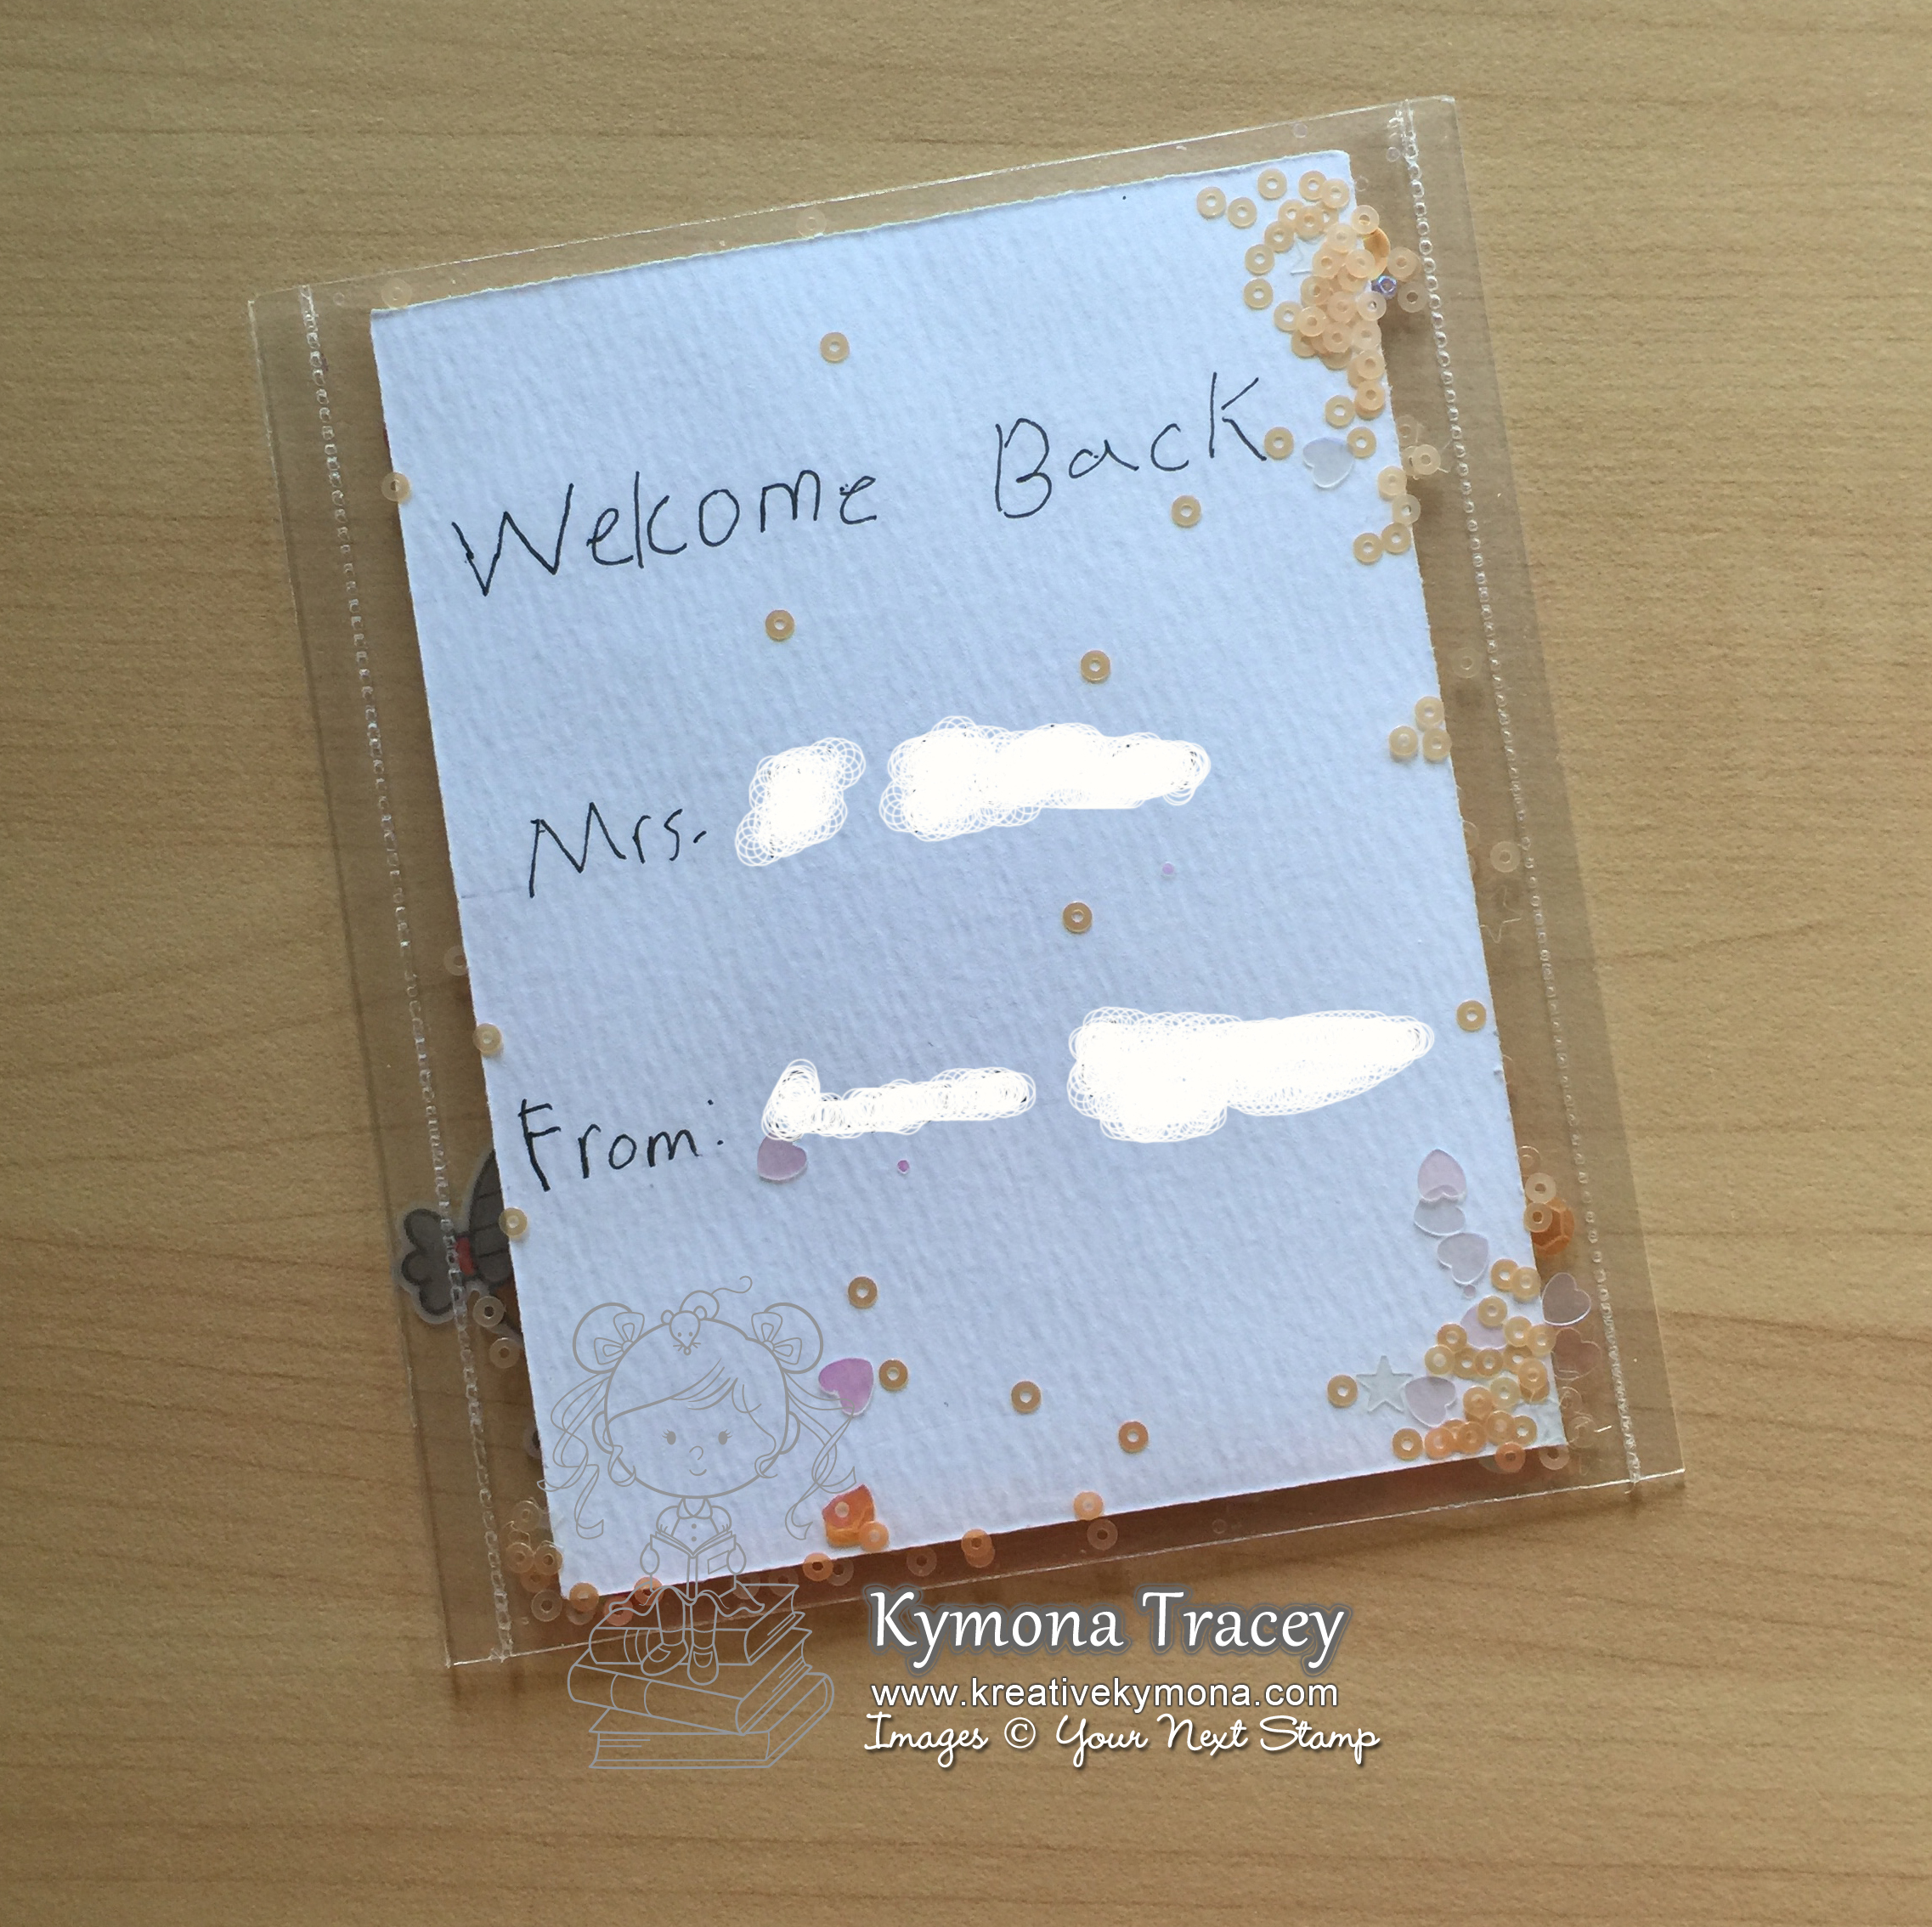
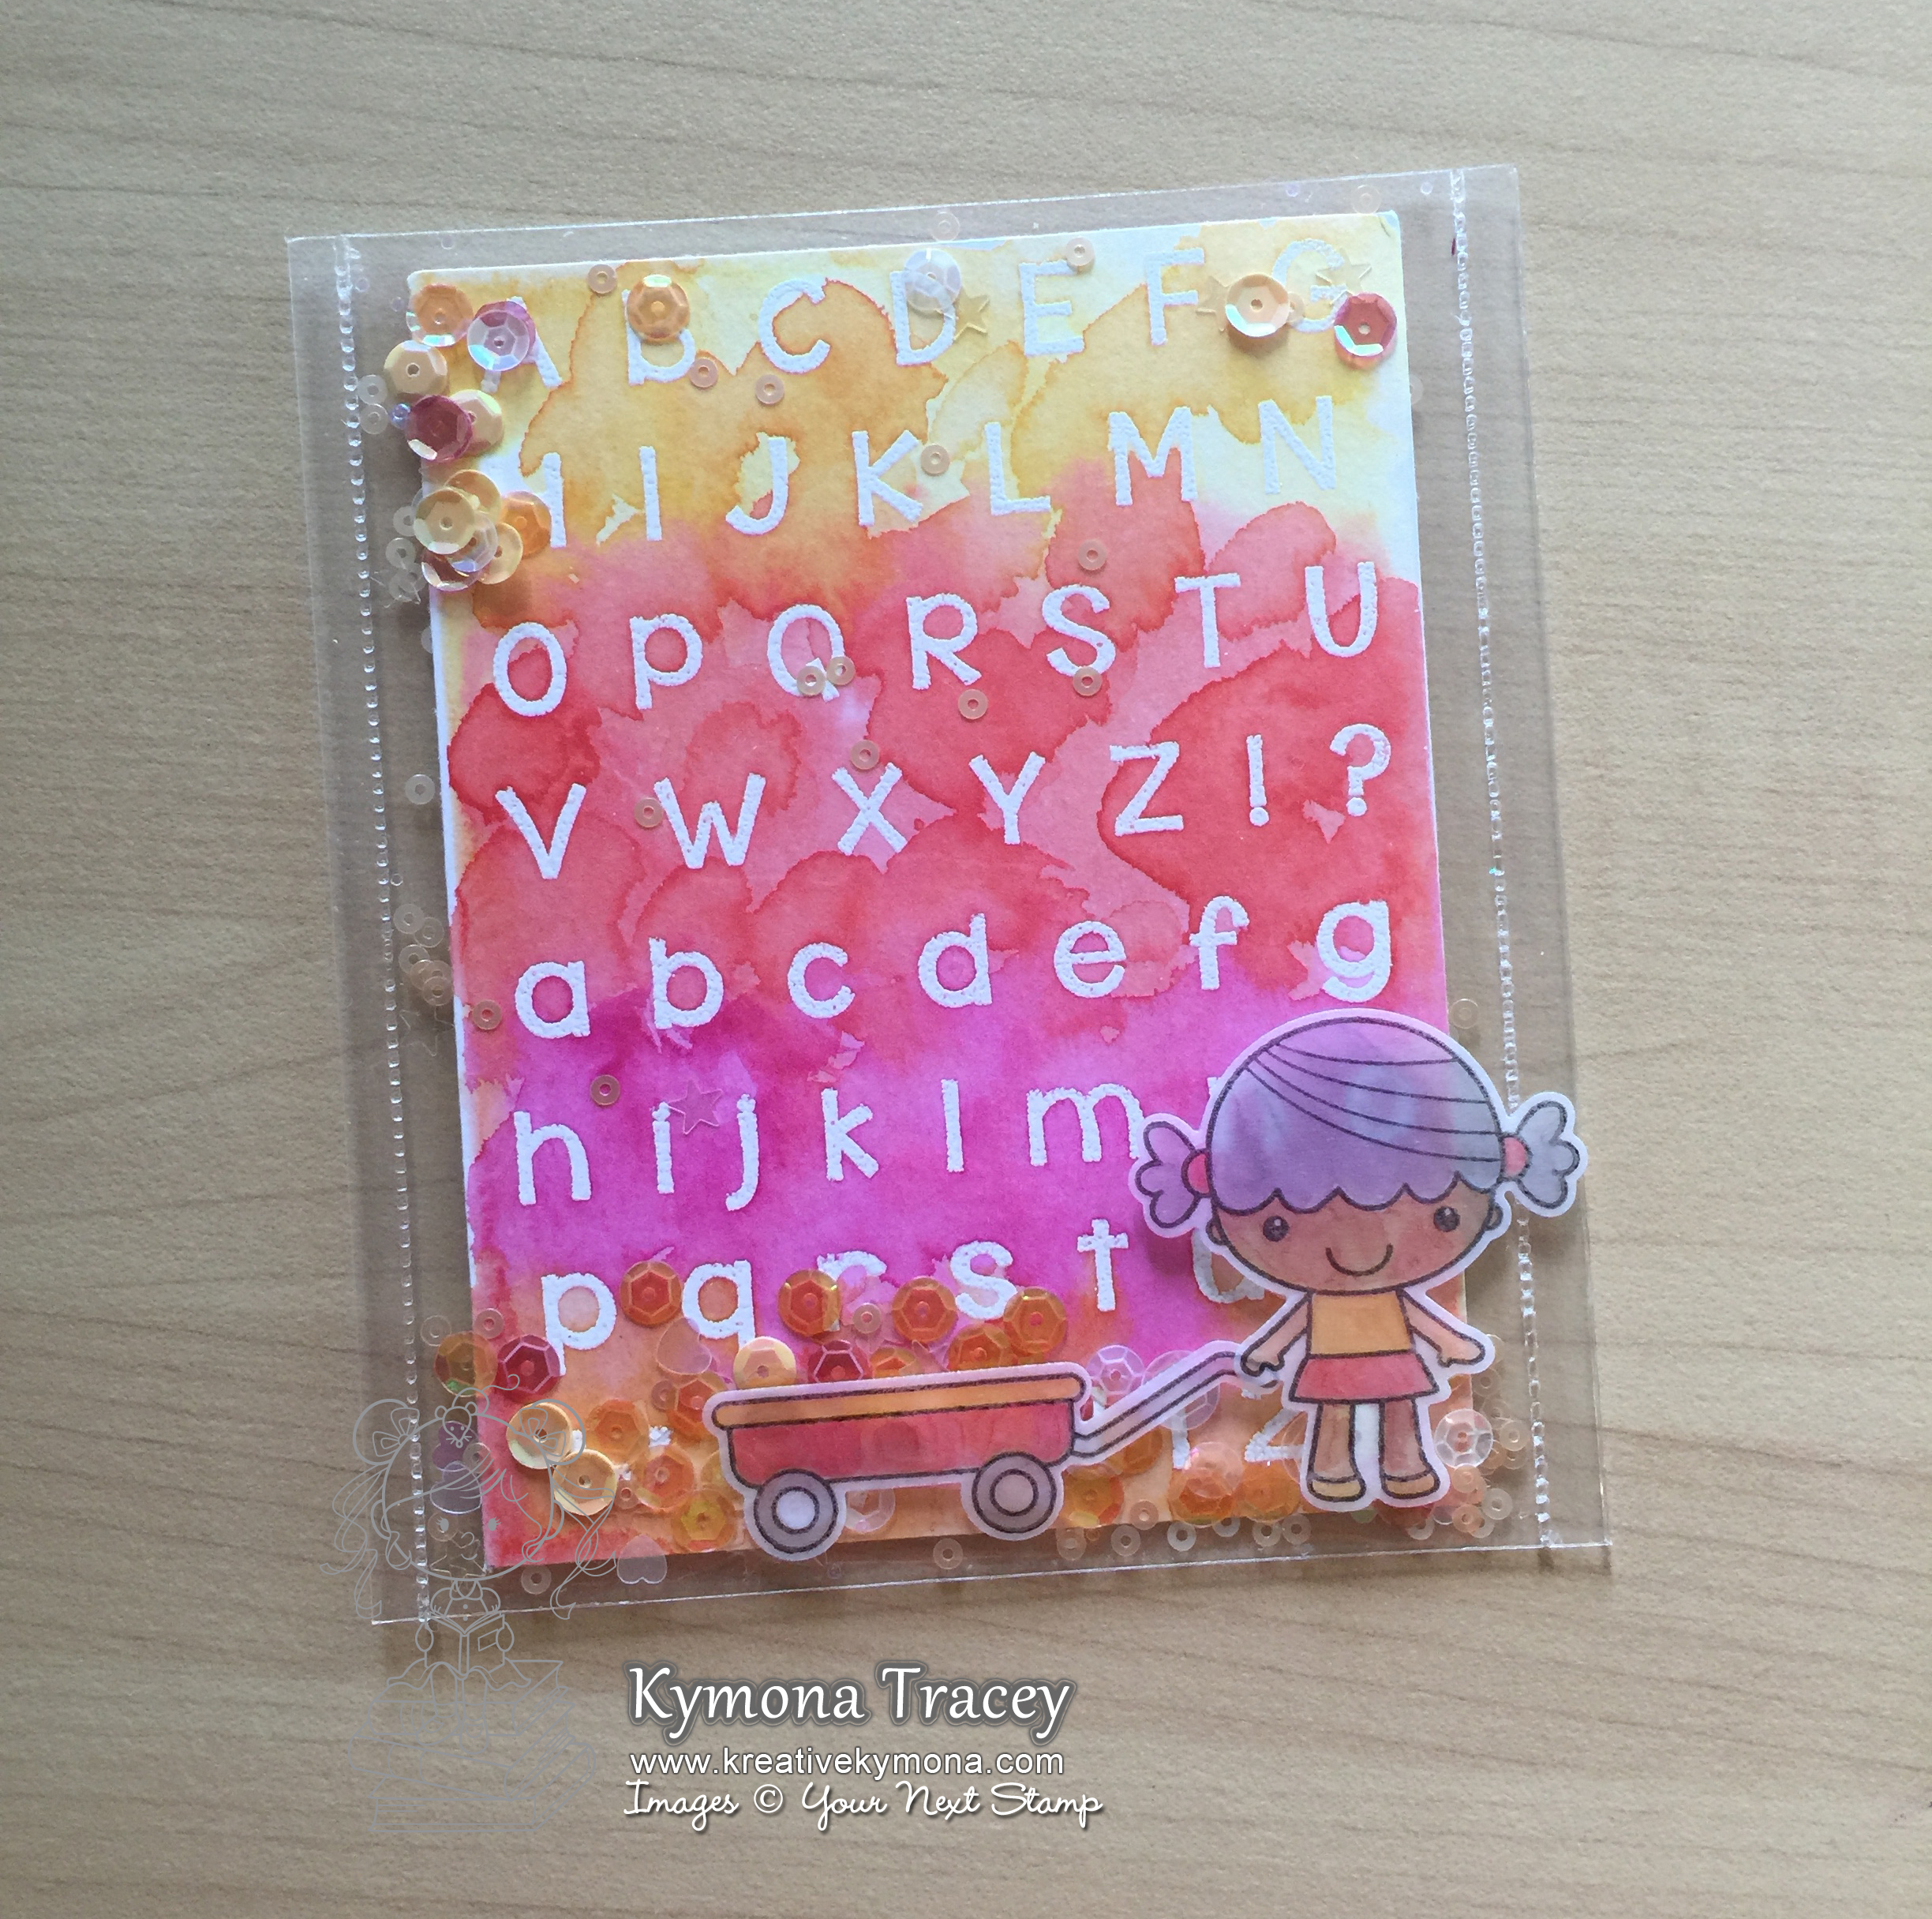
This is my favorite card.  I created this card for my daughters new teacher.  It’s a back to school card that my daughter will give to her new teacher.  I really thing she will enjoy this.

I love making shaker cards.  They are super fun and interactive.  For this card I decided that I wanted the entire card to be a shaker card.  I created the watercolor panel and didn’t want to add anything to it.  So I decided to project it behind the plastic.

Check out my process:

Watercolor back to school (YNS)

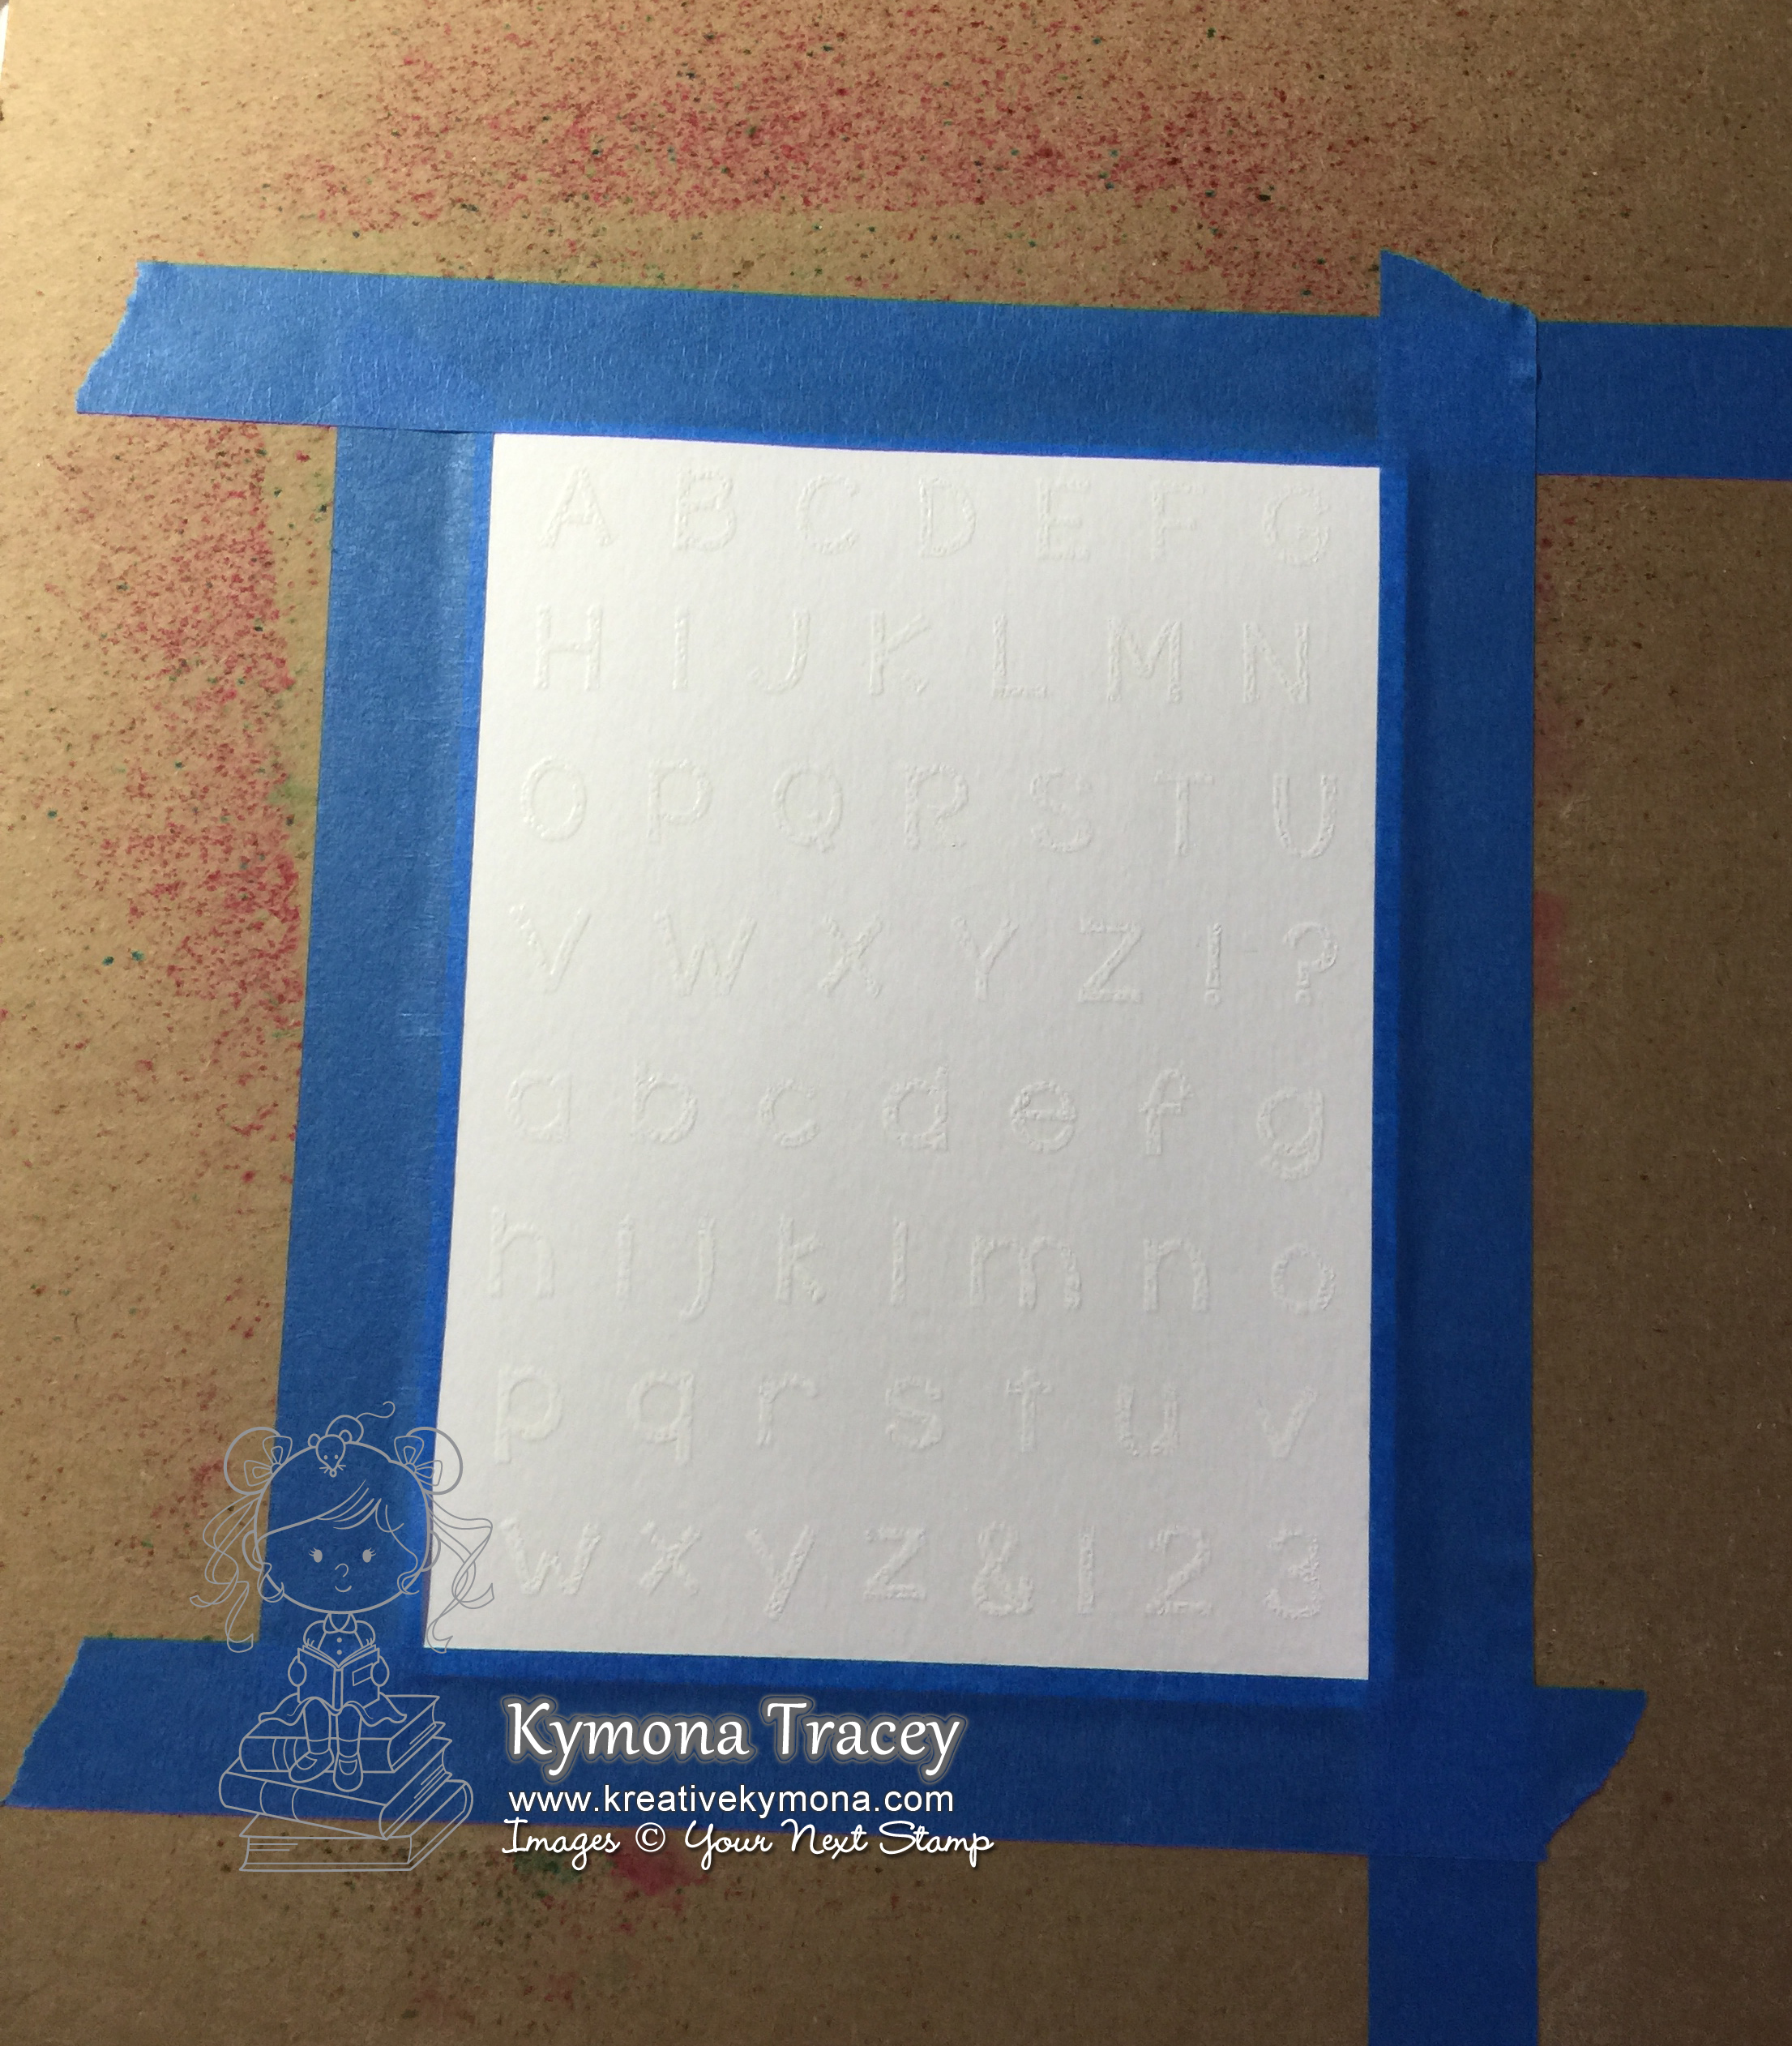
I used Versamark Ink and inked up my entire stamp set without taking the stamps off of the sheet they came on. That allowed me to keep letters and numbers nice and even.

Watercolor Back to school 2 (YNS)

After I stamped onto the watercolor paper, I added embossing powder and heat set it.

Watercolor Back to School 3 (YNS)

I used my paint brush and added a good amount of water to the watercolor paper.  Then I added my distress ink colors one at a time to the watercolor paper.  I did two watercolor washes, heating setting in between each wash.  I totally love how this turned out.  How could you add anything directly on top of it?  So the only way to decorated it with out touching it was to create a full shaker card.

Back to school (back)

My daughter did write on the back of the watercolor panel before I sealed it in the plastic. I blocked out both names to protect them.  I just wanted you to see what the back looks like.

My daughter loves how this card turned out.

Lets take another look at the card:

Back to school 2 (YNS)

YNS Supplies: Phoebe with a Wagon Stamp set and die, Cute Alpha Stamp set

Other Supplies: We R Memory Keepers Tool Bundle, Lucy Abrams Just Peachy Sequin, Copic Markers R27, Y17, C3, Vellum, Versamark Ink, Hero Arts White Embossing Powder

So what do you think?  I had so much fun creating these cards to inspire all of you and show you the versatility of the stamp sets! Which one of these cards are favorite?  I would love to hear from you!

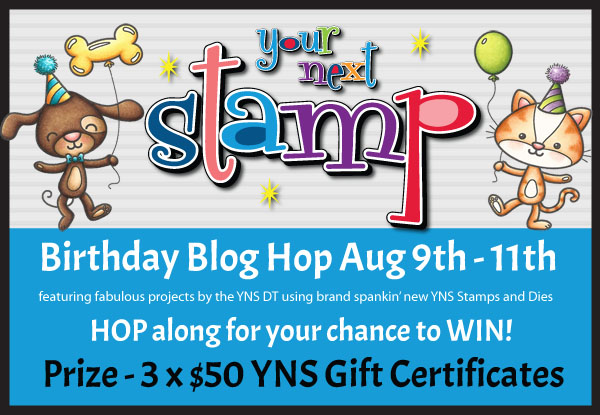
Be sure not to miss any blog along the way, because three lucky commenters will have a chance to win a YNS $50 YNS gift certificate. Winner will be announced on the YNS blog on August 12th.  So don’t for get to leave a comment on each of the blogs participating in the blog hop.

2015 special bday stamp set badge

Also, don’t forget to take advantage of the special promo code to choose your own discount!!!

sale badge 6th birthday


Thanks for stopping by!!

~Kymona