YNS Sketch and Color Challenge #42: Shape Card

I’m here today with Your Next Stamp (YNS) and the Sketch and Color Challenge #42!!

Each challenge has a sketch and a color combo to choose from.

Take a look at the color combo:

YNScolor-42

Take a look at the sketch:

YNSSketch42

Take a look at my card:

Happy Everything

YNS Supplies: Happy Everything Stamp Set, Happy Die, Cool Tag Three Die Set, Candy Corn Gumdrops

Other Supplies: Recollection Heavyweight Cardstock, Colorbox Black Embossing Powder, BoBunny Believe Pattern Paper


What do you think?  Did I follow the color photo? Let me know below.

So are you ready for the new challenge?

You have until July 7th, 2016 at midnight EST to play along and submit your project on the YNS Blog post.  One random participant will win a $15 gift certificate to the Your Next Stamp Store.  If YNS stamps or dies are the focal point then the winner receives and additional $5 gift certificate f0r a total of $20.  The winner will be announced on the YNS Blog the Sunday after the challenge closes.

I hope to see your projects!!

I’m also entering Virginia’s View Challenge #22 (Summer Challenge)

V V Challenge #22

Supplies listed above!

Thank you so much for stopping by!

~Kymona

CASology 179 – Simple

Second Post for today
If your looking for Home is Where the Heart is Blog Hop, click here

Hello everyone!!  It’s CASology Tuesday!!  We are back with another Cue Card just for you!!  

This week’s cue card is :


Week 179 - Simple

Take a look at my card:

Sweetheart (CAS)

I love this cue card!!  Simple is so easy, or at least it should be.  The more you think about something simple the easiest it is to make this more complicated.  LOL!!

I had so many thought in my head and decided to go with the stamp set I was already working with.  Its the new stamp set from Right At Home Kiss Kiss!!

As a matter of fact, we are doing a blog hop today, so you can see this set used in different ways here.

To create this card:

  1. I used Simon Says Stamp Stitched Heart College Die to cut out the stitched hearts in the center of my paper.
  2. I mounted the card panel to the black card base.
  3. Then I die cut the hearts a second time out of Real Red card stock.
  4. I placed them in the white card panel, popping some of them up with 3M foam tape.
  5. Then I stamped the sentiment using Versafine Black ink.
  6. I added Clear Wink of Stella to all of the hearts.

Nice and simple!! The hearts look like they are beating sort of! LOL!!

For more inspiration, check out my fellow Design Team members blog for more awesome work.

DT Badge

Our Guest Designer this week:

Rachel

Our Sponsor this week is Cindy B Designs!

Supplies used:

SSS Stitched Heart College DieRAH xoxo stampOnyx Versafine Ink Wink of Stella clear3M Double Coated Foam TapeRecollections White HeavyweightReal Red CSPlus tapeRecollections Black Heavyweight

Thank you so much for stopping by!!

~Kymona

CASology 164: Umbrella

Second Post for today
If your looking for the So Suzy Stamps Happiness is and Giveaway post, click here.

Hello everyone!!  It’s CASology Tuesday!!  We are back with another Cue Card for you!!!

This week’s cue card is:

Week 164 - Umbrella

Take a look at my cards:

Love Ya 1(CAS)

My cards has no stamping this time around, only die cutting!!  I love how they turned out.

All I did was die cut the umbrella from Simon Says Stamp Addy’s Spring Showers Die Set out of My Favorite Things Homespun Gingham Paper Pack.

I die cut the card panel using Simon Says Stamp Stitched Square Dies in two largest sizes.

Then I used these foam die cut the my good friend Maggie sent to me on Friday. Thanks again Maggie.  I truly appreciate it.  You can find Maggie on Instagram!!  Her handle is @maggieb1983. Check her out.

IMG_5148

Maggie told me the The Love Ya Die is from CAS-ual Friday Stamps and it won’t be available until next year for everyone who doesn’t get the Stamp of Approval kits. I have to keep that in mind.

Once everything was die cut, I adhered everything using a Tombow Multipurpose Glue Adhesive.

I placed some fun foam behind my card panel to give it an even lift. Then I adhered the card panel to the card base.

Nice and easy.  I couldn’t make one but two because it was so easy!!

Here they are individually:

Love Ya (CAS)

Love Ya green (CAS)

So what do you think? Will you play along this week?  Let me know below.

Now its your turn!! I can’t wait to see what you come up with!

For more inspiration, check out my fellow Design Team members blog for more awesome work.

Design-Team

Gillian Ross

Hannelie Baster

Hazel Hodgkins

Jen Wills

Joyce Mehrberg

Judy Marino

Kimberly Wiener

Kymona Tracey ←Me

Melissa Chipperfield

Tracey McNeely

Our Guest Designer this week:

Bhavana

Our Sponsor this week is Craft Classes Online!

I’m also entering my card in the NBUS Challenge #5:

NBUS

Supplies used:

SSS Addy's Spring ShowerTombow Multi-Purpose AdhesiveSSS Stitched Rectanglar DieFun Foam Recollections White HeavyweightEP8_HomespunGingham_ForPrint

Thanks for stopping by!

~Kymona

a2z Scrapbooking April Stencil Challenge

Second Post for today

If your looking for So Suzy Stamps April Release and Blog Hop, click here.

Hello everyone!!  I’m here with a2z Scrapbooking today with our April Challenge!!!  The theme is Stencil!

Guess what April is such a great month!!  Do you know why?  Have you guessed?

a2z Scrapbooking is celebrating their one year blog anniversary and it’s my birthday month!!

So its time to party!!

Our new challenge is sure to entice you!!  Our challenge this month is Stencil!!  Use any Hero Arts product to create a beautiful stenciled piece.  This will be fun and interesting.  There are so many things that you can use with your stencils.  The possibilities are endless.

Check out the card I created for this challenge:

Thanks I appreciate all that you doTo create this card:

I used Hero Arts Swirl Stencil and Distress Ink Evergreen Bough and Peacock Feathers to add the design to the card panel.

I used Hero Arts Thanks Stamp and Cut to cut out the word thanks out of my card panel.

I repeated that step 4 more time.

I adhered the card panel to the front of my card base.

I stacked the die cuts together and placed it back into my card panel with liquid adhesive.

I stamped my sentiment and stars using My Favorite Things Hybrid Black Ink.

Super easy and fun.

Amazing isn’t it!! I hope you love what you see and that it inspires you to join us this month. You have the entire month to create a new project and enter it into our challenge. By entering you will have a chance to win a $25 Gift Certificate to the a2z Scrapbooking Store. Winner will be announced on the 7th of May. Good Luck!

Some of the supplies I used can be found at the a2z Scrapbooking Store. If you would like to purchase any of the supplies I used please head on over to the store and use the coupon code KYMONA15 to get 15% off your purchase.

Supplies used:

Hero Arts Swirl StencilHero arts stamp cuts thanksDistress Ink Evergreen BoughDistress Ink Peacock Feathers MFT Hybrid Black Ink

One more thing before I go, did you know that we are on Twitter, Instagram and Facebook?. If you haven’t done so already, please follow us on these different social media outlets!! You don’t want to miss out on any fun promotions!!

Thanks for stopping by!!

Kymona

CASology 140 – Spring

Hello everyone!!  It’s CASology Tuesday!!  We are back again with another Cue Card for you!!!

Week 140 - SpringYayyyy!! This cue card makes me happy!!  Spring means sunshine, warmer weather, birds chirping, my BIRTHDAY (April 4) and rain!!  LOL, yes rain! Spring brings a lot of rain.

So, for my card I thought of rain.  Take a look at my card:

Happy Spring (CAS)

I just love this stamp set from Simon Says Stamp.  Abby is so cute!! I couldn’t wait to sit and color her! Look at that umbrella!!

Here is how I created this card:

1. I cut my card base to 4.25 x 5.50, scored at 4.25.

2. I stamped Abby and the umbrella from Simon Says Stamp Abby’s Spring using My Favorite Things Hybrid Black Ink.

3. I used Copic Markers to color Abby and her umbrella.

R24, YR68, Y06, G17, E00, E23, E11, E21, E33, E37 and W5.

4. I used the Simon Says Stamp Spring Showers Wafer coordinating die to cut out Abby and the umbrella.

5. I placed Abby and the umbrella down on my card base and covered them with Simon Says Stamp Raindrop Stencil. I used post-it tape to hold the stencil in place.

Masking Abby off

6. I took my time and pounced Distress Salty Ocean Ink onto the raindrop stencil without touch Abby or the umbrella.

7. I stamped the sentiment and adhered Abby and the umbrella with foam adhesive.

Super doper easy and fun.  I didn’t do much blending.  I just colored and that was stress relieving for me.

So what will you come up with? I can’t wait to see!

For more inspiration, check out my fellow Design Team members blog for more awesome work.

Design-Team

Gillian Ross

Hazel Hodgkins

Jen Wills

Joyce Mehrberg

Judy Marino

Kimberly Wiener

Kymona Tracey ←Me

May Park

Melissa Chipperfield

Tracey McNeely

Our Guest Designer this week:

Yuliya

Our Sponsor this week is Melon Door Lighthouse.

Supplies used:

SSS Rain Rain Go Away SetMFT Hybrid Black Ink Salty Ocean Distress InkCopic Markers

Thanks for stopping by!

~Kymona

CS Take It Make It: Take a Technique Inspiration

Hello everyone!!  I’m here again with CS Take It Make It: Take a Technique for our February Challenge.

Our theme is Stenciling!!! No specific stenciling technique, just make sure you use a stencil somehow, somewhere on your project.

Remember, if you do not have stencils, cut or punch shapes from a piece of cardstock or acetate and use that as a stencil.

Take a look at my inspiration project:

Peak-a-Boo Easter Wish

Take a look at my colorful background!!

Lets take a closer look:

Easter Wishes closeup3

Easter Wishes closeup4

I used my Hero Arts Stone Circle Pattern Stencil and Distress Ink Dried Marigold, Wild Honey, Picked Raspberry, Salty Ocean and Mowed Lawn to create all of those Easter egg looking shapes.

I used my new Pretty Pink Posh Peek-A-Boo Die to create a window for my beautiful So Suzy Stamps Chicky with Egg stamped image.

I colored my little chick with Copic Markers:Y15, Y17, Y19, B00, B02, B04, R20 and R22.

I stamped my So Suzy Stamps “Easter Wishes” sentiment with Memento black ink.

I added my panel to my black base cardstock.

So what do you think?  Are you ready to play along with us?  I hope so!  The prize pack is awesome.

Supplies used:

Hero Arts Stone Circle Pattern Stencil Dried MarigoldWild HoneyPicked RaspberryDistress Ink Salty OceanMowed LawnPeek-A-Boo Die 19831-chicky_with_egg_wm__91849-1418596897-451-416Copic MarkersMemento Black Ink

We have a great prize pack for you.

Our sponsor is Paperbabe Stamps this month.

Paperbabe Stamps

The winner will get to pick 2 stamp plates of their choice.

I hope you join us this month for this super fun challenge!!

So what do you think? Let me know!

Thanks for stopping by!

~Kymona


CASology 133 – Love

Hello everyone!! Its that time of the week again!!  CASology time!!

The cue card word this week is so fitting since Valentine’s Day is this Saturday.  Can you guess the word is this week?

Take a look:

Week 133 - Love

What is love!! When I was a kid there used to be a comic in the LA Times called Love Is….. totally my favorite comic.  I used to clip the comic everyday.  I’m not even sure why we received the LA Times, I lived in Brooklyn.

When I saw the word “Love”, my thoughts went straight to this comic!  So I wanted to sure one with all of you.


Love IsThese are the cutest comics ever.  That heart made me smile so I decided that I wanted hearts on my card.

Remember my watercolor panel I created a couple of days ago?  I punched a couple more hearts out of it to used on this card.

Watercolor piece 2

Take a look at my card:

Saranghaeyo

I love how this card turned out.  The idea came from Laura Bassen,  she used her sewing machine to attached her hearts to the card panel.  I didn’t think my needle would go through the paper so I used glue to hold them in place.

Lets take a closer look at those hearts:

I love you closeup1

Can you see the gold shimmer on that heart that’s in focus? I love how that turned out.

I love you closeup2

Beautiful watercolor

I love you closeup3

I stacked those hearts in threes and pinched them so that they are raised.

I love how the sentiment nestles right up to the hearts!  Are you wondering what my card says?

Saranghaeyo means I  Love You in Korean.  The stamp set is Waffle Flower Craft DT Mix Stamp Set.

Nice clean and simple!!  What do you think?

Check out what my fellow DT Members have created!!

Design-Team

Gillian Ross

Hazel Hodgkins

Jen Wills

Joyce Mehrberg

Judy Marino

Kimberly Wiener

Kymona Tracey ←Me

May Park

Melissa Chipperfield

Tracey McNeely

Our Guest Designer this week:

Mayline

The prize this week is a from Lawn Fawn. This week’s winner will receive not only their choice of a stamp set from the store, but will also receive a 6×6 paper pad of their choice!

I’m linking my card up to AAA Card Challenge.  Their theme is Love.  I haven’t played along with them in such a long time.  I’m super glad I have a chance to play again.

Game32

I’m also linking my card up to Addicted to CAS Challenge.

ATCAS - code word hugs and kisses

Supplies used:

Basic RGB Sweetheart PunchBasic Rhinestones Jewel AccentsHeidi Swapp Color Shine Pack

Thanks for stopping by!

~Kymona


Waffle Flower Photo Inspiration Challenge

Hello everyone!!  I’m here today with Waffle Flower’s 2nd Photo Inspiration Challenge!!

What did you thing of the first challenge?  Those colors were a challenge but not to challenging to some of you!  I love seeing all of the entries.

Are you ready to see our new challenge?  Yayyy, here you go:

Photo Inspiration January 26

Here is my take on this challenge:

Perfect Bloom

Sooo, what do you think?  I totally love this new Planted Stamp Set and the Perfect Word Die from Waffle Flower.

If you know the stamp set, that third potted plant was created using the plant from the first stamp!  Ingenious, is what I say, LOL!!

Here is how I created this card:

1. I cut my Simon Says Stamp Fog cardstock to an A2 (4.25 x 5.50) size card.

2. I stamped the first and second potted plant using Memento Tuxedo Black ink because I wanted to color the images using my Copic markers.

3. I used my Copic markers to color in each plant and pot.  I used the same colors in the photo.

4. For the third potted plant, I stamped the empty post first.

5. Then I created a mask for that pot, so that I could stamp the plant inside.  Then I colored the image.

6. I die cut the word Perfect out of Simon Says Stamp School House Red cardstock 4 times..

7. I stacked them on top of each other so that the die could have some dimension. I adhered the die to the front of my card.

8. I stamped the word “Bloom ” underneath the die cut.

9. I added some Pretty Pink Posh sequins to the card and that was it.

Super easy card to create. This card allowed me to practice my Copic coloring.

Come on and join us!! Now I can’t wait to see what you come up with.

Supplies Used:

Basic RGB Word-Die-Perfect Memento Black InkCopic MarkersSSS Fog cardstockSSS schoolhouse red

Thank you for stopping by!

Kymona

Season Tweetings…

Hello everyone!!  I’m here with Lawnscaping today.  They are having a Facebook Inspiration Design Team Call.

Lawnscaping FIT DT Call Challnege

How cool is that!!  I said to myself, why not go for the the gusto!!  So, I did!!

I picked up the cutest Lawn Fawn stamp set and die today from a scrapbook store I found online called Scrappers Playground.  It’s a cute store with all sorts of papercraft goodies.  Its in Long Island, a really nice drive, on such a pleasant day.   The ladies that helped me were so helpful and nice.  They were passionate about what they do!  I will have to go back for a class on my free time!!  If your in the LI area, check them out!

On to my cards, I have two, couldn’t help myself:

Joy birds

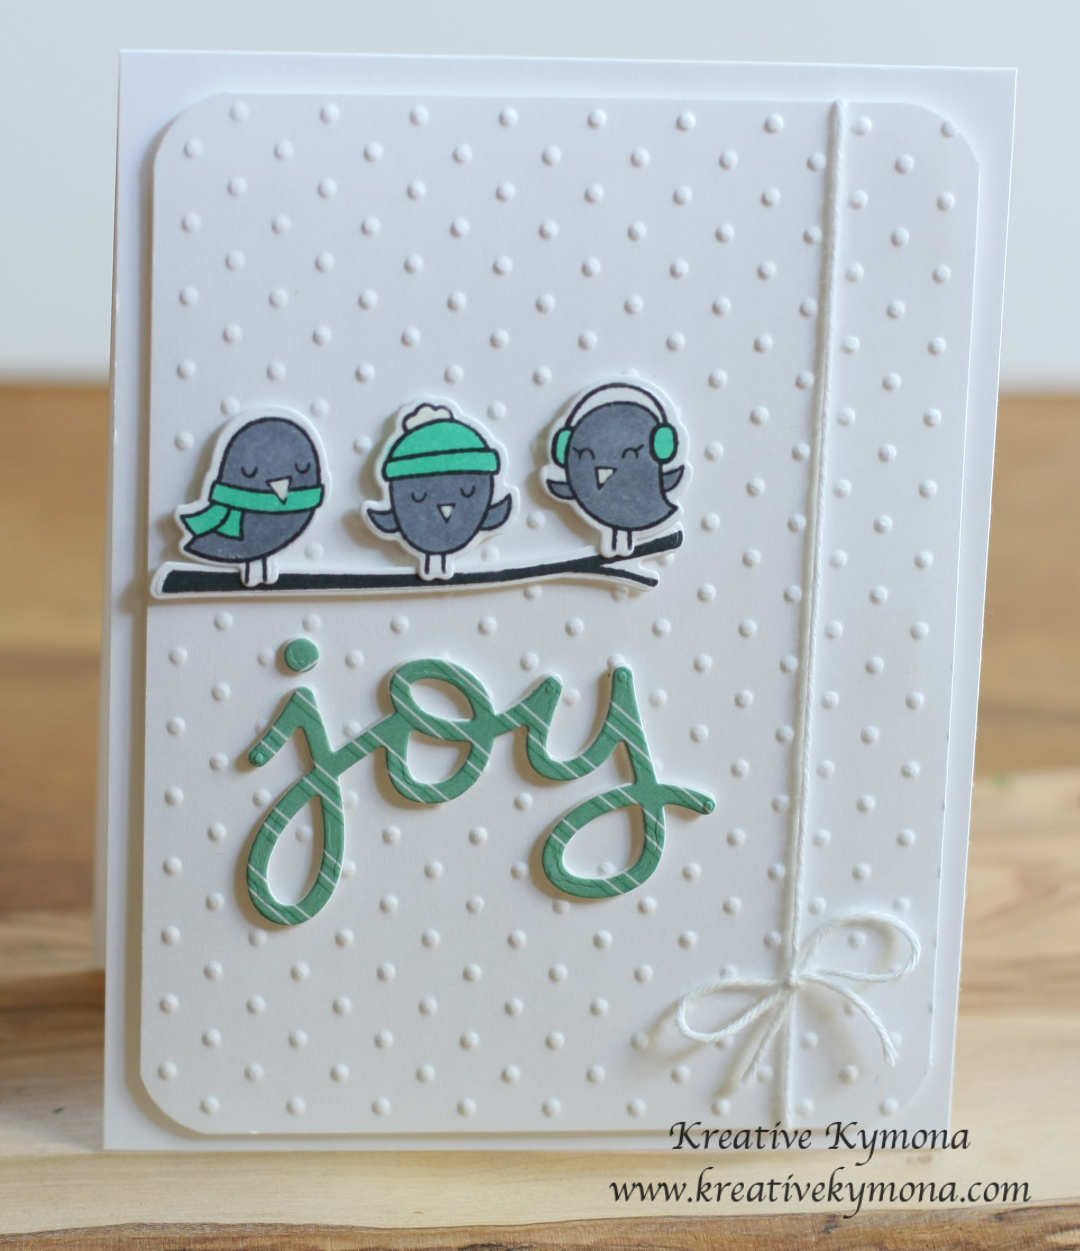
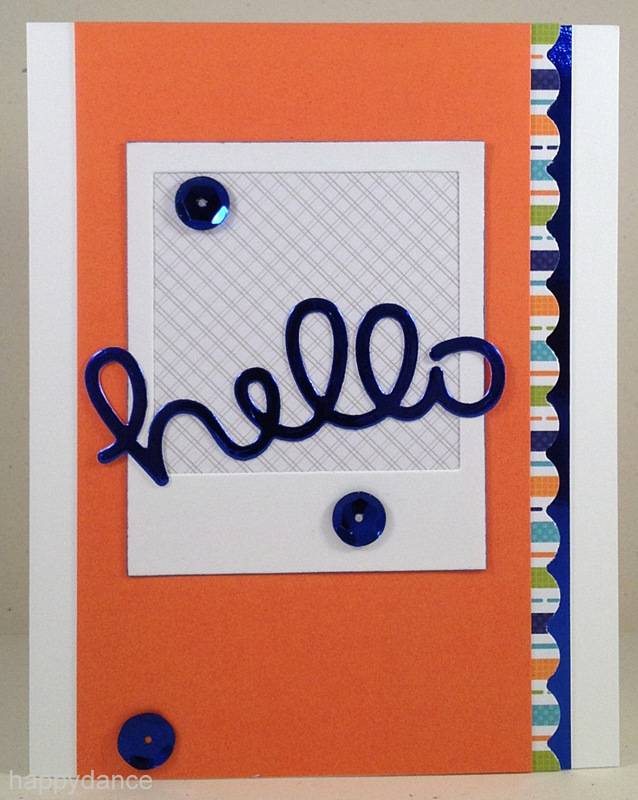
I love these little birds!  Here’s how I created this card:

1. My card base is 4.25 x 5.50 scored at 5.50.  My card panel is cut to 4 x 5.25, I rounded all four corners.

2. I embossed my card panel with Stampin’ Up! Perfect Polka Dot embossing folder.

3. I stamped my birds and tree branch from Lawn Fawns Winter Sparrows.  I colored my birds with Copic markers: Body C5 and their accessories BG34.

4. I used the Lawn Fawn Winter Sparrow dies to cut everything out.

5. I attached the tree branch and the birds with foam adhesive.

6. I used Lawn Fawn Joy die and cut out three of them from white card stock and one from Lawn Fawn Sweater Weather pattern paper.

7. I stacked them together using Tombo Mono Adhesive.

8. I added it to my card panel.

9. I added Stampin’ Up! Whisper White bakers twine to the right side of the card panel.

That was easy!!

Know on to my second card:

Season's Tweeting

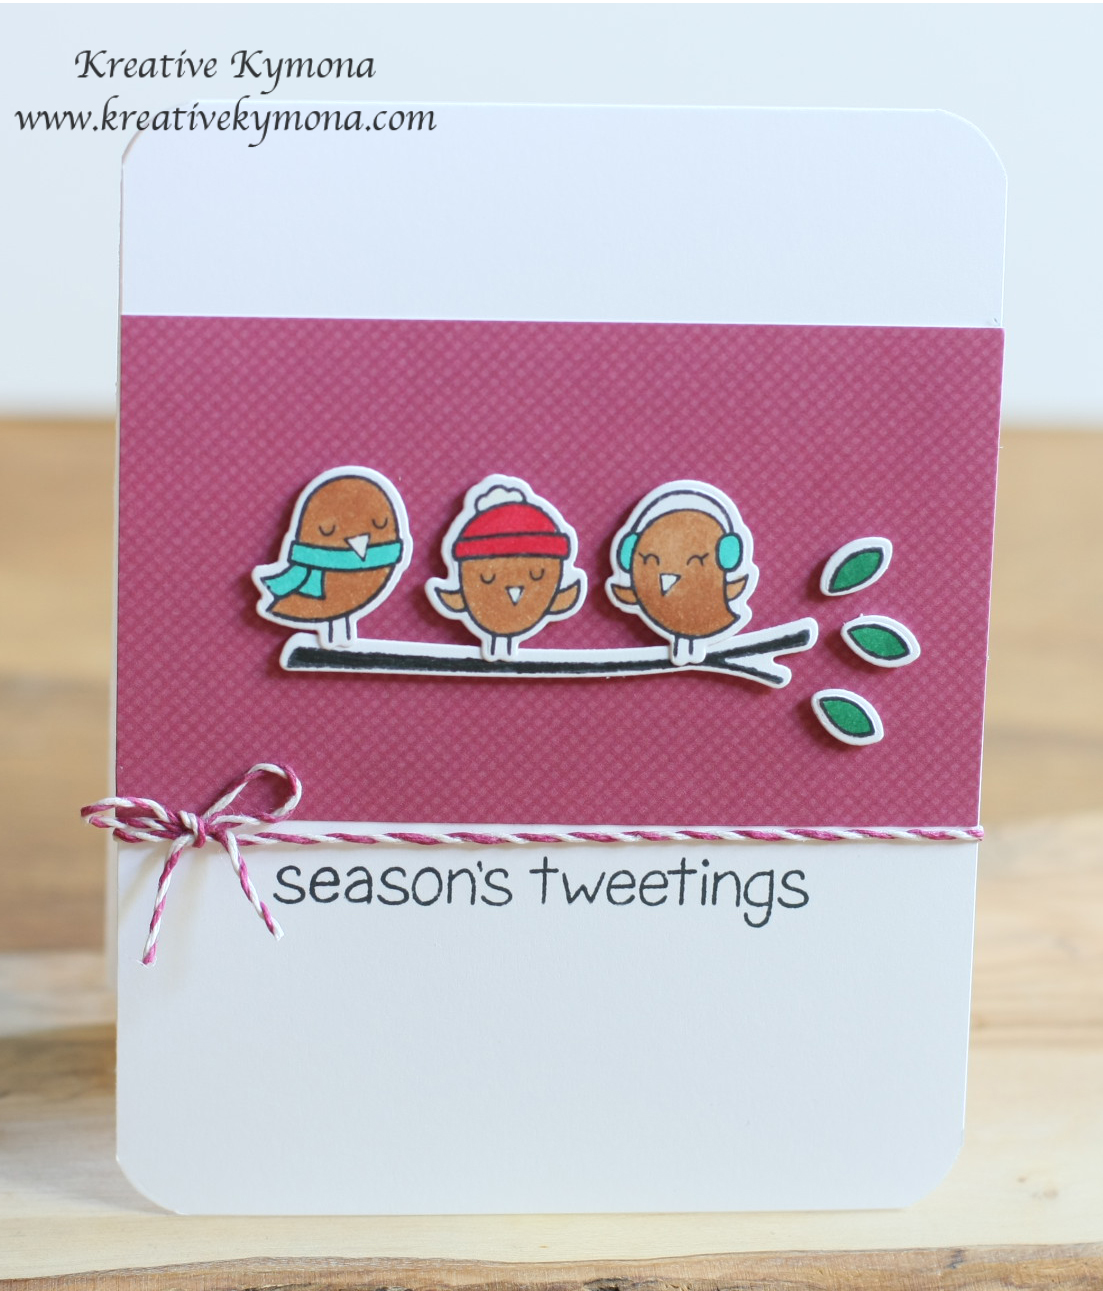
This card was created with the same stamp set and die.  I loved it that much.

Here is how I created this card:

1. My card base is 4.25 x 5.50 scored at 5.50.  My Lawn Fawn Sweater Weather pattern paper is cut to 4.25 x 2.50.

2. I stamped my birds, tree branch and leaves from Lawn Fawns Winter Sparrows.  I colored my birds with Copic markers: Body E33; their accessories BG34 and R29 and leaves G17.

3. I used the Lawn Fawn Winter Sparrow dies to cut everything out.

4. I attached the tree branch and the birds with foam adhesive.

5. I attached Lawn Fawn Orchid Hemp Trim under the pattern paper.

6. I stamped the sentiment under the trim.

Easy Peasy!!!

So tell me what you think?

Supplies used:

Winter Sparrows Lawn Cuts Winter Sparrows Orchid Lawn Trimmings Sweater Weather Petite Paper Pack Perfect Polka Dots Textured Impressions Embossing FolderCopic MarkersWhisper White Baker's Twine


Nothing Is Impossible Today!

Hello everyone! Let me begin by saying Thank you to all of the lovely ladies over at the Muse for picking my dragon card last week as Featured Member.  Awesome!!

If you missed that card, you can check out the the announcement here.

So onto today’s news, I’m here today playing along with the Muse Challenge,  Simon Says Stamp Wednesday Challenge, Addicted to Stamps Challenge Blog today.  I’m so glad to be playing along with everyone this week.

The Muse this week was Bev Beunker!  Her card was full of colors.

Take a look at her card:

musegd

I love the sequin and the photo frame she used on her card so I knew I wanted to have the thing on my card.  I stuck to two main colors.

For Simon Says Stamp Wednesday Challenge the theme is Anything Goes.

wed-newchallenge-headerFor Addicted to Stamps Challenge Blog the theme is Anything Goes.

Addicted to Stamps

Take a look at my card:

Noting is Impossible

Nothing is impossible 2

I received my cute Sweet Stamp Shop Elephant Heart stamp set this weekend so had to use it for this card.

Instead of placing my sequin on the outside panel of the card I wanted my photo frame from Stampin ‘ UP! On Film Framelit Die to be interactive so I decided to create a shaker card with sequin.

I stamped my elephant and the sentiment on to a piece of patten paper from Simon Says Stamp Card Kit for July 2014 Pink Paislee Pen Pals.

I used my Copic markers N4 and N5 to color in my elephant.

I die cut out the “today” from Papertrey Ink Wet Paint Cuts 2.

Nice, simple and easy.  No fuss with this card.

So what do you think? Let me know.


Supplies used:

Elephant HeartsOn Flim Framelits DieSSS Card Kit July 2014Copic MarkersPTI Wet Paint Cuts 2

Basic BlackSSS Khaki CSSSS Lipstick Red CardstockStampin' Trimmer3M Mounting TapeAcetate

Thank you for stopping by!

~Kymona