CS Take It Make It: Take A Technique

Hello everyone!! I’m here today with CS Take It Make It Design Team for our February Challenge.

You are going to love this months challenge.  I had so much fun creating my card for this challenge.  So do you want to know what the challenge is?

Its all about Stenciling!!  No specific stenciling technique, just make sure you use a stencil somehow, somewhere on your project.

If you do not have stencils, cut or punch shapes from a piece of cardstock or acetate and use that as a stencil!!

Super easy and super cool!!

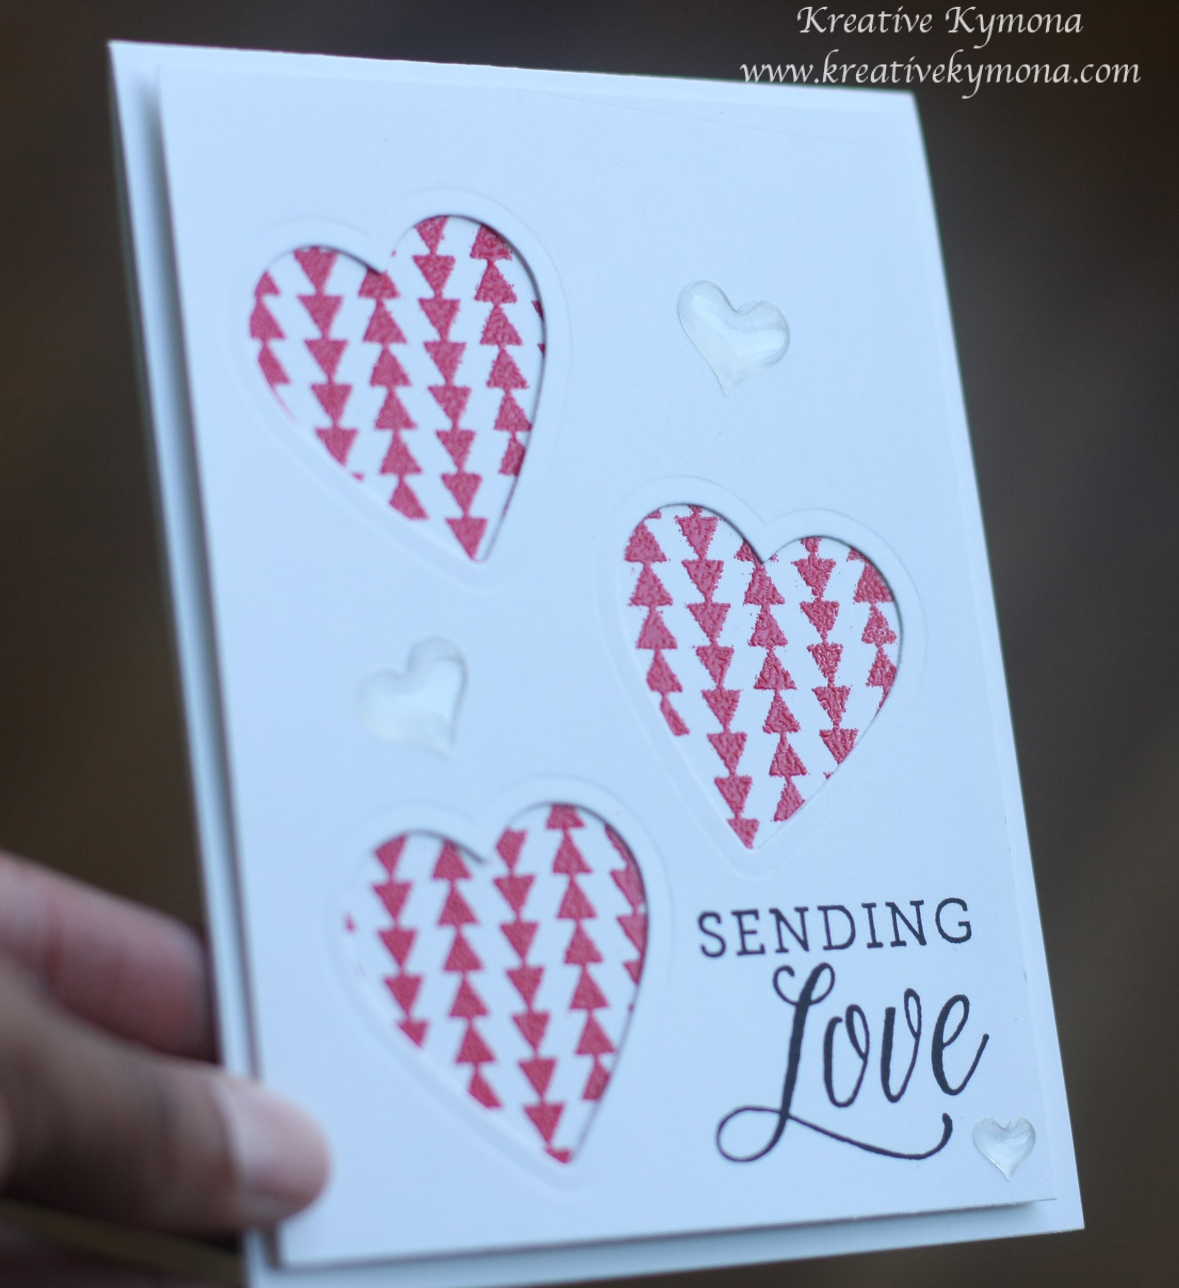
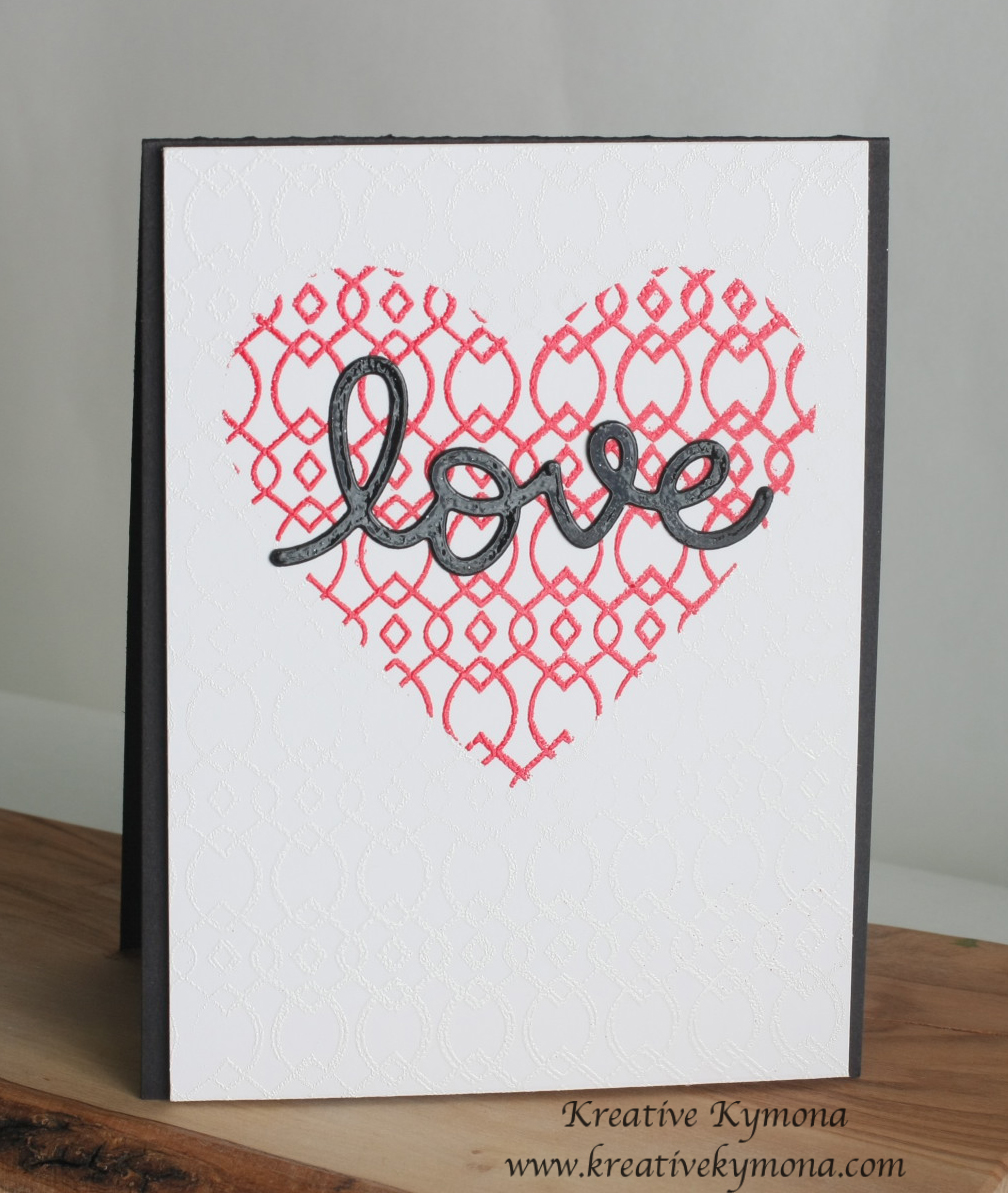
Take a look at my project:

(CS Take it) Enjoy

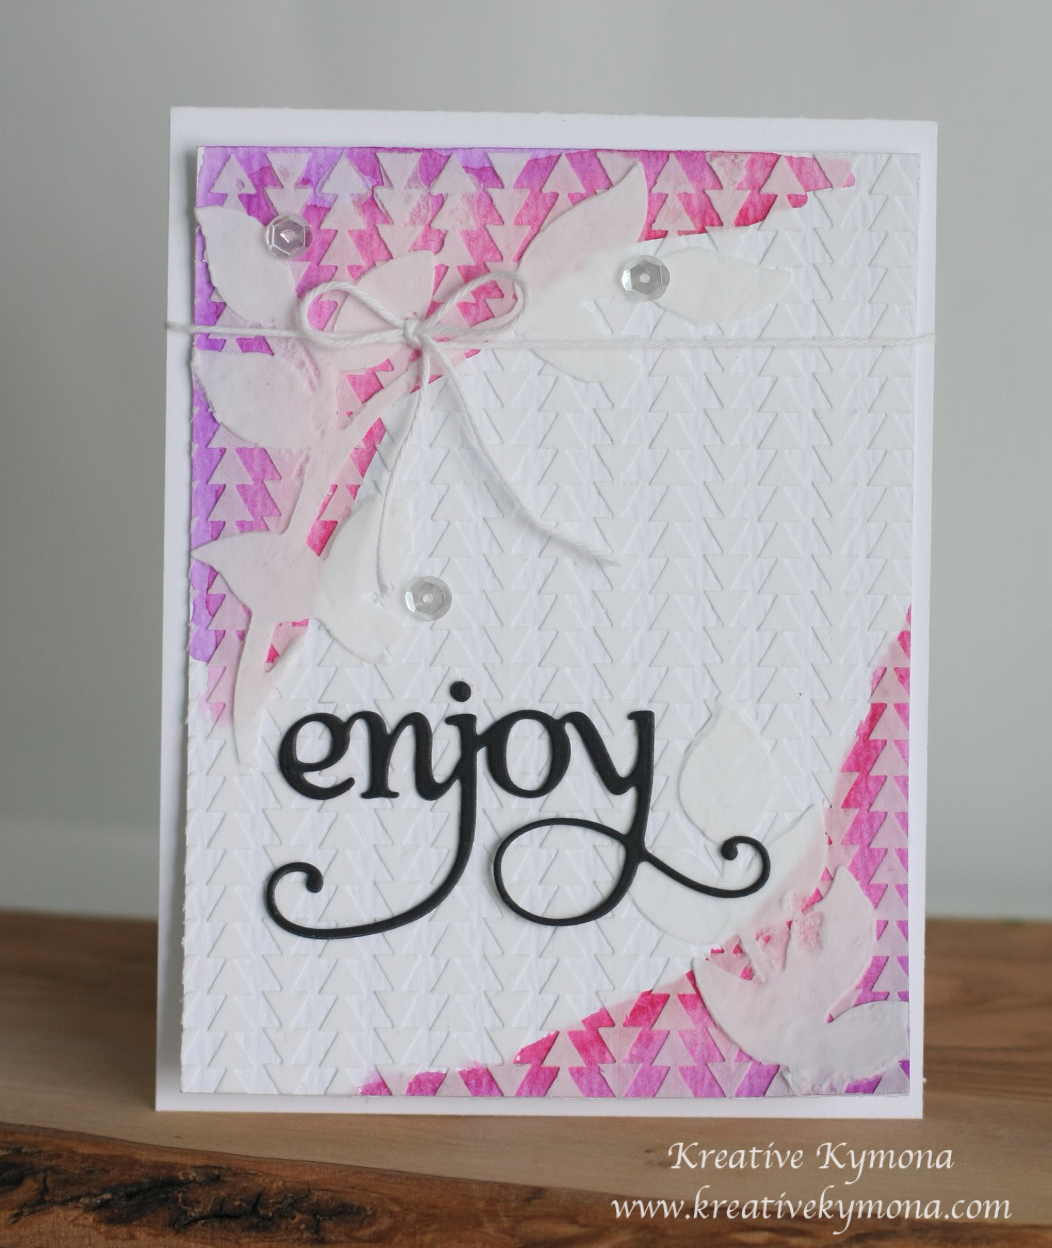
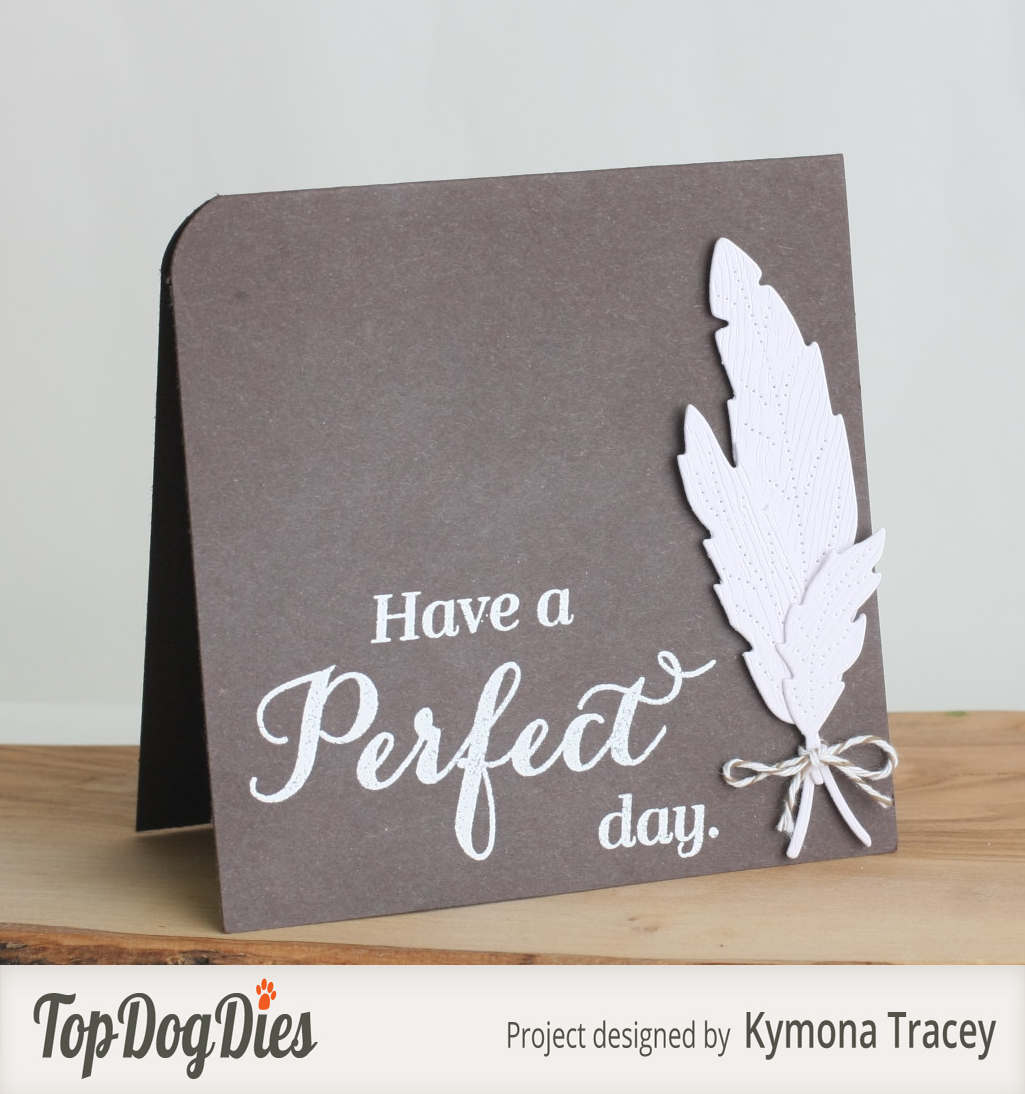
I used two different stencils and embossing paste to create this card.  I totally love how my card turned out. My inspiration comes from my current online card class Clean and Simple 4.

This is how I created this card:

1. I cut my ranger watercolor paper to 4 x 5.25.  My card base was cut to 4.25 x 5.50.

2. I used my watercolor brush to add clean water to the corners of my watercolor paper panel.  I used my Koi Watercolor to add two different colors to the corners of my watercolor panel.  I just added color with no thinking as to how I wanted it to look.  I heat set the paint.

3. Then I position my Hero Arts Triangle Pattern Stencil over my watercolor panel and secured it with painter’s tape.

4. I added a very think layer of Ranger Textured Paste over my stencil making sure to smooth it over the entire stencil.

5. I carefully remove the stencil and wash the paste off of the stencil.  I allowed the paste to try.

6. Once the pasted dried, I position my second stencil, the  Heidi Swapp Bird Stencil Set, over my watercolor panel where I want the flowers to be.

7. I applied a thin layer of embossing paste over the stencil, making sure to have an even impression. I carefully lifted the stencil and washed it right away.

8. I die cut the sentiment from Penny Black Hooray Die Set and adhered it to my embossed panel.  I used my hand to hold the sentiment in place for a couple of minutes.

9. I added some Stampin’ Up! Whisper White Bakers Twine and some Pretty Pink Posh Sequin.

10. I adhered the completed panel to my card base.  I only adhered the top of the panel, leaving the bottom unattached.

So what do you think?  I would love to hear from you.

I used not one but two stencils!!  I challenge you to get your stencils out and play along with us.

We have a great prize pack for you.

Our sponsor is Paperbabe Stamps this month.

Paperbabe Stamps

The winner will get to pick 2 stamp plates of their choice.

I hope you join us this month for this super fun challenge!!

Winner Announcement from last month’s Blog Hop!!

I didn’t get a chance to announce the winner from my blog comments.  See the complete list here.

Congrats go to:

Jenny

January 20, 2015 at 7:36 am

Ha Ha I love this little pig – a brilliant card – thank you for making me smile.

Jenny won both cards that I create for the January Challenge.

Congrats to all of the winners. We had 181 entries.  Wonderful!!
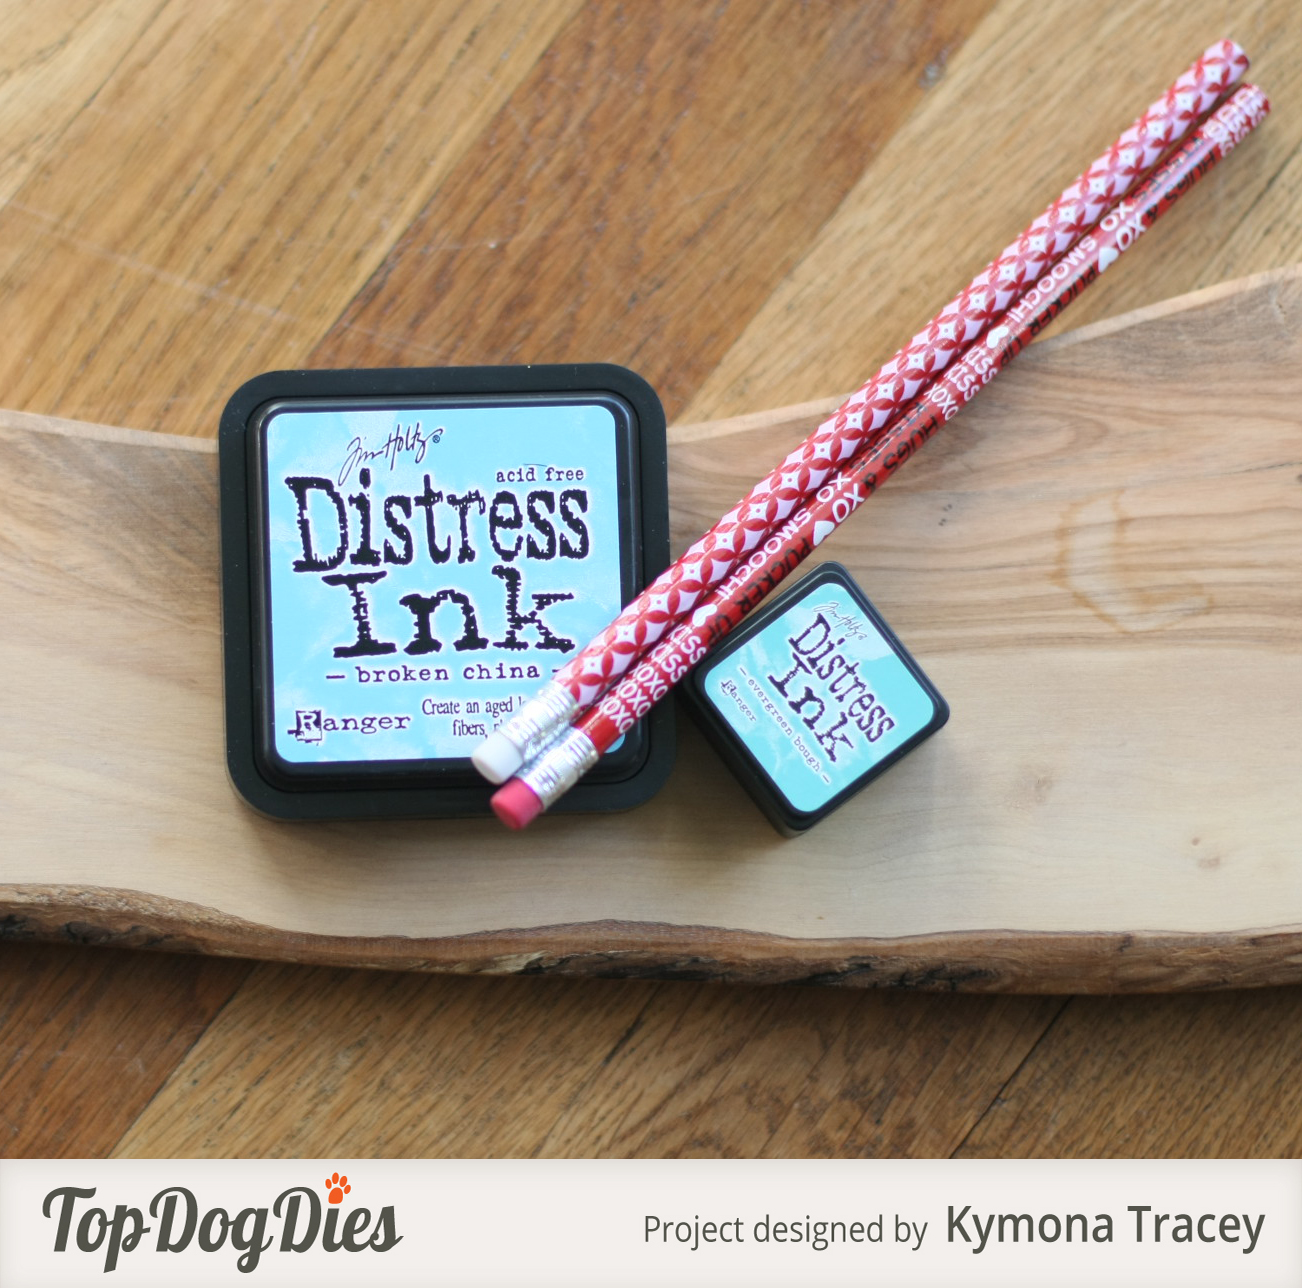
 

Supplies used:

Ranger Watercolor PaperKoi WatercolorsHero Arts Triangle Patten Stenciltextured pasteMixed Media Bird Stencil SetPenny Black Hooray DiesWhisper White Baker's TwinePretty Pink Posh 6mm Sequins

Thank you so much for stopping by!!

~Kymona

Top Dog Dies: More Feathers

Hello everyone!!  Its Wednesday again and I’m here with Top Dog Dies!!

I have another card to share with you using their Feathers Die Set. I just love these feathers.  They are so cute and you can create so many thing with them.

Take a look at my card:

Perfect Day

Take a look at all of that detail on those white feathers.  Simply perfect!

Here is how I created this card:

1. I cut Simon Says Stamp Dark Chocolate Cardstock to 8 x 4, scored at 4.

2. I die cut Top Dog Dies Feathers Die Set out of Neenah Solar White Cardstock.

3. I taped the feathers in place using a basic adhesive.

4. I then used Stampin ‘ UP! Early Espresso and created a bow around the base of the feathers.

5. I stamp the sentiment from Waffle Flower Craft In Everyway Stamp Set with Versamark Ink.

6. I sprinkled Ranger White Embossing Powder over the stamped sentiment and then heat set it.

7. I used my We R Memories Corner Chomper to round the left top corner.

Nothing to it!!  You can recreate this card with ease!!

So what do you think?  Let me know below.


Supplies used:

top dog die feathersSSS Dark Chocolate csclassiccrestsolarwhtieEarly Expresso Bakers TwineBasic RGBVersamarkWe R Memory Keepers Corner Chomper


Thank you for stopping by!

~Kymona


CASology 132 – HOT

Hello everyone!!  Its Tuesday so you know what that means.  I’m here with the new CASology Challenge today.

The Cue Card is super interesting this week.

Take a look:

Week 132 - Hot

Here is my interpretation of the Cue Card:

(CAS) Hot Apple Cider

This snowy cold weather calls for a super warm beverage with a good book.  Hot apple cider hits the spot for some.

Let me share with you how I created this card:

1. I used My Favorite Things Die-namics Mini Album Square Scallop STAX to create my card base (the second largest die).

2. I used Stampin’ Up! Perfect Polka Dots Textured Impressions Embossing Folder to emboss the front of my card base.

3. I used Simon Says Stamp Stitched Circles Wafer Die to cut the third largest circle.

4. I stamp my cup image from Newton’s Nook Designs Apple Delights onto Neenah 80lb Solar White Cardstock.

5.  I colored my image using Copic Markers: BG05, BG07, R24, R46, E18, E15, E21, E23, Go7, T0

6. I attached the stitched circle to the front of my card panel with foam adhesive.

7.  I stamped my sentiment on the inside of the card from the same stamp set.

That is my card for today. I hope you play along with us this week.

Check out what my fellow DT Members have created!!

Design-Team

The prize this week is a special stamp set designed by our very own May Park called Jump Start My Heart by Neat and Tangled.

Supplies used:

MFT Die-namics Mini Album Square Scallop STAXPerfect Polka Dots Textured Impressions Embossing FolderStitiched CircleApple Delight classiccrestsolarwhtieCopic Markers3M Mounting Tape

Thanks for stopping by!!

~Kymona

So Suzy Stamps New Release and Challenge

If your looking for a2z Scrapbooking posts, click here.

Hello everyone!! I’m here today with So Suzy Stamps!  She has some exciting things going on today on her blog and in her store!!

New Release

Lets start with her new stamp that are released today. Take a look at some of the stamps that were released today.

We are not done yet!!!   There are 11 more sentiment stamps that are apart of this release!!

Head on over to So Suzy Stamp to see the rest of stamps!

She is offering Free Shipping today only, USA and International too!!  Now, is the time to pick up those new stamps!

Blog Challenge

Which is right on time for our new February Challenge.  The them is Love!

My fellow design team members have really out done themselves. Check out their cards here.

I created two card using the Easter collection.

Take a look:

Easter Wishes colored

Easter Wishes

This is just the beginning.  All month long the design team will inspire you to create, create, create!!

I hope you play along with us this month. You have a chance to win a $15 gift certificate to the So Suzy Stamps online shop.

Before I go, did you know that So Suzy Stamps can be found on Instagram, Facebook, Pinterest and Twitter? Yes, you should join us there and find more inspirations and fun!!

Thanks for stopping by!

~Kymona

a2z Scrapbooking February Challenge

Hello everyone!!  I’m here today with a2z Scrapbooking February Challenge.  The theme is Embossing!!

How fun is that.  There is so much you can do with embossing.  As a matter of fact I just finished a class that taught me new trick with embossing. So I have so much to share this month.

Take a look at the card I created:

Sending Love

Check out those embossed hearts!!  Totally amazing.  So you want to know how I created this card?

Sending Love closeup

Here you go!

1. I cut my card base out of Hero Arts Snow Layering Paper to an A2 size card (4.25 x 5.50), my embossed panel to 3.75 x 5.0 and my front panel to 4.0 x 5.25.

2. I taped my Hero Arts Basic Grey Triangle Pattern Stencil on top of my middle card panel.  I used Versamark ink and stamped directly on top of my stencil.

3. I added Wow- Cable Car Red embossing powder on top of my stamp image then heated it up. Then I set that panel aside to cool down.

4. I used the heart die from Hero Arts Stamp and Cuts Hearts set to cut 3 hearts out of my front card panel.

5. I stamped my sentiment on the front card panel using Hero Arts Sending Love Stamp.

6. I attached my embossed panel to the back of my front card panel.

7. I added Stampin’ Up! Itty Bitty accents Epoxy Stickers to my front card panel.

Easy Peasy!! I love how this card turned out.

Well, now its your turn!!

Some of the supplies I used can be found at the a2z Scrapbooking Store. If you would like to purchase any of the supplies I used please head on over to the store and use the coupon code KYMONA15 to get 15% off your purchase.

I hope my card gives you some inspiration to participate in our Embossing Challenge. It runs to the end of the month, you only have 27 days left to play along.

You have a chance to win a $25.00 gift card to the a2z Scrapbooking Store. Hope to see you there!

Supplies used:

Kymona:

Hero Arts Triangle Patten Stencil Itty Bitty Accents Epoxy Stickers Versamark

One more thing before I go, did you know that we are on Twitter, Instagram and Facebook?. If you haven’t done so already, please follow us on these different social media outlets!! You don’t want to miss out on any fun promotions!!

Thanks for stopping by!!

Kymona

Clean and Simple 4 – Day 1

Hello everyone!!  I’m here today with my first homework project from the new Online Card Class – Clean and Simple 4!!

Before I show you what I created, let me just say I LOVE these classes.  I learn so much from all of the instructors.  Its unbelievable.

Day 1 we learned about:

1. Heat Embossing and Masking

2. 3D Embossing

3. Faux Ceramic Titles

Did your jaw drop?  Yes, it should.  Amazing, Amazing stuff. I can’t wait to share all of it with you.


My card today showcases Heat Embossing and Masking!  The talented Jennifer McGuire taught us how to combine simple masking and stamping with powders to create unique backgrounds that will really add pop to a clean and simple design.

Take a look at my card:

OCC Embossed Love

Amazing right!! Just some pop of color turned this simple card to Wow!! simple card.

Here is a closer look:

OCC Embossed Love 2

Here you can see the white emboss pattern that follows evenly across the card.  Amazing what masking can really do!!

I will be back with more cards from Day 1 class!!

FYI –  a2z Scrapbooking Store has all of your Hero Arts needs.  The best part is, I have a coupon for you to use.  Use KYMONA15 to get 15% off your totally purchase.

Jennifer used a Hero Arts Basic Grey Bold Flower Pattern Background Cling Stamp on her card, that I love but didn’t have. So I ordered it from a2z Scrapbooking and you can too.

Hero Arts Bold Flower Pattern

Supplies used:

Hero Arts Highline Ironwork LF Scripty Love Hero Arts White Embossing PowderHero Arts Snow Layering Paper Hero Arts Black Layering Paper

Thanks for stopping by!

~Kymona


Top Dog Dies Dotted Tags

Hello everyone!!  Happy Wednesday!! Friday is in sight now, yes!  I need a day off!!  LOL!!

Wednesday’s are my Top Dog Dies days!!  I’m here today to share another new die they released last week!

Take a look:

TDD Dotted Tags Die SetTop Dog Dies Dotted Tags Die Set

They are super cute and will fit on any box, card and scrapbook page.  The stitched edges are so pretty!

Take a look at my totally awesome gift box:

Be Mine box

You can give this box to anyone, simply change the sentiment from “Be Mine” to something that would suit your recipient.

I used the heart die from Top Dog Dies Heart Mini Album Finishers Die Set, to create all of those small hearts on my box!!

Take a closer look at my box:

Be Mine box closeup tag

I attached the tag under one of the glitter hearts and it fit perfectly.  No string needed!!

Be Mine box side view

I added the glitter hearts on both sides of the box.  This box is big enough to hold a nice size gift!!

I added a bag fill of chocolate to this box.  I’m giving my box to my daughter.  I have to make another one for my son.

Here is how I created this gift box:

1. I stamped the big and small heart from Waffle Flower Crafts DT Mix Stamp Set on my box using Versamark Ink.

2. I put the box together buy folding on the score lines. I added my chocolate to the box now because when I add the decorations to the box, you can’t open it back.

3. I used my retired Stampin’ Up! Scallop border punch to create the scallop border out of Stampin Up! Cherry Cobbler cardstock.

4. I attached the border punched cardstock to the edge of the white cardstock.  Then I adhered the entire piece to the takeout box using Tombow X-treme adhesive.

5. I attached 5 pieces of Stampin’ Up! Cherry Cobbler Baker’s Twine around my box.

6. I die cut 16 small hearts from Top Dog Dies Heart Mini Album Finishers Die Set and attached them to the bakers twine with glue dots.

7.  I die cut my tag from Top Dog Dies Dotted Tags Die Set and stamped my sentiment from Stampin’ Up! You Plus Me stamp set. I adhered it to my box.

That was super easy to create and the recipient will love it.  Head on over to the Top Dog Dies shop to see what they have to offer. You will not be disappointed.

So what do you think?  Let me know below.

Supplies used:

TDD Heart Mini Album Finisher Die SetTDD Dotted Tags Die SetTake out boxCherry Cobbler Baker's TwineRed Glimmer PaperCherry Cobblerclassiccrestsolarwhtieae540-versamarkBasic RGB Tombow XtremeYou Plus Me


Thanks for stopping by!!

~Kymona

CASology 131 – Birthday

Hello everyone!!  It’s Tuesday and you know what that means, its CASology time.  Yayyyy!!  Last week, there were so many fabulous cards, it was super hard to choose one card.

This weeks cue card it fabulous too.  Check it out:

Week 131 - Birthday

Such a fun word.  The possibilities are endless. I saw a card Laura Bassen created and I and wanted to make a card similar to hers.

Take a look at my card:

Wishing you the happiest Birthday(this photo doesn’t do this card justice, its so pretty in person)

This little lady is all dressed up and ready to attend a birthday party.  Isn’t she the cutest little you’ve seen!!

Here is how I created this card:

1.  I cut my card base to an A2 (4.25 x 5.50) size card.  I cut my card panel to (4 x 5.25).

2. I used Simon Says Stamp Stitched Circle die to create an opening on the card panel.

3.  I use the cut circle to draw a circle on my card base to guide where my stamped imagine should be placed.

4. I stamped the little girl from Penny Black Cool Chicks Stamp Set within the drawn in circle on my card front.  Once the ink dried, I erased the circle.

5. I colored the little girl with Copic Markers.

Hat: BG11, BG 13, BG15, R24, and Y06

Dress: R22, R24, and R27.

Necklace: BG34

Stocking: R24,  and BG34

Shoes: R20 and R24

Skin: E00 and E11

6. I used Copic BG 34 to color a piece of cardstock to match the color in the little girls dress.

7. I die cut Simon Says Stamp Wishing Die 4 times (3 black die cuts and one out of the cardstock that I colored.

8. I stacked that word die on top of each other and adhered it to the front of my card.

9. I stamped the rest of the sentiment from Simon Says Stamp Sending and Wishing stamp set.

What do you think?  What about my coloring? I would love to hear from you.

Check out what my fellow DT Members have created!!!

Design-Team

Ardyth Percy-Robb

Gillian Ross

Hazel Hodgkins

Jen Wills

Joyce Mehrberg

Judy Marino

Kimberly Wiener

Kymona Tracey ← Me!

May Park

Melissa Chipperfield

Tracey McNeely

Hannelie  (Guest Designer)

Our sponsor for this challenge is STAMPlorations.

I can’t wait to see what everyone comes up with.  I hope to see all of you there!

Supplies used:

Stitiched CirclePenny black Cool ChicksCopic MarkersWishing dieSending & Wishingclassiccrestsolarwhtie


Thanks for stopping by!!

~Kymona

Waffle Flower Photo Inspiration Challenge

Hello everyone!!  I’m here today with Waffle Flower’s 2nd Photo Inspiration Challenge!!

What did you thing of the first challenge?  Those colors were a challenge but not to challenging to some of you!  I love seeing all of the entries.

Are you ready to see our new challenge?  Yayyy, here you go:

Photo Inspiration January 26

Here is my take on this challenge:

Perfect Bloom

Sooo, what do you think?  I totally love this new Planted Stamp Set and the Perfect Word Die from Waffle Flower.

If you know the stamp set, that third potted plant was created using the plant from the first stamp!  Ingenious, is what I say, LOL!!

Here is how I created this card:

1. I cut my Simon Says Stamp Fog cardstock to an A2 (4.25 x 5.50) size card.

2. I stamped the first and second potted plant using Memento Tuxedo Black ink because I wanted to color the images using my Copic markers.

3. I used my Copic markers to color in each plant and pot.  I used the same colors in the photo.

4. For the third potted plant, I stamped the empty post first.

5. Then I created a mask for that pot, so that I could stamp the plant inside.  Then I colored the image.

6. I die cut the word Perfect out of Simon Says Stamp School House Red cardstock 4 times..

7. I stacked them on top of each other so that the die could have some dimension. I adhered the die to the front of my card.

8. I stamped the word “Bloom ” underneath the die cut.

9. I added some Pretty Pink Posh sequins to the card and that was it.

Super easy card to create. This card allowed me to practice my Copic coloring.

Come on and join us!! Now I can’t wait to see what you come up with.

Supplies Used:

Basic RGB Word-Die-Perfect Memento Black InkCopic MarkersSSS Fog cardstockSSS schoolhouse red

Thank you for stopping by!

Kymona

Wishing you were here…

Hello everyone!!  Kymona here sharing my very first Top Dog Dies Design Team post with you today!!  I’m super excited to be here and I hope you love what I’m about to share with you!!

Today I’m working with one of the new dies that was released on Tuesday!!

tc084_1Top Dog Dies Feathers Die Set

Take a look at what I created for you:

Wishing you were closer

These feathers are super fun to work with.  I love the detail on each feather! So you want to know how I created this card?

Here you go:

1. I cut a piece of watercolor paper down to 4.25 x 5.50 and taped it down to my work station.

2. I added a good amount of water to my watercolor paper.

3. Then I dropped Distress Inks Broken China and Evergreen Bough to my paper and let the color spread all over my paper.  I heat set it.  Then I sprayed water in my hand and drop some drops of water onto my paper to create blotches of white spots.

TDD feather tutorial

4. Once my watercolor piece dried.  You can see in the next photo how watercolor dries lighter.

TDD feather Tutorial 1

5. I used my feather dies and cut out three feathers.

6. I adhered the flowers together with glue dots and tied a bow using linen thread.

7. I used the same color inks and a clean pencil erasers and added the dots surrounding my feathers.

TDD feather tutorial 3

8. I adhered the feathers over those dots using glue dots.

9. I used Simon Says Stamp Sending & Wishing stamp set to create my sentiment.  I stamped it to the right of the flowers.

TDD feather tutorial 2

10.  I used my corner chomper to round two of the cards corners.

That is all it took to create this card.  I love how it turned out and I hope you will give this technique a try.

Very elegant without any real hard work.

So what do you think? I would love to hear from you.

Supplies used:

Canson Watercolor Paper Distress Ink Broken ChinaDistress Ink Evergreen BoughLinen ThreadStampin Up glue dotsSending and WishingWe R Memory Keepers Corner Chomper

Thanks for stopping by!

~Kymona