Watercolor Resist

Hello everyone!!  I’m here with CAS(E) this Sketch #145 Challenge today.  I don’t get to participate in challenges much so when I do, I get all excited.

Lets jump right in:

Here is the sketch:

CTS_145

Take a look at my card:

Be Kind and Thoughtful (challenge)

Creating this card was simple:

I used my powder bag and prepped my watercolor paper so that the embossing powder would stick to areas that I don’t want.

I used Concord & 9th Being Classy Stamp Set and stamped my sentiment using Versamark Ink.

I sprinkled Hero Arts White Embossing Powder on top of the stamped sentiment.  Then I heat set it.

After all of the powder melted, I taped down my Canson watercolor paper so that I can watercolor the front of the card.

I used Koi Watercolor to add the color to my Canson watercolor paper.

Since I heat set the sentiment, it resists the color and rolls of the white sentiment.  The color only lands on the paper where the sentiment isn’t.

Some of the paint settled on the sentiment, I just used a damp cloth to wipe the ink off.  Super easy.

I used Stampin’ Up! Elegant Butterfly Punch to cut out three butterflies out of vellum paper.

I attached each of the butterflies together and add two rhinestones in the center.

Super easy and pretty!!

I hope I fit the sketch!

Supplies used:

Being Classy VersamarkHero Arts Clear Embossing PowderKoi Watercolor Canson Watercolor Paper Elegant Butterfly PunchBasic Rhinestones Jewel Accents

Thanks for stopping by!!

~Kymona

Tag You’re It Challenge

Hell everyone!!  I popping in really quickly to play along with Tag You’re It Challenge this week.

Marybeth is the Designer this week and this is what she came up with:

TYIC+%2326


I love the butterfly on her tag so I wanted to give it a try!

I created these watercolor background pieces the other day and want to use one of them to create my tag.

Watercolor pieces

Take a look at my tag:

You make me smile upright

I love that watercolor piece and didn’t want to hide it so I decided to create my second tag using acetate to create my second tag.

You might be able to see it better here:

You make me smile tag flat


My sentiment is from Papertrey Ink Lunchbox Love Stamp Set and I stamped it in Versamark Ink and embossed it with Stampin’ Up! Gold embossing powder.

I punched out two butterflies using Stampin’ Up! Elegant Butterfly Punch and their Bitty Butterfly Punch out of the same watercolor piece.

I adhered everything with glue dots and added the Papertrey Ink Baker’s Twine Cream Cotton to finish off my tag.

Easy Peasy!! What do you think?  Let me know below in the comment section.

Supplies used:

PTI Lunchbox Love  VersamarkSU Gold Embossing PowderElegant Butterfly PunchSU Bitty Butterfly PunchPI Bakers Twine Cream Cotton


Thank you for stopping by!!

Kymona

Top Dog Dies – Butterfly

Hello everyone!!! It’s Top Dog Die Wednesday!!  I’m here today showcasing Top Dog Dies Butterfly Die Set!!

TDD Butterfly


When I first saw this butterfly die set I knew I had to have it.  Its super intricate.  I love the detail!

A couple of days ago I was on Instagram, my favorite social media site, and came across Bianca better known as@thecoloursofmagic.  She posted a finish piece of different distress inks blended together.  I fell in love. I knew I had to give this a try.


Take a look at her color combo:

FullSizeRender (1)


Totally awesome right!! Thanks Bianca for sharing!! Check her out, she has some great coloring photos in her feed.

Now take a look at my card:

Butterfly 4 (TDD)

I love how you can see the multicolors behind the butterfly.  I added some Clear Wink of Stella for some shimmer.

Butterfly 3 (TDD)

Such a great card to give to a friend.  I stamped Mama Elephant Sunday Sentiments on the inside of the card.

Butterflyinside (TDD)


Look at how beautiful those colors look behind that butterfly!  Love it.

Butterfly (TDD)

Butterfly 2 (TDD)

This card was easy to create:

1. I partial die cut my butterfly out of the card panel.

2. I used an ink blending tool to blend Distress Ink Mustard Seed, Spiced Marmalade, Fired Brick and Seedless Preserve on my card base.

3. I added some Clear Wink of Stella to the blended colors.

Tip: be careful when using the wink of stella on distress ink.  Since the distress ink activates with water, the liquid will move the colors around.  So good across the colors not up and down.

4. I added the card panel to the card base using Tombow Xtreme Adhesive.

5. I stamped my sentiment from Mama Elephants Sunday Sentiments on the inside of my card using My Favorite Things Hybrid Ink.

6. I used my We R Memory Keepers Corner Chomper to round the bottom corners.

7. I added Pretty Pink Posh 4mm and 6mm Sparkling Clear Sequins.

So what do you think?  I hope you like this card as much as I enjoy making it!

Supplies used:

TDD Butterfly SUNDAY SENTIMENTS Wink of Stella clear Tombow XtremeWe R Memory Keepers Corner ChomperMFT Hybrid Black Ink Mustard SeedSpiced Marmalade Fired BrickSeedless PreservesPretty Pink Posh Sequins 4mmPretty Pink Posh 6mm Sequins


Thanks for stopping by!!

~Kymona

CS Take It Make It: Take a Technique Challenge

Hello everyone!! I’m here with CS Take It Make It: Take a Technique Challenge for our June.

Our theme is Take a Technique!

This months challenge is going to be super fun!!  Its all about texture!

This means using texture paste or embossing paste on your project or using a technique such as embossing, either embossing powder or embossing folders. Anything that gives your project a “touchy-feely” style!!

Wait, don’t forget the stamping, that with your texture should be fun!!

Take a look at my card:

Smile (CSTIMI)

Take a look at that textured background!!  I love it.

Here is how I created this card:

1. I taped my card base down to my work surface to keep it from moving.

2. I taped the Simon Says Stamp Grid Stencil on top of my card base.

3. I spread Wendy Vecchi White Embossing Paste on top of the Grid Stencil from the top left corner to the bottom right corner.

4.  While the paste was still wet, I sprinkled some Tim Holtz Distress Glitter Clear Rock Candy on top of the paste for a glittery look.

IMG_3845

5. I set the card base down to dry.

6. I die cut Stampin’ Up! Butterflies Thinlits Dies out of a watercolor piece that I created awhile back.

Watercolor scrap

I love keeping scraps, you never know when you will need them.

7. I attach the butterfly with Glossy Accents.

8. I stamped the sentiment using Simon Says Clear Stamps Happy and Smile to the bottom right side of his card.

Nice and easy!!

Now its your turn to play along with us.

We have a great prize pack for you.

We have two prizes to offer this month, the first is our sponsor prize. This winner will be chosen randomly from all of the entries in the challenge! The sponsor for June is:

Rubber Dance

Rubber Dance Store

Random Winners will win a voucher worth £20!

Winners amount

Our second winner is our Design Winner. This winner is chosen by our DT, who all vote for their favorite design from all of the entries. This winner will have their winning project published in Craft Stamper Magazine, they will have a GDT slot for an upcoming challenge, and will also feature in their very own Winners Profile blog post!

Now if that isn’t a reason to play along I’m not sure what is!!

I can’t wait to see what you come up with.

I would like to link this card up to Pretty Pink Posh Watercolor Blog Hop.

PPP Watercolor Blog Hop

Supplies used:

SSS Grid StencilEmbossing PasteDistress Stickles clear rock candyRubber Dance Store Butterflies Thinlits DieKuretake Gansai Tambi Watercolor

Thanks for stopping by!

~Kymona

CS Take It Make It: Take a Stamp Challenge

Hello everyone!  I’m here today with CS Take It Make It Design Team for our CS Take It Make It: Take a Stamp Challenge for the month of May.

This month’s theme is Take a Stamp!!  That means take any stamp and create something, anything goes!! Now if that isn’t easy, I’m not sure what is!!

Take a look at my card:

There is Beauty in Simplicity (CS)

OMG!!  That butterfly is super amazing.  That butterfly comes from the new Tim Holtz’s Perspective stamp set.  I’m so glad I ordered it.  I will get a lot of mileage with that stamp.

Here is how I created this card:

1. I cut my card base to an A2 size card (4.25 x 5.50 scored at 4.25).

2. I stamped the butterfly and the sentiment from Tim Holtz’s Perspective stamp set using My Favorite Things Hybrid Black Ink.

3. I colored the butterfly using Copic Markers: BV02, BV04, BV08 and R81.

4. I added Clear Wink of Stella to the butterfly for extra shimmer.

5. I cut a mask out of the butterfly to cover my pretty butterfly up.

6. I used WPlus9 Bloomsberry Spray Mist and the Shimmer Spray Mist to add splatters to my card front.

Those sprays are awesome.  Such a great added touch to my card.

7. I rounded the corners with the We R Memory Keepers Corner Chomper.

Pretty neat right!!  Now its your turn to play along with us.

We have two prizes to offer this month, the first is our sponsor prize. This winner will be chosen randomly from all of the entries in the challenge! The sponsor for May is: WOW! Embossing Powders.

Wow

Here are the prizes this month:

A set of 6 vintage embossing glitters in a case and a lace stamp!!

Wow embossing powder               Wow Stencil

Our second winner is our Design Winner. This winner is chosen by our DT, who all vote for their favorite design from all of the entries. This winner will have their winning project published in Craft Stamper Magazine, they will have a GDT slot for an upcoming challenge, and will also feature in their very own Winners Profile blog post!

Now if that isn’t a reason to play along I’m not sure what is!!

I can’t wait to see what you come up with.

Supplies used:

Tim Holtz Perspective MFT Hybrid Black InkCopic BV02 Copic BV04 Copic BV08 Copic R81Wink of Stella clearWPlus9 BloomsBerryWPlus9 Shimmer Spray MistWe R Memory Keepers Corner Chomper

Thank you so much for stopping by!

~Kymona

Same but Different Challenge #6

Second Post

If your looking for the Top Dog Dies Baby Shower Invite post, click here

Hello everyone!  I’m here today with a new challenge that I’m participating in and its called the Same but Different Challenge #6!!

logo_same+but+differentFrancine from 1001 CARTES and Anja from Little Butterfly Creations are the co-owners of this challenge and I have to tell you they are super fabulous at card making.  Their use of color is totally amazing.  I love seeing their cards.  Such inspiration!!

I first discovered this challenge a couple of months back when they first started, but I couldn’t participate, because I didn’t have the stamp set that Francine and Anja used.  I have it now, LOL!!

So, I’ve been dying to give this challenge a try so I put forth the effort to get the butterfly die that they used.

Lets take a look at the die we are using for this challenge.  They are using the “Chrissy Butterfly” from Simon Says Stamp:

Photo_Blog_448b

When I looked on Simon Says Stamp website, I couldn’t find that die.  I reached out to Francine to let her know that I can’t find that die but that I did find a die that was very similar but it had a different name. I found the Paulina Butterfly Die.  Francine said that was fine, its the same die just a bit bigger.  Yayyy!!

Paulina butterly

Now take a look at my card:

Take your time to be happy

I love how my butterfly turned out.  I had a couple of watercolor pieces that I wasn’t sure what to do with and now look.  I found a use for it!!

So, let me make you laugh.  I thought this die partial die cut but it cut straight through.  So I had to improvise.  I just glued the center of the butterfly back in place so that it could appear as if it was partial die cut.  Nice right!!

My sentiment is from Create a Smile Botanical Love stamp set.

Lets take a closer look at my card:

Take your time to be happy 2

I love how clean cut the butterfly looks.

Take your time to be happy 3

This sentiment is so fitting for this card.  It matches the butterfly and the watercolor colors!

Take your time to be happy 4I love how this turned out!  What do you think? Let me know below. I would love to hear from you.

I’m also entering this card into the Less is More Challenge: Week 213 – This makes me happy!

Less-Is-More-Header

Creating pretty cards and hanging out with my children makes me happy!

Supplies used:

Paulina butterlyBotanical Love Kuretake Gansai Tambi WatercolorRanger Watercolor PaperBasic Rhinestones Jewel Accents

Thanks for stopping by!

~Kymona


a2z Scrapbooking March Color It In Challenge

Third Post for today!

If your looking for the So Suzy Stamps Release, click here

If your looking for the So Suzy Stamps March Challenge post , click here

Hello everyone!! I’m here with a2z Scrapbooking today with our March Challenge!!  The theme is Color It In!!

Use any Hero Arts product to create a beautiful colored in piece.  This will be super fun and interesting.  We get to go back to the basic and color!!  There are so many possibilities and so many different mediums that you can use for this challenge.

Check out the cards I created for this challenge:

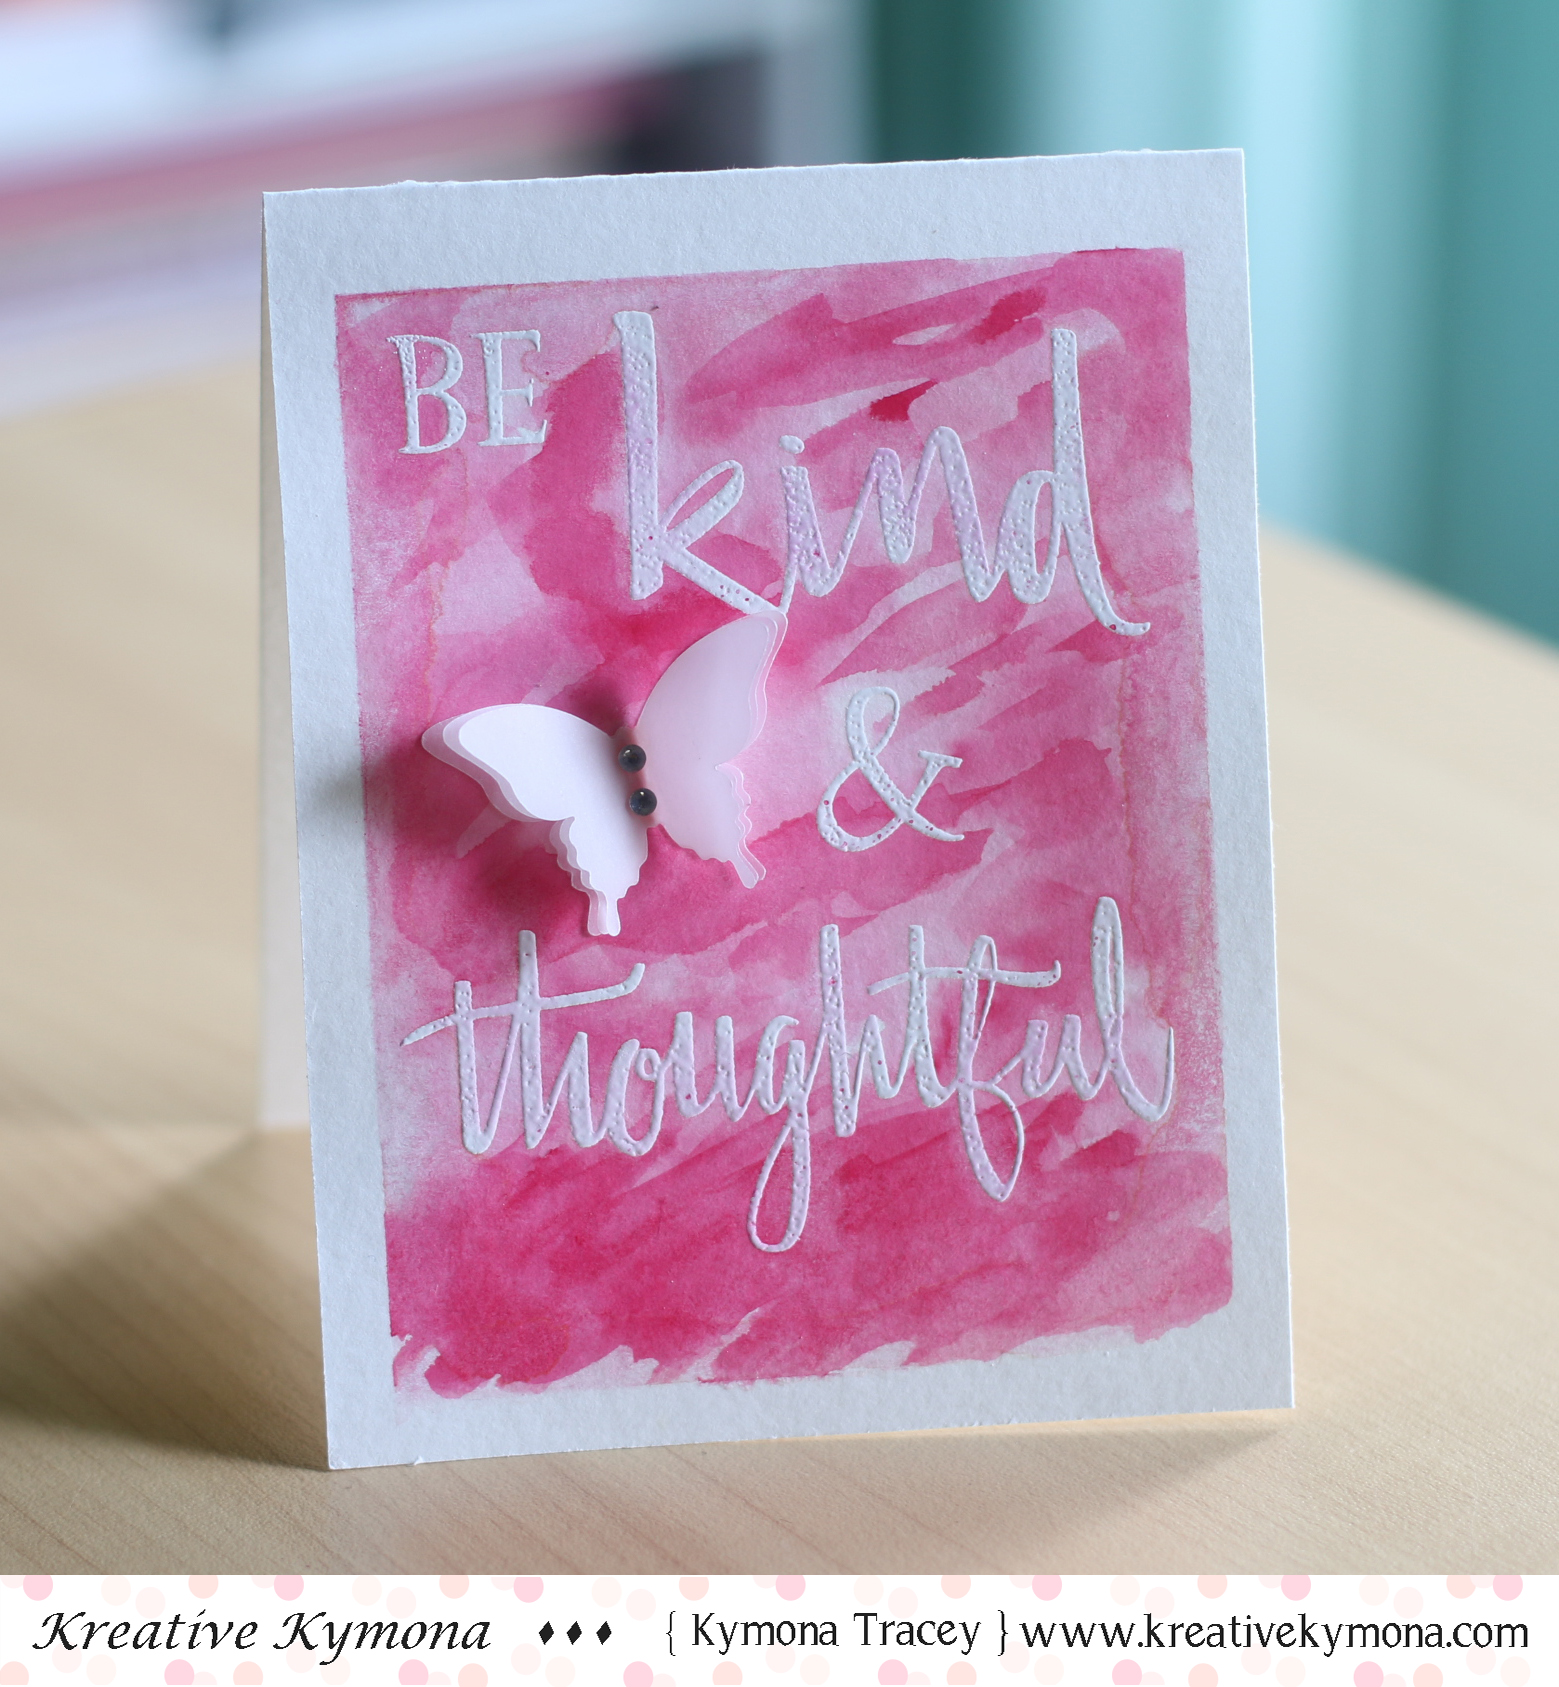
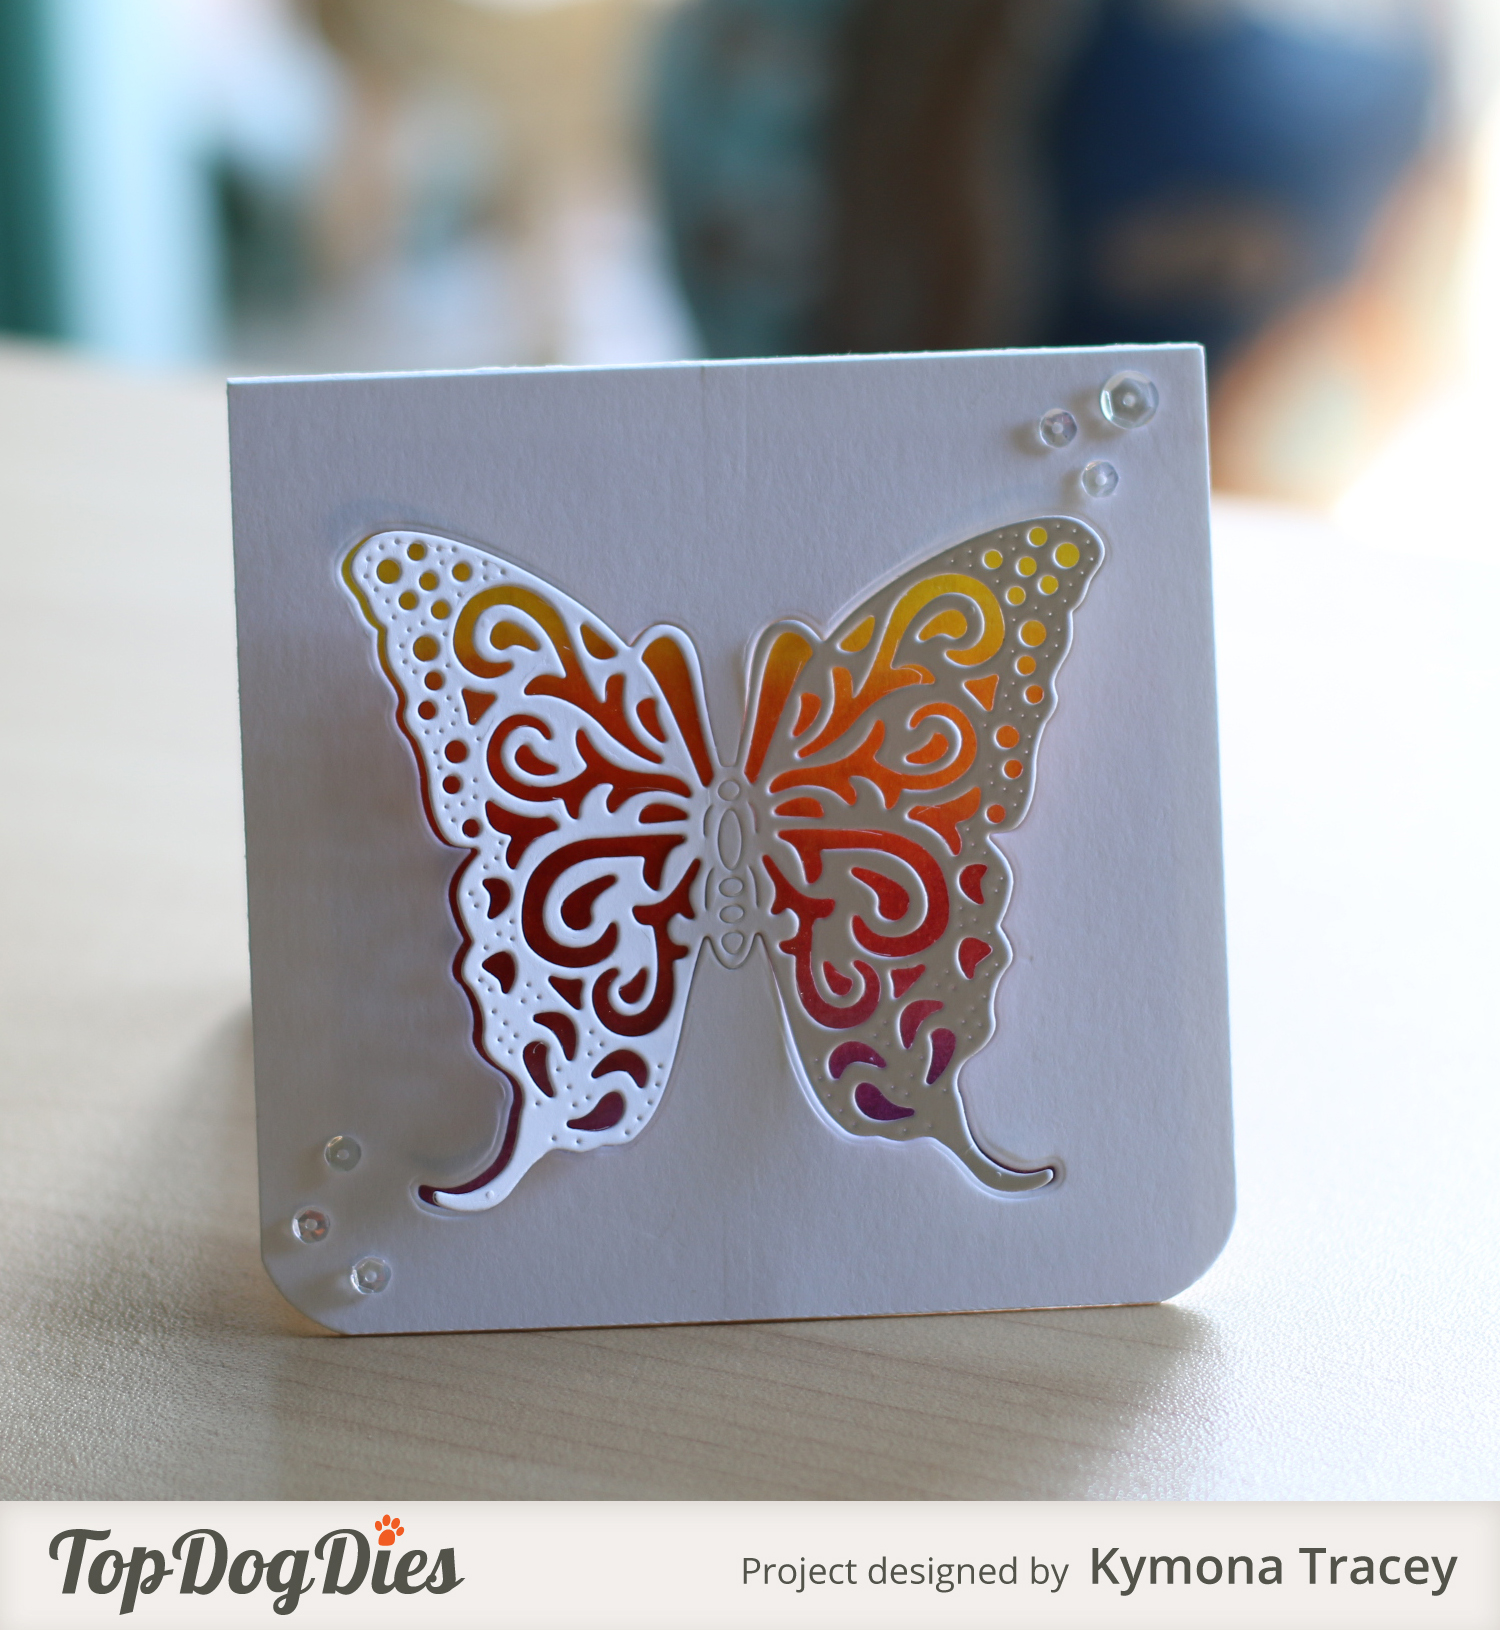
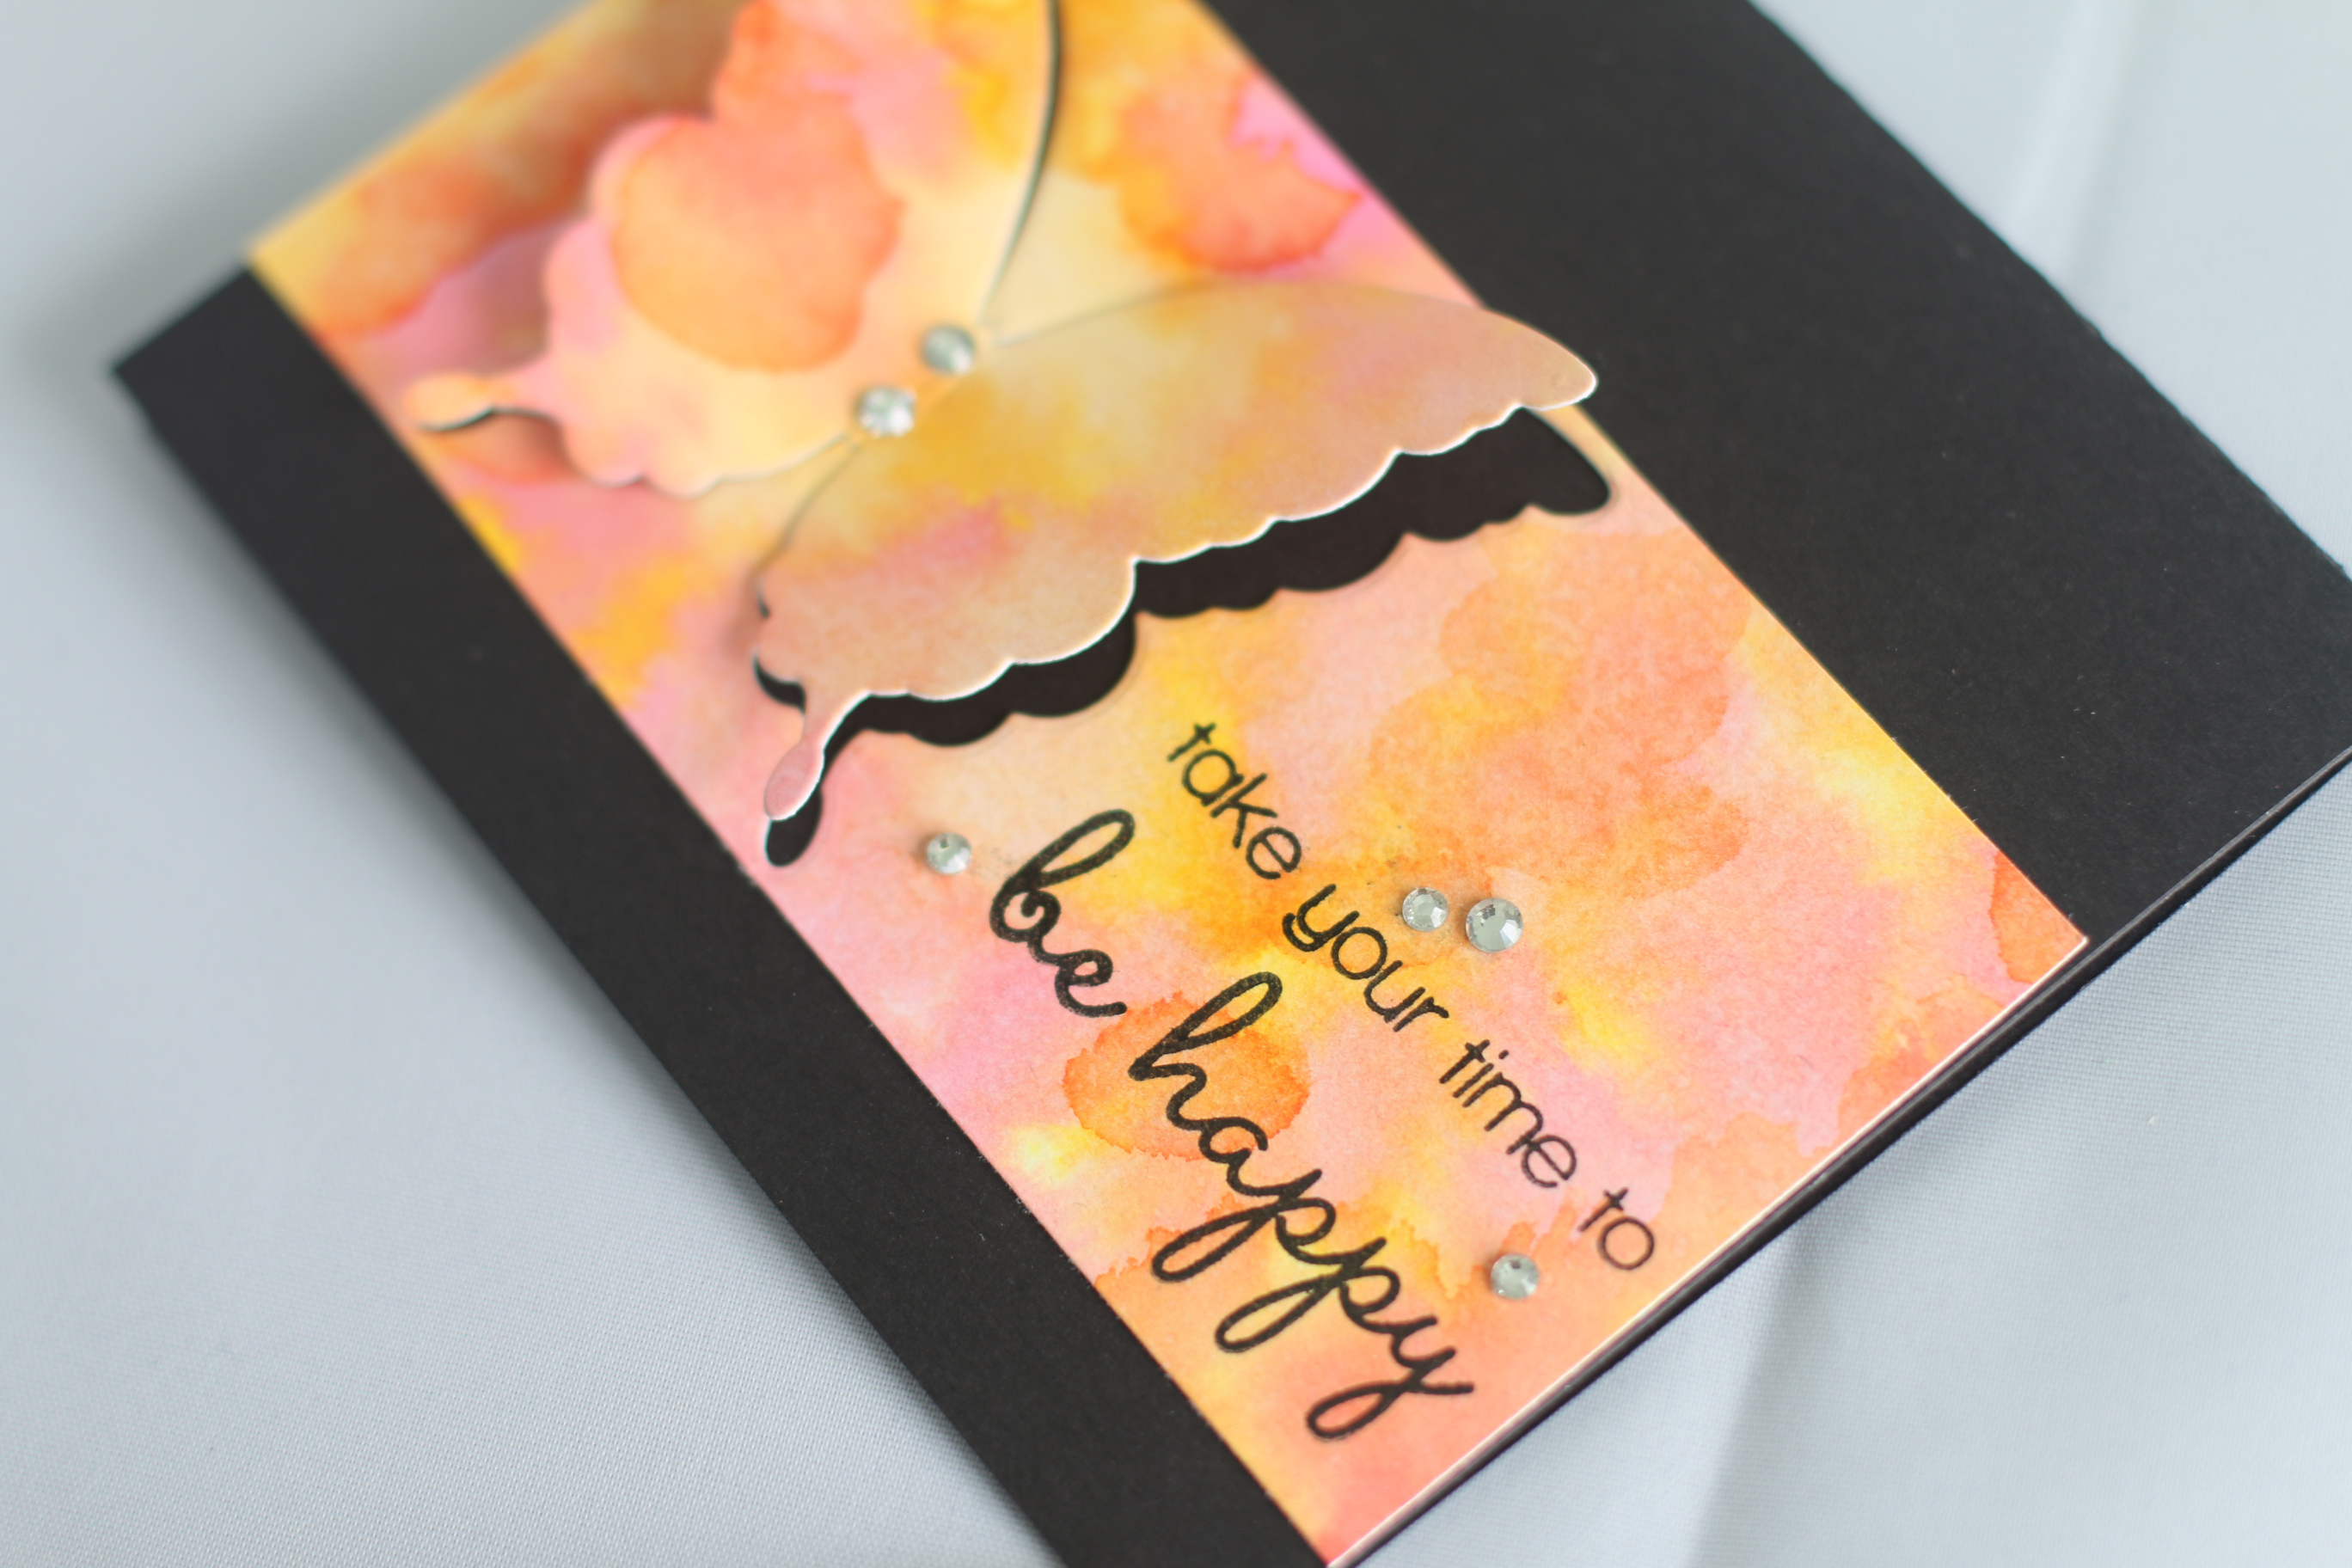
I decided to go with no-line watercoloring to color in my image.

Have a fabulous day 2

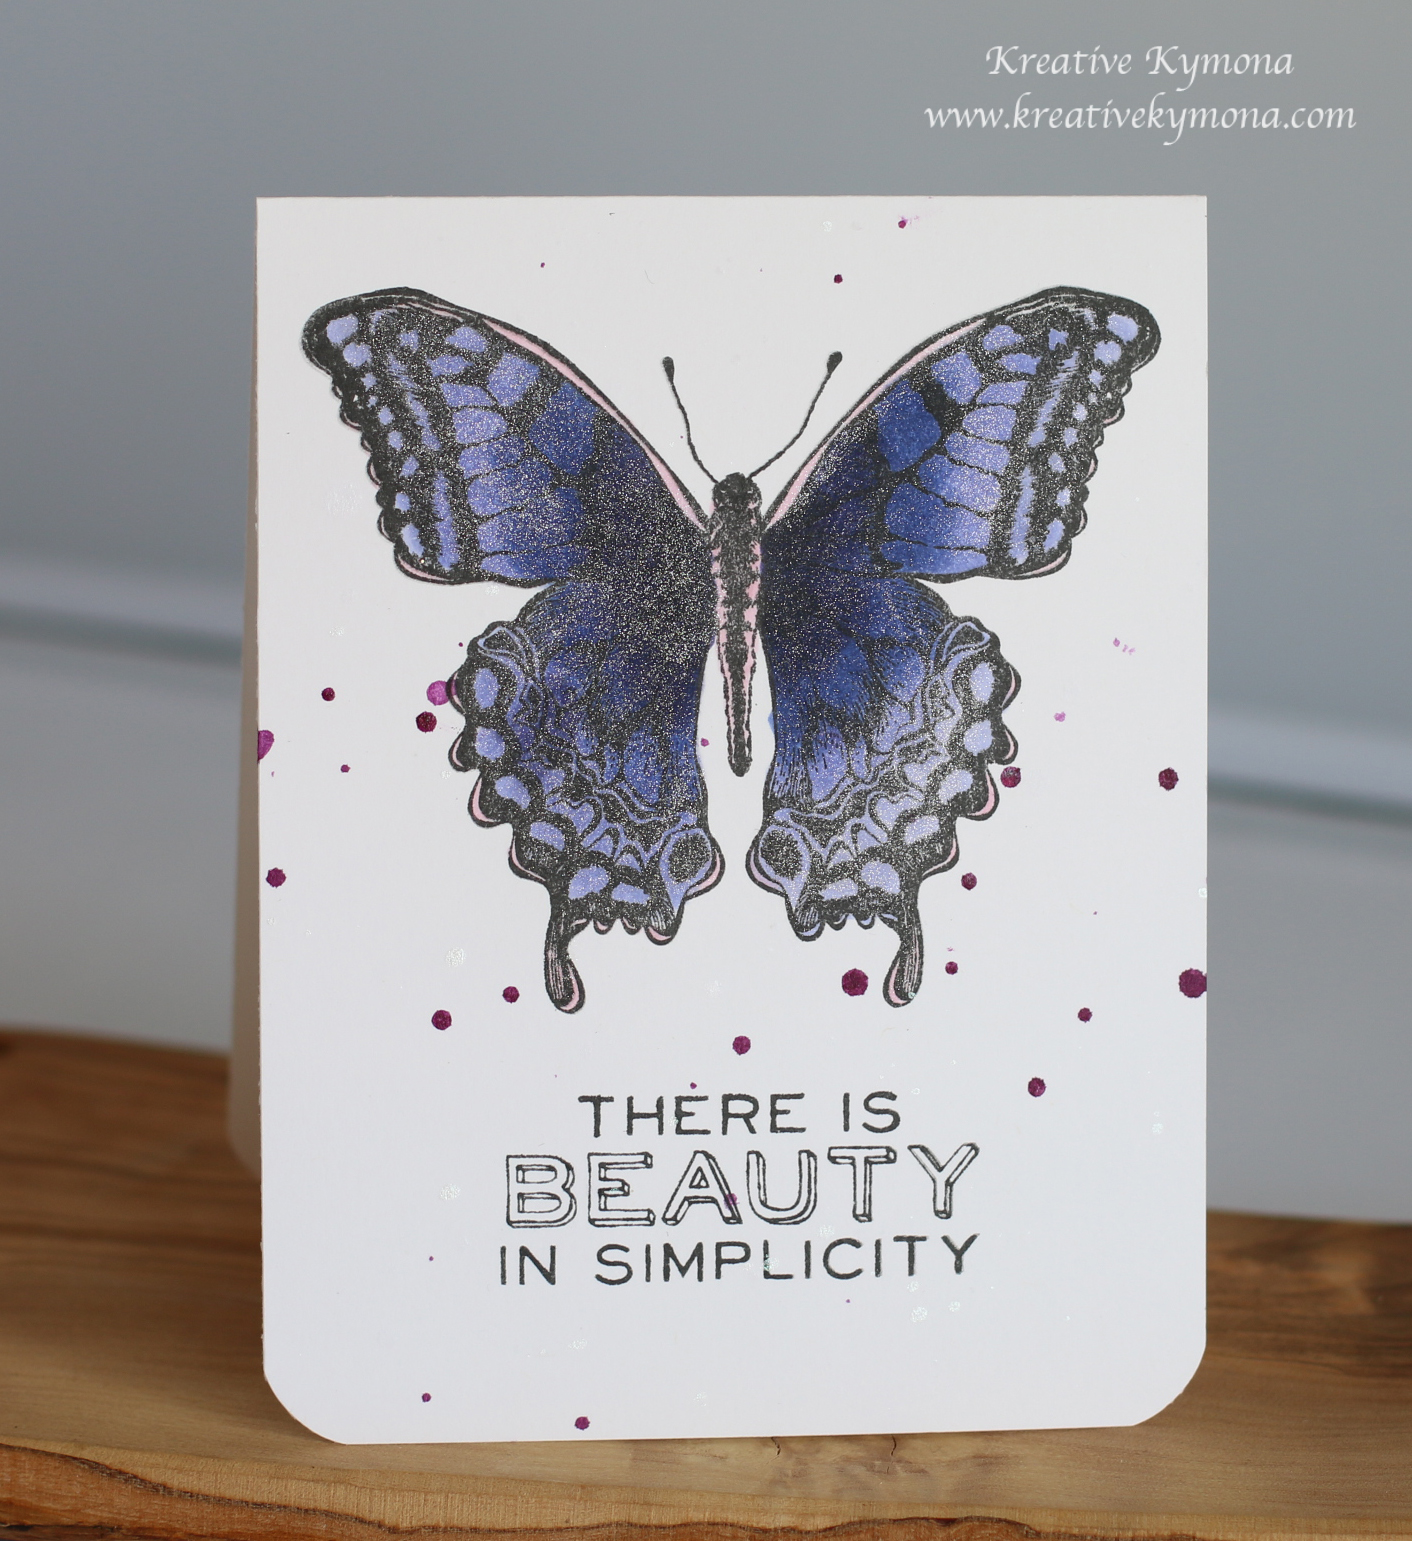
This card I created first and loved the butterfly but once I added the splatters  I wasn’t to sure about it!  I thought it was to much and it took away from my watercolor butterfly.

Have a fabulous day

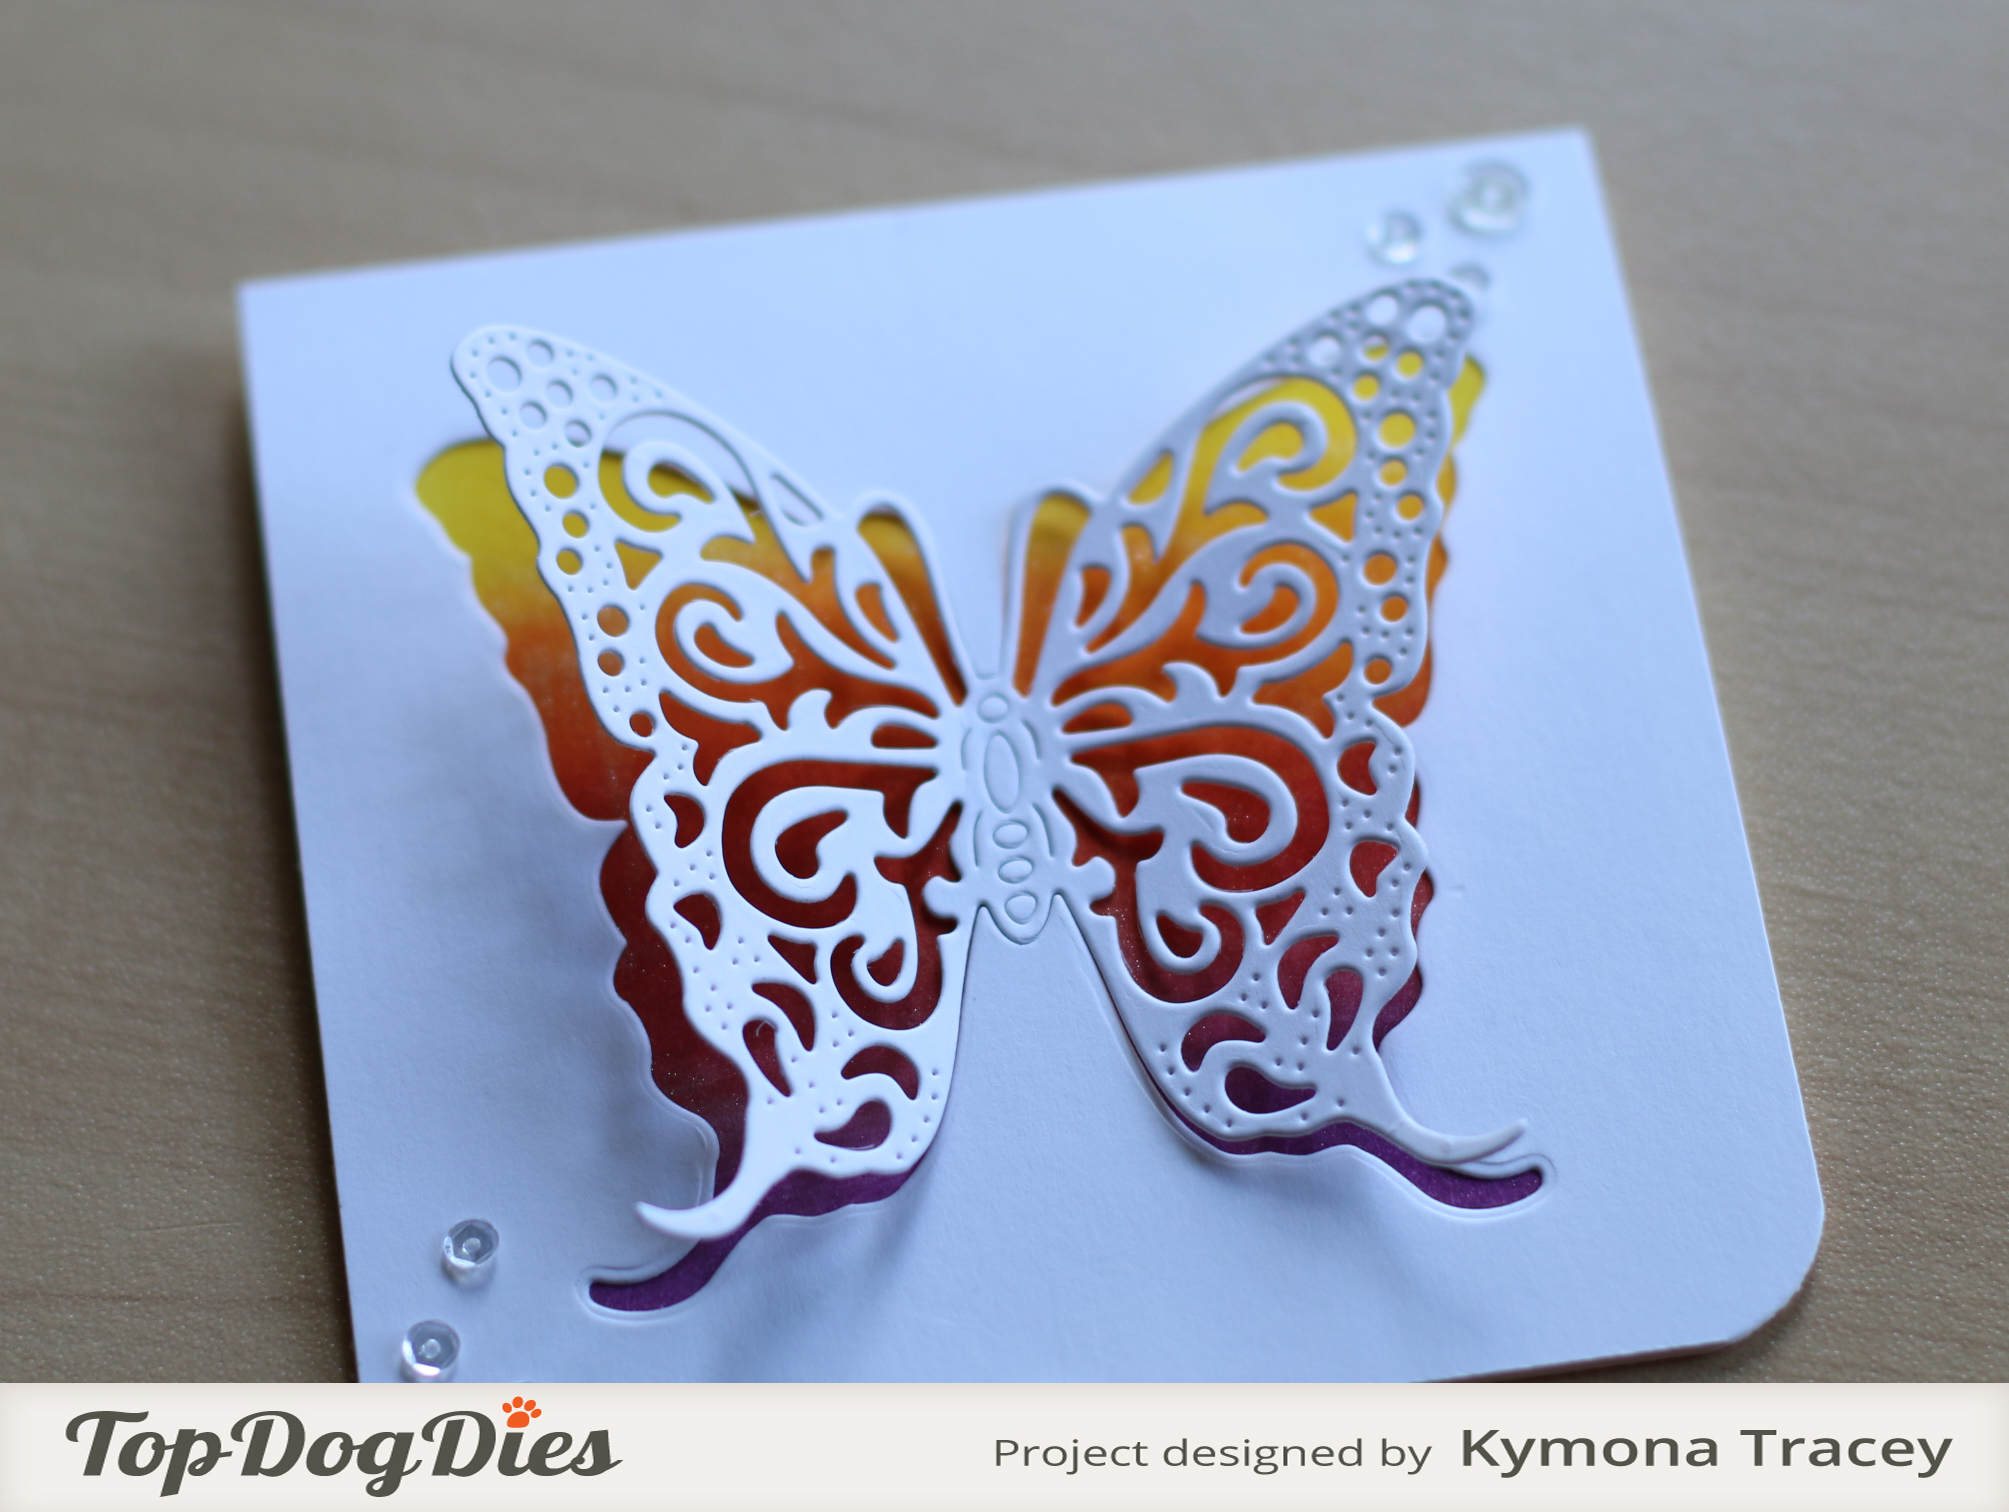
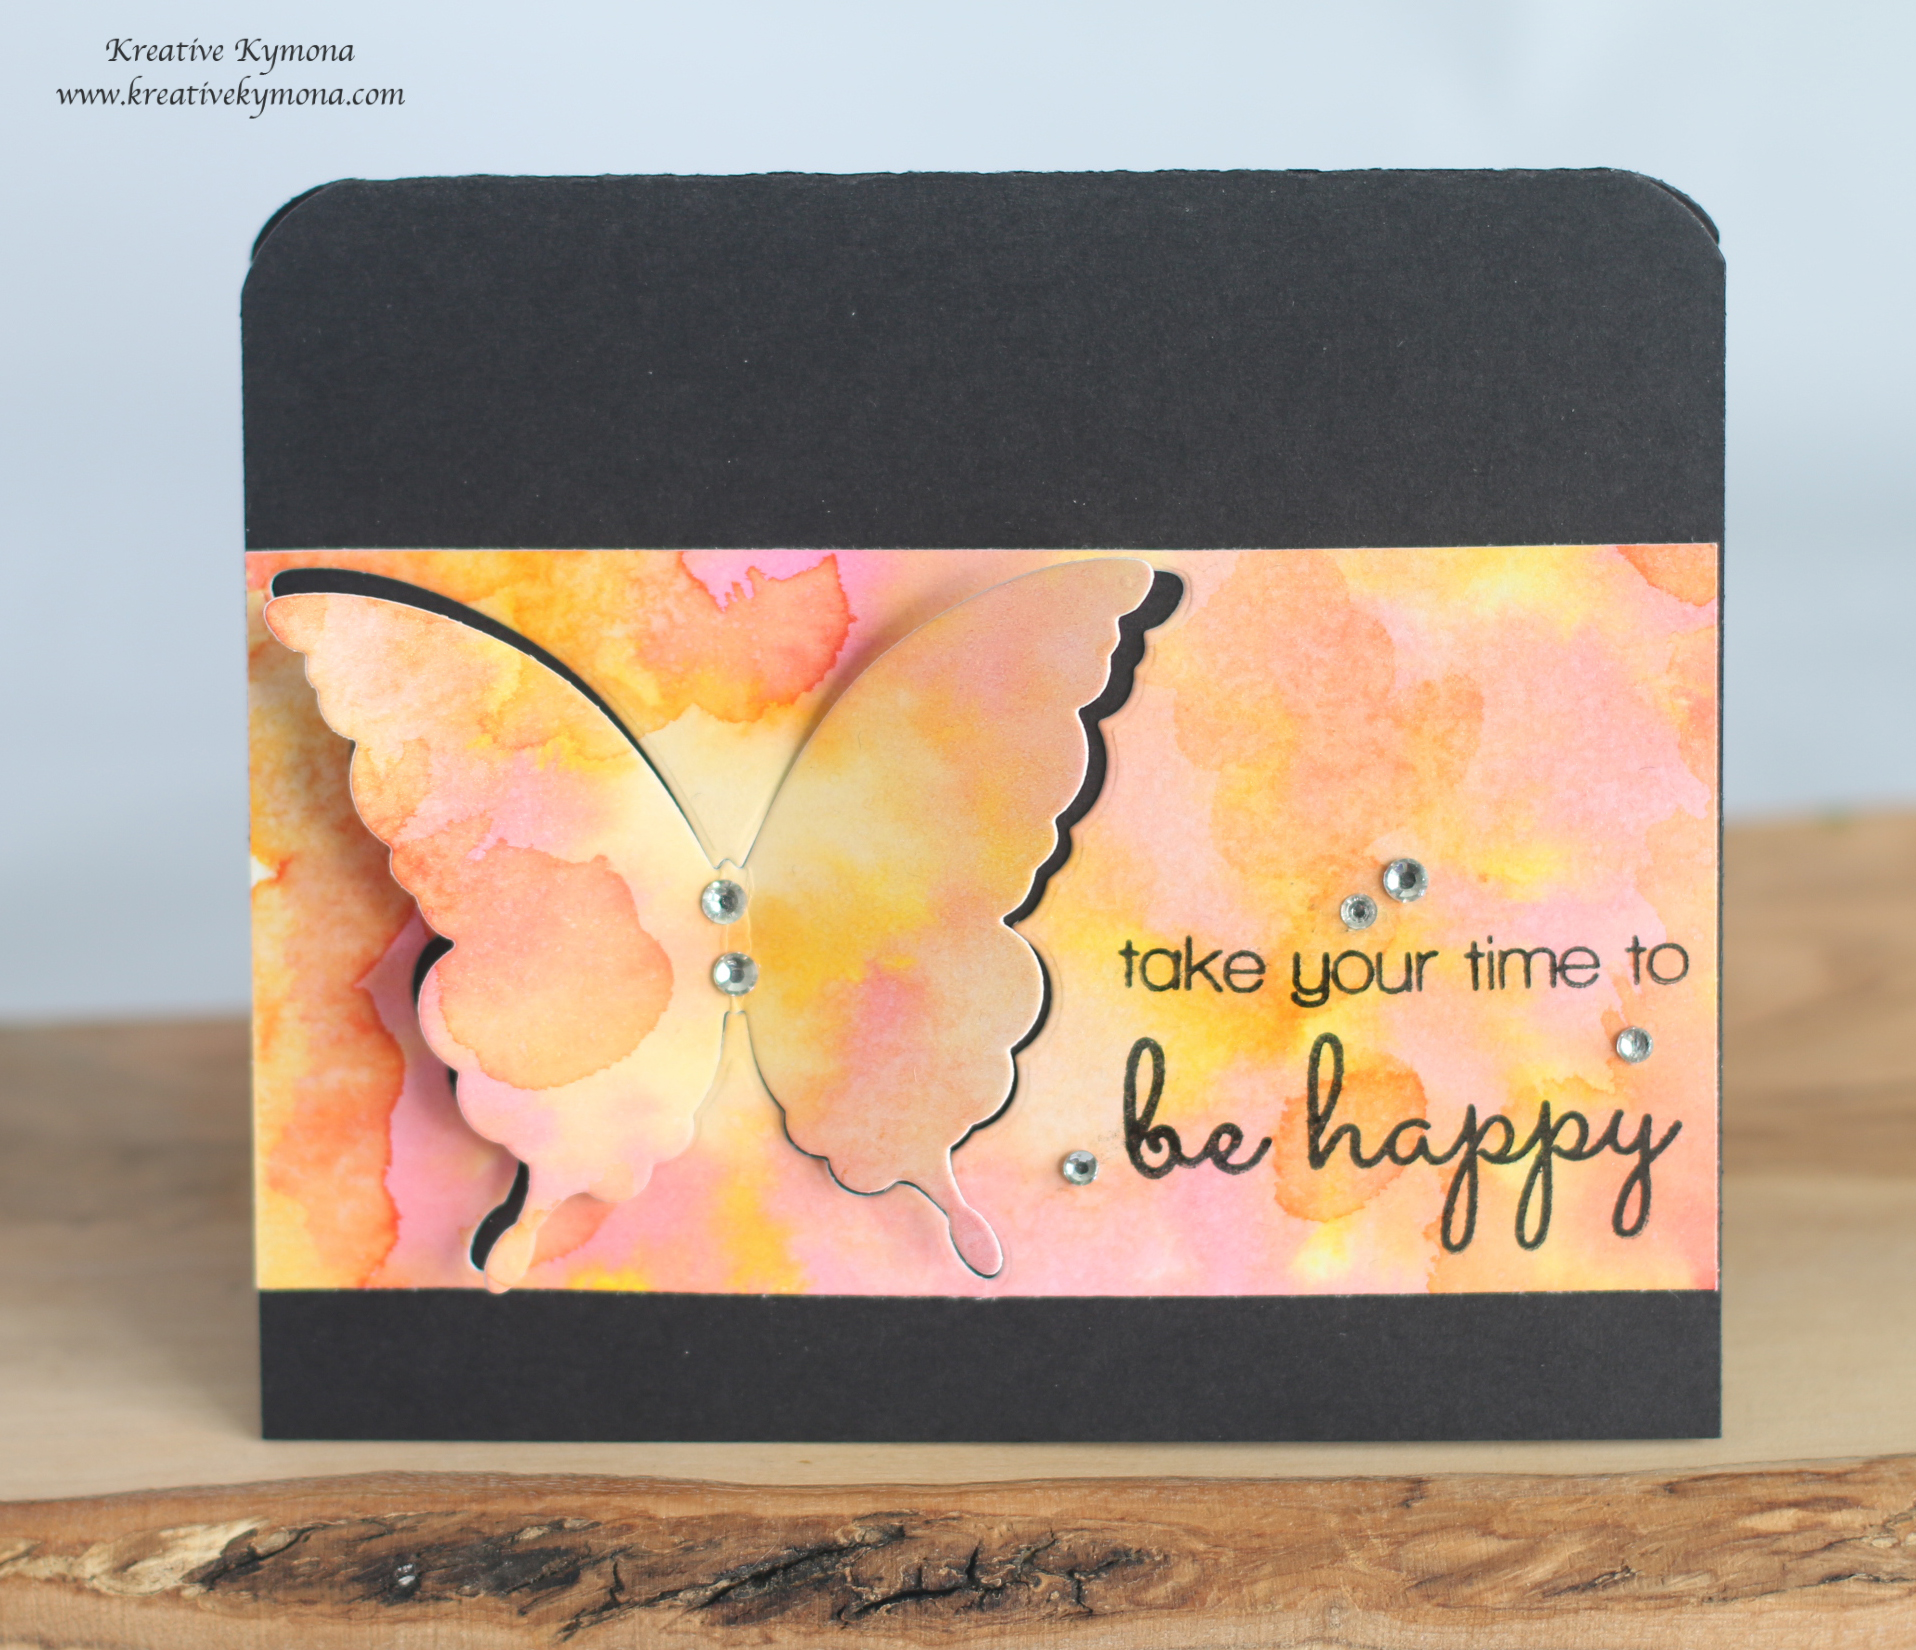
So I created this card with less splatter but the edges of the butterfly didn’t look as good as the first one.

I’m posting both so you can decided which one looks better.  My daughter and sister loves the first one better. What do you think?

I love how Dawn from WPlus9 watercolors so I watch her do this no-line coloring and decided to give it a try and I have to say I really like it.  It does take time but eventually I got it, I hope, LOL.

To create this card was simple:

I used the new Hero Arts Butterfly Stamp and Cut to stamp my image in a very light link.  I used Distress Ink Antique Linen.

Then I added clean water to the inside of the butterfly so that my colors will move when I add them.

I used my new Kuretake Gansai Tambi Watercolor #50, #64 and #44 to produce the colors you see within the butterfly.

I used Versafine Onxy Black Ink and stamped the butterfly’s center body.  If you notice in the first image, I try to draw the antennas but that didn’t turn out to well. So I stamped right over it.

I used the same ink to stamp my sentiment from the same stamp set underneath my butterfly.

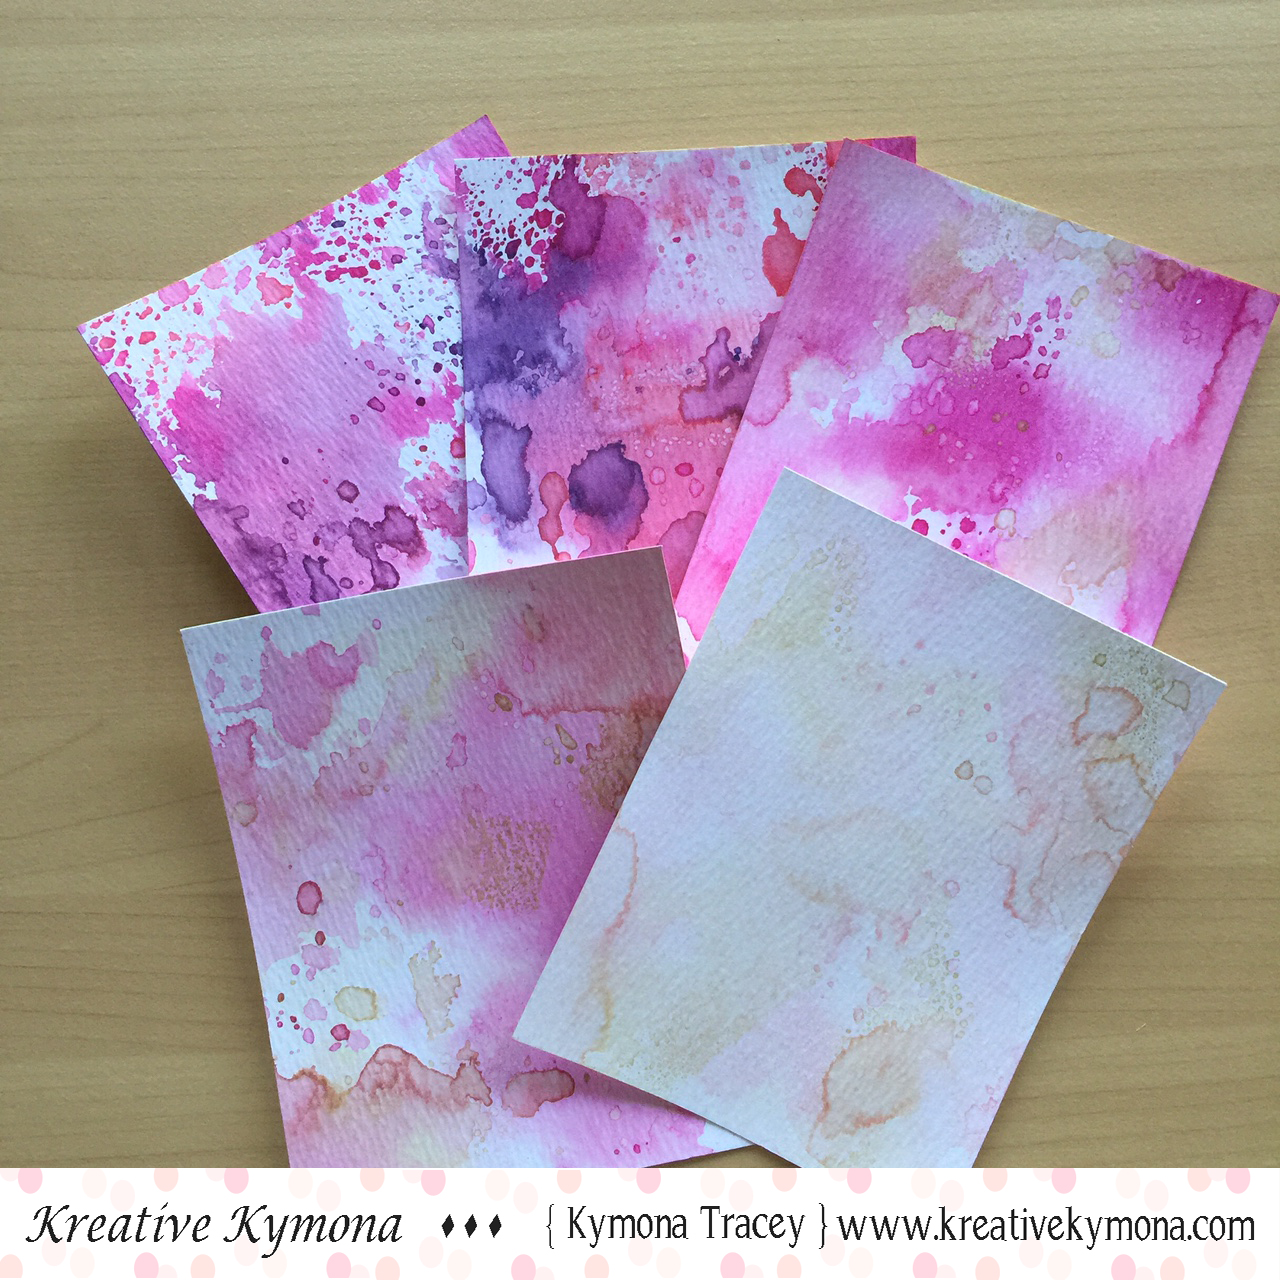
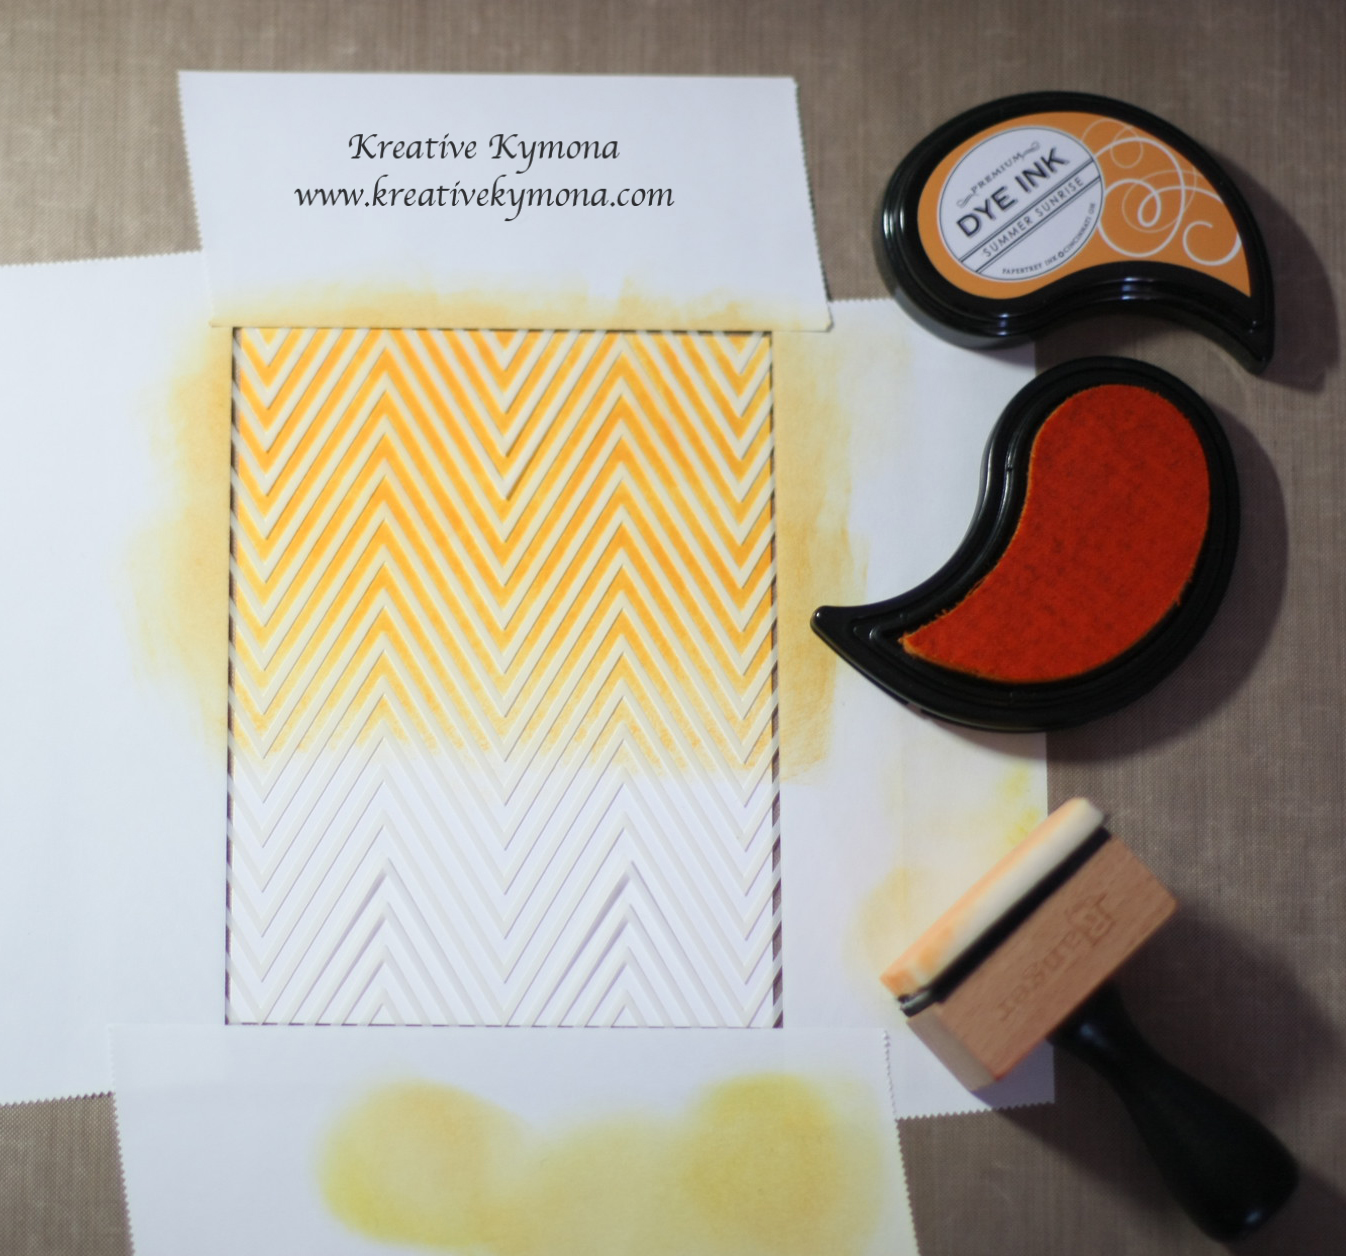
I added some of the different colors to my paintbrush and added splatters to my watercolor paper panel.

I trimmed that panel down and adhered it to my card base.

Easy Peasy!!

Now its your turn to give this Color It In theme a try!!

Amazing isn’t it!! I hope you love what you see and that it inspires you to join us this month. You have the entire month to create a new project and enter it into our challenge. By entering you will have a chance to win a $25 Gift Certificate to the a2z Scrapbooking Store. Winner will be announced on the 7th of April. Good Luck!

Some of the supplies I used can be found at the a2z Scrapbooking Store. If you would like to purchase any of the supplies I used please head on over to the store and use the coupon code KYMONA15 to get 15% off your purchase.

We can’t wait to see what you create!

I’m also entering my card into the Hero Arts Nature Challenge!

nature-challenge

Supplies used:

HA-DC134 Bazzill Cardstock Candy Necklace Kuretake Gansai Tambi WatercolorHero Arts Black InkWinsor & Newton Galeria BrushDistress ink Antique linenOnyx Versafine Ink

One more thing before I go, did you know that we are on Twitter, Instagram and Facebook?. If you haven’t done so already, please follow us on these different social media outlets!! You don’t want to miss out on any fun promotions!!

Thanks for stopping by!!

Kymona

Jamaican Butterfly…..

Hello everyone!!  I’m here with Muse Challenge #84.  This week Muse was Therese Calvird and I have to say her card is ABSOLUTELY Beautiful!

Take a look at Therese’s card:

Butterfly Triangles

When I say it I was taken back.  Her butterfly was so pretty and I love how she broke it up.

I still can’t figure how she did it.  It looks like embossing paste but how did she stamp on that.  Then I thought she stamped the image and then use her die cut to cut the panel.  That made more sense but still I was intrigued.

So I decided to to give this card a try.

On August 8th, 2014 I posted a picture of a Jamaican butterfly that I fell in love with on Instragram, wishing all Jamaican’s Happy Independence Day.  I also mentioned that that butterfly would be my next butterfly card inspiration.

Here is the picture of the butterfly:

201-314-PRODUCT-200Photo credit

Here is my card:

Jamaican Butterfly

Here is the card flat:

Jamaican Butterfly closeup

So how did I create this card?  Here you go:

1. I stamped Papertrey Ink Life is Beautiful large butterfly in Memento Tuxedo Black Ink on my Neenah Solar White card panel.

2. I colored the butterfly with Copic markers G28 and Y13.

3.  I used Papertrey Ink Stripes Horizontal Cover Plate and cut the card panel.

4. I used Papertrey Ink Wet Paint to stamp my sentiment on one of the horizontal die cuts.

5. I carefully placed the strip back in place but lifting some of them with foam adhesive.

6. I had a couple of Lawn Fawn Scripty Hello die cut already so I adhered two together for thickness.  I use glue and added it to the front of my card.

7. I added Clear Wink of Stella to the butterfly and the hello.

8. I added Pretty Pink Posh Clear Sequins and Stampin’ Up! Rhinestones to the card to spice it up.

So what do you think?  Did my card pass this Muse test?

Please let me know!

Supplies used:

Life is Beautiful Stamp Set Memento Black InkclassiccrestsolarwhtieCopic MarkersStripes Horizontal Cover Plate3M Mounting TapeScripty Hello Wet Paint Wink of Stella clearPretty Pink Posh clear Basic Rhinestones Jewel Accents


Life Is A Story…

Hello everyone!!  I’m here today playing with the Muse Challenge #81.  Today’s Muse is Marion Vagg and her card is absolutely gorgeous.

Take a look at her card:

IMG_3336.CR2Marion Vagg

When I saw this card, my mouth dropped.  I love the colors, the glitter, the butterfly just amazing.

I knew what I wanted to create.  I wanted my card to be similar but different.

I’m also playing along with CAS-UAL FRIDAYS Challenge Tic Tac Toe

cfc134

Chevrons, Black and Sequins is my Tic Tac Toe.

Take a look at my card:

Life is a Story

Can you tell how my card is different from Marion?

1. My butterfly is cut out of my stencil card panel.

2. The glitter is on my butterfly wings and not on the rest of the card.

3.  I decided to use only two colors but when blended it created a third color.

This is how I created this card:

1.  My card base is an A2 size card, 4.25 x 5.50 and my card panel measures 4 x 5.25.

     Semi Completed Stencil   Completed Stencil

2. I used Simon Says Stamp Zig Zag Stencil and Papertrey Ink Summer Sunrise and Hawaiian Shores Ink to create my stenciled panel.

This stencil is so delicate that you can’t rub the ink onto the stencil, you have to pounce it on the the stencil as to not break the stencil.

Life is a Story Sideview

3. I used my Memory Box Asti Butterfly Wings to partial die cut the butterfly wings out of my stenciled piece.

4. I used Papertrey Ink’s Building Block Sentiment Stamp Set to stamp “Life Is A Story” on a piece of black card stock.

5. I used Stampin’ Up! Bitty Banners Framelits to cut out a banner out of my sentiment.

6. I used foam adhesive to add my banner to the front of my stenciled panel.

Life is a Story close up

Life is a Story glitter wings

7. I added Clear Wink of Stella to the butterfly wings for some sparkle and Doodlebug Beetle Black Sprinkles in the center of the butterfly wings.

That’s my card for today.  What do you think?

This just in:

A friend of mines notified me today that a good friend of hers daughter past away this weekend.  The little girl whose name is Katy was only 6 years old.  She was dealing with a bad heart.  I can’t image how her parents are feeling.  I’m a mom of 2 and they are my life-line. 

I’m going to send this card to her parents and brother, with hopes of lifting their spirits.  Life is a story and they have one to tell.  For me the butterfly symbolizes hope and that Katy is in a better place, no more pain or surgeries.  Please keep them in your prayers and if you want to send them a card too let me know!

Supplies used:

Zig Zag StencilPTI Summer Sunrise InkHawaiian ShoresBlending toolMemory Box Asti Butterfly Wings3M Mounting TapeDoodlebug Beetle Black Sprinklesclassiccrestsolarwhtie

Thanks for stopping by!

~Kymona

Who Are You Thinking Of?

Hello everyone!! First let me begin by saying THANK YOU to all of the ladies over at CAS(E) this Sketch!

I received Honorable Mention for the card that I made last week for their challenge.  How neat is that!! If you missed the card, check out the mention here.

The card I create was a cute one, I must say.  The winner Semee, her card is truly amazing and her win was well deserved.  I might have to CASE her card.  I have to ask her. (I just did, waiting for a response, LOL).

Now on to the matter at hand.

I’m here with CAS(E) this Sketch #86.  Today sketch was done by Sam Simpson.  Its simple and pretty.

CTS_86

Here is my card:

Thinking Of You

The strip of pattern paper is from Bo Bunny which was in my Simon Says Stamp August Card Kit.

I used Papertrey Ink’s Life is Beautiful Die set to cut my butterfly out of Simon Says Stamp Cardstock that came in the August Card Kit, Sunshine and Orange Peel.

I used Papertrey Ink’s Keep It Simple: Thinking of You Mini Stamp set to stamp my sentiment three times with Papertrey Ink’s Summer Sunrise Ink Pad.

For the add touch I added Stampin’ Up! rhinestone to the butterfly wings.

What do you think?  Let me know.


Supplies used:

Bo BunnyLife is Beautiful DieSSS Sunshine CSSSS Orange PeelPTI Summer Sunrise InkKeep It Simple- Thinking of You MiniBasic Rhinestones Jewel Accents

Thank you for stopping by.

~Kymona