Clean and Simple 4 – Day 1

Hello everyone!!  I’m here today with my first homework project from the new Online Card Class – Clean and Simple 4!!

Before I show you what I created, let me just say I LOVE these classes.  I learn so much from all of the instructors.  Its unbelievable.

Day 1 we learned about:

1. Heat Embossing and Masking

2. 3D Embossing

3. Faux Ceramic Titles

Did your jaw drop?  Yes, it should.  Amazing, Amazing stuff. I can’t wait to share all of it with you.


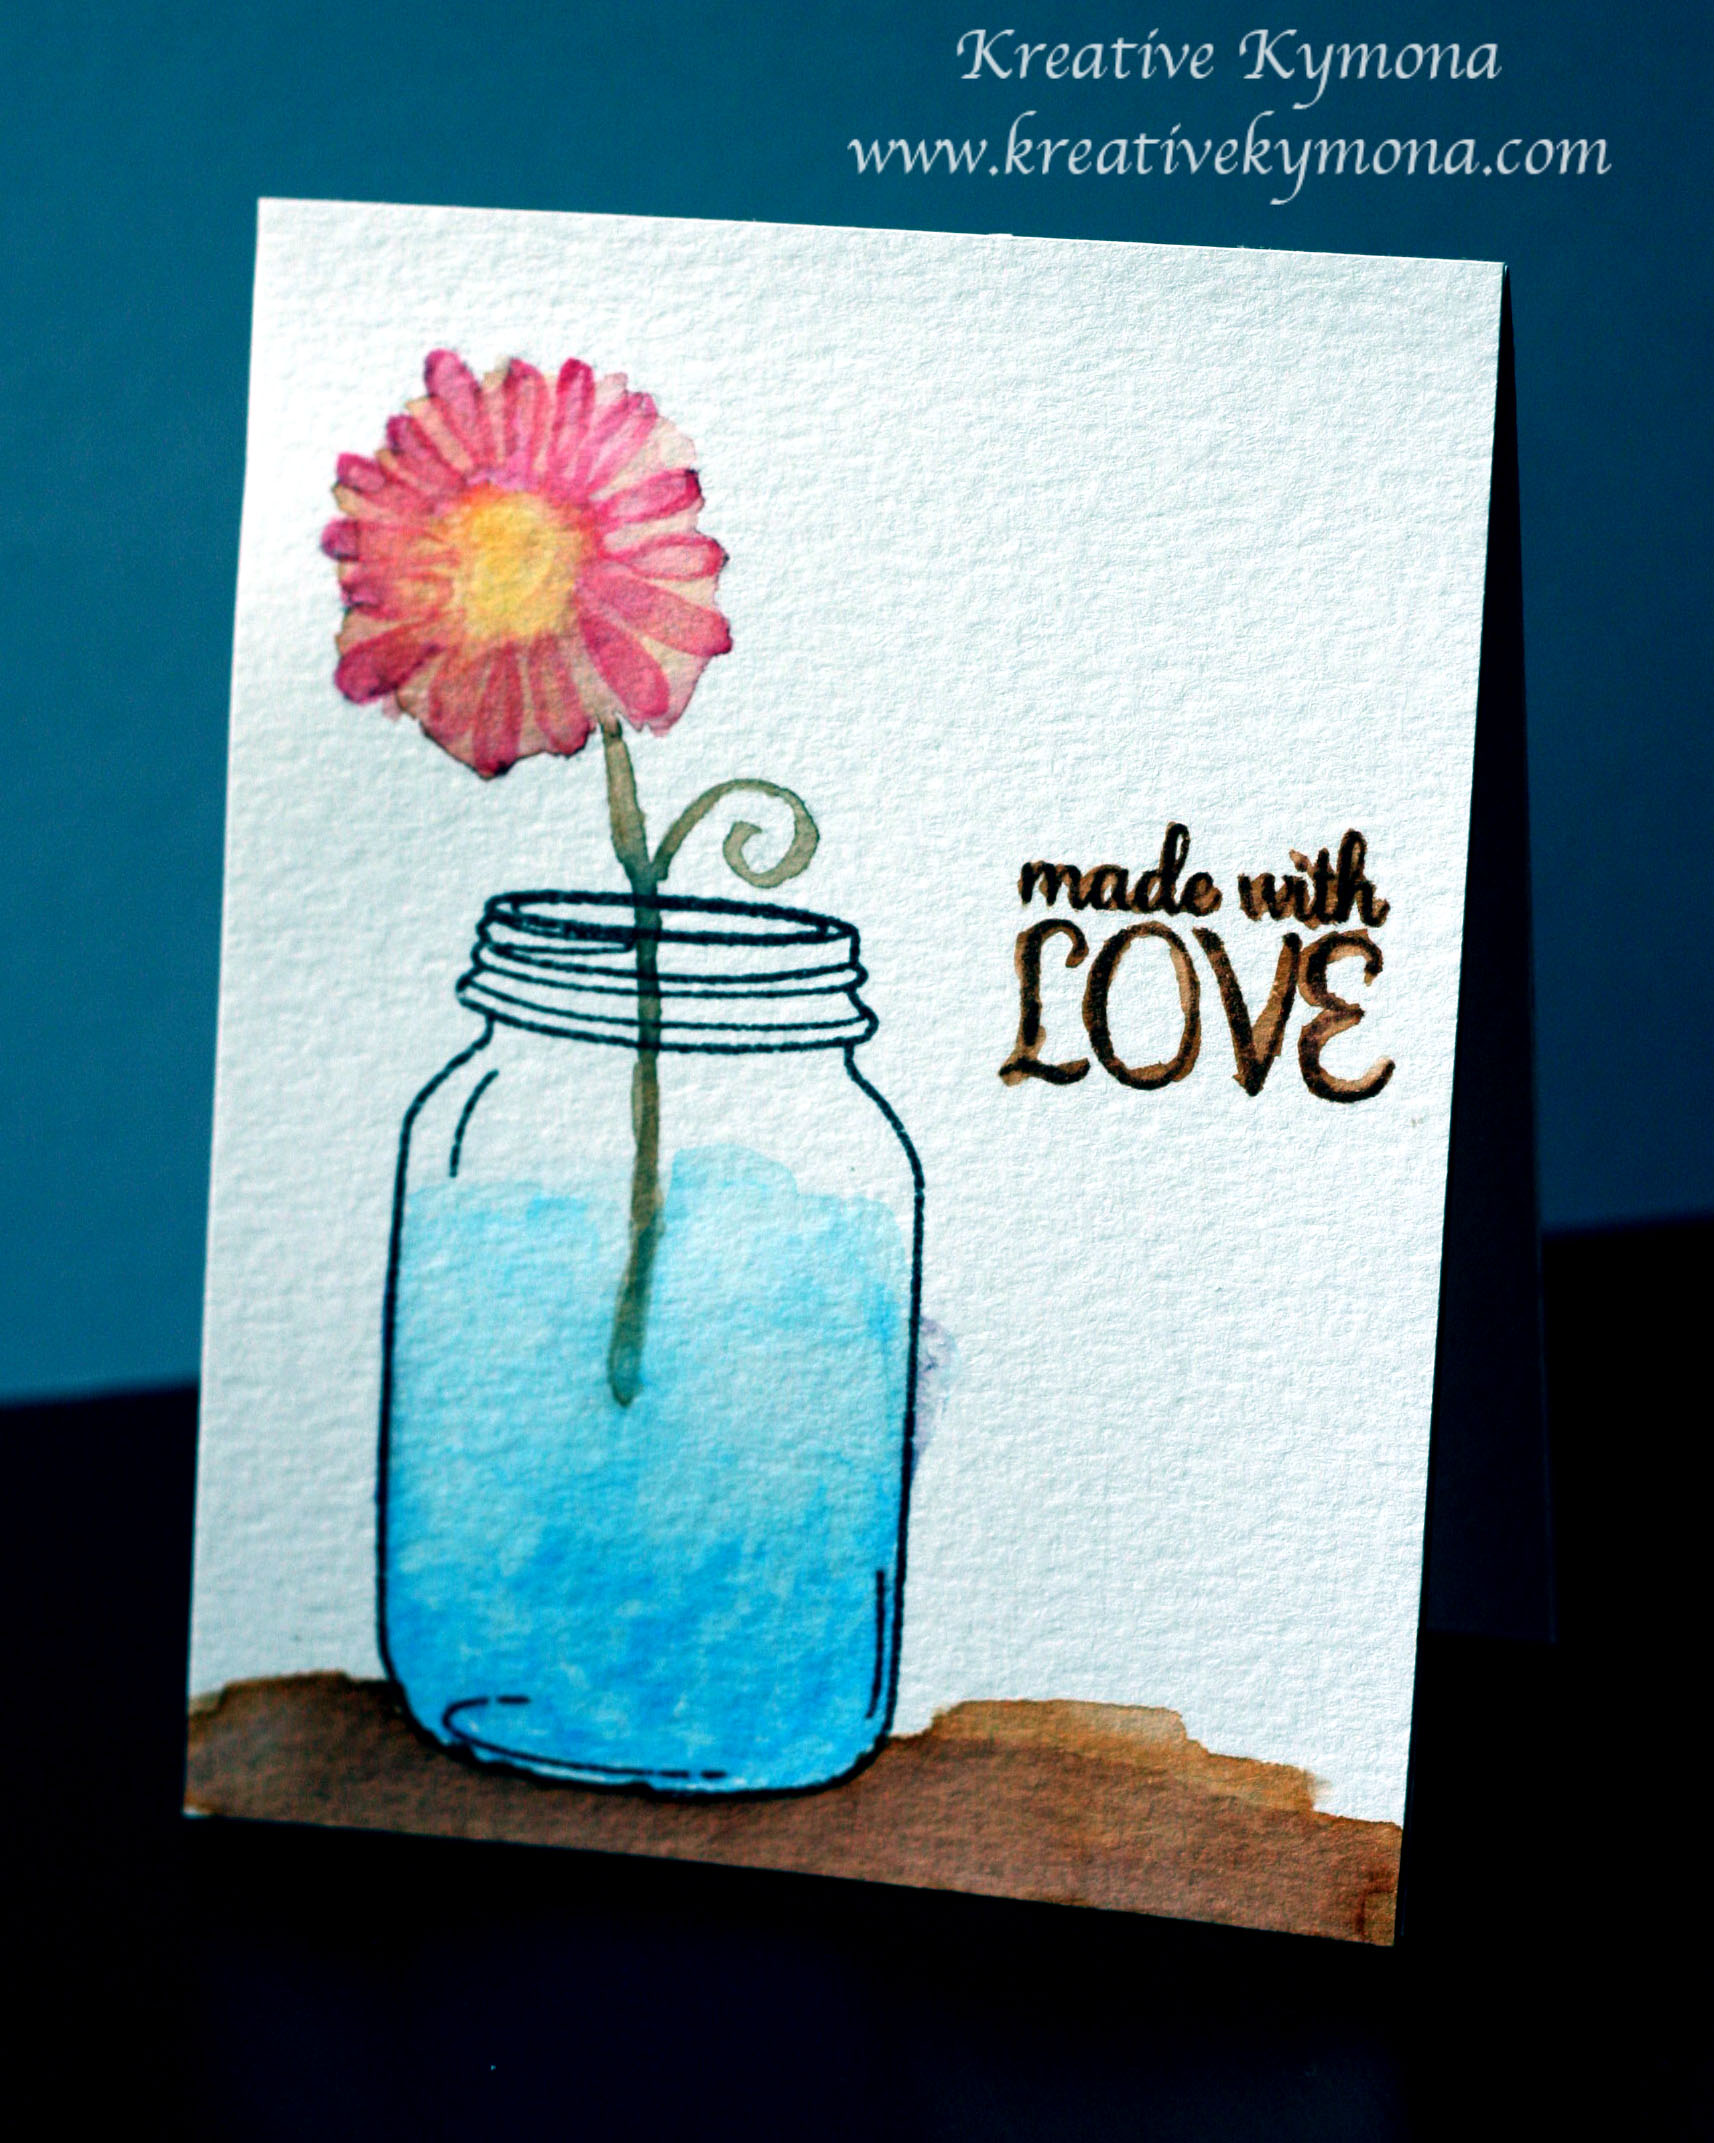
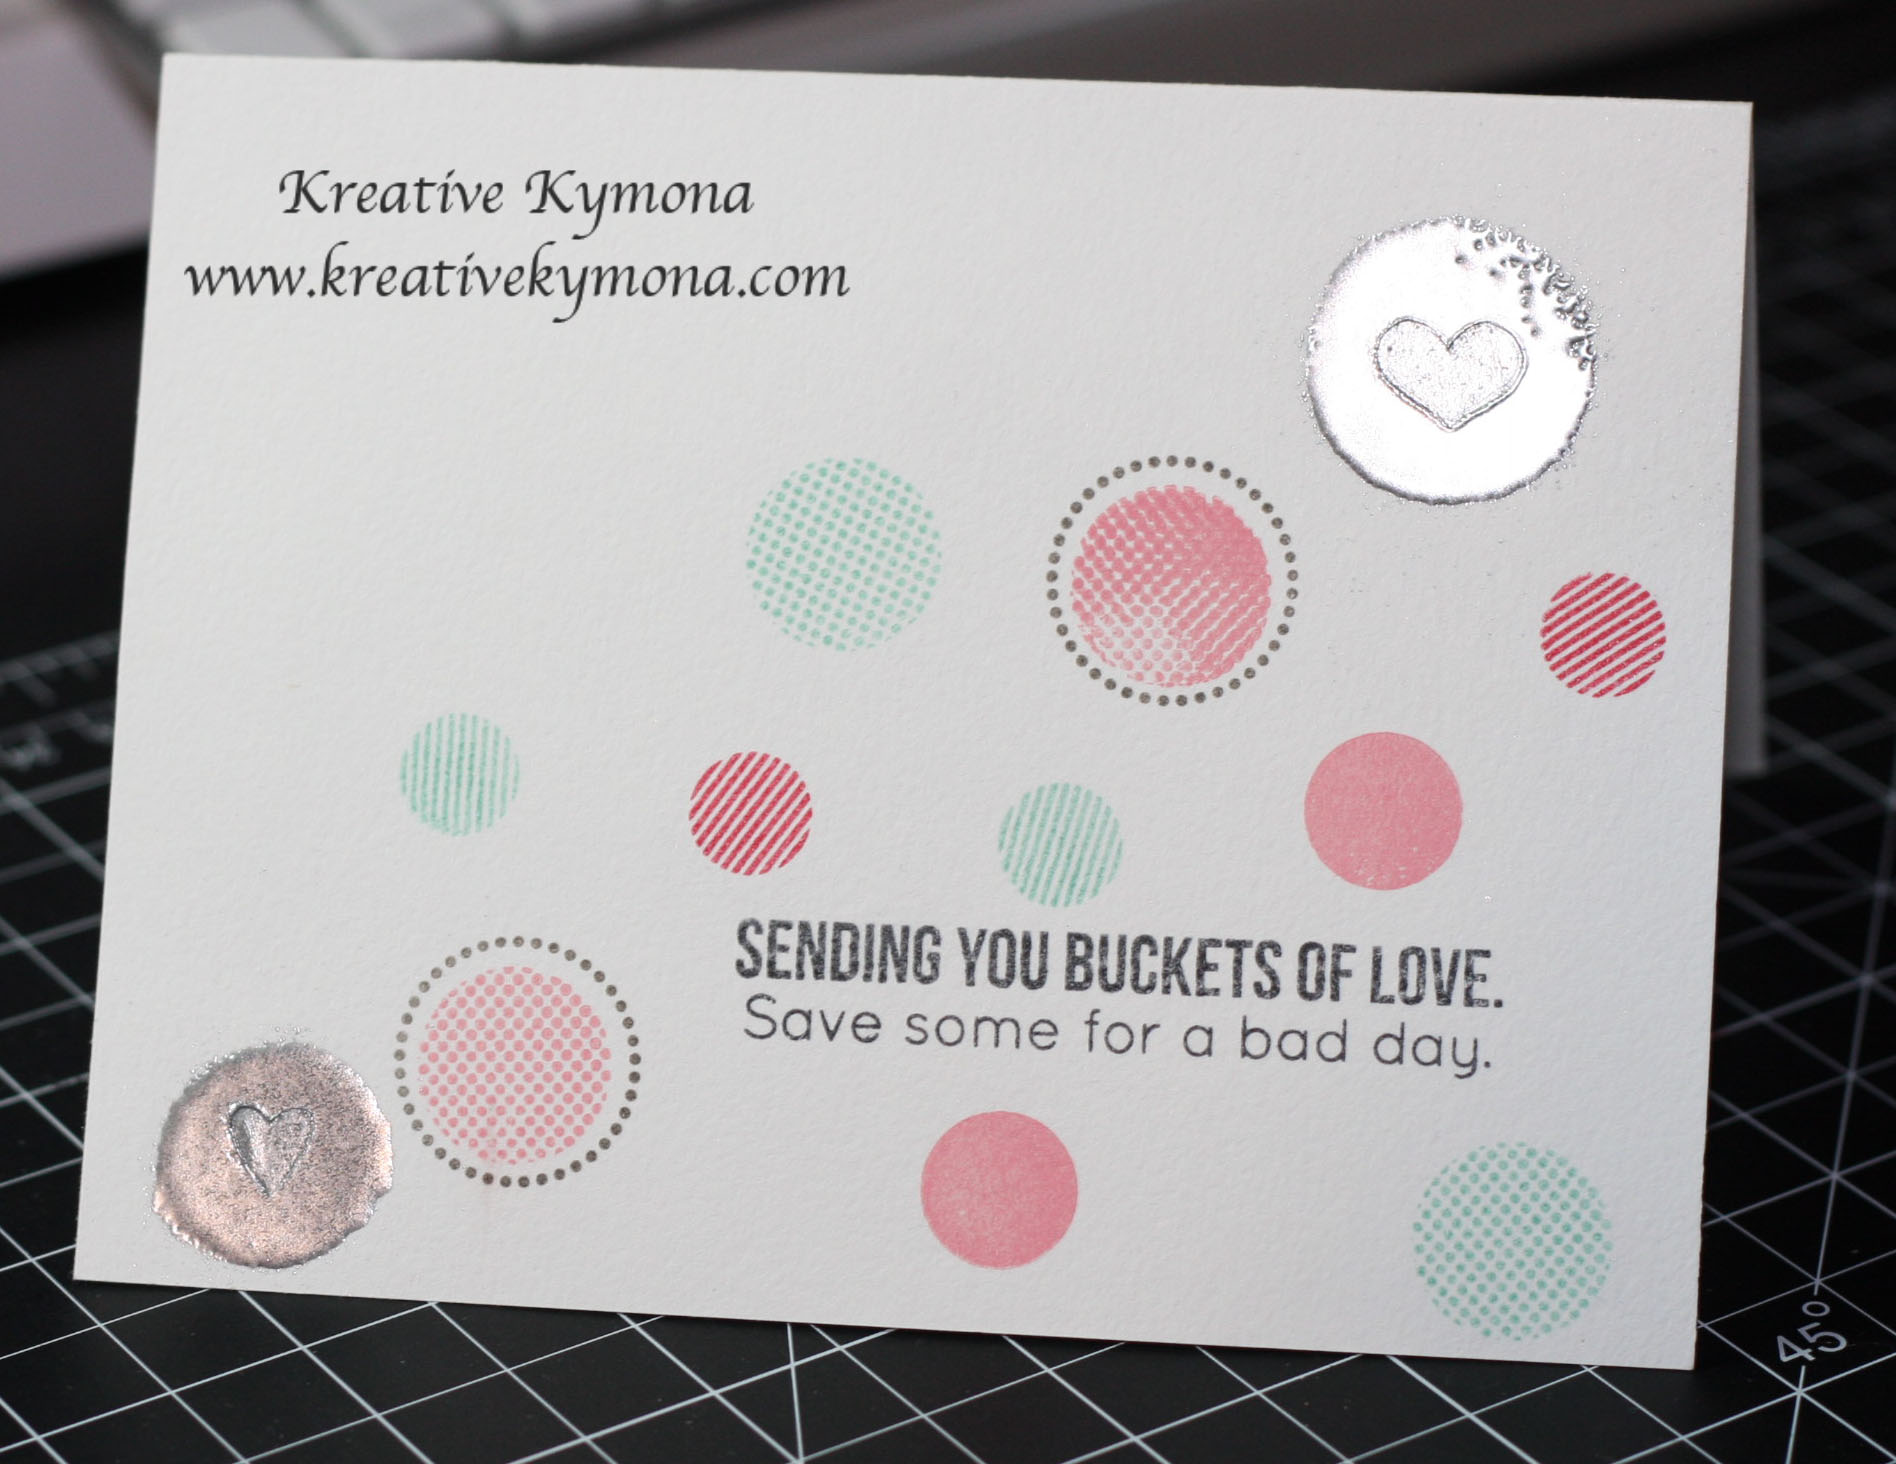
My card today showcases Heat Embossing and Masking!  The talented Jennifer McGuire taught us how to combine simple masking and stamping with powders to create unique backgrounds that will really add pop to a clean and simple design.

Take a look at my card:

OCC Embossed Love

Amazing right!! Just some pop of color turned this simple card to Wow!! simple card.

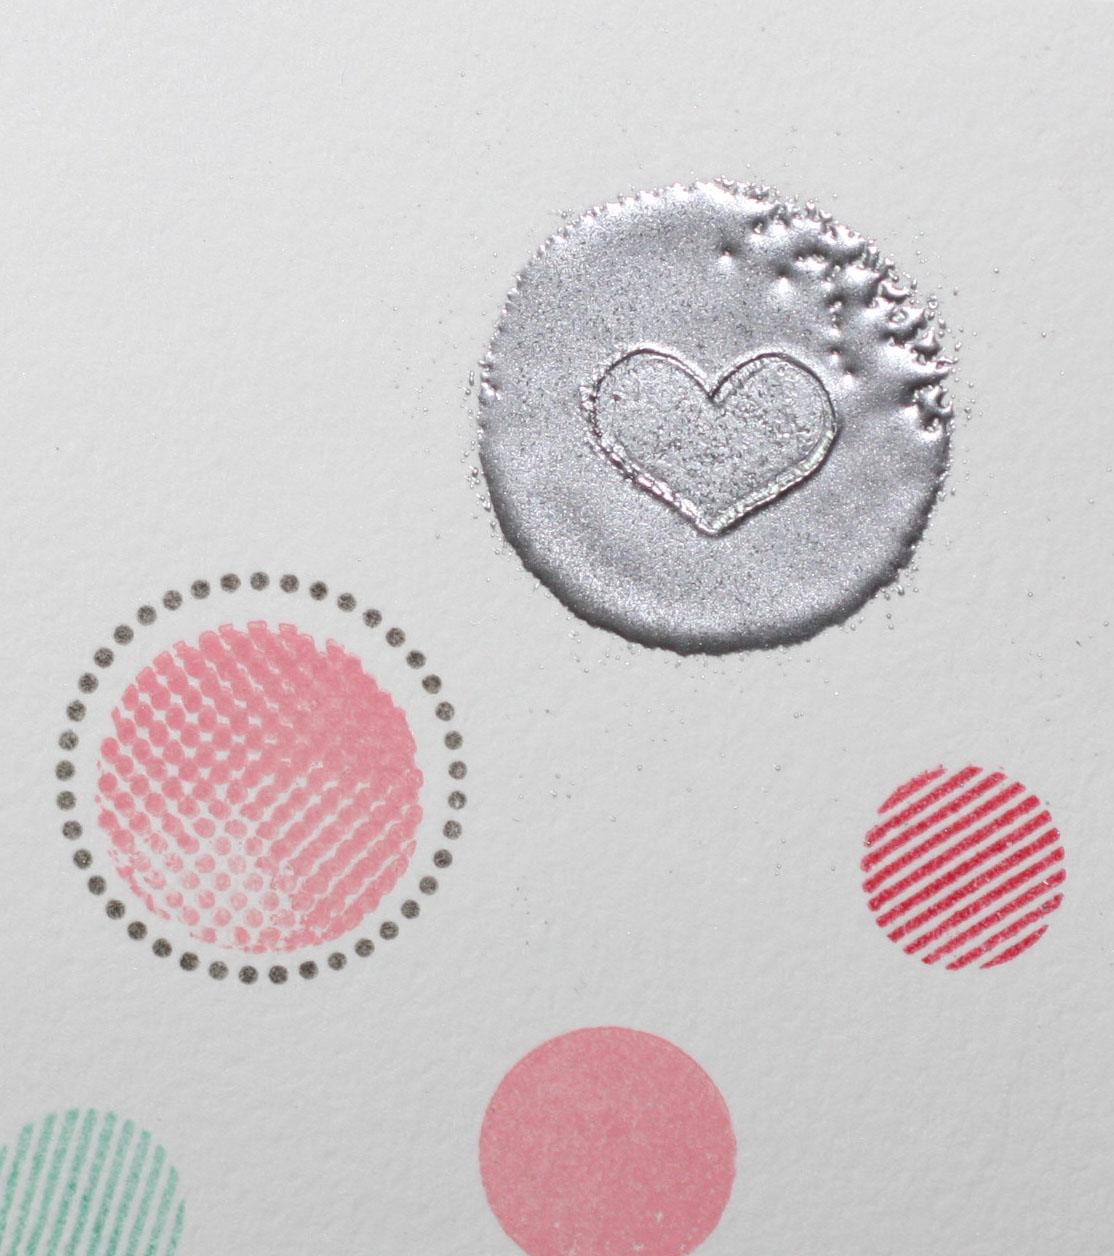
Here is a closer look:

OCC Embossed Love 2

Here you can see the white emboss pattern that follows evenly across the card.  Amazing what masking can really do!!

I will be back with more cards from Day 1 class!!

FYI –  a2z Scrapbooking Store has all of your Hero Arts needs.  The best part is, I have a coupon for you to use.  Use KYMONA15 to get 15% off your totally purchase.

Jennifer used a Hero Arts Basic Grey Bold Flower Pattern Background Cling Stamp on her card, that I love but didn’t have. So I ordered it from a2z Scrapbooking and you can too.

Hero Arts Bold Flower Pattern

Supplies used:

Hero Arts Highline Ironwork LF Scripty Love Hero Arts White Embossing PowderHero Arts Snow Layering Paper Hero Arts Black Layering Paper

Thanks for stopping by!

~Kymona


Top Dog Die: Love on The Horizon

Hello everyone!!  I’m here today with Top Dog Dies with another Valentine’s day card for you!

Love will be in in the air soon and I hope your getting ready for the ones you love.  If not, I have a really cute card that is super easy to make for those loved ones.

Take a look at my card:

I Love You frontview(TDD)

Aren’t these cats the cutest you’ve seen!!!  When I saw this die, I knew I wanted them to close together looking out to something.

The male cat wasn’t sure how to tell the female cat “I love you” so he decided to have it written in the sky for her to read it herself!!

I love the ombre effect in the background!

Lets take a closer look:

I Love You (TDD)

Check out the glitter on my die cuts letters and heart shape.

I Love you sideview (TDD)

Check out this side view, so you can see the scalloped edge of the heart on the inside of the card.

So you want to know how I created this card?  Here you go:

1. I used Neenah Solar White cardstock for my card base.  I use Top Dog Dies Heart Doily Die to cut out the heart on the front of my card.

2. I created my own heart stencil out of acetate so that I can create a perfect heart ombre effect on the inside of the card.

3. I used Distress Ink Picked Raspberry and Spun Sugar to create the ombre effect on the inside of the card.

4. I cut the letter and shape from Top Dog Dies Heart Mini Album Finishers Die Set out of black cardstock.

5. I adhered it on the inside of my card and added Clear Wink of Stella for the sparkle.

6. I die cut my cats from Top Dog Dies Cool Cats Die Set out of black cardstock.

7. I adhered the cats with regular adhesive.

That’s it!! So what do you think?  I love how the cats are looking at the horizon together.  Beautiful!!

I would love to hear what you think.

Before I go, Top Dog Dies has a Little B Giveaway going one right now. One lucky Winner will receive $113 in Little B Crafting Products.

littleb_promo_150106

You have 3 chances to win. Enter by January 25, 2015!! Check out Little B Dies here.

Supplies used:

classiccrestsolarwhtieTDD Heart Doily DiePicked Raspberry InkSpun Sugar InkMini Ink Blending ToolTDD Heart Mini Album Finisher Die SetWink of Stella clearTDD Cool Cats Die Set

Thanks for stopping by!!

~Kymona

Sending Love Your Way…

Hello everyone!!! I’m here today with the new DoubleClick Skittles Challenge!!

This weeks challenge is Something New!! With the new year coming, this theme is so fitting.

I used new goodies to create my card.  I love how it turned out.

Take a look:

Sending Love your way

Don’t you just love the vintage look that this card has?

Here is a list of all the new goodies that I used to create this card:

1. Waffle Flower Holiday Labels – Give Thanks Set

2. Waffle Flower Holiday Label 1 Die

3. Bo Bunny Pop Quiz Pattern Paper

This card was super easy to create.

Here is how:

1. I cut my card base to an A2 size (4.25 x 5.50)

2. I cut 1/2″ strips of pattern paper and adhered them next to each other.

3. I inked the edge of my card with distress ink for a vintage look.

4. I wrapped linen thread around the card and tied a bow on the front of the card.

5. I stamped my sentiment with black ink and die cut it with my label die cut.

6. I adhered the label with foam adhesive.

7. I added Sunshine Yellow Skittles to finish off my card.

I totally love this card.  Such a non-traditional valentines day card.

What do you think about my card?  Please let me know.  I would love to hear from you.

Now its your turn to join us and play along with our challenge this week. 

I hope to see you there.

I’m also linking this card to Waffle Flower’s Anything Goes Challenge.

IMG_0168-0

I’m also linking this card to Simon Says Stamps Anything Goes Challenge.

wednesdayblog-logo

Supplies used:

Holiday Label1 Die Holiday Labels Give Thanks Stamp Set Bo Bunny Pop Quiz Paper Pad Sunshine Yellow Skittles Neenah Desert Storm CS Linen threadWalnut Stain

Thanks for stopping by!

~Kymona

Smile, I Love You!

Hello everyone!!  I’m here today with CAS(E) this Sketch #101 and only have a couple of hours to get my card in before it closes.  Why do I put myself under soooo much pressure?  I seem to think, that my best work comes from stressful situations, LOL.  That’s my excuse and I’m sticking to it.

CTS_101

The guest designer this week is Anita and she did a great job with this one.  I hope my card measures up.

I’m also entering the Waffle Flower Anything Goes Challenge for the first time.

IMG_0168.JPG

Take a look at my card:

Smile I love you

So what do you thing?  Did I past?  Do you agree that I work best under pressure?

I wanted to make sure I stuck to her design from the sketch to the pop of color in my flower.

My original thought was to create a tag using my new Waffle Flower: Flower Circle Die, but I couldn’t figure out how to do it.  So I just added the flower cut pieces to the front of my card.

I then stamped my sentiment from Craftin Desert Divas Say It Big stamp set, in the center of the flower.  Then I decided to add another sentiment from the same set under the flower.  Both sentiments just seem to fit perfectly.

I added some Pretty Pink Posh 6mm Sparkling Sequins and 4mm Sparkling Sequins and Clear Wink of Stella on the flower and sentiments.

I rounded the corners and decided that my card was done.

So, what do you think?  Let me know below what you think.  After I completed the card, I realized that I could have made the card a shaker card.  Next time!!

Supplies used:

Waffle Flower Flower Circles Die New Say It Big Pretty Pink Posh 6mm Sequins Pretty Pink Posh Sequins 4mm Wink of Stella clearMemento Black InkSweater Weather Petite Paper Pack

Thanks for stopping by!

~Kymona

Who Do You Feel Strongly About?

Hello everyone!  I’m here today with Casology week 104.  The Cue Card is Pet!! I’m also linking this card to Addicted to Stamps and their challenge is CLEAN AND SIMPLE (CAS).

Week 104 - Pet

Addicted to Stamps

When I first saw the word I immediately thought of a pet animal.  I figured everyone would choose that so I decided to look up the meaning of the word “pet” to see what else it means.

I decided to go with pet as an adjective: to feel particularly strongly about someone or something.

Take a look at my card:

Love you with heartss

Nothing like a father’s love for his only daughter!

I decided to do a one layer card with a lot of white space, one focal point and a sentiment, CLEAN AND SIMPLE (CAS) at its best.

My Koala’s are from my new Sweet Stamp Shop Koala stamp set and my sentiment and hearts are from Lawn Fawn’s Love You Tons stamp set.

I used my Copic markers #B12, B14, #R20, R24 and C3.

I wanted to color with my Copic’s for practice.  I need to color more often. I want to master this skill.


This was my first card but I didn’t like how the sentiment “little sister” turned out but I wanted to share it with you.

Plus the belly is blue and not pink.

Love you little sister

What do you think?  Let me know!

Supplies used:

Koala FamilyLove You TonsCopic Markerscopic blending xpress itStampin' TrimmerWe R Memory Keepers Corner Chomper

Thank you for stopping by.

~Kymona

Are You A Watercolorists?

Watercolor painting is an art form that creates artistic representations, usually on watercolor paper, using pigments that are water-soluble.

OK, I love the wording “artistic representation” because I can’t draw for the life of me and I also have trouble actually painting objects much less making my sentiment look like I painted it.  I’m so glad that my cards are beautiful regardless if I can’t draw or paint.  Thank you “artistic representation”!!

With that said, I created two cards today for my online Watercolor for Card Makers Class Homework.  The assignment was to watercolor paint over a stamped image.  This was fun!  My daughter, niece and I sat down to create our cards.  It’s amazing how all of us came up with different versions of the same image.

I made two cards because I felt like my first flower was dulled out and wanted to see if I could use a different flower.  Also, my sentiment was giving me so trouble.  Here are my “artistic representation” of flowers in a vase!

Made with Love

On my first card, the blue water started to seep out of my jar on the side.  I went to close to the black line with my wet paint brush.  I over did it a little with the shadow at the bottom of the jar.  You have to learn from your mistakes.

Made with Love2

This second card, the water stayed in the jar and my shadow looks so much better.  The sentiment is where I think I over did it.  That’s the beauty of water-coloring.

So what do you think?  Did I do a good job at depicting a watercolor painting?  Would you call me a Watercolorists?

Well in my book, I’m the best Watercolorists on this side of the computer screen, lol!!!!

The real test is how do I compare to my daughter and niece!!  Below you will find the cards they painted.

Little Lady Sanaa Flower Little Lady Zoe Flower

My Daughter                                                       My Niece

What fun!!!

Well that’s it for today.  I hope you enjoyed our cards today and will not hesitate to try water-coloring and become a Watercolorists!!


Supplies used:

Canson Watercolor PaperKio WaterColorsLove JarMemento Tuxedo BlackStampin' TrimmerSnail Adhesive

~Kymona

What’s Your Favorite Watercolor Color?

watercolor for card makers

I must say this Watercolor for Card Makers is an awesome class.  I’m learning so much and sharing it with my daughter has been even better.  Both of us are having a lot of fun learning about colors and how the work with one another.  Once her cards are posted I will link them here in my blog so you can see what her take on the lessons were.

Today’s card is a Stamped Emboss Resist and Watercolor Wash Card.  Kristina Werner taught us how to add ink on top of an embossed image, the ink just happens to be watercolor.  I’ve practice this technique a couple of weeks ago and it took me a while but I got it down pack and my card came out really nice. You can check out my post on April 30.

For my new card, I wanted to create a male card.  I don’t have many of those, I wanted to make sure I tried colors that were suited for men.  I love blues, yellow, and coral.  I also tried something new.  ADDING STITCHING TO MY CARD!!!  I’ve never done that before but I wanted to finally try it.  It was exciting!

Love to call you my friend

I love how the colors blended to make colors that weren’t in my original palette.  When I added the yellow to the tip of the blue it create that pretty green.  The same when I added the coral to the yellow, it created the orange.  It was amazing.

Creating the background was pretty easy.

I used Impression Obsessions Honeycomb Stamp to create my background.  I stamped it with VersaMark and embossed it with Stampin’ Up! clear embossing powder.

I used my Koi Watercolors,  I used number 23, 24 and 8.

My vellum and card stock was attached with my small sewing machine.  I had that sewing machine for two years and never used.  I pulling it out to create this card and I’m so glad I did.

Guess what, I didn’t know how to use the sewing.  I had to ask my daughter to help set up the machine.  I thought that was funny and she loved teaching me.

All and all, my card came out the way I had hoped it would.  I’m very pleased with the look.  I hope you are too!


Supplies used:

Canson Watercolor PaperKio WaterColorsCover-a-Card HoneycombExpressions Thinlits Diesgumball-green-stampin-emboss-powderSnail AdhesiveStampin' TrimmerStampin' DimensionalsPacific PointSewing MachineLawn Fawn SequinExchanging FriendsTombow Multi-Purpose Adhesive

Clean & Simple 3 Card Class – Day 1 Faux Effects

My new online card class, Clean & Simple 3 started today.  I’m so excited.  It was packed with different faux effects.  My card today was inspired by Kristina Werner lesson on faux metal elements.  Creating this card took sometime and trial and error.  My metal circles refused to stay circles but it has grown on me.

The faux metal circle was created using silver embossing powder, circle mask and a heart stamp.  Its amazing what you can create when you put your mind to it.

Take a look at my new faux metal element card:

Buckets of Love

fuax heart close up

Supplies Used:

Strawberry Slush 131178

Strawberry Slush
131178

Coastal Cabana 131175

Coastal Cabana
131175

Pool Party Classic Ink 126982

Pool Party Classic Ink
126982


Early Espresso 126974

Early Espresso
126974

Bubblegum Pigment Ink

Bubblegum Pigment Ink

Silver Stampin' Emboss Powder 109131

Silver Stampin’ Emboss Powder 109131


Cupcake Party sss130701

Cupcake Party
sss130701

Love This sss101364

Love This
sss101364

Only Have Eyes For You sss101382

Only Have Eyes For You
sss101382

Post-it Labeling Tape 695, 2 Inches x 36 Yards

Post-it Labeling Tape 695, 2 Inches x 36 Yards


I also used VersaMark to do my embossing.

I had a great time learning this new technique and I really enjoyed trying out this new technique.  I’m going to continue perfecting this technique so that I can use it on other cards as well.

Let me know what you think of my faux metal element card.  If you have any question regarding how I created this look drop me a line.

Signature